Manage context for AI
By providing the right context, you can get more relevant and accurate responses from the AI in VS Code. In this article, you learn how to manage context in chat, including how to use #-mentions to reference files, folders, and symbols, how to reference web content, or how you can use custom instructions to guide the AI's responses.
The features on this page work in both the Chat view and the Agents window.
For background on what context is and how VS Code assembles it, see Context concepts.
#-mentions
You can explicitly add context to your prompt by typing # followed by the context item you want to mention. VS Code supports different types of context items: files, folders, code symbols, tools, terminal output, source control changes, and more.
Type the # symbol in the chat input field to see a list of available context items, or select Add Context in the Chat view to open the context picker.

View the full list of supported context items.
Add files as context
By default, VS Code performs uses workspace indexing to automatically include relevant files as context based on the conversation. However, you can also explicitly add specific files, folders, or symbols as context using #-mentions or the context picker. This can be useful when the question is ambiguous and could also be considered a general question about coding practices, and you want to make sure the AI considers specific parts of your codebase in its response.
To provide specific files, folders, or symbols as context, add them to the chat using the following methods:
-
#-mention the file, folder, or symbol in your chat message by typing
#followed by the name of the file, folder, or symbol. To reference a symbol, make sure to open the file containing the symbol in the editor first. -
Drag and drop files or folders from the Explorer view, Search view, or editor tabs onto the Chat view to add them as context.
-
Select Add Context in the Chat view and select Files & Folders or Symbols from the Quick Pick.
To explicitly inform the AI that you want to use the entire codebase as context, you can add #codebase to your prompt.
Reference content from the web
You can reference content from the web in your chat prompts, for example to get the latest API reference or code examples.
You can directly include a URL in your prompt to get information from that webpage, or use the #fetch tool to indicate that you want to retrieve content from the web. For example:
"What are the highlights of the latest VS Code release #fetch""Update the asp.net app to .net 9 #fetch https://learn.microsoft.com/en-us/aspnet/core/migration/80-90"
VS Code caches the content of the web page for a limited time to improve performance. If the content of the page changes, you can force a refresh by restarting VS Code. If the page cannot be reached, the cache will expire after a short time (approximately five minutes).
VS Code prompts for confirmation before accessing external URLs to protect your privacy and security. Learn more about configuring URL auto-approval.
Learn more about adding and using tools in chat.
@-mentions
Chat participants are specialized assistants that let you ask domain-specific questions in chat. You can invoke a chat participant by @-mentioning it: type @ followed by the participant name. VS Code has built-in chat participants like @vscode or @terminal. They are optimized to answer questions about their respective domains.
The following examples show how to use @-mentions in your chat prompts:
"@vscode how to enable word wrapping""@terminal what are the top 5 largest files in the current directory"
Type @ in the chat input field to see a list of available chat participants.
Extensions can also contribute their own chat participants.
Vision (Preview)
Chat supports vision capabilities, which means you can attach an image as context to your chat prompt and ask questions about it. For example, attach a screenshot of a block of code and ask to explain it, or attach a sketch of a UI and ask the agent to implement it.
You can drag and drop an image from a web browser onto the Chat view to add it as context.
Add browser context (Experimental)
VS Code has a built-in integrated browser that you can use to preview and interact with web pages inside VS Code, for example to do quick testing and debugging of your web application.
The browser toolbar has an Add to Chat split button with actions that let you attach different types of context from the current page to your chat prompt:
- Add Element to Chat: select HTML elements from the page to add as context, including their CSS styles and screenshots.
- Add Screenshot to Chat: capture a screenshot of the current browser viewport and attach it as an image.
- Add Console Logs to Chat: capture the console output from the page and attach it as context, useful for debugging runtime errors.
To add elements from the integrated browser to your chat prompt:
-
Start your web application.
-
Open the integrated browser by running the Browser: Open Integrated Browser command from the Command Palette.
-
Enter the URL of the web page you want to interact with.
-
Select the Add Element to Chat button. You can now hover over the elements of the web page and select them to add them as context to your chat prompt.
You can configure which information is included when adding elements:
- Attach CSS: chat.sendElementsToChat.attachCSS setting
- Attach images: chat.sendElementsToChat.attachImages setting
Learn more about browser-to-chat actions.
Interact with browser pages
Browser tools for agents are currently experimental.
Agents can directly read and interact with pages in the integrated browser by using built-in browser tools. This enables agents to navigate to URLs, read page content and console errors, take screenshots, click elements, type text, and more, without requiring an external MCP server.
To enable browser tools, set the
workbench.browser.enableChatTools
This setting is managed at the organization level. Contact your administrator to change it. setting to true.
You can also share a browser page you already have open with the agent. Select the Share with Agent button in the browser toolbar to give the agent access to your page, including your existing session and login state. Agents can also detect unshared tabs and prompt you to share one when needed, for example when you refer to a page the agent can't see.
For example, you can ask an agent to open your web app, check for layout issues, or verify that a feature works correctly. The agent opens the browser, interacts with the page, and reports back with its findings.
Learn more about browser tools for agents.
Monitor context window usage
The chat input box displays a context window control that shows how much of the model's context window is being used. This visual indicator helps you understand when chat summarization might occur or when you should start a new session.
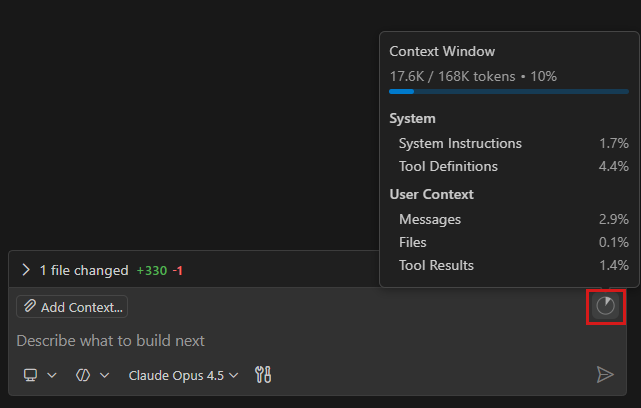
The context window control provides the following information:
- Visual fill indicator: a shaded bar shows the proportion of the context window currently in use
- Total usage and breakdown on hover: hover over the control to see the exact token count as a fraction of the total available context (for example, 15K/128K) and a breakdown of usage by category
As you send more requests in a conversation, the control updates to reflect the increasing context usage. The total available context (denominator) changes based on the AI model you select, since different models have different context window sizes.
When the context window fills up, VS Code automatically compacts the conversation history to free up space.
Context compaction
As a conversation grows, the accumulated messages and context can fill up the model's context window. Context compaction summarizes the conversation history to free up space, so you can continue working in the same session without losing important details. Compacting also reduces the number of tokens sent with each subsequent request, which helps manage AI credit consumption.
Automatic compaction
When the context window fills up, VS Code automatically compacts the conversation by summarizing earlier messages. This happens transparently in the background, so you can keep chatting without interruption.
To disable automatic compaction, set
github.copilot.chat.summarizeAgentConversationHistory.enabled
to false.
Manual compaction
You can also manually trigger compaction at any time, for example to refocus the conversation or reduce noise from earlier exchanges. Manual compaction is available for local, background, and Claude agent sessions.
To manually compact the conversation, use one of the following methods:
-
Type
/compactin the chat input field. Optionally, add custom instructions after the command to guide how the summary is generated, for example/compact focus on the database schema decisions. -
Select the context window control in the chat input box, and then select Compact Conversation.
If you want to reset the context entirely, start a new chat session.