LoRA fine-tuning for Phi Silica
You can use Low Rank Adaptation (LoRA) to fine-tune the Phi Silica model to enhance its performance for your specific use case. By using LoRA to optimize Phi Silica, Microsoft Windows local language model, you can achieve more accurate results. This process involves training a LoRA adapter and then applying it during inference to improve the model's accuracy.
Phi Silica features are not available in China.
Prerequisites
- You have identified a use case for enhancing the response of Phi Silica.
- You have chosen an evaluation criteria to decide what a 'good response' is.
- You have tried the Phi Silica APIs and they do not meet your evaluation criteria.
Train your adapter
To train a LoRA adapter for fine-tuning the Phi Silica model with Windows 11, you must first generate a dataset that the training process will use.
Generate a dataset for use with a LoRA adapter
To generate a dataset, you need to split the data into two files:
train.json: used for training the adapter.test.json: used for evaluating the adapter's performance during and after training.
Both files must use the JSON format, where each line is a separate JSON object representing a single sample. Each sample should contain a list of messages exchanged between a user and an assistant.
Every message object requires two fields:
content: the text of the message.role: either"user"or"assistant", indicating the sender.
See the following examples:
{"messages": [{"content": "Hello, how do I reset my password?", "role": "user"}, {"content": "To reset your password, go to the settings page and click 'Reset Password'.", "role": "assistant"}]}

{"messages": [{"content": "Can you help me find nearby restaurants?", "role": "user"}, {"content": "Sure! Here are some restaurants near your location: ...", "role": "assistant"}]}

{"messages": [{"content": "What is the weather like today?", "role": "user"}, {"content": "Today's forecast is sunny with a high of 25°C.", "role": "assistant"}]}
Training tips:
- There is no comma needed at the end of each sample line.
- Include as many high-quality and diverse examples as possible. For best results, collect at least a few thousand training samples in your
train.jsonfile. - The
test.jsonfile can be smaller, but should cover the types of interactions you expect your model to handle. - Create
train.jsonandtest.jsonfiles with one JSON object per line, each containing a brief back-and-forth conversation between a user and an assistant. The quality and quantity of your data will greatly affect the effectiveness of your LoRA adapter.
Training a LoRA adapter
To train a LoRA adapter, you need the following required prerequisites:
- Azure subscription with available quota in Azure Container Apps.
- We recommend using A100 GPUs or better to efficiently run a fine-tuning job.
- Check that you have available quota in the Azure Portal. If you'd like help finding your quota, see View Quotas.
Follow these steps to create a workspace and start a fine-tuning job:
-
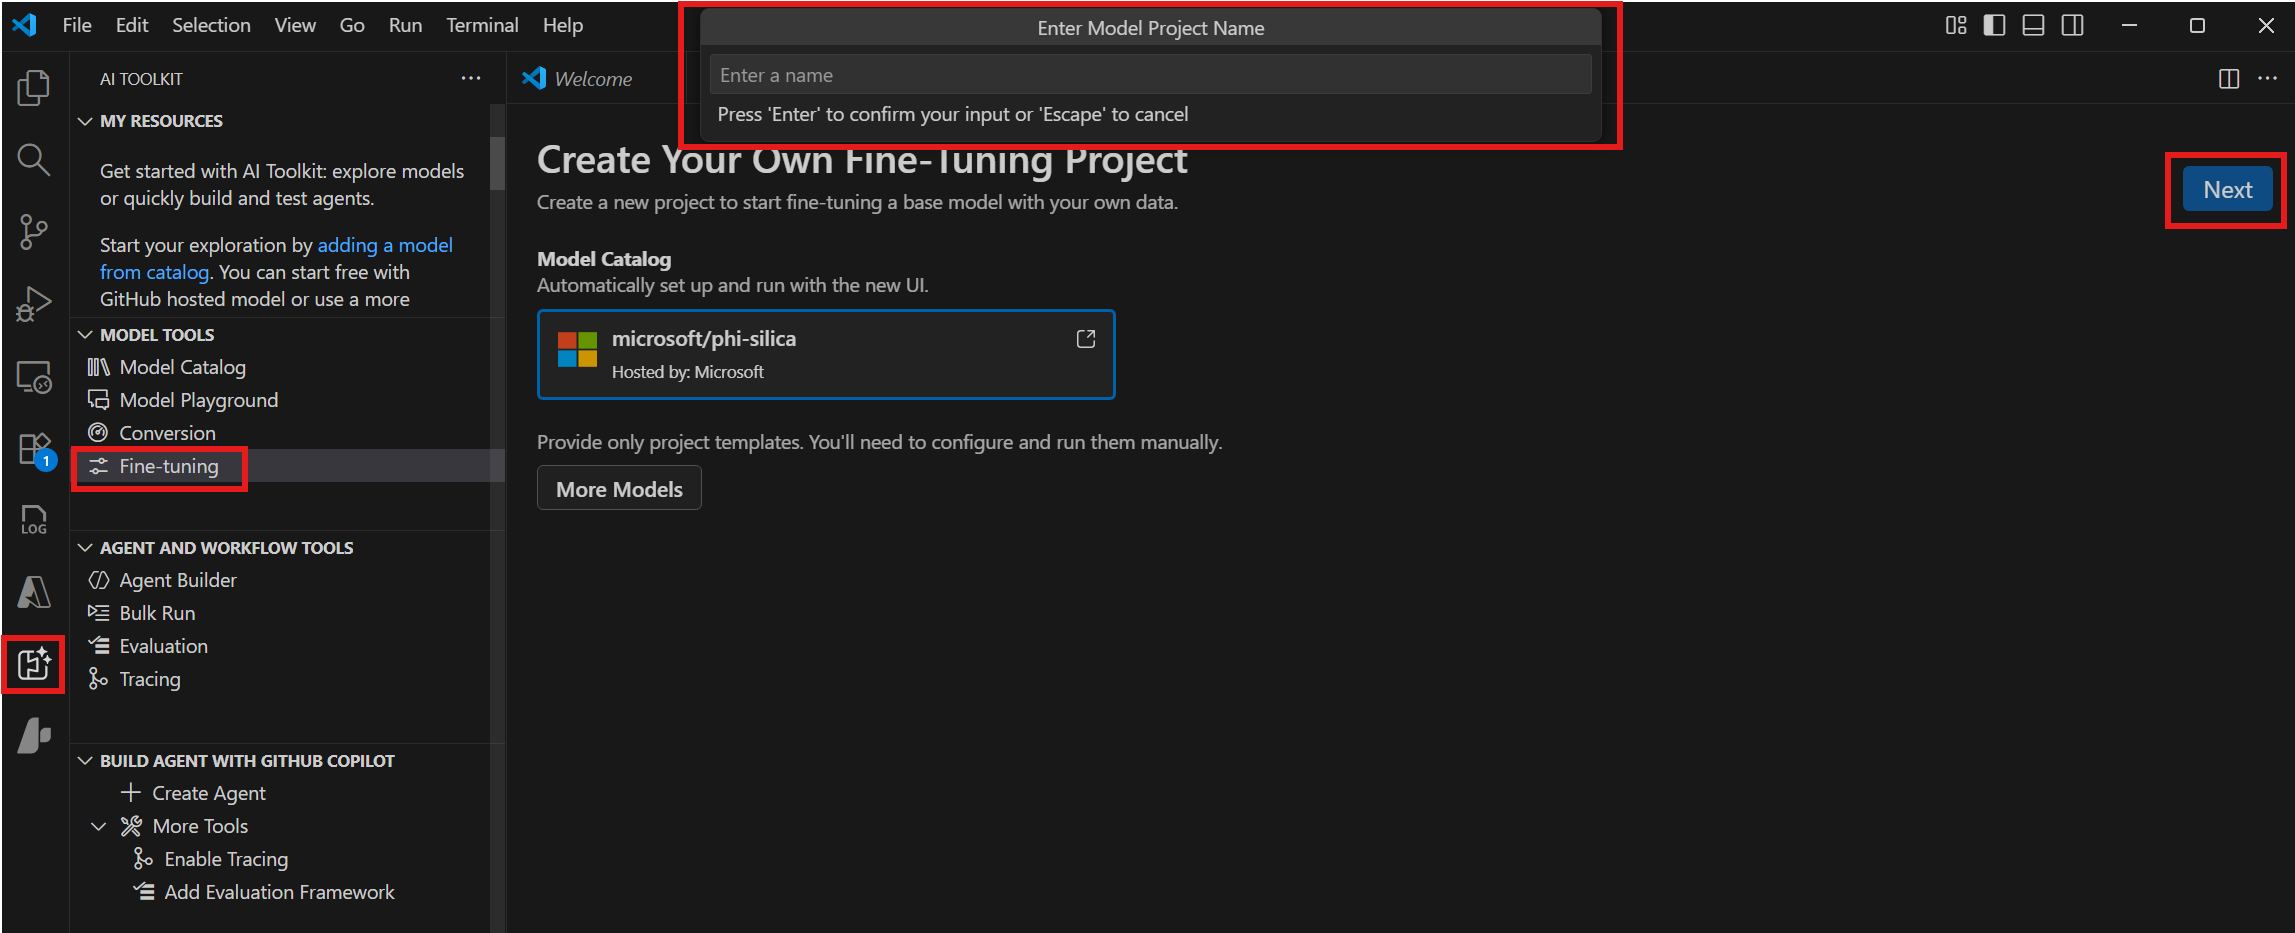
Navigate to Model Tools > Fine-tuning and select New Project.
-
Select "microsoft/phi-silica" from the Model Catalog and select Next.
-
In the dialog, select a Project Folder and enter a Project Name. A new VS Code window will open for the project.

-
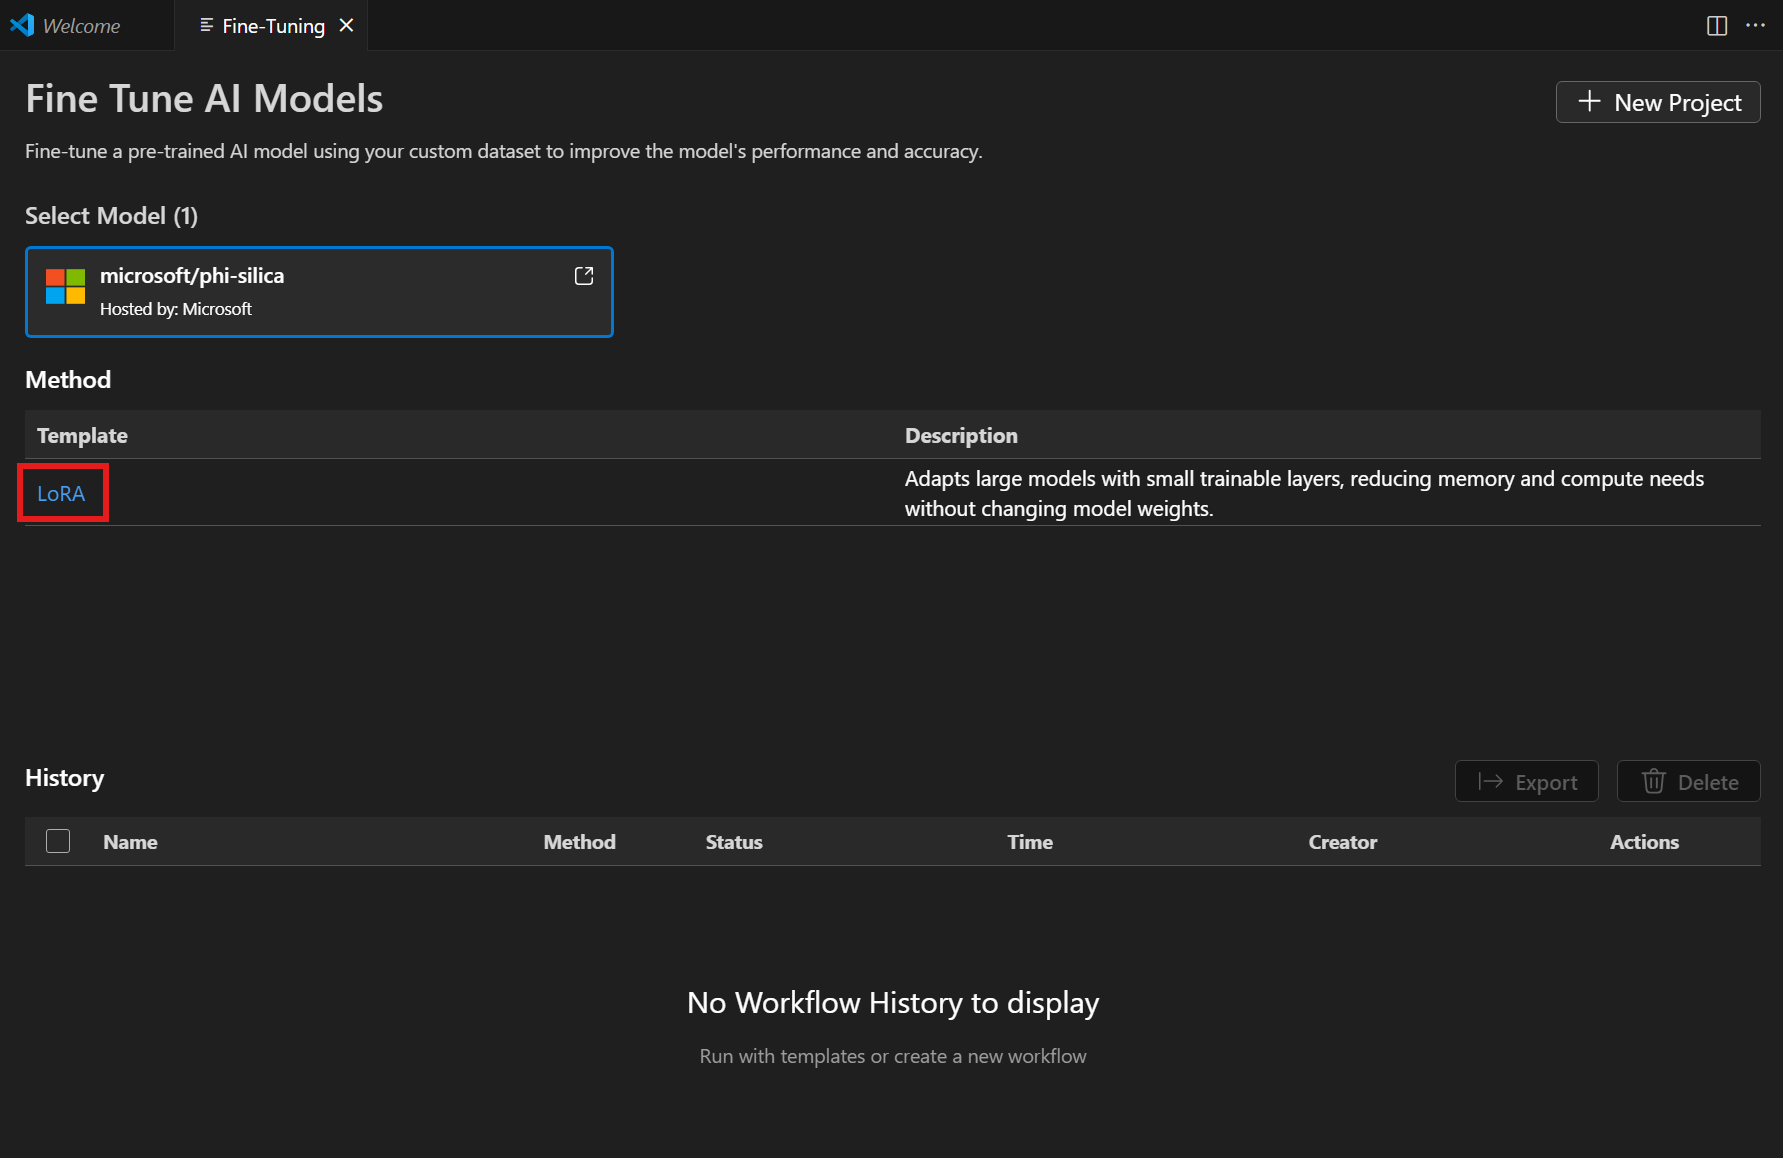
Select "LoRA" from the Method list.

-
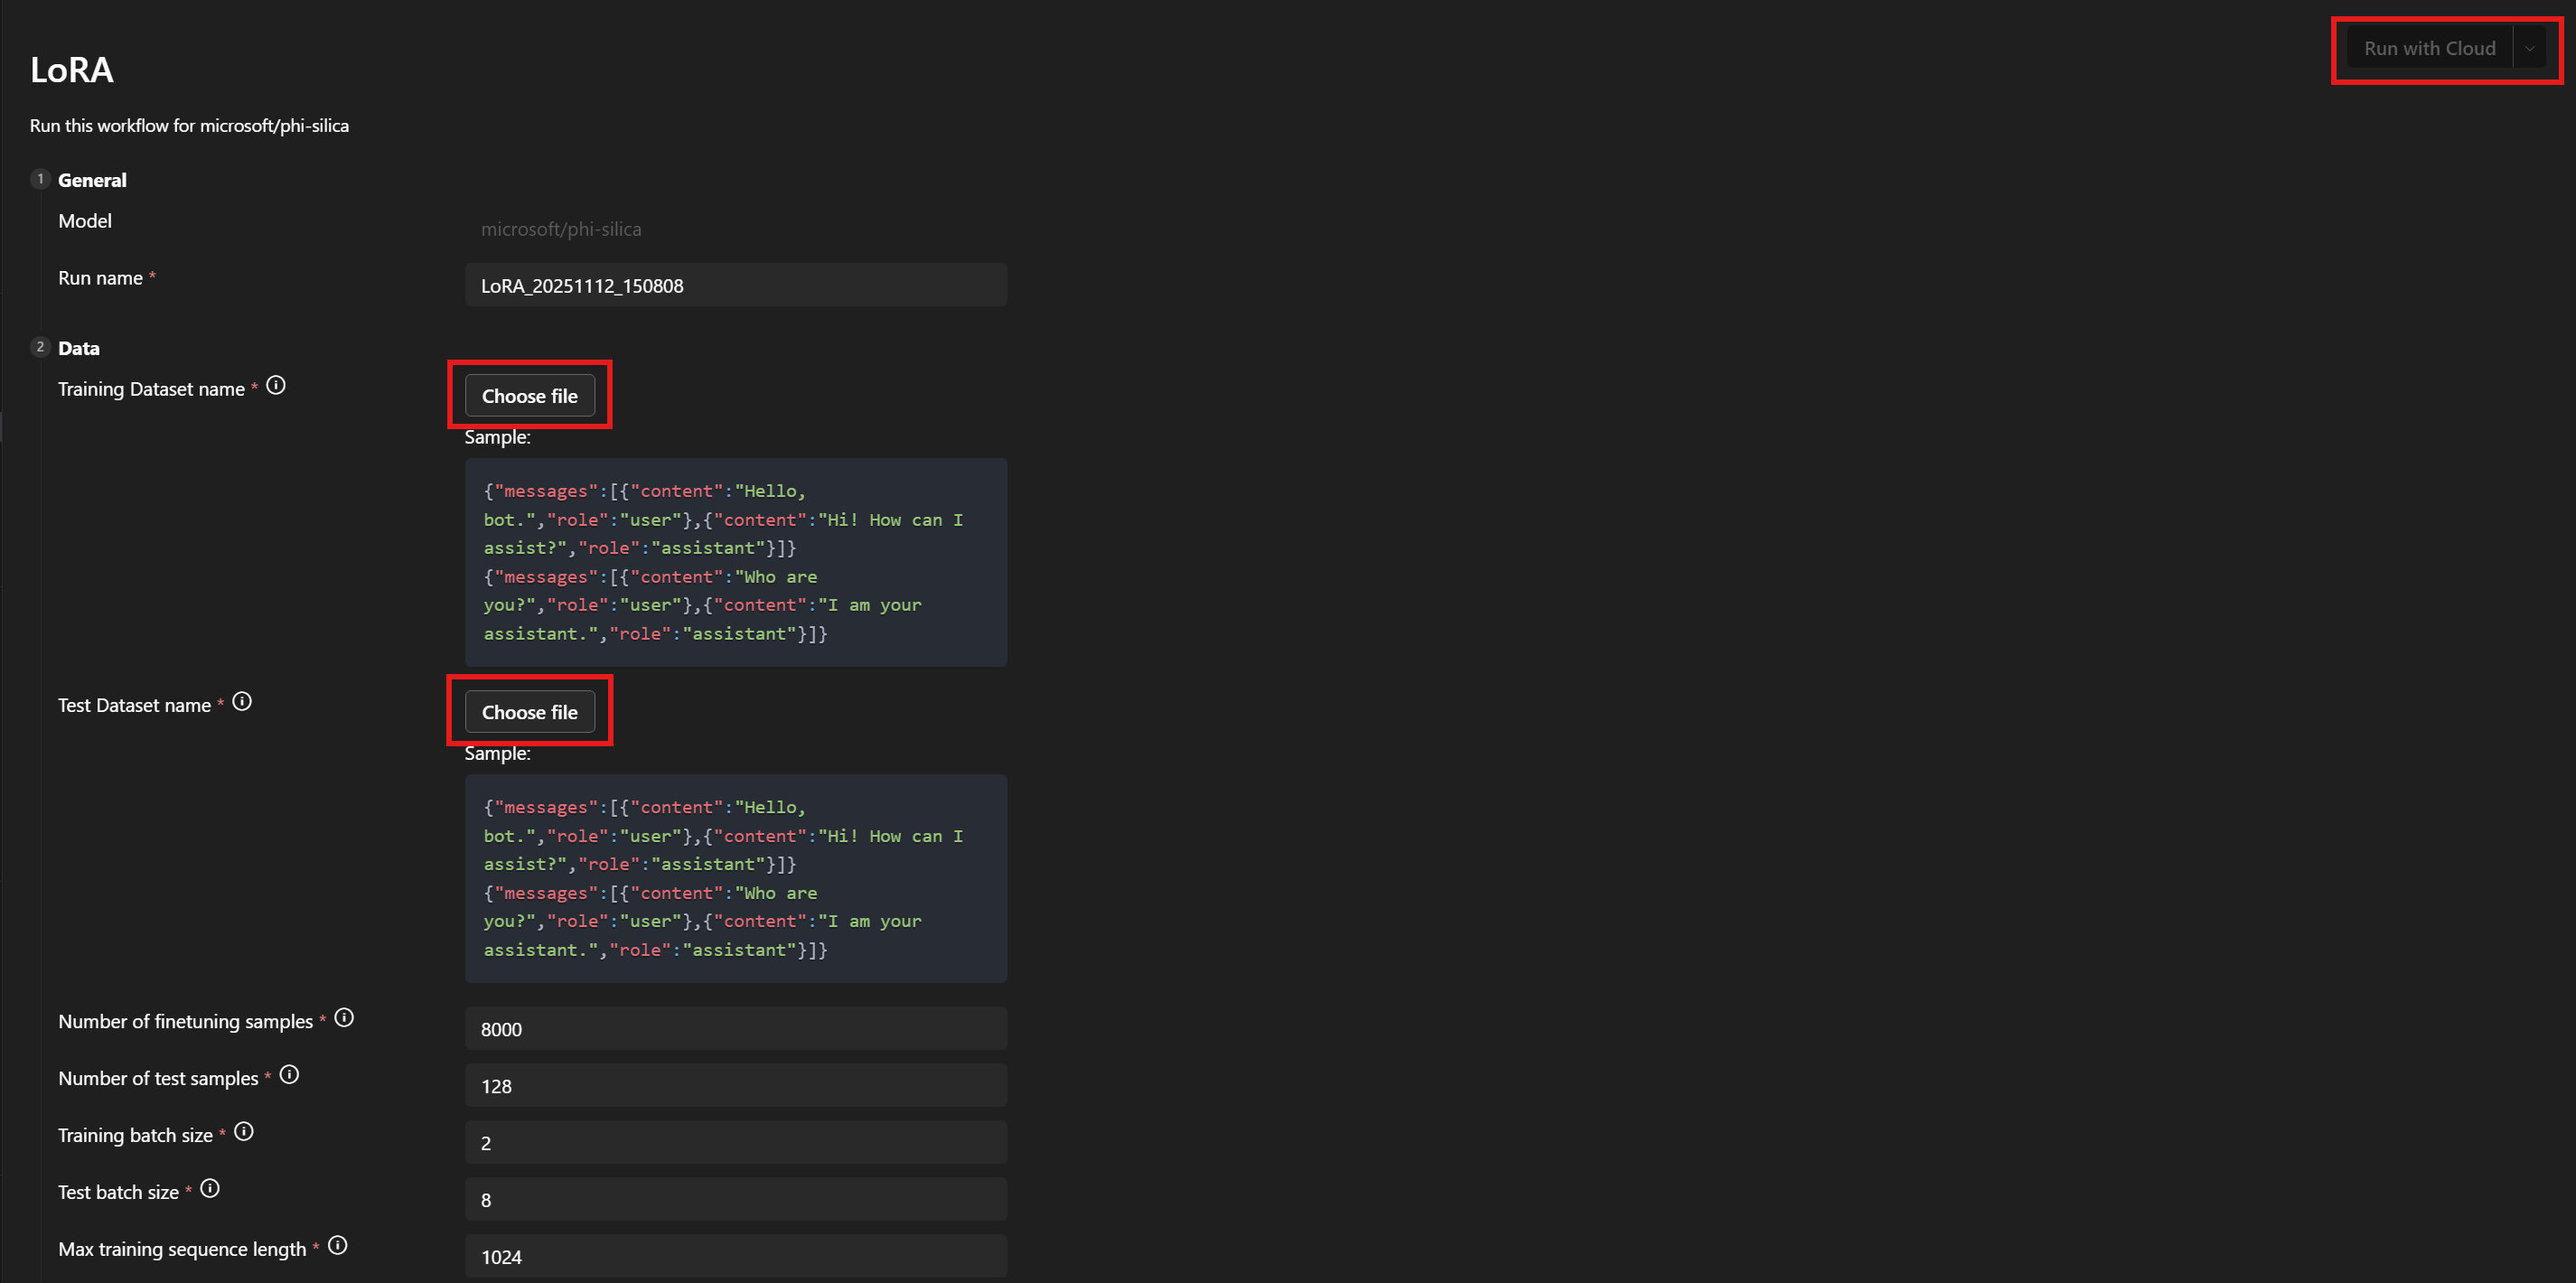
Under Data > Training Dataset name and Test Dataset name, select your
train.jsonandtest.jsonfiles. -
Select Run with Cloud.

-
In the dialog, select the Microsoft account with which to access your Azure subscription.
-
Once your account is selected, select a resource group from the subscription dropdown menu.
-
Notice that your fine-tuning job successfully starts and shows a job status.
Use the Refresh button to manually update the status. It typically takes an average of 45 - 60 minutes for a fine-tuning job to complete.
-
Once the job has completed, you have the option to download the newly trained LoRA adapter by selecting Download and selecting Show Metrics to check the fine-tuning metrics.

LoRA fine-tuning recommendations
Hyperparameter selection
The default hyperparameters set up for LoRA fine-tuning should give a reasonable baseline finetune to compare against. We have done our best to find defaults which work well for most use cases and datasets.
However, we have left in the flexibility for you to sweep over parameters if you so wish.
Training hyperparameters
Our standard parameter search space would be:
| Parameter name | Min | Max | Distribution |
|---|---|---|---|
| learning_rate | 1e-4 | 1e-2 | Log-uniform |
| weight_decay | 1e-5 | 1e-1 | Log-uniform |
| adam_beta1 | 0.9 | 0.99 | Uniform |
| adam_beta2 | 0.9 | 0.999 | Uniform |
| adam_epsilon | 1e-9 | 1e-6 | Log-uniform |
| num_warmup_steps | 0 | 10000 | Uniform |
| lora_dropout | 0 | 0.5 | Uniform |
We also search over the learning rate scheduler, choosing one of linear_with_warmup or cosine_with_warmup. If the num_warmup_steps parameter is set to 0, then you can equivalently use the linear or cosine options.
The learning rate, learning rate scheduler and number of warmup steps all interact with each other. Keeping two fixed and varying the third will give you better insights into how they change the output of training on your dataset.
The weight decay and LoRA dropout parameters are there to help control overfitting. If you see that your adapter is not generalizing well from your training set to your evaluation set, try increasing the values of these parameters.
The adam_ parameters affect how the Adam optimizer behaves during the training steps. For more information on that optimizer see, for example, the PyTorch documentation.
Many of the other parameters exposed are analogous to their equivalently named counterparts in the PEFT library. For more information on those, see the transformers documentation.
Data hyperparameters
The data hyperparameters train_nsamples and test_nsamples control how many samples to take for training and testing respectively. Using more samples from your training set is normally a good idea. Using more test samples gives you test metrics that are less noisy, but each evaluation run will take longer.
The train_batch_size and test_batch_size parameters control how many samples should be used in each batch for training and testing, respectively. You can normally use more batches for testing than training, because running a test example takes less GPU memory than a training example.
The train_seqlen and test_seqlen parameters control how long the train and test sequences can be. Generally, the longer the better until you hit GPU memory limits. The defaults should give a good balance.
Choosing a system prompt
The strategy we have found that works well when choosing a system prompt to train with, is to keep it fairly simple (1 or 2 sentences) while still encouraging the model to produce output in the format that you want. We have also found that using a slightly different system prompt for training and inference can improve results.
The more different your desired output is from the base model, the more a system prompt can help you.
For example, if you are training for only a slight style change in the base model, such as using simplified language to appeal to younger readers, you might not need a system prompt at all.
However, if your desired output has more structure then you will want to use the system prompt to get the model part of the way there. So, if you need a JSON table with particular keys, the first sentence of your system prompt could describe what a model response should look like if it was responding in plain language. The second sentence could then specify more what the JSON table format should look like. Using the first sentence in training and then both sentences in inference could provide you with the results that you want.
Parameters
The list of all parameters that can be finetuned is appended here. If a parameter does not appear in the workflow page UI, add it manually to <your_project_path>/<model_name>/lora/lora.yaml.
[

################## Basic config settings ##################
  {
    "groupId": "data",
    "fields": [
      {
        "name": "system_prompt",
        "type": "Optional",
        "defaultValue": null,
        "info": "Optional system prompt. If specified, the system prompt given here will be prepended to each example in the dataset as the system prompt when training the LoRA adapter. When running inference the same (or a very similar) system prompt should be used. Note: if a system prompt is specified in the training data, giving a system prompt here will overwrite the system prompt in the dataset.",
        "label": "System prompt"
      },
      {
        "name": "varied_seqlen",
        "type": "bool",
        "defaultValue": false,
        "info": "Varied sequence lengths in the calibration data. If False (default), training examples will be concatenated together until they are finetune_[train/test]_seqlen tokens long. This makes memory usage more consistent and predictable. If True, each individual example will be truncated to finetune_[train/test]_seqlen tokens. This can sometimes give better training performance, but also gives unpredictable memory usage. It can cause `out of memory` errors mid training, if there are long training examples in your dataset.",
        "label": "Allow varied sequence length in data"
      },
      {
        "name": "finetune_dataset",
        "type": "str",
        "defaultValue": "wikitext2",
        "info": "Dataset to finetune on.",
        "label": "Dataset name or path"
      },
      {
        "name": "finetune_train_nsamples",
        "type": "int",
        "defaultValue": 4096,
        "info": "Number of samples to load from the train set for finetuning.",
        "label": "Number of finetuning samples"
      },
      {
        "name": "finetune_test_nsamples",
        "type": "int",
        "defaultValue": 128,
        "info": "Number of samples to load from the test set for finetuning.",
        "label": "Number of test samples"
      },
      {
        "name": "finetune_train_batch_size",
        "type": "int",
        "defaultValue": 4,
        "info": "Batch size for finetuning training.",
        "label": "Training batch size"
      },
      {
        "name": "finetune_test_batch_size",
        "type": "int",
        "defaultValue": 8,
        "info": "Batch size for finetuning testing.",
        "label": "Test batch size"
      },
      {
        "name": "finetune_train_seqlen",
        "type": "int",
        "defaultValue": 2048,
        "info": "Maximum sequence length for finetuning training. Longer sequences will be truncated.",
        "label": "Max training sequence length"
      },
      {
        "name": "finetune_test_seqlen",
        "type": "int",
        "defaultValue": 2048,
        "info": "Maximum sequence length for finetuning testing. Longer sequences will be truncated.",
        "label": "Max test sequence length"
      }
    ]
  },
  {
    "groupId": "finetuning",
    "fields": [
      {
        "name": "early_stopping_patience",
        "type": "int",
        "defaultValue": 5,
        "info": "Number of evaluations with no improvement after which training will be stopped.",
        "label": "Early stopping patience"
      },
      {
        "name": "epochs",
        "type": "float",
        "defaultValue": 1,
        "info": "Number of total epochs to run.",
        "label": "Epochs"
      },
      {
        "name": "eval_steps",
        "type": "int",
        "defaultValue": 64,
        "info": "Number of training steps to perform before each evaluation.",
        "label": "Steps between evaluations"
      },
      {
        "name": "save_steps",
        "type": "int",
        "defaultValue": 64,
        "info": "Number of steps after which to save model checkpoint. This _must_ be a multiple of the number of steps between evaluations.",
        "label": "Steps between checkpoints"
      },
      {
        "name": "learning_rate",
        "type": "float",
        "defaultValue": 0.0002,
        "info": "Learning rate for training.",
        "label": "Learning rate"
      },
      {
        "name": "lr_scheduler_type",
        "type": "str",
        "defaultValue": "linear",
        "info": "Type of learning rate scheduler.",
        "label": "Learning rate scheduler",
        "optionValues": [
          "linear",
          "linear_with_warmup",
          "cosine",
          "cosine_with_warmup"
        ]
      },
      {
        "name": "num_warmup_steps",
        "type": "int",
        "defaultValue": 400,
        "info": "Number of warmup steps for learning rate scheduler. Only relevant for a _with_warmup scheduler.",
        "label": "Scheduler warmup steps (if supported)"
      }
    ]
  }


################## Advanced config settings ##################


  {
    "groupId": "advanced",
    "fields": [
      {
        "name": "seed",
        "type": "int",
        "defaultValue": 42,
        "info": "Seed for sampling the data.",
        "label": "Random seed"
      },
      {
        "name": "evaluation_strategy",
        "type": "str",
        "defaultValue": "steps",
        "info": "Evaluation strategy to use.",
        "label": "Evaluation strategy",
        "optionValues": [
          "steps",
          "epoch",
          "no"
        ]
      },
      {
        "name": "lora_dropout",
        "type": "float",
        "defaultValue": 0.1,
        "info": "Dropout rate for LoRA.",
        "label": "LoRA dropout"
      },
      {
        "name": "adam_beta1",
        "type": "float",
        "defaultValue": 0.9,
        "info": "Beta1 hyperparameter for Adam optimizer.",
        "label": "Adam beta 1"
      },
      {
        "name": "adam_beta2",
        "type": "float",
        "defaultValue": 0.95,
        "info": "Beta2 hyperparameter for Adam optimizer.",
        "label": "Adam beta 2"
      },
      {
        "name": "adam_epsilon",
        "type": "float",
        "defaultValue": 1e-08,
        "info": "Epsilon hyperparameter for Adam optimizer.",
        "label": "Adam epsilon"
      },
      {
        "name": "num_training_steps",
        "type": "Optional",
        "defaultValue": null,
        "info": "The number of training steps there will be. If not set (recommended), this will be calculated internally.",
        "label": "Number of training steps"
      },
      {
        "name": "gradient_accumulation_steps",
        "type": "int",
        "defaultValue": 1,
        "info": "Number of updates steps to accumulate before performing a backward/update pass.",
        "label": "gradient accumulation steps"
      },
      {
        "name": "eval_accumulation_steps",
        "type": "Optional",
        "defaultValue": null,
        "info": "Number of predictions steps to accumulate before moving the tensors to the CPU.",
        "label": "eval accumulation steps"
      },
      {
        "name": "eval_delay",
        "type": "Optional",
        "defaultValue": 0,
        "info": "Number of epochs or steps to wait for before the first evaluation can be performed, depending on the eval_strategy.",
        "label": "eval delay"
      },
      {
        "name": "weight_decay",
        "type": "float",
        "defaultValue": 0.0,
        "info": "Weight decay for AdamW if we apply some.",
        "label": "weight decay"
      },
      {
        "name": "max_grad_norm",
        "type": "float",
        "defaultValue": 1.0,
        "info": "Max gradient norm.",
        "label": "max grad norm"
      },
      {
        "name": "gradient_checkpointing",
        "type": "bool",
        "defaultValue": false,
        "info": "If True, use gradient checkpointing to save memory at the expense of slower backward pass.",
        "label": "gradient checkpointing"
      }
    ]
  }
]
Modify the Azure subscription and resource group
If you want to modify the Azure subscription and resource group that were previously set, you can update or remove them in the <your_project_path>/model_lab.workspace.provision.config file.
Inference with the Phi Silica LoRA adapter
The Phi Silica APIs are part of a Limited Access Feature (see LimitedAccessFeatures class). For more information or to request an unlock token, please use the LAF Access Token Request Form.
Inference with the Phi Silica LoRA adapter is currently supported only on Copilot+ PCs with ARM processors.
Use Windows AI APIs to inference: Phi Silica with LoRA adapter