Remote Development Tips and Tricks
This article covers troubleshooting tips and tricks for each of the Visual Studio Code Remote Development extensions. See the SSH, Containers, and WSL articles for details on setting up and working with each specific extension. Or try the introductory Tutorials to help get you running quickly in a remote environment.
For tips and questions about GitHub Codespaces, see the GitHub Codespaces documentation.
SSH tips
SSH is powerful and flexible, but this also adds some setup complexity. This section includes some tips and tricks for getting the Remote - SSH extension up and running in different environments.
Customize AI Chat Responses
Custom instructions enable you to describe common guidelines or rules to get responses that match your specific coding practices and tech stack.
You can use custom instructions to give Copilot more information about the type of remote environment you're connected to (like what kind of languages or toolchains are installed). You can use a copilot-instructions.md file just as you would locally. There are additional instruction configuration steps you can take when using a dev container too.
Configuring the $EDITOR variable
For macOS / linux remote hosts, add this snippet to your shell configuration file (like .bashrc or .zshrc)
if [ "$VSCODE_INJECTION" = "1" ]; then
    export EDITOR="code --wait" # or 'code-insiders' if you're using VS Code Insiders
fi
For Windows hosts, here is the equivalent PowerShell:
if ($env:VSCODE_INJECTION -eq "1") {
    $env:EDITOR = "code --wait"  # or 'code-insiders' for VS Code Insiders
}
Now running a terminal command that uses the $EDITOR variable, like git commit, will open the file in VS Code instead of the default terminal-based editor (like vim or nano).
Configuring key based authentication
SSH public key authentication is a convenient, high security authentication method that combines a local "private" key with a "public" key that you associate with your user account on an SSH host. This section will walk you through how to generate these keys and add them to a host.
Tip: PuTTY for Windows is not a supported client, but you can convert your PuTTYGen keys.
Quick start: Using SSH keys
To set up SSH key based authentication for your remote host. First we'll create a key pair and then copy the public key to the host.
Create your local SSH key pair
Check to see if you already have an SSH key on your local machine. This is typically located at ~/.ssh/id_ed25519.pub on macOS / Linux, and the .ssh directory in your user profile folder on Windows (for example C:\Users\your-user\.ssh\id_ed25519.pub).
If you do not have a key, run the following command in a local terminal / PowerShell to generate an SSH key pair:
ssh-keygen -t ed25519 -b 4096
Tip: Don't have
ssh-keygen? Install a supported SSH client.
Restrict the permissions on the private key file
-
For macOS / Linux, run the following shell command, replacing the path to your private key if necessary:
chmod 400 ~/.ssh/id_ed25519 -
For Windows, run the following command in PowerShell to grant explicit read access to your username:
icacls "privateKeyPath" /grant <username>:RThen navigate to the private key file in Windows Explorer, right-click and select Properties. Select the Security tab > Advanced > Disable inheritance > Remove all inherited permissions from this object.
Authorize your macOS or Linux machine to connect
Run one of the following commands, in a local terminal window replacing user and host name as appropriate to copy your local public key to the SSH host.
-
Connecting to a macOS or Linux SSH host:
export USER_AT_HOST="your-user-name-on-host@hostname" export PUBKEYPATH="$HOME/.ssh/id_ed25519.pub" ssh-copy-id -i "$PUBKEYPATH" "$USER_AT_HOST" -
Connecting to a Windows SSH host:
-
The host uses OpenSSH Server and the user belongs to the administrator group:
export USER_AT_HOST="your-user-name-on-host@hostname" export PUBKEYPATH="$HOME/.ssh/id_ed25519.pub" ssh $USER_AT_HOST "powershell Add-Content -Force -Path \"\$Env:PROGRAMDATA\\ssh\\administrators_authorized_keys\" -Value '$(tr -d '\n\r' < "$PUBKEYPATH")'" -
Otherwise:
export USER_AT_HOST="your-user-name-on-host@hostname"
export PUBKEYPATH="$HOME/.ssh/id_ed25519.pub"

ssh $USER_AT_HOST "powershell New-Item -Force -ItemType Directory -Path \"\$HOME\\.ssh\"; Add-Content -Force -Path \"\$HOME\\.ssh\\authorized_keys\" -Value '$(tr -d '\n\r' < "$PUBKEYPATH")'"
You may want to validate that the
authorized_keysfile in the.sshfolder for your remote user on the SSH host is owned by you and no other user has permission to access it. See the OpenSSH wiki for details.
-
Authorize your Windows machine to connect
Run one of the following commands, in a local PowerShell window replacing user and host name as appropriate to copy your local public key to the SSH host.
-
Connecting to a macOS or Linux SSH host:
$USER_AT_HOST="your-user-name-on-host@hostname" $PUBKEYPATH="$HOME\.ssh\id_ed25519.pub" $pubKey=(Get-Content "$PUBKEYPATH" | Out-String); ssh "$USER_AT_HOST" "mkdir -p ~/.ssh && chmod 700 ~/.ssh && echo '${pubKey}' >> ~/.ssh/authorized_keys && chmod 600 ~/.ssh/authorized_keys" -
Connecting to a Windows SSH host:
-
The host uses OpenSSH Server and the user belongs to the administrator group:
$USER_AT_HOST="your-user-name-on-host@hostname" $PUBKEYPATH="$HOME\.ssh\id_ed25519.pub" Get-Content "$PUBKEYPATH" | Out-String | ssh $USER_AT_HOST "powershell `"Add-Content -Force -Path `"`$Env:PROGRAMDATA\ssh\administrators_authorized_keys`" `"" -
Otherwise:
$USER_AT_HOST="your-user-name-on-host@hostname"
$PUBKEYPATH="$HOME\.ssh\id_ed25519.pub"

Get-Content "$PUBKEYPATH" | Out-String | ssh $USER_AT_HOST "powershell `"New-Item -Force -ItemType Directory -Path `"`$HOME\.ssh`"; Add-Content -Force -Path `"`$HOME\.ssh\authorized_keys`" `""
Validate that the
authorized_keysfile in the.sshfolder for your remote user on the SSH host is owned by you and no other user has permission to access it. See the OpenSSH wiki for details.
-
Improving your security with a dedicated key
While using a single SSH key across all your SSH hosts can be convenient, if anyone gains access to your private key, they will have access to all of your hosts as well. You can prevent this by creating a separate SSH key for your development hosts. Just follow these steps:
-
Generate a separate SSH key in a different file.
macOS / Linux: Run the following command in a local terminal:
ssh-keygen -t ed25519 -f ~/.ssh/id_ed25519-remote-sshWindows: Run the following command in a local PowerShell:
ssh-keygen -t ed25519 -f "$HOME\.ssh\id_ed25519-remote-ssh" -
Follow the same steps in the quick start to authorize the key on the SSH host, but set the
PUBKEYPATHto theid_ed25519-remote-ssh.pubfile instead. -
In VS Code, run Remote-SSH: Open Configuration File... in the Command Palette (F1), select an SSH config file, and add (or modify) a host entry as follows:
Host name-of-ssh-host-here
    User your-user-name-on-host
    HostName host-fqdn-or-ip-goes-here
    IdentityFile ~/.ssh/id_ed25519-remote-ssh
Tip: You can use
/for Windows paths as well. If you use\you will need to use two slashes. For example,C:\\path\\to\\my\\id_ed25519.
Reusing a key generated in PuTTYGen
If you used PuTTYGen to set up SSH public key authentication for the host you are connecting to, you need to convert your private key so that other SSH clients can use it. To do this:
-
Open PuTTYGen locally and load the private key you want to convert.
-
Select Conversions > Export OpenSSH key from the application menu. Save the converted key to a local location under the
.sshdirectory in your user profile folder (for exampleC:\Users\youruser\.ssh). -
Validate that this new local file is owned by you and no other user has permissions to access it.
-
In VS Code, run Remote-SSH: Open Configuration File... in the Command Palette (F1), select the SSH config file you want to change, and add (or modify) a host entry in the config file as follows to point to the file:
Host name-of-ssh-host-here
    User your-user-name-on-host
    HostName host-fqdn-or-ip-goes-here
    IdentityFile ~/.ssh/exported-keyfile-from-putty
Improving security on multi-user servers
The Remote - SSH extension installs and maintains the "VS Code Server". The server is started with a randomly generated key, and any new connection to the server needs to provide the key. The key is stored on the remote's disk, readable only by the current user. There is one HTTP path that is available without authentication at /version.
By default, the server listens to localhost on a random TCP port that is then forwarded to your local machine. If you are connecting to a Linux or macOS host, you can switch to using Unix sockets that are locked down to a particular user. This socket is then forwarded instead of the port.
Note: This setting disables connection multiplexing so configuring public key authentication is recommended.
To configure it:
-
Ensure you have a local OpenSSH 6.7+ SSH client on Windows, macOS, or Linux and an OpenSSH 6.7+ Linux or macOS Host (Windows does not support this mode).
-
Switch Remote - SSH into socket mode by enabling Remote.SSH: Remote Server Listen On Socket in your local VS Code User settings.

-
If you've already connected to the SSH Host, select Remote-SSH: Kill VS Code Server on Host... from the Command Palette (F1) so the setting takes effect.
If you encounter an error when connecting, you may need to enable socket forwarding on your SSH Host's sshd config. To do so:
- Open
/etc/ssh/sshd_configin a text editor (like vi, nano, or pico) on the SSH host (not locally). - Add the setting
AllowStreamLocalForwarding yes. - Restart the SSH server. (On Ubuntu, run
sudo systemctl restart sshd.). - Retry.
Troubleshooting hanging or failing connections
If you are running into problems with VS Code hanging while trying to connect (and potentially timing out), there are a few things you can do to try to resolve the issue.
General troubleshooting: Remove the server
One command helpful to troubleshoot a variety of Remote-SSH issues is Remote-SSH: Kill VS Code Server on Host. This will remove the server, which can fix a wide range of issues and error messages you may see, such as "Could not establish connection to server_name: The VS Code Server failed to start."
See if VS Code is waiting on a prompt
Enable the remote.SSH.showLoginTerminal setting in VS Code and retry. If you are prompted to input a password or token, see Enabling alternate SSH authentication methods for details on reducing the frequency of prompts.
If you are still having trouble, set the following properties in settings.json and retry:
"remote.SSH.showLoginTerminal": true,
"remote.SSH.useLocalServer": false
Work around a bug with some versions of Windows OpenSSH server
Due to a bug in certain versions of OpenSSH server for Windows, the default check to determine if the host is running Windows may not work properly. This does not occur with OpenSSH server that ships with Windows 1909 and below.
Fortunately, you can work around this problem by specifically telling VS Code if your SSH host is running Windows by adding the following to settings.json:
"remote.SSH.useLocalServer": false
You can also force VS Code to identify a particular host as Windows using the following property:
"remote.SSH.remotePlatform": {
    "host-in-ssh-config-or-fqdn": "windows"
}
A fix has been merged so this problem should be resolved in a version of the server greater than 8.1.0.0.
Enable TCP Forwarding on the remote host
Remote - SSH extension makes use of an SSH tunnel to facilitate communication with the host. In some cases, this may be disabled on your SSH server. To see if this is the problem, open the Remote - SSH category in the output window and check for the following message:
open failed: administratively prohibited: open failed
If you do see that message, follow these steps to update your SSH server's sshd config:
- Open
/etc/ssh/sshd_configorC:\ProgramData\ssh\sshd_configin a text editor (like Vim, nano, Pico, or Notepad) on the SSH host (not locally). - Add the setting
AllowTcpForwarding yes. - Restart the SSH server. (On Ubuntu, run
sudo systemctl restart sshd. On Windows, in an admin PowerShell run,Restart-Service sshd). - Retry.
Set the ProxyCommand parameter in your SSH config file
If you are behind a proxy and are unable to connect to your SSH host, you may need to use the ProxyCommand parameter for your host in a local SSH config file. You can read this SSH ProxyCommand article for an example of its use.
Ensure the remote machine has internet access
The remote machine must have internet access to be able to download the VS Code Server and extensions from the Marketplace. See the FAQ for details on connectivity requirements.
Set HTTP_PROXY / HTTPS_PROXY on the remote host
If your remote host is behind a proxy, you may need to set the HTTP_PROXY or HTTPS_PROXY environment variable on the SSH host. Open your ~/.bashrc file add the following (replacing proxy.fqdn.or.ip:3128 with the appropriate hostname / IP and port):
export HTTP_PROXY=http://proxy.fqdn.or.ip:3128
export HTTPS_PROXY=$HTTP_PROXY

# Or if an authenticated proxy
export HTTP_PROXY=http://username:password@proxy.fqdn.or.ip:3128
export HTTPS_PROXY=$HTTP_PROXY
Work around /tmp mounted with noexec
Some remote servers are set up to disallow executing scripts from /tmp. VS Code writes its install script to the system temp directory and tries to execute it from there. You can work with your system administrator to determine whether this can be worked around.
Check whether a different shell is launched during install
Some users launch a different shell from their .bash_profile or other startup script on their SSH host because they want to use a different shell than the default. This can break VS Code's remote server install script and isn't recommended. Instead, use chsh to change your default shell on the remote machine.
Connecting to systems that dynamically assign machines per connection
Some systems will dynamically route an SSH connection to one node from a cluster each time an SSH connection is made. This is an issue for VS Code because it makes two connections to open a remote window: the first to install or start the VS Code Server (or find an already running instance) and the second to create the SSH port tunnel that VS Code uses to talk to the server. If VS Code is routed to a different machine when it creates the second connection, it won't be able to talk to the VS Code server.
One workaround for this is to use the ControlMaster option in OpenSSH (macOS/Linux clients only), described in Enabling alternate SSH authentication methods, so that VS Code's two connections will be multiplexed through a single SSH connection to the same node.
Contact your system administrator for configuration help
SSH is a very flexible protocol and supports many configurations. If you see other errors, in either the login terminal or the Remote-SSH output window, they could be due to a missing setting.
Contact your system administrator for information about the required settings for your SSH host and client. Specific command-line arguments for connecting to your SSH host can be added to an SSH config file.
To access your config file, run Remote-SSH: Open Configuration File... in the Command Palette (F1). You can then work with your admin to add the necessary settings.
Enabling alternate SSH authentication methods
If you are connecting to an SSH remote host and are either:
- Connecting with two-factor authentication
- Using password authentication
- Using an SSH key with a passphrase when the SSH Agent is not running or accessible
then VS Code should automatically prompt you to enter needed information. If you do not see the prompt, enable the remote.SSH.showLoginTerminal setting in VS Code. This setting displays the terminal whenever VS Code runs an SSH command. You can then enter your authentication code, password, or passphrase when the terminal appears.
If you are still having trouble, you may need to add the following properties in settings.json and retry:
"remote.SSH.showLoginTerminal": true,
"remote.SSH.useLocalServer": false
If you are on macOS and Linux and want to reduce how often you have to enter a password or token, you can enable the ControlMaster feature on your local machine so that OpenSSH runs multiple SSH sessions over a single connection.
To enable ControlMaster:
-
Add an entry like this to your SSH config file:
Host * ControlMaster auto ControlPath ~/.ssh/sockets/%r@%h-%p ControlPersist 600 -
Then run
mkdir -p ~/.ssh/socketsto create the sockets folder.
Setting up the SSH Agent
If you are connecting to an SSH host using a key with a passphrase, you should ensure that the SSH Agent is running locally. VS Code will automatically add your key to the agent so you don't have to enter your passphrase every time you open a remote VS Code window.
To verify that the agent is running and is reachable from VS Code's environment, run ssh-add -l in the terminal of a local VS Code window. You should see a listing of the keys in the agent (or a message that it has no keys). If the agent is not running, follow these instructions to start it. After starting the agent, be sure to restart VS Code.
Windows:
To enable SSH Agent automatically on Windows, start a local Administrator PowerShell and run the following commands:
# Make sure you're running as an Administrator
Set-Service ssh-agent -StartupType Automatic
Start-Service ssh-agent
Get-Service ssh-agent
Now the agent will be started automatically on login.
Linux:
To start the SSH Agent in the background, run:
eval "$(ssh-agent -s)"
To start the SSH Agent automatically on login, add these lines to your ~/.bash_profile:
if [ -z "$SSH_AUTH_SOCK" ]; then
   # Check for a currently running instance of the agent
   RUNNING_AGENT="`ps -ax | grep 'ssh-agent -s' | grep -v grep | wc -l | tr -d '[:space:]'`"
   if [ "$RUNNING_AGENT" = "0" ]; then
        # Launch a new instance of the agent
        ssh-agent -s &> .ssh/ssh-agent
   fi
   eval `cat .ssh/ssh-agent`
fi
macOS:
The agent should be running by default on macOS.
Making local SSH Agent available on the remote
An SSH Agent on your local machine allows the Remote - SSH extension to connect to your chosen remote system without repeatedly prompting for a passphrase, but tools like Git that run on the remote, don't have access to your locally-unlocked private keys.
You can see this by opening the integrated terminal on the remote and running ssh-add -l. The command should list the unlocked keys, but instead reports an error about not being able to connect to the authentication agent. Setting ForwardAgent yes makes the local SSH Agent available in the remote environment, solving this problem.
You can do this by editing your .ssh/config file (or whatever Remote.SSH.configFile is set to - use the Remote-SSH: Open SSH Configuration File... command to be sure) and adding:
Host *
    ForwardAgent yes
Note that you might want to be more restrictive and only set the option for particular named hosts.
Fixing SSH file permission errors
SSH can be strict about file permissions and if they are set incorrectly, you may see errors such as "WARNING: UNPROTECTED PRIVATE KEY FILE!". There are several ways to update file permissions in order to fix this, which are described in the sections below.
Local SSH file and folder permissions
macOS / Linux:
On your local machine, make sure the following permissions are set:
| Folder / File | Permissions |
|---|---|
.ssh in your user folder |
chmod 700 ~/.ssh |
.ssh/config in your user folder |
chmod 600 ~/.ssh/config |
.ssh/id_ed25519.pub in your user folder |
chmod 600 ~/.ssh/id_ed25519.pub |
| Any other key file | chmod 600 /path/to/key/file |
Windows:
The specific expected permissions can vary depending on the exact SSH implementation you are using. We recommend using the out of box Windows 10 OpenSSH Client.
In this case, make sure that all of the files in the .ssh folder for your remote user on the SSH host is owned by you and no other user has permissions to access it. See the Windows OpenSSH wiki for details.
For all other clients, consult your client's documentation for what the implementation expects.
Server SSH file and folder permissions
macOS / Linux:
On the remote machine you are connecting to, make sure the following permissions are set:
| Folder / File | Linux / macOS Permissions |
|---|---|
.ssh in your user folder on the server |
chmod 700 ~/.ssh |
.ssh/authorized_keys in your user folder on the server |
chmod 600 ~/.ssh/authorized_keys |
Note that only Linux hosts are currently supported, which is why permissions for macOS and Windows 10 have been omitted.
Windows:
See the Windows OpenSSH wiki for details on setting the appropriate file permissions for the Windows OpenSSH server.
Installing a supported SSH client
| OS | Instructions |
|---|---|
| Windows 10 1803+ / Server 2016/2019 1803+ | Install the Windows OpenSSH Client. |
| Earlier Windows | Install Git for Windows. |
| macOS | Comes pre-installed. |
| Debian/Ubuntu | Run sudo apt-get install openssh-client |
| RHEL / Fedora / CentOS | Run sudo yum install openssh-clients |
VS Code will look for the ssh command in the PATH. Failing that, on Windows it will attempt to find ssh.exe in the default Git for Windows install path. You can also specifically tell VS Code where to find the SSH client by adding the remote.SSH.path property to settings.json.
Installing a supported SSH server
| OS | Instructions | Details |
|---|---|---|
| Debian 8+ / Ubuntu 16.04+ | Run sudo apt-get install openssh-server |
See the Ubuntu SSH documentation for details. |
| RHEL / CentOS 7+ | Run sudo yum install openssh-server && sudo systemctl start sshd.service && sudo systemctl enable sshd.service |
See the RedHat SSH documentation for details. |
| SuSE 12+ / openSUSE 42.3+ | In Yast, go to Services Manager, select "sshd" in the list, and click Enable. Next go to Firewall, select the Permanent configuration, and under services check sshd. | See the SuSE SSH documentation for details. |
| Windows 10 1803+ / Server 2016/2019 1803+ | Install the Windows OpenSSH Server. | |
| macOS 10.14+ (Mojave) | Enable Remote Login. |
Resolving hangs when doing a Git push or sync on an SSH host
If you clone a Git repository using SSH and your SSH key has a passphrase, VS Code's pull and sync features may hang when running remotely.
Either use an SSH key without a passphrase, clone using HTTPS, or run git push from the command line to work around the issue.
Using SSHFS to access files on your remote host
SSHFS is a secure remote filesystem access protocol that builds up from SFTP. It provides advantages over something like a CIFS / Samba share in that all that is required is SSH access to the machine.
Note: For performance reasons, SSHFS is best used for single file edits and uploading/downloading content. If you need to use an application that bulk reads/write to many files at once (like a local source control tool), rsync is a better choice.
macOS / Linux:
On Linux, you can use your distribution's package manager to install SSHFS. For Debian/Ubuntu: sudo apt-get install sshfs
Note: WSL 1 does not support FUSE or SSHFS, so the instructions differ for Windows currently. WSL 2 does include FUSE and SSHFS support, so this will change soon.
On macOS, you can install SSHFS using Homebrew:
brew install --cask macfuse
brew install gromgit/fuse/sshfs-mac
brew link --overwrite sshfs-mac
In addition, if you would prefer not to use the command line to mount the remote filesystem, you can also install SSHFS GUI.
To use the command line, run the following commands from a local terminal (replacing user@hostname with the remote user and hostname / IP):
export USER_AT_HOST=user@hostname
# Make the directory where the remote filesystem will be mounted
mkdir -p "$HOME/sshfs/$USER_AT_HOST"
# Mount the remote filesystem
sshfs "$USER_AT_HOST:" "$HOME/sshfs/$USER_AT_HOST" -ovolname="$USER_AT_HOST" -p 22  \
    -o workaround=nonodelay -o transform_symlinks -o idmap=user  -C
This will make your home folder on the remote machine available under the ~/sshfs. When you are done, you can unmount it using your OS's Finder / file explorer or by using the command line:
umount "$HOME/sshfs/$USER_AT_HOST"
Windows:
Follow these steps:
-
On Linux, add
.gitattributesfile to your project to force consistent line endings between Linux and Windows to avoid unexpected issues due to CRLF/LF differences between the two operating systems. See Resolving Git line ending issues for details. -
Next, install SSHFS-Win using Chocolatey:
choco install sshfs -
Once you've installed SSHFS for Windows, you can use the File Explorer's Map Network Drive... option with the path
\\sshfs\user@hostname, whereuser@hostnameis your remote user and hostname / IP. You can script this using the command prompt as follows:net use /PERSISTENT:NO X: \\sshfs\user@hostname -
Once done, disconnect by right-clicking on the drive in the File Explorer and selecting Disconnect.
Connect to a remote host from the terminal
Once a host has been configured, you can connect to it directly from the terminal by passing a remote URI.
For example, to connect to remote_server and open the /code/my_project folder, run:
code --remote ssh-remote+remote_server /code/my_project
We need to do some guessing on whether the input path is a file or a folder. If it has a file extension, it is considered a file.
To force that a folder is opened, add slash to the path or use:
code --folder-uri vscode-remote://ssh-remote+remote_server/code/folder.with.dot
To force that a file is opened, add --goto or use:
code --file-uri vscode-remote://ssh-remote+remote_server/code/fileWithoutExtension
Using rsync to maintain a local copy of your source code
An alternative to using SSHFS to access remote files is to use rsync to copy the entire contents of a folder on remote host to your local machine. The rsync command will determine which files need to be updated each time it is run, which is far more efficient and convenient than using something like scp or sftp. This is primarily something to consider if you really need to use multi-file or performance intensive local tools.
The rsync command is available out of box on macOS and can be installed using Linux package managers (for example sudo apt-get install rsync on Debian/Ubuntu). For Windows, you'll need to either use WSL or Cygwin to access the command.
To use the command, navigate to the folder you want to store the synched contents and run the following replacing user@hostname with the remote user and hostname / IP and /remote/source/code/path with the remote source code location.
On macOS, Linux, or inside WSL:
rsync -rlptzv --progress --delete --exclude=.git "user@hostname:/remote/source/code/path" .
Or using WSL from PowerShell on Windows:
wsl rsync -rlptzv --progress --delete --exclude=.git "user@hostname:/remote/source/code/path" "`$(wslpath -a '$PWD')"
You can rerun this command each time you want to get the latest copy of your files and only updates will be transferred. The .git folder is intentionally excluded both for performance reasons and so you can use local Git tools without worrying about the state on the remote host.
To push content, reverse the source and target parameters in the command. However, on Windows you should add a .gitattributes file to your project to force consistent line endings before doing so. See Resolving Git line ending issues for details.
rsync -rlptzv --progress --delete --exclude=.git . "user@hostname:/remote/source/code/path"
Cleaning up the VS Code Server on the remote
The SSH extension provides a command for cleaning up the VS Code Server from the remote machine, Remote-SSH: Uninstall VS Code Server from Host.... The command does two things: it kills any running VS Code Server processes and it deletes the folder where the server was installed.
If you want to run these steps manually, or if the command isn't working for you, you can run a script like this:
# Kill server processes
kill -9 $(ps aux | grep vscode-server | grep $USER | grep -v grep | awk '{print $2}')
# Delete related files and folder
rm -rf $HOME/.vscode-server # Or ~/.vscode-server-insiders
The VS Code Server was previously installed under ~/.vscode-remote so you can check that location too.
SSH into a remote WSL 2 host
You may want to use SSH to connect to a WSL distro running on your remote machine. Check out this guide to learn how to SSH into Bash and WSL 2 on Windows 10 from an external machine.
Filing an issue
If you are having trouble using the Remote-SSH extension and think that you need to file an issue, first make sure that you have read through the documentation on this site, and then see the troubleshooting wiki doc for information on grabbing the log file and trying more steps that may help narrow down the source of the problem.
Dev Containers tips
If you'd like to read about tips for using Dev Containers, you can go to Dev Containers Tips and Tricks.
WSL tips
First time start: VS Code Server prerequisites
Some WSL Linux distributions are lacking libraries that are required by the VS Code server to start up. You can add additional libraries into your Linux distribution by using its package manager.
Debian and Ubuntu
Open the Debian or Ubuntu WSL shell to add wget and ca-certificates:
sudo apt-get update && sudo apt-get install wget ca-certificates
Alpine
Open the Alpine WSL shell as root (wsl -d Alpine -u root) to add libstdc++:
apk update && apk add libstdc++
On Windows 10 April 2018 Update (build 1803) and older, /bin/bash is required:
apk update && apk add bash
Selecting the distribution used by the WSL extension
WSL: New Window will open the WSL distro registered as default.
To open a non-default distro, run code . from the WSL shell of the distro to use or use WSL: New Window using Distro.
With WSL versions older than Windows 10, May 2019 Update (version 1903), the WSL command can only use the default distro. For this reason, the WSL extension might prompt you if you agree to change the default distro.
You can always use wslconfig.exe to change your default.
For example:
wslconfig /setdefault Ubuntu
You can see which distributions you have installed by running:
wslconfig /l
Configure the environment for the server startup
When the WSL extension starts the VS Code server in WSL, it does not run any shell configuration scripts. This was done to avoid that custom configuration scripts can prevent the startup.
If you need to configure the startup environment, you can use the environment setup script as described here.
Configure the environment for the remote extension host
The environment for the remote extension host and terminal are based on the default shell's configuration scripts. To evaluate the environment variables for the remote extension host process, the server creates an instance of the default shell as an interactive login shell. It probes the environment variables from it and uses them as the initial environment for the remote extension host process. The values of environment variables therefore depend on what shell is configured as the default and the content of the configuration scripts for that shell.
See Unix shell initialization for an overview of each shell's configuration scripts. Most WSL distributions have /bin/bash configured as the default shell. /bin/bash will look for startup files under /etc/profile first and for any startup files under ~/.bash_profile, ~/.bash_login, ~/.profile.
To change the default shell of a WSL distro, follow the instructions of this blog post.
Fixing problems with the code command not working
If typing code from a WSL terminal on Window does not work because code cannot be found, you may be missing some key locations from your PATH in WSL.
Check by opening a WSL terminal and typing echo $PATH. You should see VS Code install path listed. By default, this would be:
/mnt/c/Users/Your Username/AppData/Local/Programs/Microsoft VS Code/bin
But, if you used the System Installer, the install path is:
/mnt/c/Program Files/Microsoft VS Code/bin
...or...
/mnt/c/Program Files (x86)/Microsoft VS Code/bin
It's a feature of WSL that paths are inherited from the PATH variable in Windows. To change the Windows PATH variable, use the Edit environment variables for your account command from the start menu in Windows.
If you have disabled the path sharing feature, edit your .bashrc, add the following, and start a new terminal:
WINDOWS_USERNAME="Your Windows Alias"

export PATH="$PATH:/mnt/c/Windows/System32:/mnt/c/Users/${WINDOWS_USERNAME}/AppData/Local/Programs/Microsoft VS Code/bin"
# or...
# export PATH="$PATH:/mnt/c/Program Files/Microsoft VS Code/bin"
# or...
# export PATH="$PATH:/mnt/c/Program Files (x86)/Microsoft VS Code/bin"
Note: Be sure to quote or escape space characters in the directory names.
Finding problems with the 'code' command
If typing code from a Windows command prompt does not launch VS Code, you can help us diagnose the problem by running VSCODE_WSL_DEBUG_INFO=true code ..
Please file an issue and attach the full output.
Finding problems starting or connected to the server
When the WSL window fails to connect to the remote server, you can get more information in the WSL log. When filing an issue, it is important to always send the full content of the WSL log.
Open the WSL log by running the command WSL: Open Log. The log will show in the terminal view under the WSL tab.
To get even more verbose logging, enable the setting remote.WSL.debug in the user settings.
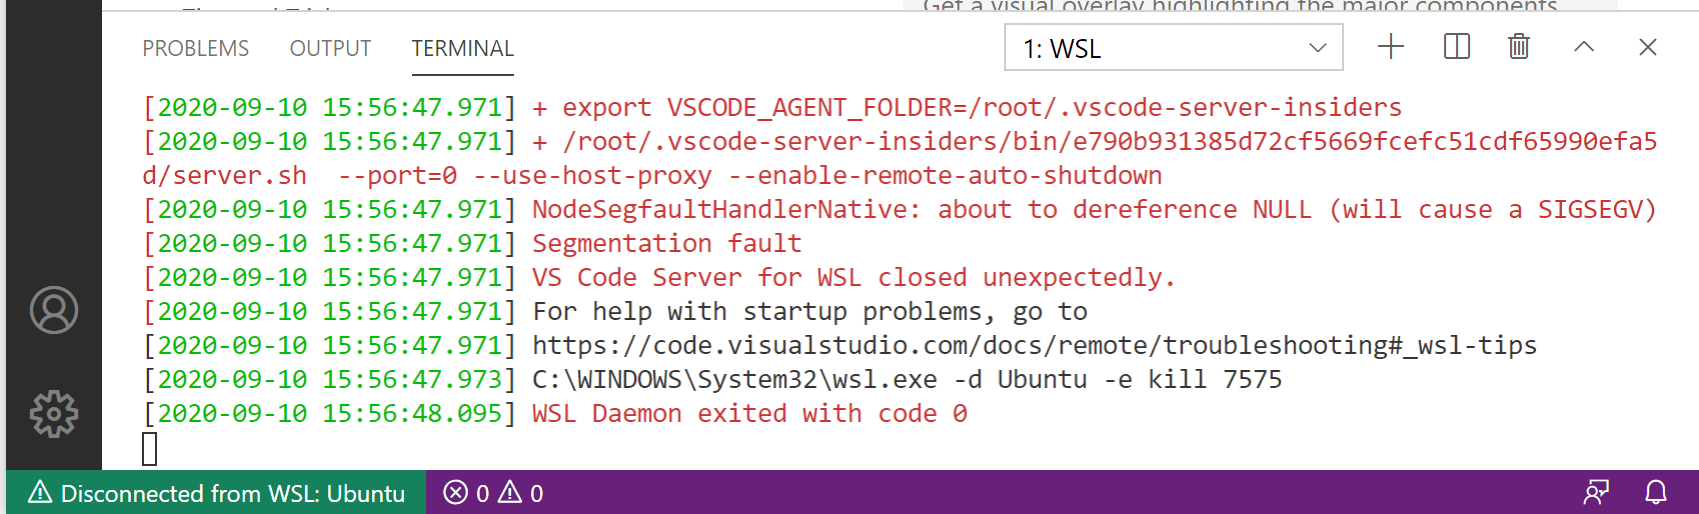
The server fails to start with a segmentation fault
You can help us investigate this problem by sending us the core dump file. To get the core dump file, follow these steps:
In a Windows command prompt:
- Run
code --locate-extension ms-vscode-remote.remote-wslto determine the WSL extension folder. cdto the path that is returned.- Open the
wslServer.shscript with VS Code,code .\scripts\wslServer.sh. - Before the last line (before
"$VSCODE_REMOTE_BIN/$COMMIT/bin/$SERVER_APPNAME" "$@"), addulimit -C unlimited. - Start the WSL window running the remote server and wait for the segmentation fault.
The core file will be in the WSL extension folder from above.
I see EACCES: permission denied error trying to rename a folder in the open workspace
This is a known problem with the WSL file system implementation (Microsoft/WSL#3395, Microsoft/WSL#1956) caused by the file watcher active by VS Code. The issue will only be fixed in WSL 2.
To avoid the issue, set remote.WSL.fileWatcher.polling to true. However, polling based has a performance impact for large workspaces.
For large workspace you may want to increase the polling interval, remote.WSL.fileWatcher.pollingInterval, and control the folders that are watched with
files.watcherExclude
.
WSL 2 does not have that file watcher problem and is not affected by the new setting.
Resolving Git line ending issues in WSL (resulting in many modified files)
Since Windows and Linux use different default line endings, Git may report a large number of modified files that have no differences aside from their line endings. To prevent this from happening, you can disable line-ending conversion using a .gitattributes file or globally on the Windows side.
Typically adding or modifying a .gitattributes file in your repository is the most reliable way to solve this problem. Committing this file to source control will help others and allows you to vary behaviors by repository as appropriate. For example, adding the following to .gitattributes file to the root of your repository will force everything to be LF, except for Windows batch files that require CRLF:
* text=auto eol=lf
*.{cmd,[cC][mM][dD]} text eol=crlf
*.{bat,[bB][aA][tT]} text eol=crlf
Note that this works in Git v2.10+, so if you are running into problems, be sure you've got a recent Git client installed. You can add other file types in your repository that require CRLF to this same file.
If you would prefer to still always upload Unix-style line endings (LF), you can use the input option.
git config --global core.autocrlf input
If you'd prefer to disable line-ending conversion entirely, run the following instead:
git config --global core.autocrlf false
Finally, you may need to clone the repository again for these settings to take effect.
Sharing Git credentials between Windows and WSL
If you use HTTPS to clone your repositories and have a credential helper configured in Windows, you can share this with WSL so that passwords you enter are persisted on both sides. (Note that this does not apply to using SSH keys.)
Just follow these steps:
-
Configure the credential manager on Windows by running the following in a Windows command prompt or PowerShell:
git config --global credential.helper wincred -
Configure WSL to use the same credential helper, but running the following in a WSL terminal:
git config --global credential.helper "/mnt/c/Program\ Files/Git/mingw64/bin/git-credential-manager.exe"
Any password you enter when working with Git on the Windows side will now be available to WSL and vice versa.
Resolving hangs when doing a Git push or sync from WSL
If you clone a Git repository using SSH and your SSH key has a passphrase, VS Code's pull and sync features may hang when running remotely.
Either use an SSH key without a passphrase, clone using HTTPS, or run git push from the command line to work around the issue.
GitHub Codespaces tips
For tips and questions about GitHub Codespaces, see the GitHub Codespaces documentation. You can also check out the known web limitations and adaptations that may impact your Codespaces.
Extension tips
While many extensions will work unmodified, there are a few issues that can prevent certain features from working as expected. In some cases, you can use another command to work around the issue, while in others, the extension may need to be modified. This section provides a quick reference for common issues and tips on resolving them. You can also refer to the main extension article on Supporting Remote Development for an in-depth guide on modifying extensions to support remote extension hosts.
Resolving errors about missing dependencies
Some extensions rely on libraries not found in the basic install of certain WSL Linux distributions. You can add additional libraries into your Linux distribution by using its package manager. For Ubuntu and Debian based distributions, run sudo apt-get install <package> to install the needed libraries. Check the documentation for your extension or the runtime that is mentioned in the error message for additional installation details.
Local absolute path settings fail when applied remotely
VS Code's local user settings are reused when you connect to a remote endpoint. While this keeps your user experience consistent, you may need to vary absolute path settings between your local machine and each host / container / WSL since the target locations are different.
Resolution: You can set endpoint-specific settings after you connect to a remote endpoint by running the Preferences: Open Remote Settings command from the Command Palette (F1) or by selecting the Remote tab in the Settings editor. These settings will override any local settings you have in place whenever you connect.
Need to install local VSIX on remote endpoint
Sometimes you want to install a local VSIX on a remote machine, either during development or when an extension author asks you to try out a fix.
Resolution: Once you have connected to an SSH host, container, or WSL, you can install the VSIX the same way you would locally. Run the Extensions: Install from VSIX... command from the Command Palette (F1). You may also want to add "extensions.autoUpdate": false to settings.json to prevent auto-updating to the latest Marketplace version. See Supporting Remote Development for more information on developing and testing extensions in a remote environment.
Browser does not open locally
Some extensions use external node modules or custom code to launch a browser window. Unfortunately, this may cause the extension to launch the browser remotely instead of locally.
Resolution: The extension can use the vscode.env.openExternal API to resolve this problem. See the extension author's guide for details.
Clipboard does not work
Some extensions use node modules like clipboardy to integrate with the clipboard. Unfortunately, this may cause the extension to incorrectly integrate with the clipboard on the remote side.
Resolution: The extension can switch to the VS Code clipboard API to resolve the problem. See the extension author's guide for details.
Cannot access local web server from browser or application
When working inside a container, SSH host, or through GitHub Codespaces, the port the browser is connecting to may be blocked.
Resolution: Extensions can use the vscode.env.openExternal or vscode.env.asExternalUri APIs (which automatically forwards localhost ports) to resolve this problem. See the extension author's guide for details. As a workaround, use the Forward a Port command to do so manually.
Webview contents do not appear
If the extension's webview content uses an iframe to connect to a local web server, the port the webview is connecting to may be blocked. In addition, if the extension hard codes vscode-resource:// URIs instead of using asWebviewUri, content may not appear in the Codespaces browser editor.
Resolution: The extension can use the webview.asWebviewUri to resolve issues with vscode-resource:// URIs.
If ports are being blocked, the best approach is to instead use the webview message passing API. As a workaround, vscode.env.asExternalUri can be used allow the webview to connect to spawned localhost web servers from VS Code. However, this is currently blocked for the Codespaces browser-based editor (only) by MicrosoftDocs/vscodespaces#11. See the extension author's guide for details on the workaround.
Blocked localhost ports
If you are trying to connect to a localhost port from an external application, the port may be blocked.
Resolution: VS Code 1.40 introduced a new vscode.env.asExternalUri API for extensions to programmatically forward arbitrary ports. See the extension author's guide for details. As a workaround, you can use the Forward a Port command to do so manually.
Errors storing extension data
Extensions may try to persist global data by looking for the ~/.config/Code folder on Linux. This folder may not exist, which can cause the extension to throw errors like ENOENT: no such file or directory, open '/root/.config/Code/User/filename-goes-here.
Resolution: Extensions can use the context.globalStorageUri or context.storageUri property to resolve this problem. See the extension author's guide for details.
Cannot sign in / have to sign in each time I connect to a new endpoint
Extensions that require sign in may persist secrets using their own code. This code can fail due to missing dependencies. Even if it succeeds, the secrets will be stored remotely, which means you have to sign in for every new endpoint.
Resolution: Extensions can use the SecretStorage API to solve this problem. See the extension author's guide for details.
An incompatible extension prevents VS Code from connecting
If an incompatible extension has been installed on a remote host, container, or in WSL, we have seen instances where the VS Code Server hangs or crashes due to the incompatibility. If the extension activates right away, this can prevent you from connecting and being able to uninstall the extension.
Resolution: Manually delete the remote extensions folder by following these steps:
-
For containers, ensure your
devcontainer.jsonno longer includes a reference to the faulty extension. -
Next, use a separate terminal / command prompt to connect to the remote host, container, or WSL.
- If SSH or WSL, connect to the environment accordingly (run
sshto connect to the server or open WSL terminal). - If using a container, identify the container ID by calling
docker ps -aand looking through the list for an image with the correct name. If the container is stopped, rundocker run -it <id> /bin/sh. If it is running, rundocker exec -it <id> /bin/sh.
- If SSH or WSL, connect to the environment accordingly (run
-
Once you are connected, run
rm -rf ~/.vscode-server/extensionsfor VS Code stable and/orrm -rf ~/.vscode-server-insiders/extensionsfor VS Code Insiders to remove all extensions.
Extensions that ship or acquire pre-built native modules fail
Native modules bundled with (or dynamically acquired for) a VS Code extension must be recompiled using Electron's electron-rebuild. However, VS Code Server runs a standard (non-Electron) version of Node.js, which can cause binaries to fail when used remotely.
Resolution: Extensions need to be modified to solve this problem. They will need to include (or dynamically acquire) both sets of binaries (Electron and standard Node.js) for the "modules" version in Node.js that VS Code ships and then check to see if context.executionContext === vscode.ExtensionExecutionContext.Remote in their activation function to set up the correct binaries. See the extension author's guide for details.
Extension only fails on non-x86_64 hosts or Alpine Linux
If an extension works on Debian 9+, Ubuntu 16.04+, or RHEL / CentOS 7+ remote SSH hosts, containers, or WSL, but fails on supported non-x86_64 hosts (for example, ARMv7l) or Alpine Linux containers, the extension may only include native code or runtimes that do not support these platforms. For example, the extensions may only include x86_64 compiled versions of native modules or runtimes. For Alpine Linux, the included native code or runtimes may not work due to fundamental differences between how libc is implemented in Alpine Linux (musl) and other distributions (glibc).
Resolution: Extensions will need to opt-in to supporting these platforms by compiling / including binaries for these additional targets. It is important to note that some third-party npm modules may also include native code that can cause this problem. So, in some cases you may need to work with the npm module author to add additional compilation targets. See the extension author's guide for details.
Extensions fail due to missing modules
Extensions that rely on Electron or VS Code base modules (not exposed by the extension API) without providing a fallback can fail when running remotely. You may see errors in the Developer Tools console like original-fs not being found.
Resolution: Remove the dependency on an Electron module or provide a fallback. See the extension author's guide for details.
Cannot access / transfer remote workspace files to local machines
Extensions that open workspace files in external applications may encounter errors because the external application cannot directly access the remote files.
Resolution: If you create a "UI" extension designed to run locally, you can use the vscode.workspace.fs API to interact with the remote workspace filesystem. You can then make this a dependency of your "Workspace" extension and invoke it using a command as needed. See the extension author's guide for details on different types of extensions and how to use commands to communicate between them.
Cannot access attached device from extension
Extensions that access locally attached devices will be unable to connect to them when running remotely.
Resolution: None currently. We are investigating the best approach to solve this problem.
Questions and feedback
Reporting issues
If you run into an issue with one of the remote development extensions, it's important to collect the correct logs so that we'll be able to help diagnose your issue.
Each remote extension has a command to view its logs.
You can get the Remote - SSH extension logs with Remote-SSH: Show Log from the Command Palette (F1). When reporting Remote - SSH issues, please also verify if you're able to SSH into your machine from an external terminal (not using Remote - SSH).
Similarly, you can get the Dev Containers extension logs with Dev Containers: Show Container Log.
Like the two above, you can get the WSL extension logs with WSL: Show Log. Also check whether your issue is being tracked upstream in the WSL repo (and is not due to the WSL extension).
If you're experiencing issues using other extensions remotely (for example, other extensions aren't loading or installing properly in a remote context), it's helpful to grab the log from the Remote Extension Host output channel (Output: Focus on Output View), and select Log (Remote Extension Host) from the dropdown.
Note: If you only see Log (Extension Host), this is the local extension host, and the remote extension host didn't launch. This is because the log channel is created only after the log file is created, so if the remote extension host does not launch, the remote extension host log file was not created and is not shown in the Output view. This is still helpful information to include in your issue.
Remote question and feedback resources
We have a variety of other remote resources:
- See Remote Development FAQ.
- Search on Stack Overflow.
- Add a feature request or report a problem.