Working with repositories and remotes
Git repositories and remotes enable you to collaborate with others by syncing your work across different locations. VS Code provides integrated tools for working with remote repositories without needing command-line Git knowledge.
This article covers working with Git repositories and remotes, including cloning, publishing, syncing changes, and managing multiple repositories in VS Code.
Understanding remotes
A remote is a Git repository hosted on another server, such as GitHub, Azure DevOps, or GitLab. Remotes enable collaboration by providing a central location where team members can share their work.
When you clone a repository, Git automatically creates a remote named origin that points to the original repository. You can work with multiple remotes if you need to interact with different servers or repositories.
Working with remotes involves three main operations:
-
Fetch: downloads commits from the remote without changing your working files. This lets you see what others have done without merging their changes into your work.
-
Pull: downloads commits from the remote and merges them into your current branch. This is fetch plus merge in one operation.
-
Push: uploads your local commits to the remote so others can access your changes.

When you push, Git needs to know which remote to send your commits to. By default, Git uses the upstream branch configured for your current branch. If no upstream is set, VS Code prompts you to publish the branch and set the upstream.
Add a remote
To add a new remote to your repository:
-
In the Source Control view (⌃⇧G (Windows, Linux Ctrl+Shift+G)), select More Actions (...) > Remotes > Add Remote
Alternatively, run the Git: Add Remote command from the Command Palette (⇧⌘P (Windows, Linux Shift+cmd+P)).
-
Enter the remote URL
-
Enter a name for the remote (for example,
upstream)
Your repository now has an additional remote that you can fetch from or push to.
Use similar steps to remove a remote (Git: Remove Remote).
Clone repositories
Cloning creates a local copy of a remote repository on your machine. The cloned repository includes all branches, commits, and history from the remote. By default, Git configures a remote named origin pointing to the URL you cloned from.
To clone a repository, run the Git: Clone command in the Command Palette (⇧⌘P (Windows, Linux Shift+cmd+P)), or select the Clone Repository button in the Source Control view.
If you clone from GitHub, VS Code prompts you to authenticate with GitHub. Then, select a repository from the list to clone to your machine. The list contains both public and private repositories. For other Git providers, enter the repository URL.
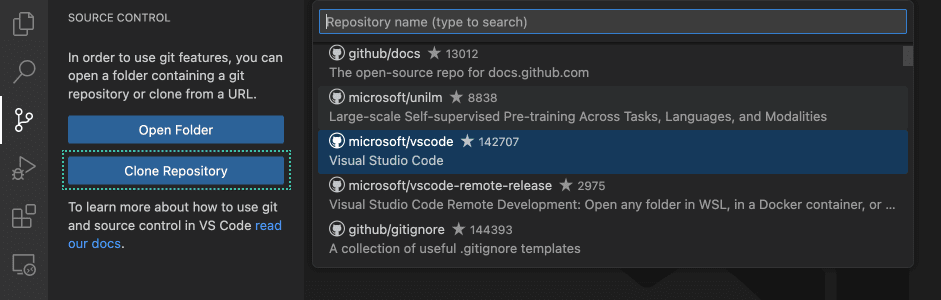
When cloning, VS Code asks you to select a local folder to store the repository. After cloning, you can choose to open the cloned repository in a new window.
The GitHub Pull Requests and Issues extension enhances the GitHub integration with pull request and issue management. Learn more about working with GitHub in VS Code.
Publish to GitHub
If you have a local repository that isn't connected to a remote, you can publish it directly to GitHub from VS Code.
To publish a repository to GitHub:
-
Open the Source Control view
-
Select Publish to GitHub in the Source Control view
-
Sign in to GitHub if prompted
-
Choose whether to create a public or private repository
-
Select which files to include in the initial commit
VS Code creates a new repository on GitHub, adds it as a remote, and pushes your commits.
Publishing to GitHub is the fastest way to get your local work online. It creates the repository, configures the remote, and pushes your commits in one step.
Push, pull, and sync
Pushing, pulling, and syncing are the core operations for keeping your local work in sync with remote repositories.
Push commits
Pushing uploads your local commits to the remote repository. To push commits:
-
Commit your changes locally
-
Select More Actions (...) > Push in the Source Control view
Alternatively, select the sync icon in the Status Bar to both pull and push in one operation. If you want to push to a specific remote, use the Push to option.
You can also push your local commits by using the Push icon in the Source Control Graph view toolbar.
-
If prompted, sign in to authenticate with the remote
Your commits are uploaded to the remote branch. Other team members can now pull your changes.
If your branch doesn't have an upstream configured, VS Code prompts you to publish the branch first.
Pull commits
Pulling downloads commits from the remote repository and merges them into your local branch. To pull commits:
-
Select More Actions (...) > Pull in the Source Control view
Alternatively, select the sync icon in the Status Bar to both pull and push in one operation. If you want to pull from a specific remote, use the Pull from option.
You can also pull remote commits by using the Pull icon in the Source Control Graph view toolbar.
-
VS Code downloads and merges the remote commits
If there are conflicts between your local changes and the remote commits, VS Code helps you resolve them through the merge conflict resolution tools.
Pull with rebase
Instead of merging remote changes, you can rebase your local commits on top of the remote changes:
-
Select More Actions (...) > Pull (Rebase) in the Source Control view
-
VS Code applies the remote commits first, then replays your local commits on top
Rebasing creates a linear history without merge commits. Learn more about Git rebase.
Sync changes
Syncing combines pull and push operations - it first pulls changes from the remote, then pushes your local commits. This is the recommended way to keep your work synchronized.
To sync changes:
- Select Sync Changes in the Source Control view
- Select the sync icon in the Status Bar
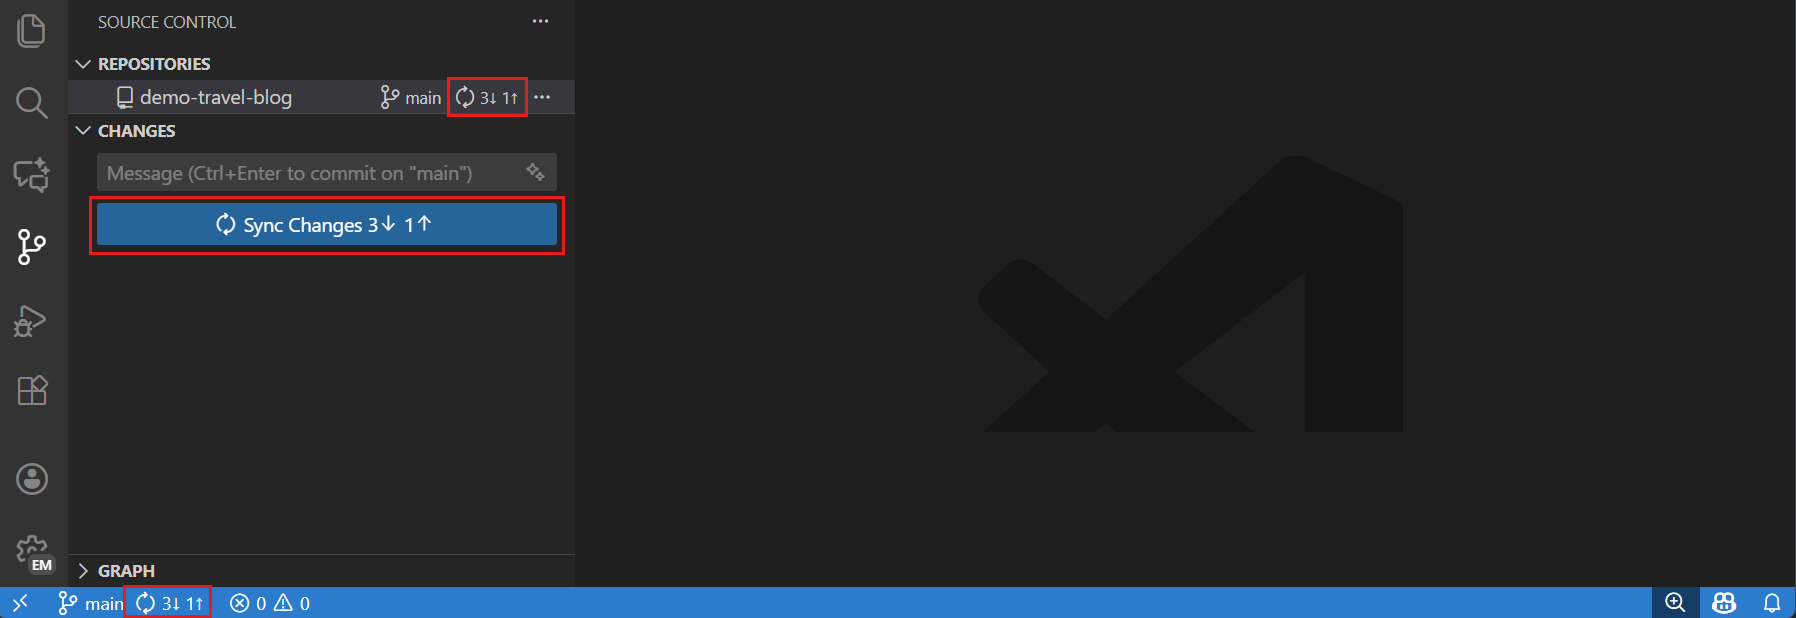
The Status Bar sync indicator shows how many commits you have to push (↑) and pull (↓). For example, ↑2 ↓1 means you have 2 commits to push and 1 commit to pull.
Configure the git.confirmSync setting to control whether VS Code asks for confirmation before syncing.
Fetch commits
Fetching downloads commits from the remote repository without merging them into your local branch. This lets you review incoming changes before integrating them.
To fetch commits:
- Select More Actions (...) > Fetch in the Source Control view
- Select Fetch From All Remotes to fetch from all configured remotes
- Select Fetch (Prune) to fetch and remove deleted remote branches (to always prune, enable the git.pruneOnFetch setting)
After fetching, you can review the incoming commits in the Source Control Graph before merging them with Pull.
To automatically fetch commits in the background, enable the git.autofetch setting (disabled by default). To configure the fetch interval, use the git.autofetchPeriod setting (default 180 seconds).
Status Bar sync actions
The Status Bar provides quick access to common repository and remote operations without opening the Source Control view.
Branch indicator
The branch indicator in the lower-left corner shows:
- Current branch name: select to switch branches
- Sync status: number of commits to push (↑) and pull (↓)
- Publishing state: shows Publish Branch for unpublished branches

The sync icon (rotating arrows) in the Status Bar enables you to sync your changes with the remote (push and pull).
You can customize Status Bar behavior with these settings:
- git.showActionButton : control which action button to show (sync or commit)
- git.showPushSuccessNotification : show a notification after successful push
- git.showCommitInput : show commit input in the Source Control view
Source Control Graph
The Source Control Graph provides a visual representation of your commit history, branch relationships, and sync status with remotes. This makes it easy to understand incoming and outgoing changes.
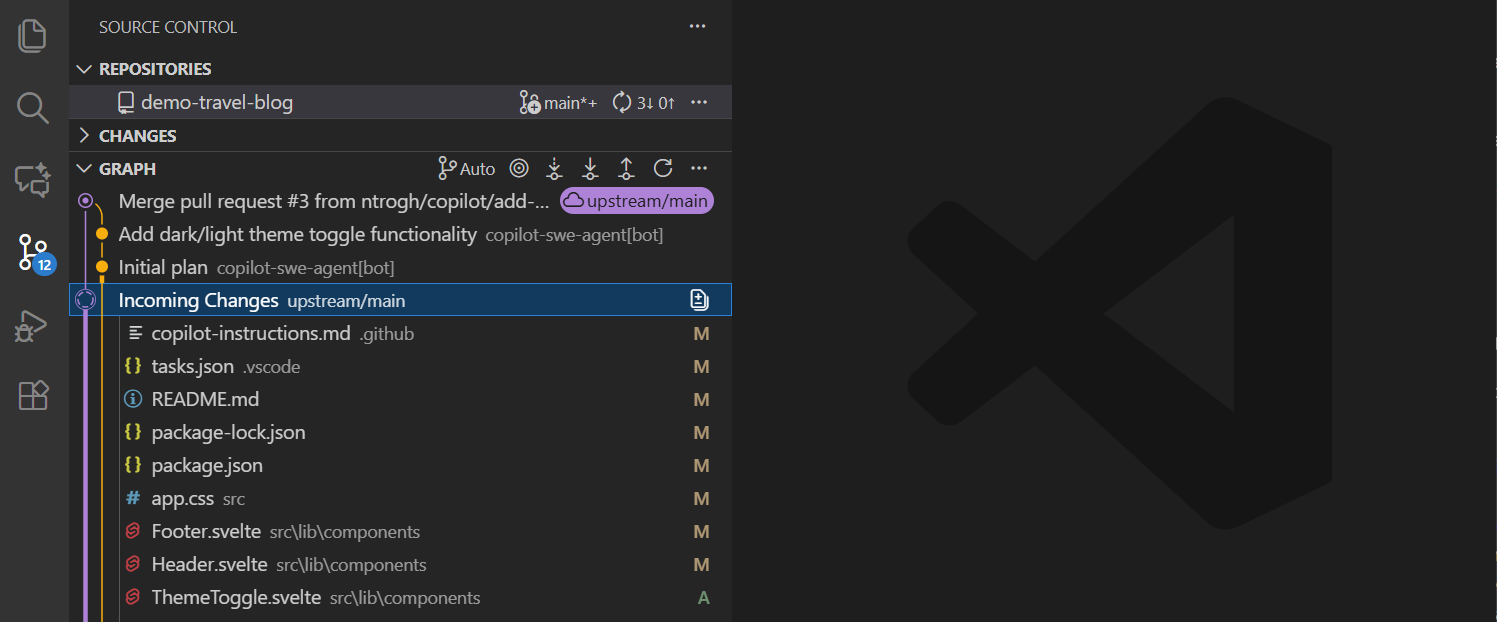
The graph displays:
- Current branch: highlighted with a special indicator
- Upstream branch: shows commits on the remote that you haven't pulled
- Incoming commits (↓): commits on the remote that you can pull
- Outgoing commits (↑): your local commits that can be pushed
- Other branches: local and remote branches in your repository
You can fetch, push, and pull directly from the graph toolbar. The graph view also shows incoming and outgoing changes, making it easy to see when you need to sync. Select an item in the graph to view the individual files changed in that commit.
Customize the Source Control Graph with these settings:
- scm.graph.showIncomingChanges : show or hide incoming commits
- scm.graph.showOutgoingChanges : show or hide outgoing commits
- scm.graph.pageSize : number of commits to load initially
Learn more about viewing commit history with the Source Control Graph.
Working with repositories
The Repositories view enables you to manage multiple Git repositories in a single workspace. This is useful when working with projects that span multiple repositories. The Repositories view also shows Git worktrees associated with your repositories.
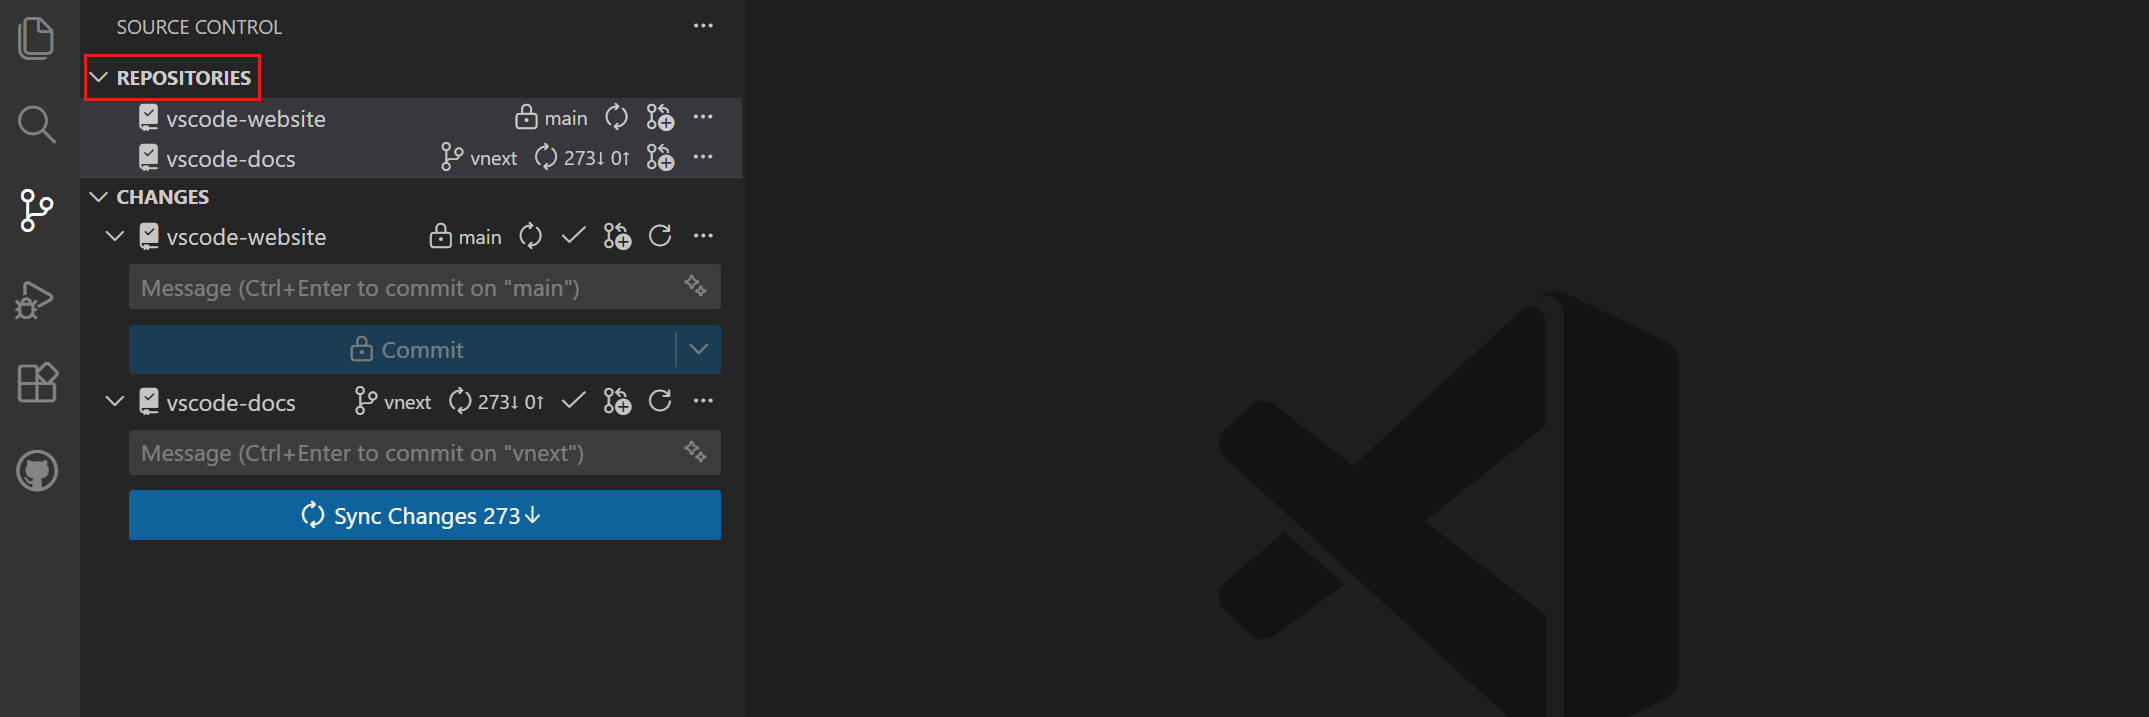
To show the Repositories view, run the Source Control: Focus on Repositories View command from the Command Palette (⇧⌘P (Windows, Linux Shift+cmd+P)). Configure the scm.alwaysShowRepositories setting to always show the Repositories view in the Source Control view.
For each repository, you can see the active branch, sync status, and access actions like fetch, pull, push, and more.
VS Code automatically detects Git repositories when you open folders that contain them. If you open a folder with multiple repositories (like a monorepo), all repositories appear in the Repositories view.
Repository selection modes
If you prefer to focus on a single repository or worktree at a time, you can switch to single repository mode. In that mode, you only see the changes and graph for the selected repository. When operating in multi-repo mode, the Source Control view shows changes across all repositories. Use the scm.repositories.selectionMode setting to switch between multi-repo and single-repo modes.
Credential helpers
Credential helpers securely store your authentication credentials so you don't have to enter them every time you push or pull. You should set up a credential helper to avoid getting asked for credentials every time VS Code interacts with a remote repository.
Next steps
- Branches and Worktrees - Learn about branch management and parallel development
- Staging and Committing - Master the commit workflow
- Merge Conflicts - Handle conflicts when merging branches
- Working with GitHub - Learn about pull requests and GitHub integration