Set up GitHub Copilot in VS Code
This guide walks you through setting up GitHub Copilot in Visual Studio Code. To use Copilot in VS Code, you need to have access to GitHub Copilot with your GitHub account.
Follow these steps to get started with Copilot in VS Code:
-
Hover over the Copilot icon in the Status Bar and select Use AI Features.
-
Choose a sign-in method and follow the prompts.
-
If you already have a Copilot subscription for your account, VS Code will use that subscription.
-
If you don't have a Copilot subscription yet, you'll be signed up for the Copilot Free plan and get a monthly allowance of inline suggestions and AI credits. Learn more about the different GitHub Copilot plans.
-
-
Start using Copilot in VS Code!
Learn the basics with the VS Code Tutorial.
-
Type
/initin a chat session to set up your project for AI.The
/initcommand analyzes your codebase and creates custom instructions to help the AI generate code that matches your coding practices.
Telemetry in your free version of GitHub Copilot is currently enabled. By default, code suggestions that match public code, including code references in the VS Code and github.com experience, are allowed. You can opt out of telemetry data collection by disabling telemetry in VS Code by setting
telemetry.telemetryLevel
This setting is managed at the organization level. Contact your administrator to change it. to off, or you can adjust both telemetry and code suggestion settings in Copilot Settings.
Use Copilot with a GHE account
If your Copilot subscription is associated with a GitHub Enterprise (GHE) account, you can sign in to Copilot in VS Code with your GHE credentials.
-
If you haven't already, hover over the Copilot icon in the Status Bar and select Use AI Features.
-
In the sign in dialog, choose Continue with GHE.com and provide your GHE instance URL and credentials.
If you need to switch between a GitHub.com account and a GHE account, see Use a different GitHub account per workspace or profile for instructions.
Use a different GitHub account with Copilot
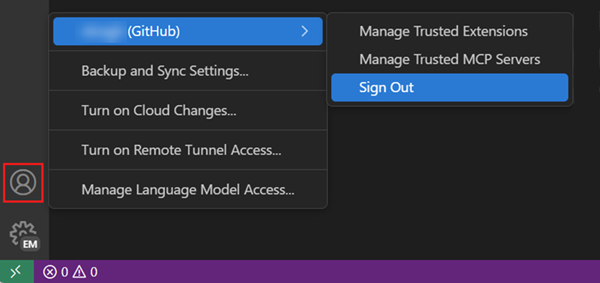
If your Copilot subscription is associated with another GitHub account, follow these steps to sign out of your GitHub account in VS Code, and sign in with another account.
-
Select the Accounts menu in the Activity Bar, and then select Sign out for the account you're currently signed in with.
-
Sign in to your GitHub account using any of the following methods:
-
Select Sign in to use Copilot from the Copilot menu in the Status Bar.

-
Select the Accounts menu in the Activity Bar, and then select Sign in with GitHub to use GitHub Copilot.

-
Run the GitHub Copilot: Sign in command in the Command Palette (⇧⌘P (Windows, Linux Shift+cmd+P)).
-
Use a different GitHub account per workspace or profile
You can use different GitHub accounts for Copilot per VS Code workspace or profile. This is useful if you use Copilot with different accounts for work and personal projects, or if you want to use different accounts for different extensions that use GitHub authentication.
Follow these steps to configure which GitHub account to use for Copilot. This configuration is saved per workspace and per profile.
-
For GitHub.com accounts:
- In the Accounts menu in the Activity Bar, select Manage Extension Account Preferences
- Select GitHub Copilot Chat from the list of extensions
- Choose the GitHub account you want to use for Copilot in the current workspace and profile
-
For GHE.com accounts:
TipIf you only want to use a GHE account for Copilot, follow the steps in Use Copilot with a GHE account to sign in with your GHE account.
-
Run Preferences: Open User Settings (JSON) or Preferences: Open Workspace Settings (JSON) from the Command Palette (⇧⌘P (Windows, Linux Shift+cmd+P))
-
Add the following setting to specify GitHub Enterprise as the authentication provider for Copilot:
"github.copilot.advanced": { "authProvider": "github-enterprise" } -
Re-sign in to your GitHub Enterprise account if you're not already signed in
-
Remove AI features from VS Code
You can disable the built-in AI features in VS Code with the chat.disableAIFeatures setting, similar to how you configure other features in VS Code. This disables and hides features like chat or inline suggestions in VS Code and disables the Copilot extensions. You can configure the setting at the workspace or user level.
Alternatively, use the Learn How to Hide AI Features action from the Chat menu in the title bar to access the setting.
If you have previously disabled the built-in AI features, your choice is respected upon updating to a new version of VS Code.
Disable AI features for a workspace
To disable AI features for a specific workspace, configure the
chat.disableAIFeatures
setting in workspace settings. This setting is available in the Settings editor (⌘, (Windows, Linux cmd+,)), or you can edit the settings.json file in the workspace.
Next steps
- Continue with the Quickstart for using AI to discover the key features for AI-powered development in VS Code.