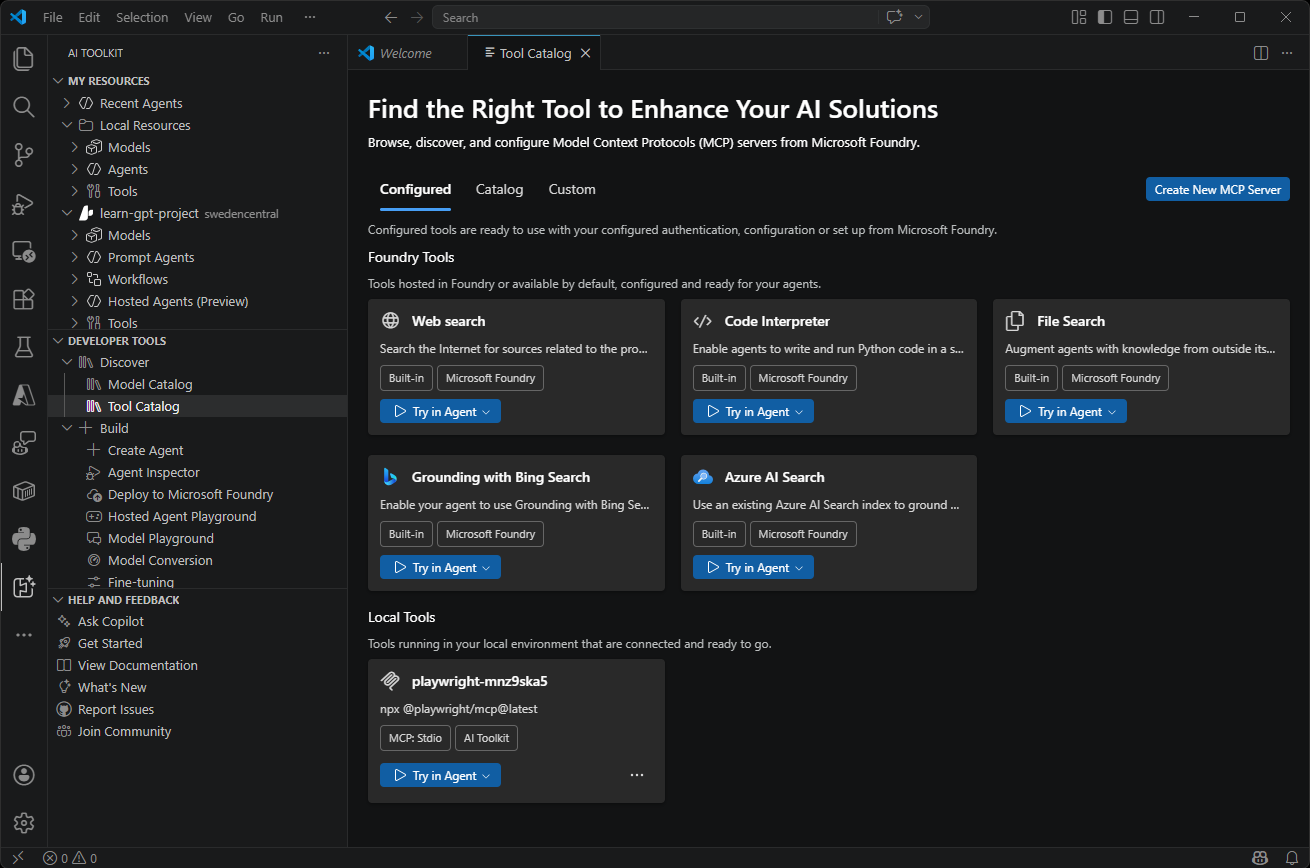
Use Tool Catalog to connect tools and Toolboxes in Foundry Toolkit
Toolbox support is currently in preview and only available in pre-release version of Foundry Toolkit.
Agents often depend on more than one tool. Some tools come from Microsoft Foundry, some run as local Model Context Protocol (MCP) servers, and some belong to a shared Toolbox managed by another team. Tool Catalog in Foundry Toolkit for Visual Studio Code gives you one place to connect those options, attach them to agents, and generate hosted agent samples that are wired to a Toolbox.
In this article, you learn how to connect Foundry tools, register local MCP servers, create and consume Toolboxes, and scaffold a hosted agent sample from a Toolbox so you can move from Agent Builder to runnable code.
A Toolbox is a centrally managed collection of tools exposed through one MCP-compatible endpoint. Use it when multiple agents need the same governed set of tools and credentials.
Key features
| Feature | Description |
|---|---|
| Connect Foundry tools | Add individual tools from your Foundry project to prompt agents in Agent Builder. |
| Connect local MCP servers | Register stdio, HTTP, or SSE MCP servers for local or remote agent workflows. |
| Attach Toolboxes | Reuse a centrally managed collection of tools through one MCP-compatible endpoint. |
| Generate hosted agent samples | Scaffold an Agent Framework Python project that connects to a Toolbox and exposes the Responses protocol. |
| Centralized governance | Keep credentials, policy enforcement, and auditability in Microsoft Foundry instead of in agent code. |
Prerequisites
Before you start, make sure you have:
- Visual Studio Code.
- The Foundry Toolkit extension installed.
- Access to a Microsoft Foundry project. For more information, see Foundry Toolkit for Visual Studio Code.
- Permission to view or attach tools and Toolboxes in your project.
- For hosted agent samples, Python 3.12 or later and Azure CLI signed in with
az login.
Toolbox endpoints are MCP-compatible. Any agent runtime that supports MCP can consume a Toolbox, including agents that you build outside Foundry Toolkit.
Get started
Tool Catalog supports several ways to bring tools into your agents. Choose the option that matches how the tool is hosted and how you want to share it across agents. The following sections walk through each option in detail.
| Option | Use it when |
|---|---|
| Foundry tool | You want to add one tool from your Foundry project to a prompt agent. |
| Local MCP server | You want to use a server that runs locally or at a custom MCP endpoint. |
| Toolbox | You want multiple agents to share the same centrally managed tools, credentials, and policies. |
Connect a Foundry tool
Use this option when you want to add a single tool from your Foundry project to a prompt agent in Agent Builder.
- Select Foundry Toolkit in the Activity Bar.
- Under My Resources, expand Your project name > Tools.
- Select the + icon next to Tools to open Tool Catalog.
- On the Catalog tab, browse the available tools.
- Select the tool that you want to use.
- In the Connect dialog, enter the required values, such as the name, endpoint, parameters, and authentication settings.
- Select Connect.
After the connection is created, the tool is available for your agents.
Connect a local MCP server tool
Register an MCP server that runs locally on your machine or at a custom remote endpoint. Use this option when you want to test an MCP server during development or connect to a server that isn't published to your Foundry project.
- Select Foundry Toolkit in the Activity Bar.
- Under My Resources, expand Local Resources > Tools.
- Select the + icon next to Tools to open Tool Catalog.
- On the Custom tab, choose one of these options:
- Select Edit mcp.json to define a server in
mcp.json. - Select Configure (stdio) to run a local command.
- Select Configure (HTTP or SSE) to connect to a remote endpoint.
- Select Edit mcp.json to define a server in
- Save or complete the configuration.
After you save the configuration, the MCP server appears as an available tool.
Add a tool to an agent
After you connect tools through Tool Catalog, attach them to a specific agent in Agent Builder so the agent can call them at run time.
- Open Agent Builder for an existing agent under My Resources > Your project name > Prompt Agents, or create a new agent under Developer Tools > Build > Create Agent.
- On the Playground tab, in the Tool section, select +.
- In the Select a tool dialog, choose a preconfigured tool, a catalog tool, or a custom tool.
- Configure the tool options.
- Select Add Tool.
The tool is now attached to the agent and can be used during execution.
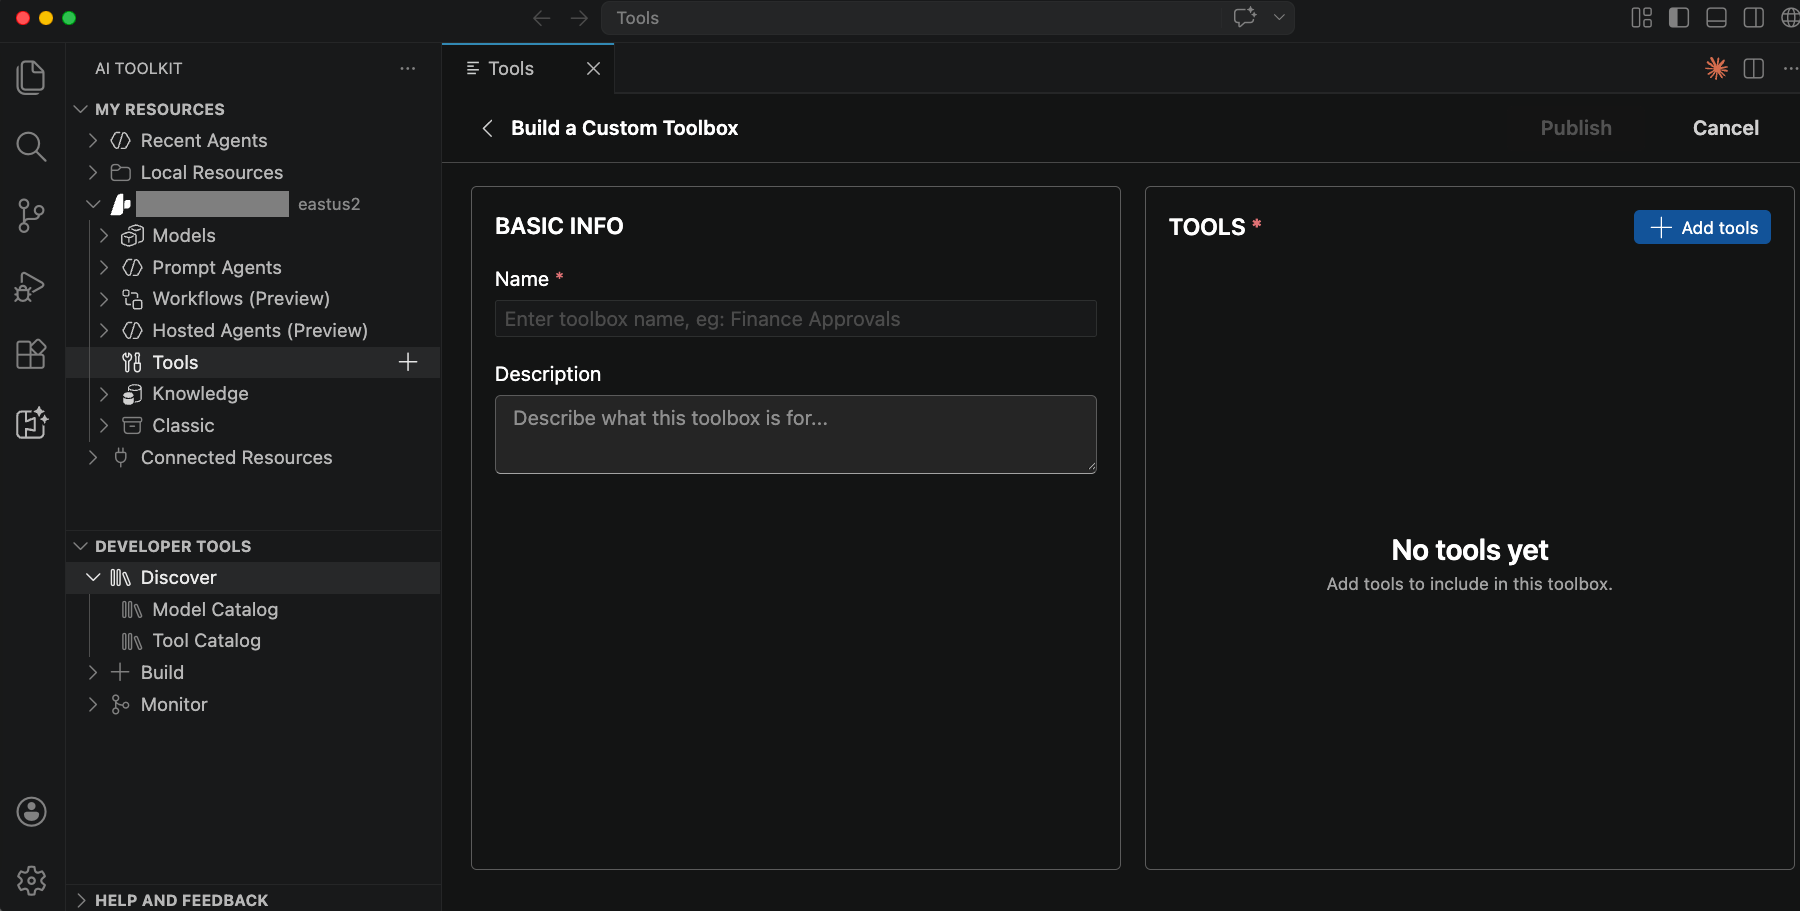
Create a new Toolbox and use it in a hosted agent
Build a custom Toolbox in your Foundry project to group related tools behind a single MCP-compatible endpoint, and then scaffold a hosted agent that consumes it.
- Select Foundry Toolkit in the Activity Bar.
- Under My Resources, expand Your project name > Tools.
- Select the + Add Toolbox icon to create a new Toolbox.
- On the Build a Custom Toolbox tab, enter the Toolbox name and description, add tools, and then select Publish.
- Go back to the Tools page, identify your new Toolbox, and select Scaffold code template to create a hosted agent that connects to the Toolbox.
Attach a Toolbox instead of wiring the same tools into multiple agents one by one. When the Toolbox owner updates the Toolbox, consuming agents pick up the change without separate agent edits.
Copy the Toolbox endpoint
After you create a Toolbox, you can copy its MCP-compatible endpoint from Foundry Toolkit.
- Select Foundry Toolkit in the Activity Bar.
- Under My Resources, expand Your project name > Tools.
- On the Toolboxes tab, locate your Toolbox.
- In the Endpoint URL column, copy the endpoint.
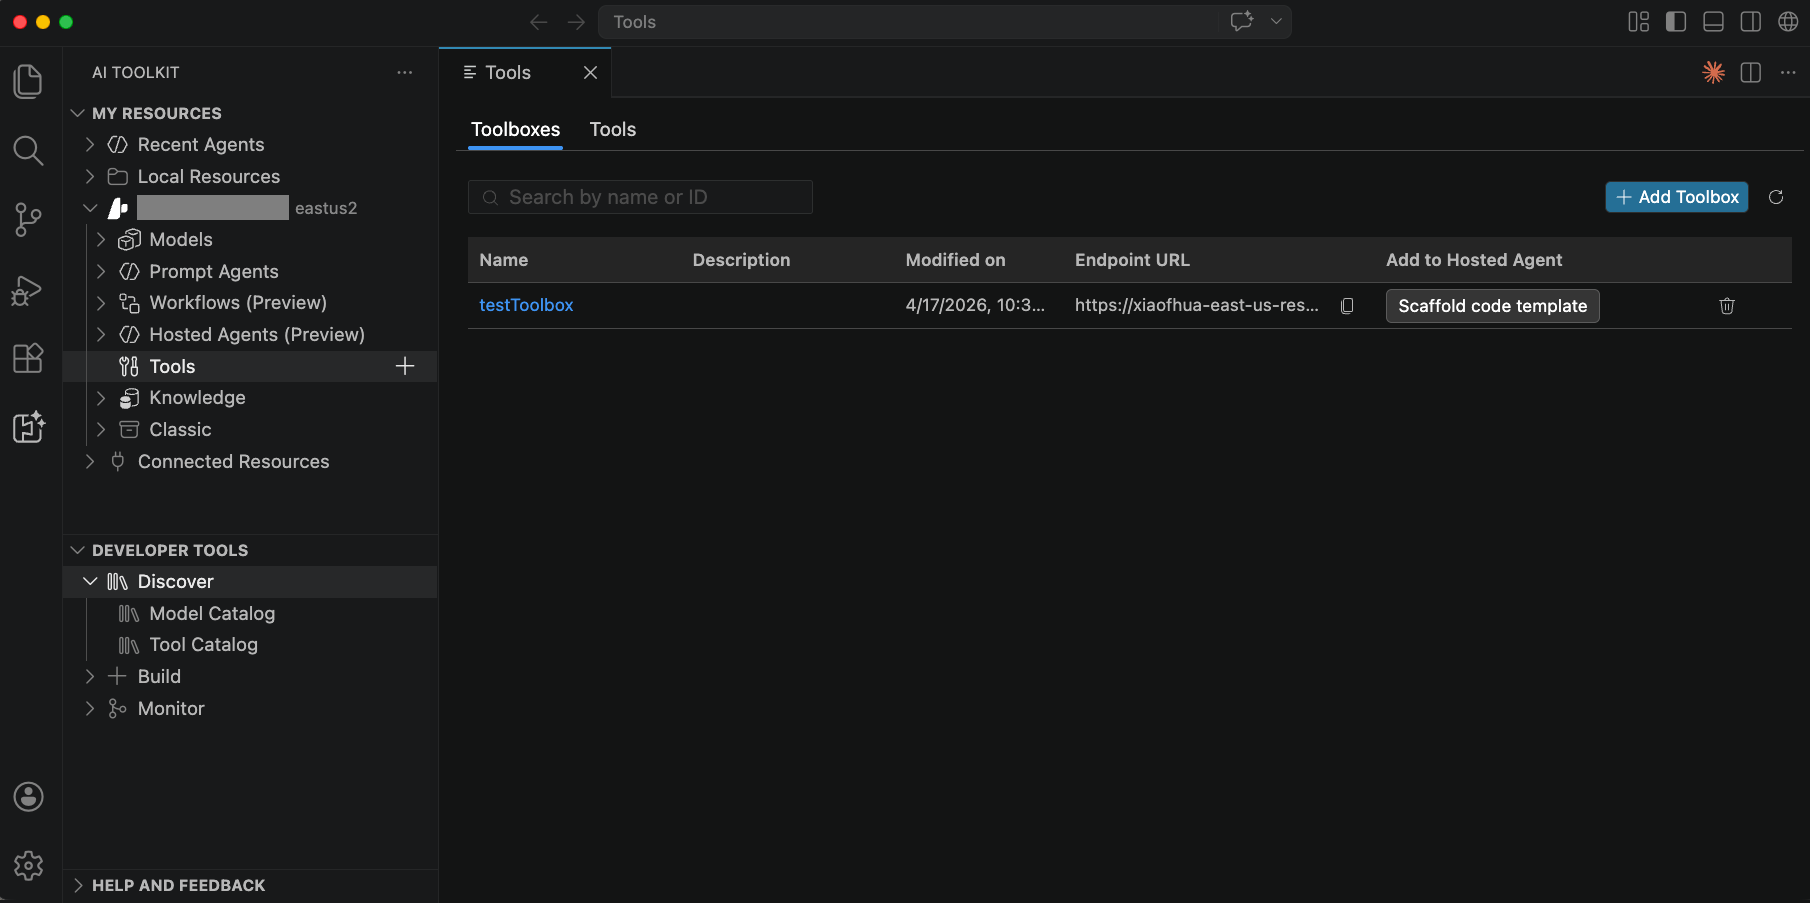
The Endpoint URL value is the Toolbox consumer endpoint. Any agent runtime that supports MCP can use this endpoint to connect to the Toolbox.
Generate a hosted agent sample that uses a Toolbox
Foundry Toolkit can scaffold a runnable hosted agent project that is already wired to a Toolbox. The generated project uses the Agent Framework and exposes the responses protocol, so you can move from Agent Builder to code, debug locally, and deploy back to Microsoft Foundry.
- Select Foundry Toolkit in the Activity Bar.
- Under My Resources, expand Your project name > Tools and open the Toolbox that you want to consume.
- Select Scaffold code template.
- In the Command Palette, select a project folder when prompted.
The generated project includes the hosted agent entry point, deployment files, and a README.md with the exact setup, run, and deployment steps for that scaffold.
Run locally
Follow the generated README.md to install dependencies, configure environment variables, and sign in to Azure. Then start the agent in one of these ways:
- Press
F5in VS Code and select Debug Local Agent HTTP Server. - Run
python main.pyfrom the terminal.
Use Agent Inspector with the F5 flow when you want an interactive UI for sending messages, viewing tool calls, and debugging agent behavior with breakpoints.
Deploy
Follow the generated README.md for the scaffold-specific deployment steps. You can deploy the project in either of these ways:
- Open the Command Palette, run Microsoft Foundry: Deploy Hosted Agent, and follow the prompts.
- In the Activity Bar, select Foundry Toolkit, select Deploy To Microsoft Foundry, and follow the prompts.
- Open GitHub Copilot Chat and ask it to deploy the hosted agent to Microsoft Foundry. Copilot uses the
microsoft-foundryskill to build the Docker image, push it, and register the agent.
The generated project stores hosted agent settings in agent.yaml and agent.manifest.yaml.
Toolbox MCP requests require the Foundry-Features: Toolboxes=V1Preview header. The generated agent handles this for you. You might also see a startup warning if no Application Insights connection is configured. The agent continues to run normally.