Resolve merge conflicts in VS Code
Merge conflicts occur when Git cannot automatically combine changes from different branches. VS Code provides several tools to help you identify and resolve these conflicts efficiently.
Learn how to resolve merge conflicts in Visual Studio Code using inline editor actions, the 3-way merge editor, and AI-assisted resolution.
Understanding merge conflicts
A merge conflict happens when Git encounters competing changes that it cannot automatically resolve. Common scenarios include:
- Two branches modify the same lines in a file
- One branch deletes a file that another branch modifies
- Two branches add different content at the same location
When you attempt to merge, rebase, pull, or cherry-pick commits that contain conflicting changes, Git pauses the operation and marks the conflicts for you to resolve manually.
Learn more about creating and managing branches to organize your development work and minimize merge conflicts.
Recognize conflicts in VS Code
When merge conflicts occur, VS Code provides multiple visual indicators to help you identify and resolve them. Files with conflicts appear in the Source Control view under a Merge Changes section.
Editor conflict markers
When you open a file with conflicts, VS Code highlights the conflicting sections with the following markers:
<<<<<<< HEAD(or current branch name): marks the start of your current branch's changes=======: separates the two conflicting versions>>>>>>> branch-name: marks the end of the incoming branch's changes
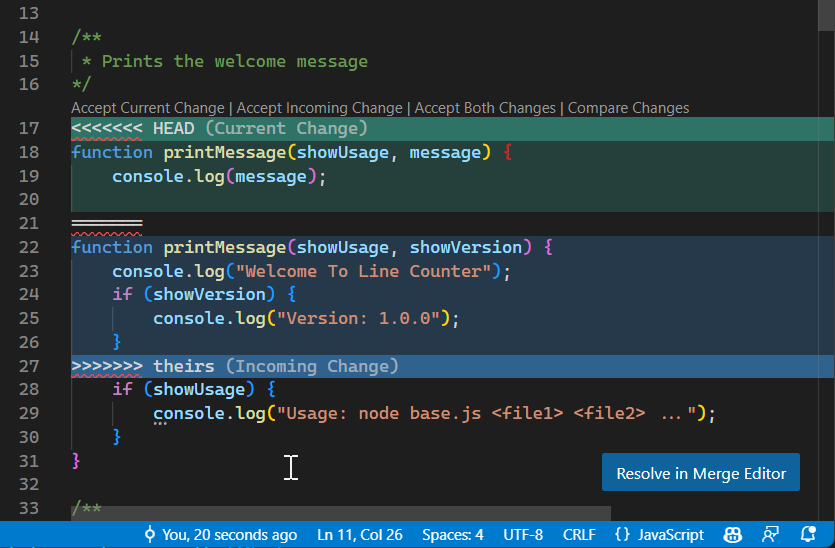
CodeLens actions
Above each conflict, VS Code displays CodeLens actions that let you quickly resolve the conflict:
- Accept Current Change: keep only your branch's version
- Accept Incoming Change: keep only the incoming branch's version
- Accept Both Changes: keep both versions, one after the other
- Compare Changes: open a diff view to see the differences side-by-side
Resolve conflicts with inline actions
For simple conflicts, you can resolve them directly in the editor using the CodeLens actions:
-
Open a file with conflicts from the Source Control view
-
Review the conflicting sections marked with conflict markers
-
Select one of the CodeLens actions above the conflict:
- Accept Current Change to keep your version
- Accept Incoming Change to keep the incoming version
- Accept Both Changes to keep both versions
-
Repeat for each conflict in the file
-
Save the file when all conflicts are resolved
After resolving conflicts in a file, the conflict markers disappear and you can stage the file which moves to the Staged Changes section in the Source Control view. You can then proceed to commit the changes.
For more complex conflicts where you need to combine parts of both changes, you can manually edit the file. Delete the conflict markers (<<<<<<<, =======, >>>>>>>) and edit the content to create the desired result.
Use the 3-way merge editor
For more complex conflicts or when you want a side-by-side view of all changes, use the 3-way merge editor. This editor provides a comprehensive view with three panels:
- Incoming (left): changes from the branch being merged
- Current (right): changes from your current branch
- Result (bottom): the merged result that will be saved
Open the merge editor
To open the 3-way merge editor:
-
Select a file with conflicts in the Source Control view
-
Select Open in Merge Editor from the context menu, or select the Resolve in Merge Editor button that appears at the top of the editor
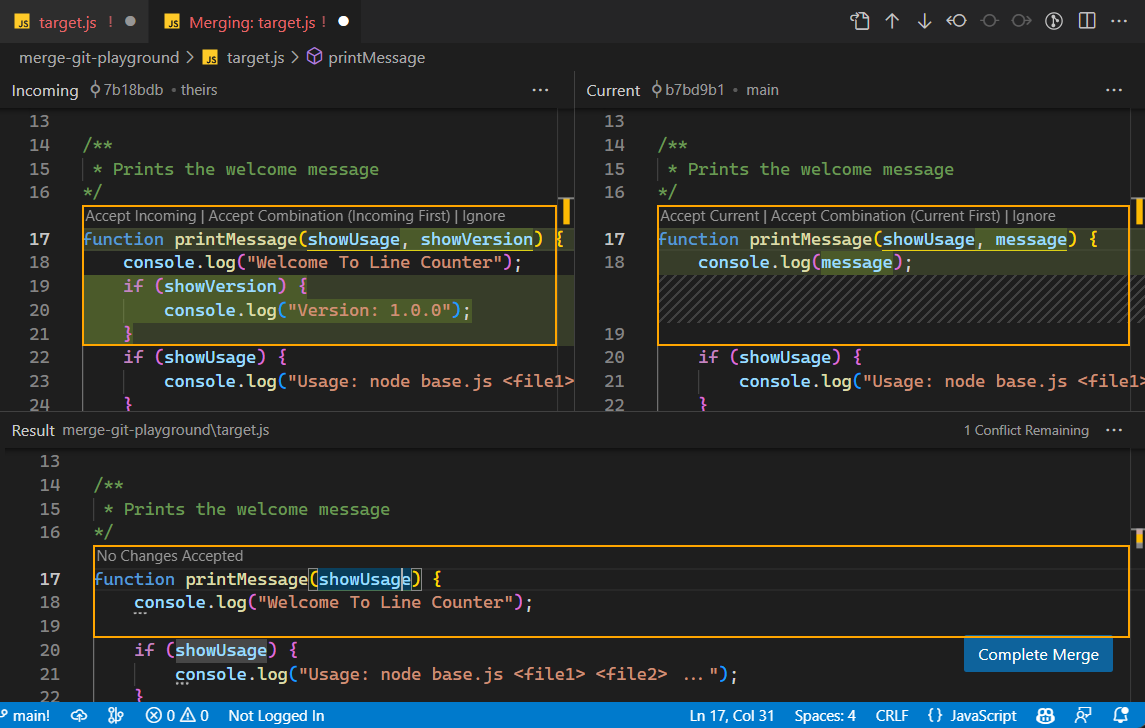
Accept changes in the merge editor
The merge editor displays conflicts with checkboxes next to each conflicting change. Use these checkboxes to choose which changes to accept:
-
Review the changes in the Incoming and Current panels
-
Use the editor CodeLens actions to select which changes to accept:
- Accept either the Incoming or Current change
- Accept a Combination of both changes to smartly merge both changes
- Ignore the change to leave it out of the result
-
The Result panel at the bottom updates automatically to show your selections
-
Use the conflict count indicator in the right of the result editor to keep track of how many unresolved conflicts are remaining.
-
When all conflicts are resolved, select Complete Merge to stage the changes and close the merge editor
Manual edits in the merge editor
Sometimes you need to combine parts of both changes or create a completely new resolution. You can edit the Result panel directly:
-
Select anywhere in the Result panel to place your cursor
-
Edit the content as needed, combining elements from both changes or writing new code
Use the Ignore buttons in the Incoming or Current panels to hide changes you don't want to accept. This helps focus on the relevant conflicts.
Alternative layouts
Selecting the three dots (···) in the top right corner of the merge editor opens a context menu with additional options. You can switch to a vertical layout and display the base view, which shows the state of the file before any changes were made.
The three dots next to Incoming, Current, and Result offer options for each view, such as showing a side-by-side diff against base, accepting all changes, or resetting the result.
Resolve conflicts with AI (experimental)
AI-assisted conflict resolution is an experimental feature and requires a GitHub Copilot subscription.
VS Code can use AI to help resolve merge conflicts automatically. This feature analyzes both versions of the conflicting changes and proposes a resolution:
-
Open a file with conflicts in the editor
-
Select the Resolve Merge Conflict with AI button at the top of the editor
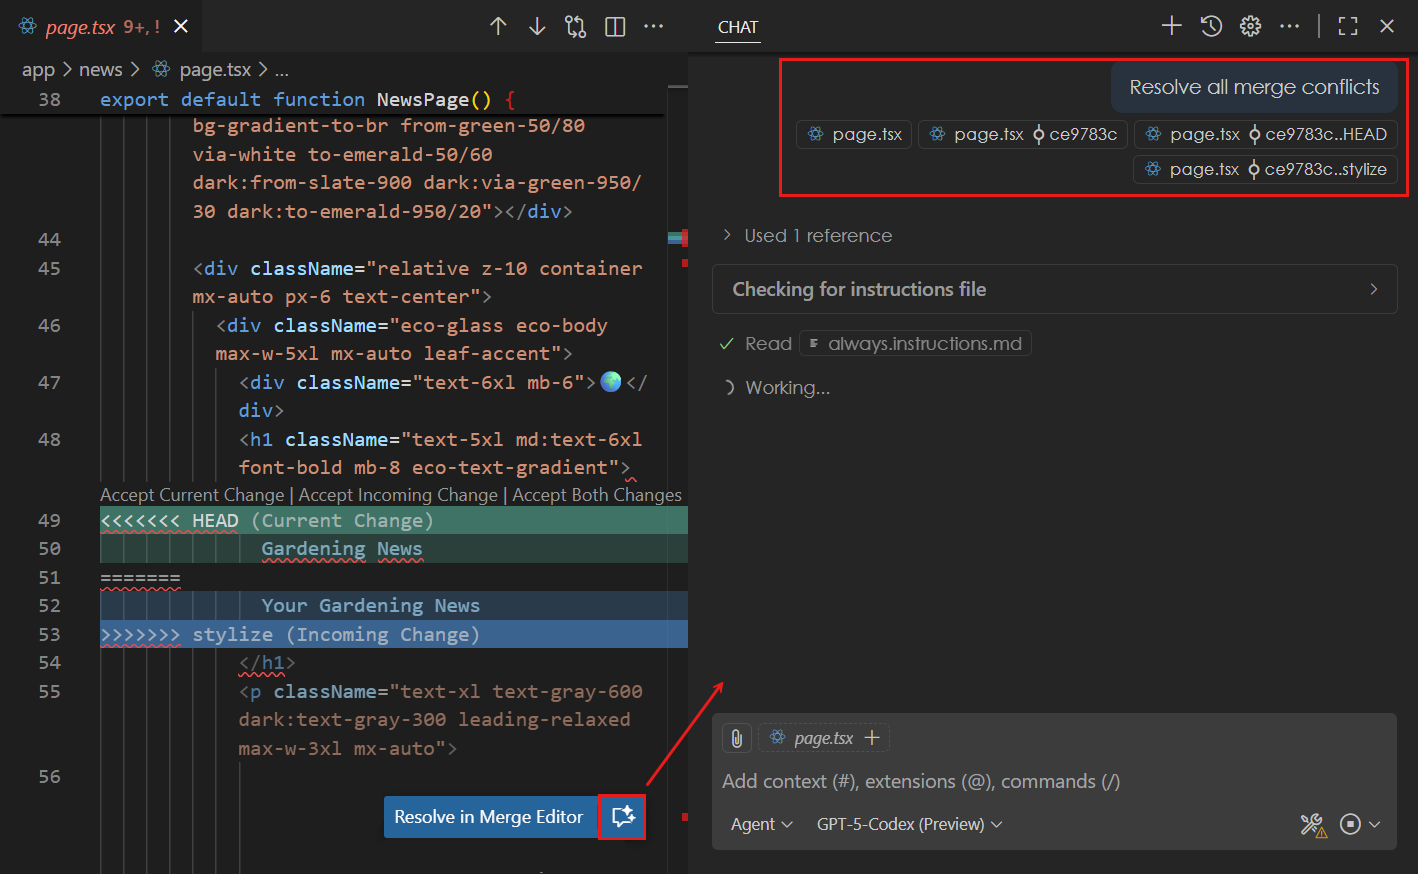
-
VS Code opens the Chat view and starts an agentic flow to analyze the conflict
-
Review the proposed changes in the editor
-
Accept the resolution or make manual adjustments as needed
The AI considers the merge base (the common ancestor of both branches) and the changes from each branch to generate a resolution that attempts to preserve the intent of both changes.
Complete the merge operation
After resolving all conflicts, you need to complete the merge operation by committing the changes:
-
Verify that all conflicting files have been resolved and are in the Staged Changes section
-
Enter a commit message and select Commit to complete the merge
If you need to abandon a merge operation, select Git: Abort Merge from the Command Palette. This returns your repository to its state before the merge began.
Configure VS Code as default merge tool
You can set VS Code as your default Git merge tool by running the following commands in your terminal. When you perform a merge in the command-line that results in conflicts, Git will open VS Code's merge editor to help you resolve them.
git config --global merge.tool vscode
git config --global mergetool.vscode.cmd 'code --wait $MERGED'
To use VS Code as your default diff tool for Git, run:
git config --global diff.tool vscode
git config --global difftool.vscode.cmd 'code --wait --diff $LOCAL $REMOTE'
Next steps
- Branches and Worktrees - Learn about branch management and strategies to minimize conflicts
- Staging and Committing - Learn about staging changes and creating commits
- Repositories and Remotes - Learn about working with remote repositories
- Source Control Overview - Explore other Git features in VS Code
- Copilot in VS Code - Discover more AI-powered development features