Chat Participant API
Chat participants are specialized assistants that enable users to extend chat in VS Code with domain-specific experts. Users invoke a chat participant by @-mentioning it, and the participant is then responsible for handling the user's natural language prompt.
In this extension guide, you learn how to create a chat participant by using the Chat Participant API.
VS Code has several built-in chat participants like @vscode, @terminal, or @workspace. They are optimized to answer questions about their respective domains.
Chat participants are different from language model tools that are invoked as part of the LLM orchestrating the steps needed to resolve the user's chat prompt. Chat participants receive the user's prompt and orchestrate the tasks that are needed themselves.
Why implement a chat participant in your extension?
Implementing a chat participant in your extension has several benefits:
- Extend chat with specialized, domain-specific knowledge and expertise. For example, the built-in
@vscodeparticipant has knowledge about VS Code and its extension APIs. - Own conversation by managing the end-to-end user chat prompt and response.
- Deeply integrate with VS Code by using the broad set of extension APIs. For example, use the debug APIs to get the current debugging context and use it as part of the tool's functionality.
- Distribute and deploy chat participants via the Visual Studio Marketplace, providing a reliable and seamless experience for users. Users don't need a separate installation and update process.
You might consider implementing a language model tool or MCP server if you want to provide domain-specific capabilities that can be invoked automatically as part of an autonomous, agentic coding session. See the AI Extensibility Overview for details on the different options and how to decide which approach to use.
Parts of the chat user experience
The following screenshot shows the different chat concepts in the Visual Studio Code chat experience for the sample extension.
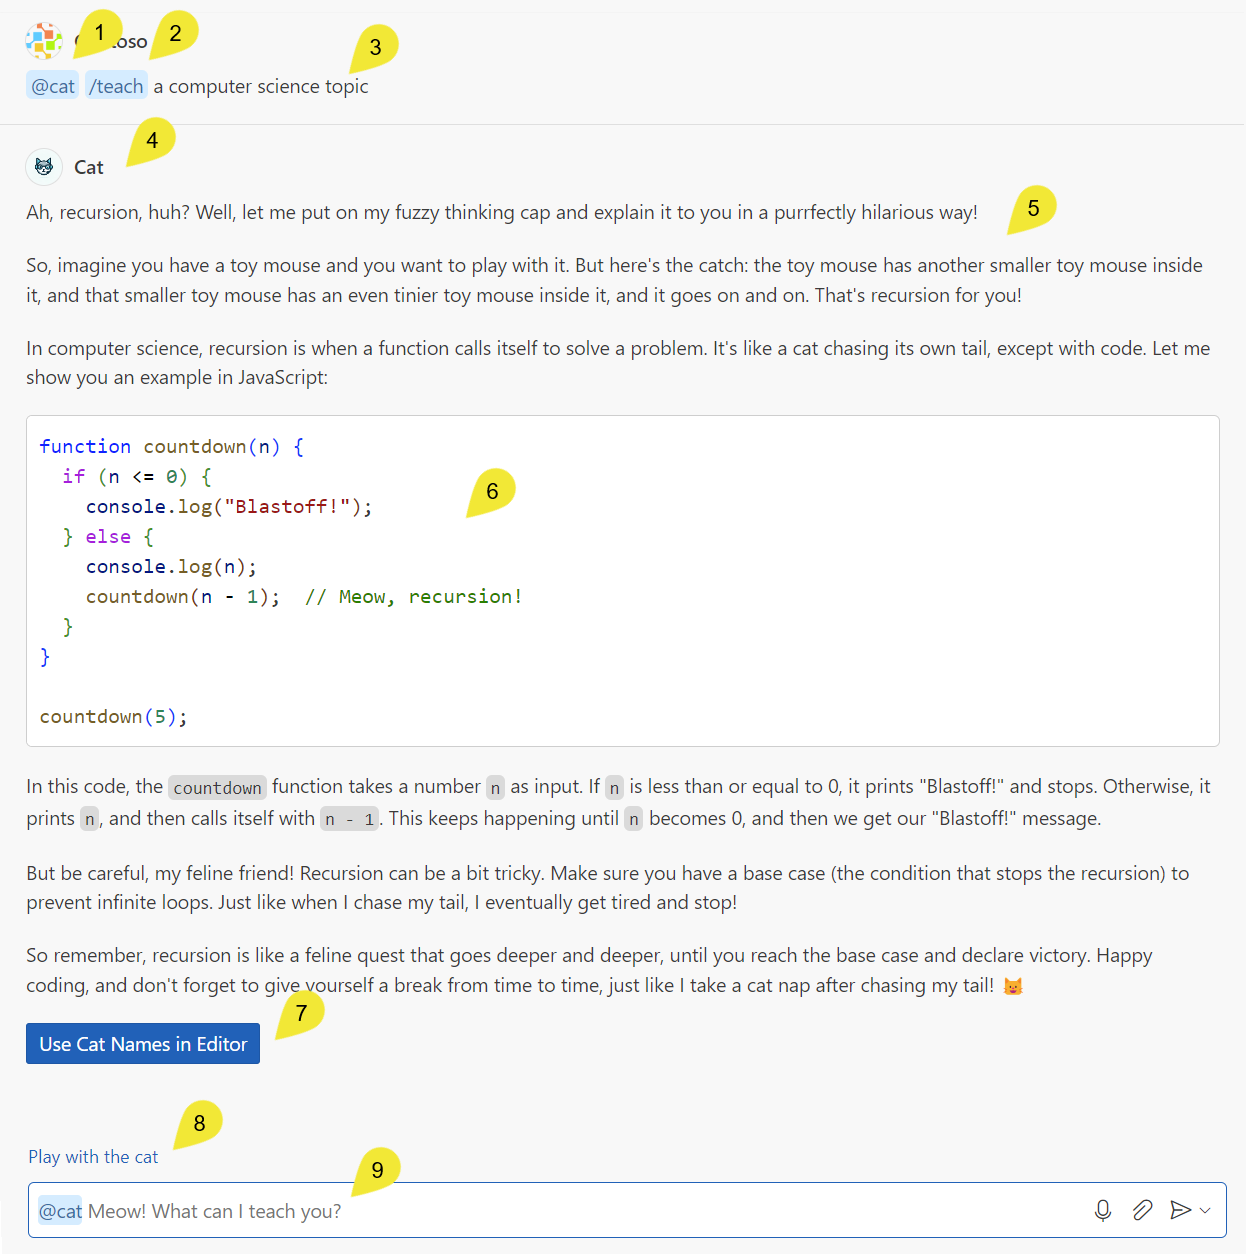
- Use the
@syntax to invoke the@catchat participant - Use the
/syntax to call the/teachcommand - User-provided query, also known as the user prompt
- Icon and participant
fullNamethat indicate that Copilot is using the@catchat participant - Markdown response, provided by
@cat - Code fragment included in the markdown response
- Button included in the
@catresponse, the button invokes a VS Code command - Suggested follow-up questions provided by the chat participant
- Chat input field with the placeholder text provided by the chat participant's
descriptionproperty
Create a chat participant
Implementing a chat participant consists of the following parts:
- Define the chat participant in the
package.jsonfile of your extension. - Implement a request handler to process the user's chat prompt and return a response.
- (Optional) Implement chat slash commands to provide users with a shorthand notation for common tasks.
- (Optional) Define suggested follow-up questions.
- (Optional) Implement participant detection where VS Code automatically routes a chat request to the appropriate chat participant without explicit mention from the user.
You can get started with a basic example project.
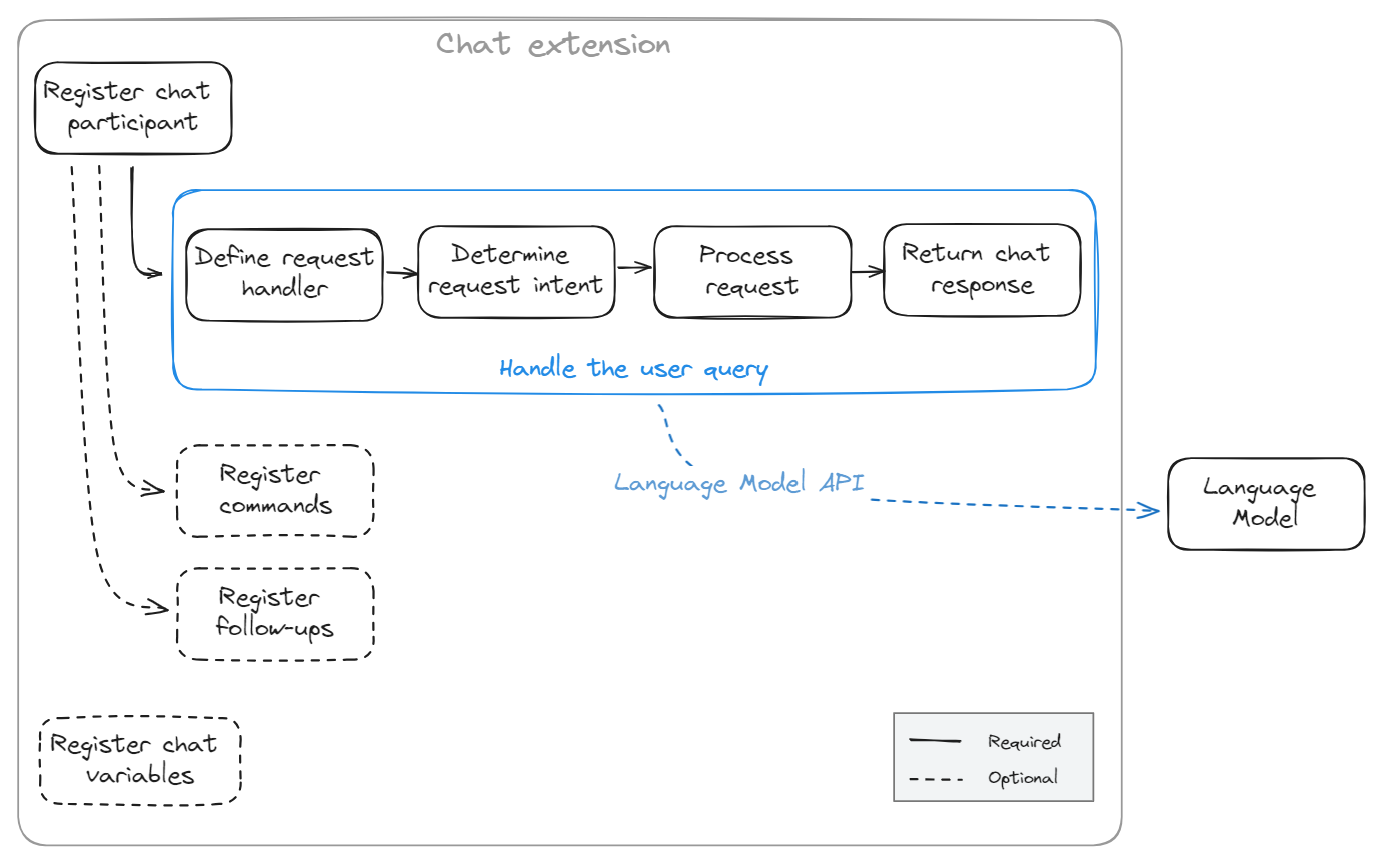
1. Register the chat participant
The first step to create a chat extension is to register it in your package.json, with the following properties:
id: A unique identifier for the chat participant, as defined in thepackage.jsonfile.name: A short name for the chat participant, used for @-mentions in the chat.fullName: The full name of the chat participant, displayed in the title area of the response.description: A brief description of the chat participant's purpose, used as placeholder text in the chat input field.isSticky: A boolean value indicating whether the chat participant is persistent in the chat input field after responding.
"contributes": {
        "chatParticipants": [
            {
                "id": "chat-sample.my-participant",
                "name": "my-participant",
                "fullName": "My Participant",
                "description": "What can I teach you?",
                "isSticky": true
            }
        ]
}
We suggest using a lowercase name and using title case for the fullName to align with existing chat participants. Get more info about the naming conventions for chat participants.
Some participant names are reserved. If you use such a reserved name, VS Code displays the fully qualified name of your chat participant (including the extension ID).
2. Implement a request handler
Implement the chat participant by using the Chat Participant API. This consists of the following steps:
-
On activation of the extension, create the participant with
vscode.chat.createChatParticipant.Provide the ID, which you defined in
package.json, and a reference to the request handler that you implement in the next step.export function activate(context: vscode.ExtensionContext) { // Register the chat participant and its request handler const cat = vscode.chat.createChatParticipant('chat-sample.my-participant', handler); // Optionally, set some properties for @cat cat.iconPath = vscode.Uri.joinPath(context.extensionUri, 'cat.jpeg'); // Add the chat request handler here } -
In the
activatefunction, define thevscode.ChatRequestHandlerrequest handler.The request handler is responsible for processing the user's chat requests in the VS Code Chat view. Each time a user enters a prompt in the chat input field, the chat request handler is invoked.
const handler: vscode.ChatRequestHandler = async ( request: vscode.ChatRequest, context: vscode.ChatContext, stream: vscode.ChatResponseStream, token: vscode.CancellationToken ): Promise<ICatChatResult> => { // Chat request handler implementation goes here }; -
Determine the user's intent from
vscode.ChatRequest.To determine the intent of the user's request, you can reference the
vscode.ChatRequestparameter to access the user's prompt text, commands, and chat location.Optionally, you can take advantage of the language model to determine the user's intent, rather than using traditional logic. As part of the
requestobject you get a language model instance that the user picked in the chat model dropdown. Learn how you can use the Language Model API in your extension.The following code snippet shows the basic structure of first using the command, and then the user prompt to determine the user intent:
const handler: vscode.ChatRequestHandler = async ( request: vscode.ChatRequest, context: vscode.ChatContext, stream: vscode.ChatResponseStream, token: vscode.CancellationToken ): Promise<ICatChatResult> => { // Test for the `teach` command if (request.command == 'teach') { // Add logic here to handle the teaching scenario doTeaching(request.prompt, request.variables); } else { // Determine the user's intent const intent = determineUserIntent(request.prompt, request.variables, request.model); // Add logic here to handle other scenarios } }; -
Add logic to process the user request.
Often, chat extensions use the
request.modellanguage model instance to process the request. In this case, you might adjust the language model prompt to match the user's intent.Alternately, you can implement the extension logic by invoking a backend service, by using traditional programming logic, or by using a combination of all these options. For example, you could invoke a web search to gather additional information, which you then provide as context to the language model.
While processing the current request, you might want to refer to previous chat messages. For example, if a previous response returned a C# code snippet, the user's current request might be "give the code in Python". Learn how you can use the chat message history.
If you want to process a request differently based on the location of the chat input (Chat view, Quick Chat, inline chat), you can use the
locationproperty of thevscode.ChatRequest. For example, if the user sends a request from the terminal inline chat, you might look up a shell command. Whereas, if the user uses the Chat view, you could return a more elaborate response. -
Return the chat response to the user.
Once you've processed the request, you have to return a response to the user in the Chat view. You can use streaming to respond to user queries.
Responses can contain different content types: Markdown, images, references, progress, buttons, and file trees.
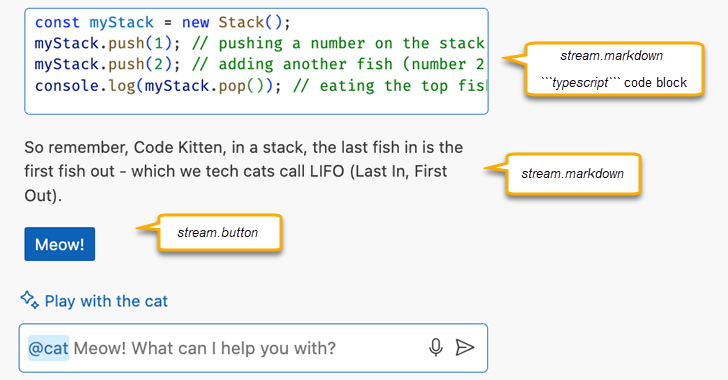
An extension can use the response stream in the following way:
stream.progress('Picking the right topic to teach...');
stream.markdown(`\`\`\`typescript
const myStack = new Stack();
myStack.push(1); // pushing a number on the stack (or let's say, adding a fish to the stack)
myStack.push(2); // adding another fish (number 2)
console.log(myStack.pop()); // eating the top fish, will output: 2
\`\`\`
So remember, Code Kitten, in a stack, the last fish in is the first fish out - which we tech cats call LIFO (Last In, First Out).`);

stream.button({
  command: 'cat.meow',
  title: vscode.l10n.t('Meow!'),
  arguments: []
});
Get more info about the supported chat response output types.
In practice, extensions typically send a request to the language model. Once they get a response from the language model, they might further process it, and decide if they should stream anything back to the user. The VS Code Chat API is streaming-based, and is compatible with the streaming Language Model API. This allows extensions to report progress and results continuously with the goal of having a smooth user experience. Learn how you can use the Language Model API.
3. Register slash commands
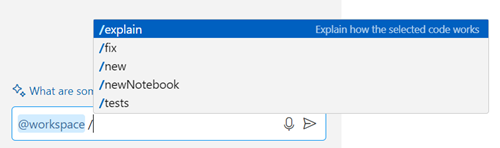
A chat participant can contribute slash commands, which are shortcuts to specific functionality provided by the extension. Users can reference slash commands in chat by using the / syntax, for example /explain.
One of the tasks when answering questions is to determine the user intent. For example, VS Code could infer that Create a new workspace with Node.js Express Pug TypeScript means that you want a new project, but @workspace /new Node.js Express Pug TypeScript is more explicit, concise, and saves typing time. If you type / in the chat input field, VS Code offers a list of registered commands with their description.
Chat participants can contribute slash commands with their description by adding them in package.json:
"contributes": {
    "chatParticipants": [
        {
            "id": "chat-sample.cat",
            "name": "cat",
            "fullName": "Cat",
            "description": "Meow! What can I teach you?",
            "isSticky": true,
            "commands": [
                {
                    "name": "teach",
                    "description": "Pick at random a computer science concept then explain it in purfect way of a cat"
                },
                {
                    "name": "play",
                    "description": "Do whatever you want, you are a cat after all"
                }
            ]
        }
    ]
}
Get more info about the naming conventions for slash commands.
4. Register follow-up requests
After each chat request, VS Code invokes follow-up providers to get suggested follow-up questions to show to the user. The user can then select the follow-up question, and immediately send it to the chat extension. Use the ChatFollowupProvider API to register follow-up prompts of type ChatFollowup.
The following code snippet shows how to register follow-up requests in a chat extension:
cat.followupProvider = {
    provideFollowups(result: ICatChatResult, context: vscode.ChatContext, token: vscode.CancellationToken) {
        if (result.metadata.command === 'teach') {
            return [{
                prompt: 'let us play',
                label: vscode.l10n.t('Play with the cat')
            } satisfies vscode.ChatFollowup];
        }
    }
};
Follow-ups should be written as questions or directions, not just concise commands.
5. Implement participant detection
To make it easier to use chat participants with natural language, you can implement participant detection. Participant detection is a way to automatically route the user's question to a suitable participant, without having to explicitly mention the participant in the prompt. For example, if the user asks "How do I add a login page to my project?", the question would be automatically routed to the @workspace participant because it can answer questions about the user's project.
VS Code uses the chat participant description and examples to determine which participant to route a chat prompt to. You can specify this information in the disambiguation property in the extension package.json file. The disambiguation property contains a list of detection categories, each with a description and examples.
| Property | Description | Examples |
|---|---|---|
category |
The detection category. If the participant serves different purposes, you can have a category for each. |
|
description |
A detailed description of the kinds of questions that are suitable for this participant. |
|
examples |
A list of representative example questions. |
|
You can define participant detection for the overall chat participant, for specific commands, or a combination of both.
The following code snippet shows how to implement participant detection at the participant level.
"contributes": {
    "chatParticipants": [
        {
            "id": "chat-sample.cat",
            "fullName": "Cat",
            "name": "cat",
            "description": "Meow! What can I teach you?",

            "disambiguation": [
                {
                    "category": "cat",
                    "description": "The user wants to learn a specific computer science topic in an informal way.",
                    "examples": [
                        "Teach me C++ pointers using metaphors",
                        "Explain to me what is a linked list in a simple way",
                        "Can you explain to me what is a function in programming?"
                    ]
                }
            ]
        }
    ]
}
Similarly, you can also configure participant detection at the command level by adding a disambiguation property for one or more items in the commands property.
Apply the following guidelines to improve the accuracy of participant detection for your extension:
- Be specific: The description and examples should be as specific as possible to avoid conflicts with other participants. Avoid using generic terminology in the participant and command information.
- Use examples: The examples should be representative of the kinds of questions that are suitable for the participant. Use synonyms and variations to cover a wide range of user queries.
- Use natural language: The description and examples should be written in natural language, as if you were explaining the participant to a user.
- Test the detection: Test the participant detection with a variation of example questions and verify there's no conflict with built-in chat participants.
Built-in chat participants take precedence for participant detection. For example, a chat participant that operates on workspace files might conflict with the built-in @workspace participant.
Use the chat message history
Participants have access to the message history of the current chat session. A participant can only access messages where it was mentioned. A history item is either a ChatRequestTurn or a ChatResponseTurn. For example, use the following code snippet to retrieve all the previous requests that the user sent to your participant in the current chat session:
const previousMessages = context.history.filter(h => h instanceof vscode.ChatRequestTurn);
History will not be automatically included in the prompt, it is up to the participant to decide if it wants to add history as additional context when passing messages to the language model.
Supported chat response output types
To return a response to a chat request, you use the ChatResponseStream parameter on the ChatRequestHandler.
The following list provides the output types for a chat response in the Chat view. A chat response can combine multiple different output types.
-
Markdown
Render a fragment of Markdown text simple text or images. You can use any Markdown syntax that is part of the CommonMark specification. Use the
ChatResponseStream.markdownmethod and provide the Markdown text.Example code snippet:
// Render Markdown text stream.markdown('# This is a title \n'); stream.markdown('This is stylized text that uses _italics_ and **bold**. '); stream.markdown('This is a [link](https://code.visualstudio.com).\n\n'); stream.markdown(''); -
Code block
Render a code block that supports IntelliSense, code formatting, and interactive controls to apply the code to the active editor. To show a code block, use the
ChatResponseStream.markdownmethod and apply the Markdown syntax for code blocks (using backticks).Example code snippet:
// Render a code block that enables users to interact with stream.markdown('```bash\n'); stream.markdown('```ls -l\n'); stream.markdown('```'); -
Command link
Render a link inline in the chat response that users can select to invoke a VS Code command. To show a command link, use the
ChatResponseStream.markdownmethod and use the Markdown syntax for links[link text](command:commandId), where you provide the command ID in the URL. For example, the following link opens the Command Palette:[Command Palette](command:workbench.action.showCommands).To protect against command injection when you load the Markdown text from a service, you have to use a
vscode.MarkdownStringobject with theisTrustedproperty set to the list of trusted VS Code command IDs. This property is required to enable the command link to work. If theisTrustedproperty is not set or a command is not listed, the command link will not work.Example code snippet:
// Use command URIs to link to commands from Markdown
let markdownCommandString: vscode.MarkdownString = new vscode.MarkdownString(
  `[Use cat names](command:${CAT_NAMES_COMMAND_ID})`
);
markdownCommandString.isTrusted = { enabledCommands: [CAT_NAMES_COMMAND_ID] };

stream.markdown(markdownCommandString);
If the command takes arguments, you need to first JSON encode the arguments and then encode the JSON string as a URI component. You then append the encoded arguments as a query string to the command link.
// Encode the command arguments const encodedArgs = encodeURIComponent(JSON.stringify(args)); // Use command URIs with arguments to link to commands from Markdown let markdownCommandString: vscode.MarkdownString = new vscode.MarkdownString( `[Use cat names](command:${CAT_NAMES_COMMAND_ID}?${encodedArgs})` ); markdownCommandString.isTrusted = { enabledCommands: [CAT_NAMES_COMMAND_ID] }; stream.markdown(markdownCommandString); -
Command button
Render a button that invokes a VS Code command. The command can be a built-in command or one that you define in your extension. Use the
ChatResponseStream.buttonmethod and provide the button text and command ID.Example code snippet:
// Render a button to trigger a VS Code command stream.button({ command: 'my.command', title: vscode.l10n.t('Run my command') }); -
File tree
Render a file tree control that lets users preview individual files. For example, to show a workspace preview when proposing to create a new workspace. Use the
ChatResponseStream.filetreemethod and provide an array of file tree elements and the base location (folder) of the files.Example code snippet:
// Create a file tree instance var tree: vscode.ChatResponseFileTree[] = [ { name: 'myworkspace', children: [{ name: 'README' }, { name: 'app.js' }, { name: 'package.json' }] } ]; // Render the file tree control at a base location stream.filetree(tree, baseLocation); -
Progress message
Render a progress message during a long-running operation to provide the user with intermediate feedback. For example, to report the completion of each step in a multi-step operation. Use the
ChatResponseStream.progressmethod and provide the message.Example code snippet:
// Render a progress message stream.progress('Connecting to the database.'); -
Reference
Add a reference for an external URL or editor location in the list references to indicate which information you use as context. Use the
ChatResponseStream.referencemethod and provide the reference location.Example code snippet:
const fileUri: vscode.Uri = vscode.Uri.file('/path/to/workspace/app.js'); // On Windows, the path should be in the format of 'c:\\path\\to\\workspace\\app.js' const fileRange: vscode.Range = new vscode.Range(0, 0, 3, 0); const externalUri: vscode.Uri = vscode.Uri.parse('https://code.visualstudio.com'); // Add a reference to an entire file stream.reference(fileUri); // Add a reference to a specific selection within a file stream.reference(new vscode.Location(fileUri, fileRange)); // Add a reference to an external URL stream.reference(externalUri); -
Inline reference
Add an inline reference to a URI or editor location. Use the
ChatResponseStream.anchormethod and provide the anchor location and optional title. To reference a symbol (for example, a class or variable), you would use a location in an editor.Example code snippet:
const symbolLocation: vscode.Uri = vscode.Uri.parse('location-to-a-symbol');

// Render an inline anchor to a symbol in the workspace
stream.anchor(symbolLocation, 'MySymbol');
Important: Images and links are only available when they originate from a domain that is in the trusted domain list. Get more info about link protection in VS Code.
Implement tool calling
To respond to a user request, a chat extension can invoke language model tools. Learn more about language model tools and the tool-calling flow.
You can implement tool calling in two ways:
- By using the
@vscode/chat-extension-utilslibrary to simplify the process of calling tools in a chat extension. - By implementing tool calling yourself, which gives you more control over the tool-calling process. For example, to perform additional validation or to handle tool responses in a specific way before sending them to the LLM.
Implement tool calling with the chat extension library
You can use the @vscode/chat-extension-utils library to simplify the process of calling tools in a chat extension.
Implement tool calling in the vscode.ChatRequestHandler function of your chat participant.
-
Determine the relevant tools for the current chat context. You can access all available tools by using
vscode.lm.tools.The following code snippet shows how to filter the tools to only those that have a specific tag.
const tools = request.command === 'all' ? vscode.lm.tools : vscode.lm.tools.filter(tool => tool.tags.includes('chat-tools-sample')); -
Send the request and tool definitions to the LLM by using
sendChatParticipantRequest.const libResult = chatUtils.sendChatParticipantRequest( request, chatContext, { prompt: 'You are a cat! Answer as a cat.', responseStreamOptions: { stream, references: true, responseText: true }, tools }, token );The
ChatHandlerOptionsobject has the following properties:prompt: (optional) Instructions for the chat participant prompt.model: (optional) The model to use for the request. If not specified, the model from the chat context is used.tools: (optional) The list of tools to consider for the request.requestJustification: (optional) A string that describes why the request is being made.responseStreamOptions: (optional) EnablesendChatParticipantRequestto stream the response back to VS Code. Optionally, you can also enable references and/or response text.
-
Return the result from the LLM. This might contain error details or tool-calling metadata.
return await libResult.result;
The full source code of this tool-calling sample is available in the VS Code Extension Samples repository.
Implement tool calling yourself
For more advanced scenarios, you can also implement tool calling yourself. Optionally, you can use the @vscode/prompt-tsx library for crafting the LLM prompts. By implementing tool calling yourself, you have more control over the tool-calling process. For example, to perform additional validation or to handle tool responses in a specific way before sending them to the LLM.
View the full source code for implementing tool calling by using prompt-tsx in the VS Code Extension Samples repository.
Measuring success
We recommend that you measure the success of your participant by adding telemetry logging for Unhelpful user feedback events, and for the total number of requests that your participant handled. An initial participant success metric can then be defined as: unhelpful_feedback_count / total_requests.
const logger = vscode.env.createTelemetryLogger({
  // telemetry logging implementation goes here
});

cat.onDidReceiveFeedback((feedback: vscode.ChatResultFeedback) => {
  // Log chat result feedback to be able to compute the success metric of the participant
  logger.logUsage('chatResultFeedback', {
    kind: feedback.kind
  });
});
Any other user interaction with your chat response should be measured as a positive metric (for example, the user selecting a button that was generated in a chat response). Measuring success with telemetry is crucial when working with AI, since it is a nondeterministic technology. Run experiments, measure and iteratively improve your participant to ensure a good user experience.
Guidelines and conventions
Guidelines
Chat participants should not be purely question-answering bots. When building a chat participant, be creative and use the existing VS Code API to create rich integrations in VS Code. Users also love rich and convenient interactions, such as buttons in your responses, menu items that bring users to your participant in chat. Think about real life scenarios where AI can help your users.
It doesn't make sense for every extension to contribute a chat participant. Having too many participants in chat might lead to a bad user experience. Chat participants are best when you want to control the full prompt, including instructions to the language model. You can reuse the carefully crafted Copilot system message and you can contribute context to other participants.
For example, language extensions (such as the C++ extension) can contribute in various other ways:
- Contribute tools that bring language service smarts to the user query. For example, the C++ extension could resolve the
#cpptool to the C++ state of the workspace. This gives the Copilot language model the right C++ context to improve the quality of Copilot answers for C++. - Contribute smart actions that use the language model, optionally in combination with traditional language service knowledge, to deliver a great user experience. For example, C++ might already offer an "extract to method" smart action that uses the language model to generate a fitting default name for the new method.
Chat extensions should explicitly ask for user consent if they are about to do a costly operation or are about to edit or delete something that can't be undone. To have a great user experience, we discourage extensions from contributing multiple chat participants. Up to one chat participant per extension is a simple model that scales well in the UI.
Chat participant naming conventions
| Property | Description | Naming guidelines |
|---|---|---|
id |
Globally unique identifier for the chat participant |
|
name |
Name of the chat participant, referenced by users through the @ symbol |
|
fullName |
(Optional) The full name of the participant, which is shown as the label for responses coming from the participant |
|
description |
(Optional) Short description of what the chat participant does, shown as placeholder text in the chat input field or in the list of participants |
|
When referring to your chat participant in any of the user-facing elements, such as properties, chat responses, or chat user interface, it's recommended to not use the term participant, as it's the name of the API. For example, the @cat extension could be called "Cat extension for GitHub Copilot".
Slash command naming conventions
| Property | Description | Naming guidelines |
|---|---|---|
name |
Name of the slash command, referenced by users through the / symbol |
|
description |
(Optional) Short description of what the slash command does, shown as placeholder text in the chat input field or in the list of participants and commands |
|
Publishing your extension
Once you have created your AI extension, you can publish your extension to the Visual Studio Marketplace:
- Before publishing to the VS Marketplace we recommend that you read the Microsoft AI tools and practices guidelines. These guidelines provide best practices for the responsible development and use of AI technologies.
- By publishing to the VS Marketplace, your extension is adhering to the GitHub Copilot extensibility acceptable development and use policy.
- Upload to the Marketplace as described in Publishing Extension.
- If your extension already contributes functionality other than chat, we recommend that you do not introduce an extension dependency on GitHub Copilot in the extension manifest. This ensures that extension users that do not use GitHub Copilot can use the non-chat functionality without having to install GitHub Copilot.
Extending GitHub Copilot via GitHub Apps
Alternatively, it is possible to extend GitHub Copilot by creating a GitHub App that contributes a chat participant in the Chat view. A GitHub App is backed by a service and works across all GitHub Copilot surfaces, such as github.com, Visual Studio, or VS Code. On the other hand, GitHub Apps do not have full access to the VS Code API. To learn more about extending GitHub Copilot through a GitHub App see the GitHub documentation.
Using the language model
Chat participants can use the language model in a wide range of ways. Some participants only make use of the language model to get answers to custom prompts, for example the sample chat participant. Other participants are more advanced and act like autonomous agents that invoke multiple tools with the help of the language model. An example of such an advanced participant is the built-in @workspace that knows about your workspace and can answer questions about it. Internally, @workspace is powered by multiple tools: GitHub's knowledge graph, combined with semantic search, local code indexes, and VS Code's language services.