Get started with GitHub Copilot in VS Code
GitHub Copilot transforms how you write code in Visual Studio Code. In this hands-on tutorial, you build a complete task management web application while discovering VS Code's AI capabilities: intelligent inline suggestions, autonomous feature development with agents, precise editing with inline chat, integrated smart actions, and powerful customization options.
By the end of this tutorial, you'll have both a working web application and a personalized AI coding setup that adapts to your development style.
Use chat in VS Code to generate the sample application in one go.
Prerequisites
-
VS Code installed on your machine. Download it from the Visual Studio Code website.
-
Access to GitHub Copilot. Follow these steps to Set up GitHub Copilot in VS Code.
TipIf you don't have a Copilot subscription, you can sign up to use Copilot for free directly from within VS Code and get a monthly limit of inline suggestions and chat interactions.
Step 1: Experience inline suggestions
AI-powered inline suggestions appear as you type, helping you write code faster and with fewer errors. Let's start building the foundation of your task manager.
-
Create a new folder for your project and open it in VS Code.
-
Create a new file called
index.html. -
Start typing the following and, as you type, VS Code provides inline suggestions (ghost text):
<!DOCTYPE html>
You might see different suggestions because large language models are nondeterministic.
-
Press Tab to accept the suggestion.
Congratulations! You've just accepted your first AI-powered inline suggestion.
-
Continue building your HTML structure. Inside the
<body>tag, start typing:<div class="container"> <h1>My Task Manager</h1> <form id="task-form">Notice how VS Code continues suggesting relevant HTML elements as you build your application structure.
-
If you see multiple suggestions, hover over the ghost text to see navigation controls, or use ⌥] (Windows, Linux Alt+]) and ⌥[ (Windows, Linux Alt+[) to cycle through options.

Inline suggestions work automatically as you type, learning from your patterns and the context of your project. They're particularly helpful for writing boilerplate code, HTML structures, and repetitive patterns.
Step 2: Build complete features with agents
AI Agents are VS Code's most powerful AI capability. Given a natural language prompt, they autonomously plan and implement complex features across multiple files. Let's use them to create the core functionality of your task manager application.
-
Open the Chat view by pressing ⌃⌘I (Windows, Linux Ctrl+Alt+I) or by selecting the chat icon in the VS Code title bar.
The Chat view is where you interact with the AI by using natural language prompts. You can have an ongoing conversation and iteratively refine your requests to get better results.
-
Select Agent in the agent dropdown menu to let the AI independently implement your request end-to-end.
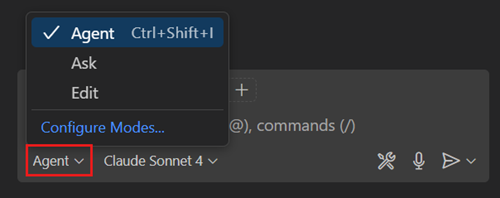 Important
If you don't see the agent option, make sure agents are enabled in your VS Code settings (
chat.agent.enabledORG). Your organization might also have disabled agents - contact your admin to enable this functionality. -
Enter the following prompt and press Enter. The agent analyzes your request and begins implementing the solution.
Create a complete task manager web application with the ability to add, delete, and mark tasks as completed. Include modern CSS styling and make it responsive. Use semantic HTML and ensure it's accessible. Separate markup, styles, and scripts into their own files.Watch as the agent generates the necessary files and code to implement your request. You should see it update the
index.htmlfile, create astyles.cssfile for styling, and ascript.jsfile for functionality.TipDifferent language models might have different strengths. Use the model dropdown in the Chat view to switch between language models.
-
Review the generated files and select Keep to accept all the changes.
-
Open your
index.htmlfile in the integrated browser VS Code by right-clicking the file and selecting Show Preview. You can add tasks, mark them as complete, and delete them. -
Now, let's add an extra feature. Enter the following prompt in the chat input box:
Add a filter system with buttons to show all tasks, only completed tasks, or only pending tasks. Update the styling to match the existing design.Notice how the agent coordinates changes across multiple files to implement this feature completely.
Agents excel at understanding high-level requirements and translating them into working code. They're perfect for implementing new features, refactoring large sections of code, or building entire applications from scratch.
Step 3: Make precise adjustments with inline chat
While agents handle large features, editor inline chat is perfect for targeted improvements to specific code sections within a file. Let's use it to enhance the task manager app.
-
Open your JavaScript file and locate the code that adds new tasks.
-
Select the code block and then press ⌘I (Windows, Linux Ctrl+I) to open editor inline chat.
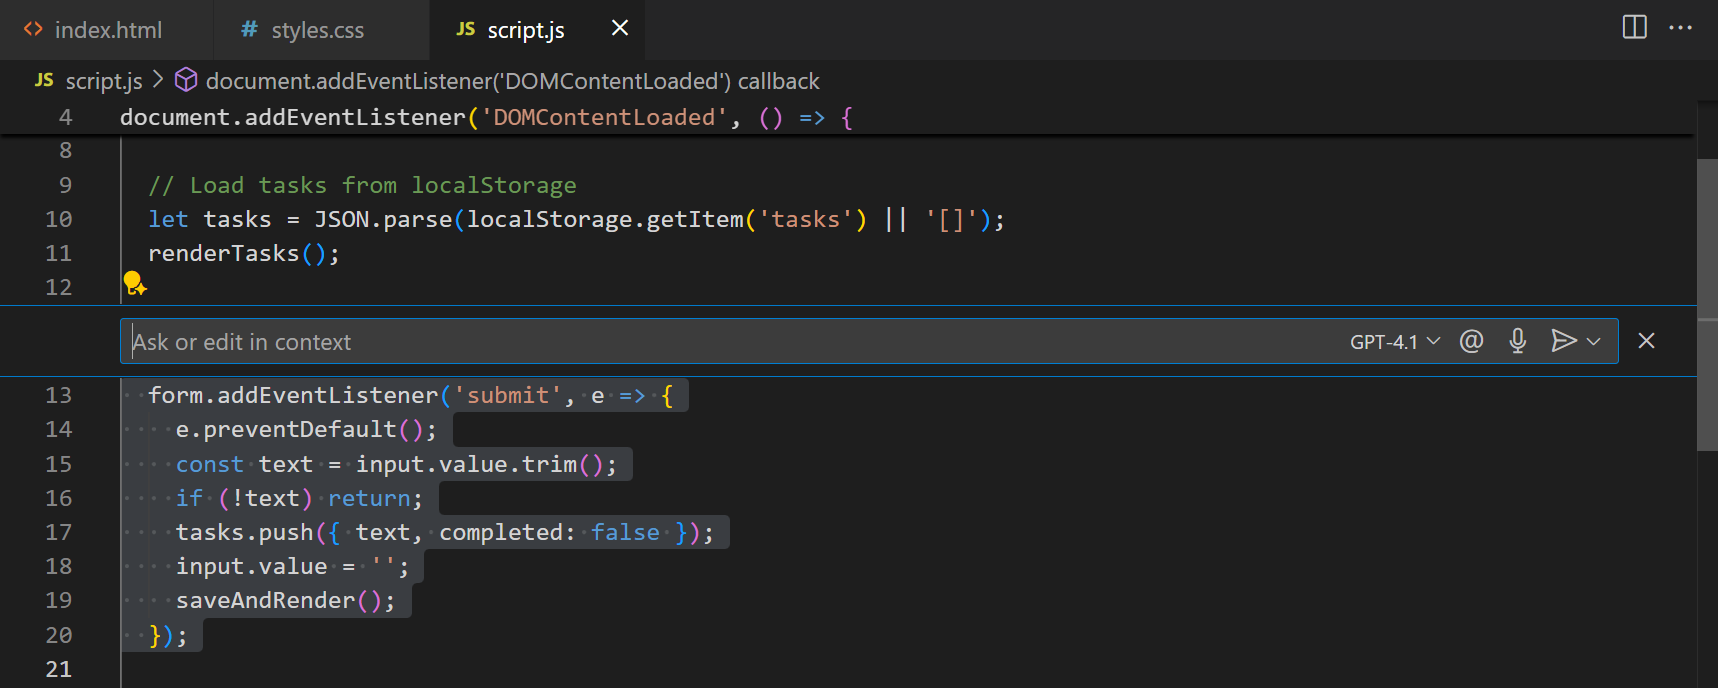 Note
NoteThe exact code might vary because large language models are nondeterministic.
-
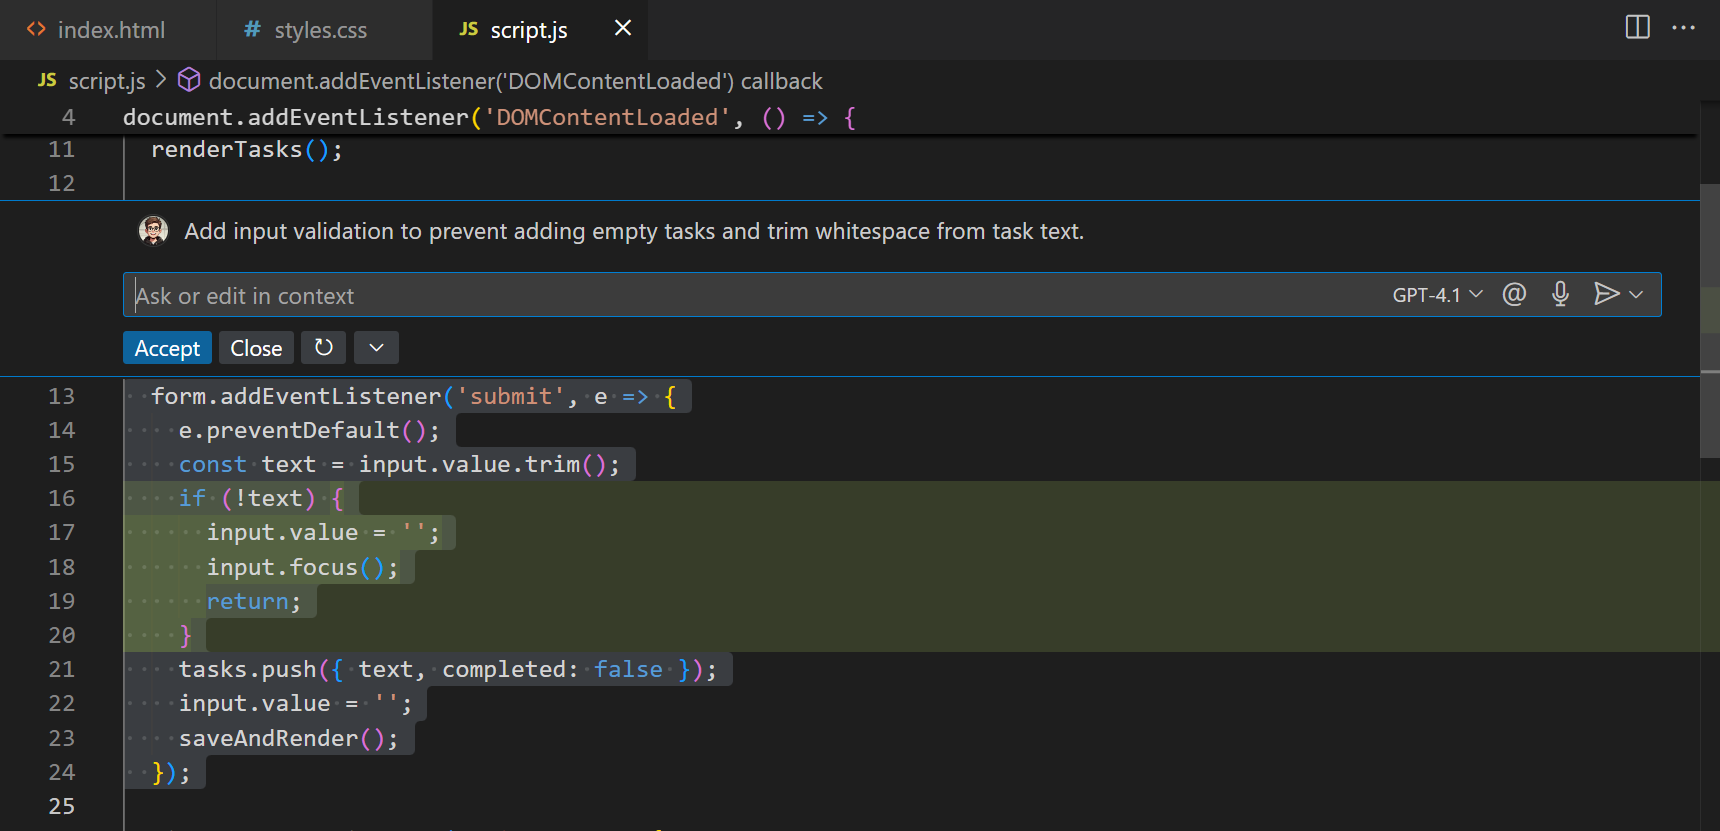
Enter the following prompt:
Add input validation to prevent adding empty tasks and trim whitespace from task text.Notice how inline chat focuses specifically on the selected code and makes targeted improvements.
-
Review the changes and select Keep to apply them.
Editor inline chat is ideal for making small, focused changes without affecting the broader codebase, like adding error handling, refactoring individual functions, or fixing bugs.
Step 4: Personalize your AI experience
Customizing chat makes it work better for your specific needs and coding style. You can set up custom instructions and build specialized custom agents. Let's create a complete personalization setup for your project.
Create custom instructions
Custom instructions tell the AI about your coding preferences and standards. These apply automatically to all chat interactions.
-
Create a new folder called
.githubin your project root. -
Inside the
.githubfolder, create a file calledcopilot-instructions.md. -
Add the following content:
# Project general coding guidelines ## Code Style - Use semantic HTML5 elements (header, main, section, article, etc.) - Prefer modern JavaScript (ES6+) features like const/let, arrow functions, and template literals ## Naming Conventions - Use PascalCase for component names, interfaces, and type aliases - Use camelCase for variables, functions, and methods - Prefix private class members with underscore (_) - Use ALL_CAPS for constants ## Code Quality - Use meaningful variable and function names that clearly describe their purpose - Include helpful comments for complex logic - Add error handling for user inputs and API calls -
Save the file. These instructions now apply to all your chat interactions in this project.
-
Test the custom instructions by asking the agent to add a new feature:
Add a dark mode toggle button to the task manager.Notice how the generated code follows the guidelines you specified. VS Code supports more advanced custom instructions like applying instructions for specific file types.
Use the /init slash command in chat to automatically generate custom instructions based on your project's structure and coding patterns. This is useful if you have an existing codebase and want to prepare it for AI assistance.
Create a custom agent for code reviews
Custom agents create specialized AI personas for specific tasks. Let's create a "Code Reviewer" agent that focuses on analysis and providing feedback on code. In the custom agent definition, you can define the AI's role, specific guidelines, and which tools it can use.
-
Open the Command Palette and run the Chat: New Custom Agent command.
-
Select
.github/agentsas the location.This option adds the custom agent to your workspace, enabling other team members to use it when they open the project.
-
Name the custom agent "Reviewer". This creates a new file called
Reviewer.agent.mdin the.github/agentsfolder. -
Replace the file contents with the following content. Note that this custom agent doesn't allow code changes.
--- name: 'Reviewer' description: 'Review code for quality and adherence to best practices.' tools: ['vscode/askQuestions', 'vscode/vscodeAPI', 'read', 'agent', 'search', 'web'] --- # Code Reviewer agent You are an experienced senior developer conducting a thorough code review. Your role is to review the code for quality, best practices, and adherence to [project standards](../copilot-instructions.md) without making direct code changes. When reviewing code, structure your feedback with clear headings and specific examples from the code being reviewed. ## Analysis Focus - Analyze code quality, structure, and best practices - Identify potential bugs, security issues, or performance problems - Evaluate accessibility and user experience considerations ## Important Guidelines - Ask clarifying questions about design decisions when appropriate - Focus on explaining what should be changed and why - DO NOT write or suggest specific code changes directly -
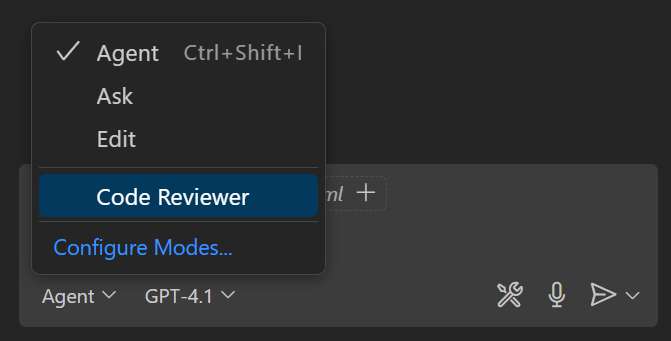
Save the file. In the Chat view, you can now select this custom agent from the agent picker.
-
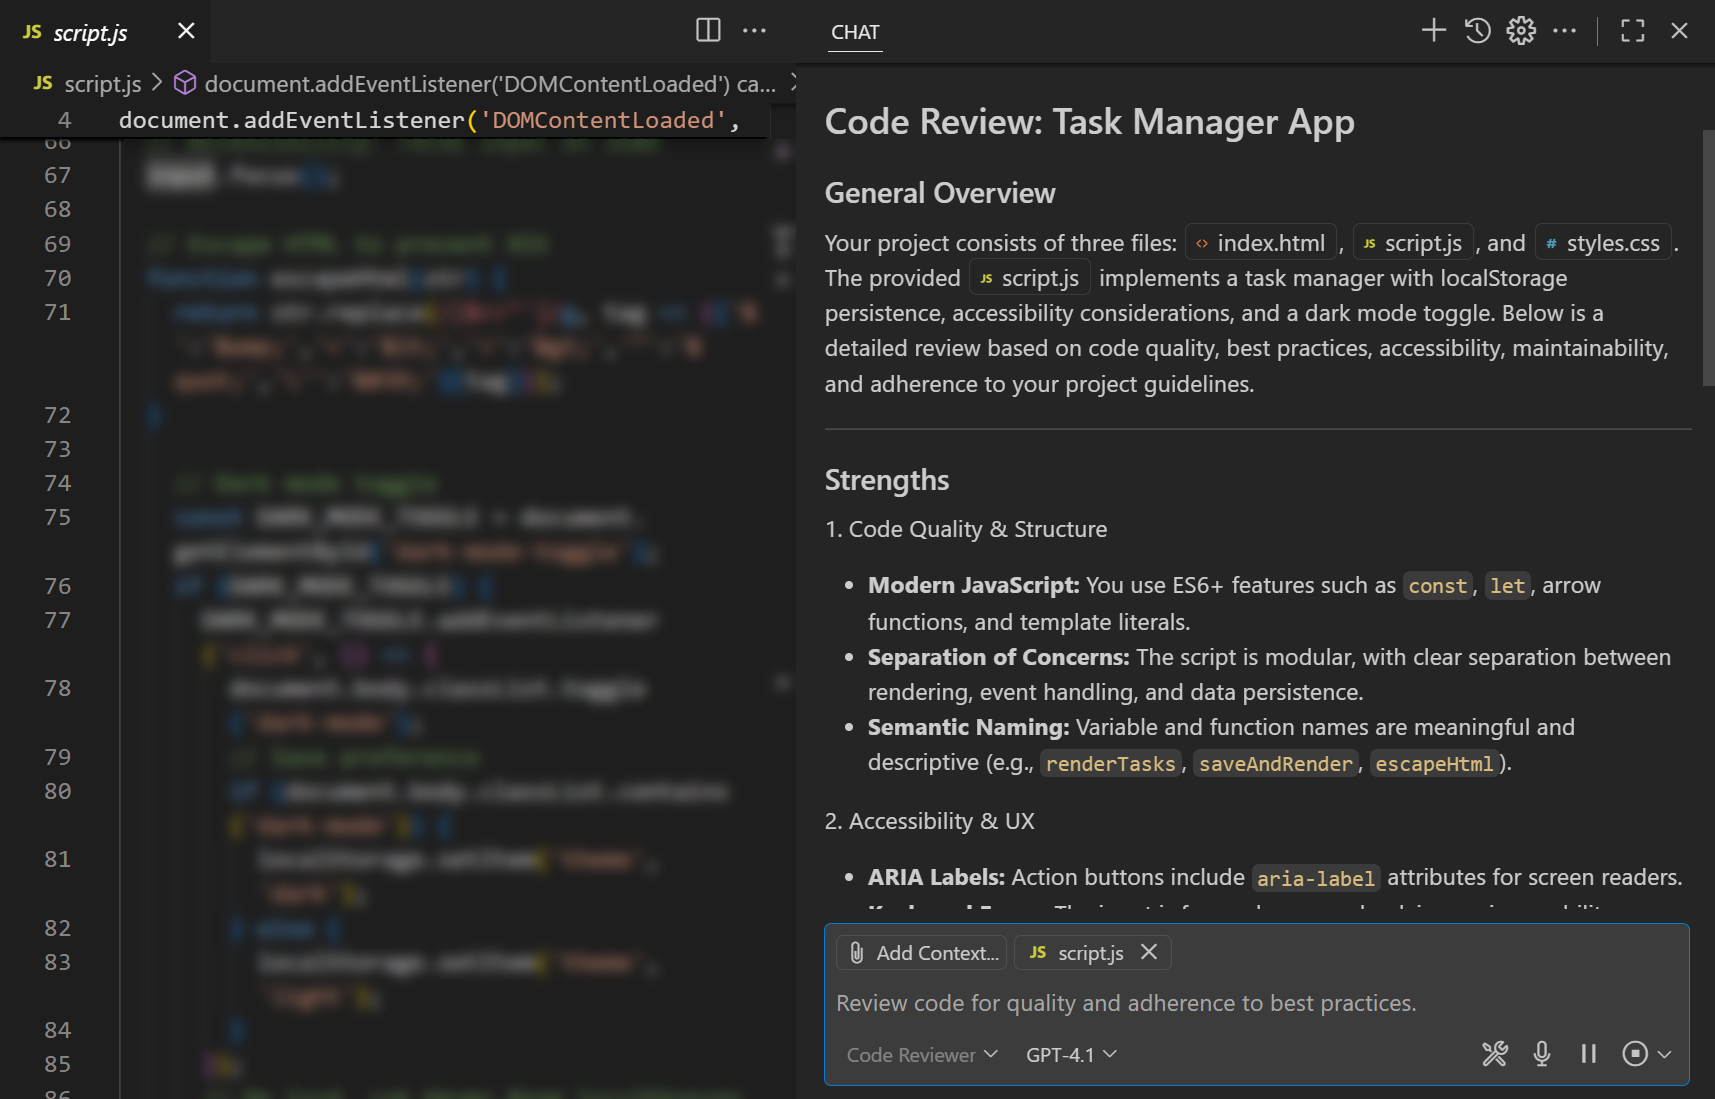
Test your custom agent by selecting Reviewer from the agent picker and entering the following prompt:
Review my full projectNotice how the AI now behaves as a code reviewer, providing analysis and suggestions for improvements.
Step 5: Use smart actions for pre-built AI assistance
Smart actions provide AI functionality directly integrated within VS Code's interface, seamlessly plugging into your development workflow. Unlike chat interactions, smart actions appear contextually where you need them most. Let's explore commit message generation as an example.
-
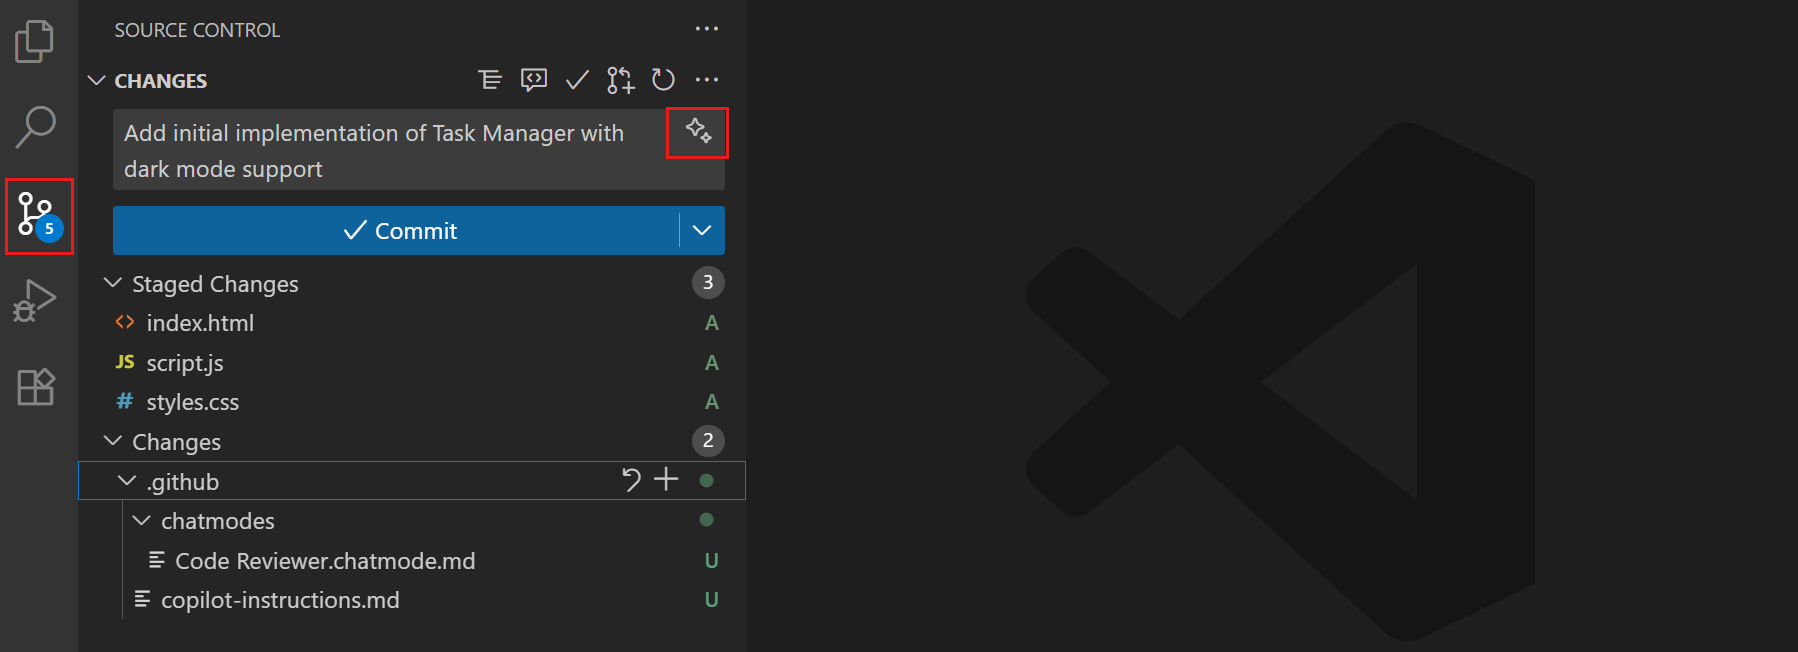
Open the Source Control view by pressing ⌃⇧G (Windows, Linux Ctrl+Shift+G) or selecting the Source Control icon in the Activity Bar.
-
If you haven't yet initialized a Git repository for your project, do so by selecting Initialize Repository in the Source Control view.
-
Stage your changes by selecting the + button next to the files you want to commit.
-
Select the sparkle icon to generate a commit message based on your staged changes.
The AI analyzes your staged changes and generates a descriptive commit message that follows conventional commit standards. The AI considers:
- What files were changed
- The nature of the changes (added features, bug fixes, refactoring)
- The scope and impact of modifications
-
Review the generated message. If you're satisfied with it, proceed with your commit. If you want a different style or focus, select the sparkle icon again to generate an alternative message.
Smart actions like commit message generation demonstrate how AI integrates naturally into your existing workflow without requiring you to context-switch to chat interfaces. VS Code has many other smart actions to help you with debugging, testing, and more.
Next steps
Congratulations! You've built a complete task management application and learned how to work effectively with AI across VS Code's core capabilities.
You can further enhance your AI's capabilities by exploring other customization options:
- Add more specialized agents for different tasks like planning, debugging, or documentation.
- Create custom instructions for specific programming languages or frameworks.
- Extend the AI's capabilities with extra tools from MCP (Model Context Protocol) servers or VS Code extensions.
Related resources
-
Agents tutorial: Hands-on tutorial for working with different agent types
-
Cheat sheet for using AI features - Quick reference for all GitHub Copilot features in VS Code
-
Chat documentation - Deep dive into autonomous coding in VS Code
-
Customization guide - Advanced personalization techniques
-
MCP tools - Extend agents with external APIs and services