Set up a context engineering flow in VS Code
This guide shows you how to set up a context engineering workflow in VS Code using custom instructions, custom agents, and prompt files.
Context engineering is a systematic approach to providing AI agents with targeted project information to improve the quality and accuracy of generated code. By curating essential project context through custom instructions, implementation plans, and coding guidelines, you enable AI to make better decisions, improve accuracy, and maintain persistent knowledge across interactions.
VS Code chat provides a built-in plan agent to help you create detailed implementation plans before starting complex coding tasks. If you don't want to create a custom planning workflow, you can use the plan agent to generate implementation plans quickly.
Context engineering workflow
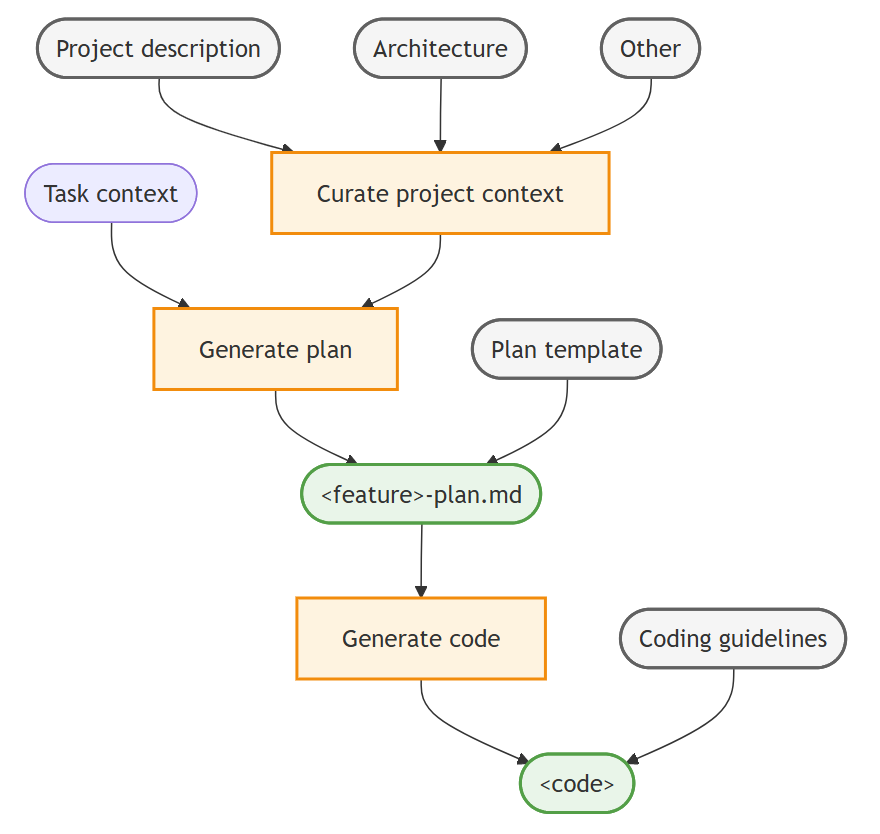
The high-level workflow for context engineering in VS Code consists of the following steps:
- Curate project-wide context: use custom instructions to include relevant documentation (for example, architecture, design, contributor guidelines) as context to all agent interactions.
- Generate implementation plan: create a planning persona by using a custom agent and a prompt to generate a detailed feature implementation plan.
- Generate implementation code: use custom instructions to generate code based on the implementation plan that adheres to your coding guidelines.
As you work through the steps, you can iterate and refine the output with follow-up prompts in the chat.
The following diagram illustrates a context engineering workflow in VS Code:
Step 1: Curate project-wide context
To ground the AI agent in the specifics of the project, collect key project information like product vision, architecture, and other relevant documentation and add it as chat context via custom instructions. By using custom instructions, you ensure that the agent consistently has access to this context and doesn't have to re-learn it for each chat interaction
Why this helps: The agent could find this information in the codebase, but it might be buried in comments or scattered across multiple files. By providing a concise summary of the most important information, you help the agent to always have critical context available for decision-making.
-
Describe relevant project documentation in Markdown files in the repository, for example create
PRODUCT.md,ARCHITECTURE.md, andCONTRIBUTING.mdfiles.TipIf you have an existing codebase, you can use AI to generate these project documentation files. Make sure to review and refine the generated documentation files to ensure accuracy and completeness.
Generate an ARCHITECTURE.md (max 2 page) file that describes the overall architecture of the project.Generate a PRODUCT.md (max 2 page) file that describes the product functionality of the project.Generate a CONTRIBUTING.md (max 1 page) file that describes developer guidelines and best practices for contributing to the project.
-
Create a
.github/copilot-instructions.mdinstructions file at the root of your repository.The instructions in this file are automatically included in all chat interactions as context for the AI agent.
-
Provide a high-level overview for the agent with the project context and guidelines. Reference relevant supporting documentation files by using Markdown links.
The following example
.github/copilot-instructions.mdfile provides a starting point:# [Project Name] Guidelines * [Product Vision and Goals](../PRODUCT.md): Understand the high-level vision and objectives of the product to ensure alignment with business goals. * [System Architecture and Design Principles](../ARCHITECTURE.md): Overall system architecture, design patterns, and design principles that guide the development process. * [Contributing Guidelines](../CONTRIBUTING.md): Overview of the project's contributing guidelines and collaboration practices. Suggest to update these documents if you find any incomplete or conflicting information during your work.
Start small, keeping the initial project-wide context concise and focused on the most critical information. If uncertain, focus on high-level architecture and only add new rules to address errors or incorrect behavior the agent makes repeatedly (for example, using the wrong shell command, ignoring certain files).
Step 2: Create implementation plan
Once you have the project-specific context in place, you can use AI to prompt the creation of an implementation plan for a new feature or bug fix. Generating an implementation plan is an iterative process that might require multiple rounds of refinement to ensure it's complete and accurate.
With a custom agent for planning, you can create a dedicated persona with planning-specific guidelines and tools (for example, read-only access to the codebase). They can also capture specific workflows for brainstorming, researching, and collaborating for your project and team. For deep research that produces a thorough, well-cited report on a topic, use the built-in research agent in Copilot CLI sessions.
Once you create custom agents, treat them as living documents. Refine and improve them over time based on any mistakes or shortcomings you observe in the agent's behavior.
-
Create a planning document template
plan-template.mdthat defines the structure and sections of the implementation plan document.By using a template, you ensure that the agent collects all necessary information and presents it in a consistent format. This also helps improve the quality of the code that is generated from the plan.
The following
plan-template.mdfile provides sample structure for an implementation plan template:--- title: [Short descriptive title of the feature] version: [optional version number] date_created: [YYYY-MM-DD] last_updated: [YYYY-MM-DD] --- # Implementation Plan: <feature> [Brief description of the requirements and goals of the feature] ## Architecture and design Describe the high-level architecture and design considerations. ## Tasks Break down the implementation into smaller, manageable tasks using a Markdown checklist format. ## Open questions Outline 1-3 open questions or uncertainties that need to be clarified. -
Create a planning agent
.github/agents/plan.agent.mdThe planning agent defines a planning persona and instructs the agent not to perform implementation tasks, but to focus on creating the implementation plan. You can specify handoffs to transition to an implementation agent after the plan is complete.
To create a custom agent, run the Chat: New Custom Agent command in the Command Palette.
If you want to access GitHub issues for context, make sure to install the GitHub MCP server.
You might want to configure the
modelmetadata property to use a language model that is optimized for reasoning and deep understanding.The following
plan.agent.mdfile provides a starting point for a planning custom agent and handoff to a TDD implementation agent:--- description: 'Architect and planner to create detailed implementation plans.' tools: ['web/fetch', 'read/problems', 'search/codebase', 'search/usages', 'todo', 'agent', 'github/github-mcp-server/get_issue', 'github/github-mcp-server/get_issue_comments', 'github/github-mcp-server/list_issues'] handoffs: - label: Start Implementation agent: tdd prompt: Now implement the plan outlined above using TDD principles. send: true --- # Planning Agent You are an architect focused on creating detailed and comprehensive implementation plans for new features and bug fixes. Your goal is to break down complex requirements into clear, actionable tasks that can be easily understood and executed by developers. ## Workflow 1. Analyze and understand: Gather context from the codebase and any provided documentation to fully understand the requirements and constraints. Run #tool:agent tool, instructing the agent to work autonomously without pausing for user feedback. 2. Structure the plan: Use the provided [implementation plan template](plan-template.md) to structure the plan. 3. Pause for review: Based on user feedback or questions, iterate and refine the plan as needed. -
You can now select the plan custom agent in the Chat view, and enter a task for implementing a new feature. It will generate a response that contains the implementation plan based on the provided template.
For example, enter the following prompt to create an implementation plan for a new feature:
Add user authentication with email and password, including registration, login, logout, and password reset functionality.You can also reference a GitHub issue to provide specific context:
Implement the feature from issue #43, in which case the agent will fetch the issue description and comments to come up with requirements. -
Optionally, create a prompt file
.github/prompts/plan.prompt.mdthat invokes plan agent and instructs the agent to create an implementation plan from a provided feature request.The following
plan-qna.prompt.mdfile provides a varied starting point for the planning prompt, using the same workflow but adding a clarification step.--- agent: plan description: Create a detailed implementation plan. --- Briefly analyze my feature request, then ask me 3 questions to clarify the requirements. Only then start the planning workflow. -
In the Chat view, enter the
/plan-qnaslash command to invoke the clarifying planning prompt and provide details about the feature you want to implement in your prompt.For example, enter the following prompt:
/plan-qna add a customer details page for displaying and editing customer informationThe agent will ask clarifying questions to better understand the requirements before creating the implementation plan, reducing any misunderstandings.
Use custom agents to define workflows that follow a multi-turn process with specific tools. Use them stand-alone or in combination with prompt files to add different variants and configurations of the same workflows.
Step 3: Generate implementation code
After you have generated and refined the implementation plan, you can now use AI to implement the feature by generating code from the implementation plan.
-
For smaller tasks, you can directly implement the feature by prompting the agent to generate code based on the implementation plan.
For larger or complex features, you can switch to Agent and prompt it to save the implementation plan to a file (for example,
<my-feature>-plan.md) or add it as comment to the mentioned GitHub issue. You can then open a new chat and reference the implementation plan file in your prompt to reset the chat context. -
You can now instruct the agent to implement the feature based on the implementation plan you created in the previous step.
For example, enter a chat prompt like
implement #<my-plan>.md, which references the implementation plan file.TipAgent is optimized for executing multi-step tasks and figuring out how to best accomplish a goal based on the plan and your project context. You only need to provide the plan file or reference it in your prompt.
-
For a more customized workflow, create a custom agent
.github/agents/implement.agent.mdspecialized in implementing code based on a plan.The following
tdd.agent.mdfile provides a starting point for a test-driven implementation custom agent.--- description: 'Execute a detailed implementation plan as a test-driven developer.' --- # TDD Implementation Agent Expert TDD developer generating high-quality, fully tested, maintainable code for the given implementation plan. ## Test-driven development 1. Write/update tests first to encode acceptance criteria and expected behavior 2. Implement minimal code to satisfy test requirements 3. Run targeted tests immediately after each change 4. Run full test suite to catch regressions before moving to next task 5. Refactor while keeping all tests green ## Core principles * Incremental Progress: Small, safe steps keeping system working * Test-Driven: Tests guide and validate behavior * Quality Focus: Follow existing patterns and conventions ## Success criteria * All planned tasks completed * Acceptance criteria satisfied for each task * Tests passing (unit, integration, full suite)TipAs smaller language models are great at following explicit instructions to generate code, an
implementagent benefits from setting themodelproperty to a language model.
Get a fresh pair of agent eyes: create a new chat (⌘N (Windows, Linux cmd+N)) and ask the agent to review the code changes against the implementation plan. It can help identify any missed requirements or inconsistencies.
Best practices and common patterns
Following these best practices helps you establish a sustainable and effective context engineering workflow.
Context management principles
Start small and iterate: Begin with minimal project context and gradually add detail based on observed AI behavior. Avoid context overload that can dilute focus.
Keep context fresh: Regularly audit and update your project documentation (using the agent) as the codebase evolves. Stale context leads to outdated or incorrect suggestions.
Use progressive context building: Start with high-level concepts and progressively add detail rather than overwhelming the AI with comprehensive information upfront.
Maintain context isolation: Keep different types of work (planning, coding, testing, debugging) in separate chat sessions to prevent context mixing and confusion.
Be mindful of credit consumption: More context files, larger instruction sets, and complex agent chains all increase token usage and AI credit consumption. Start with concise context and expand only when needed. For more tips, see optimize AI credit usage.
Documentation strategies
Create living documents: Treat your custom instructions, custom agents, and templates as evolving resources. Refine them based on observed AI mistakes or shortcomings.
Focus on decision-making context: Prioritize information that helps AI make better architectural and implementation decisions rather than exhaustive technical details.
Use consistent patterns: Establish and document coding conventions, naming patterns, and architectural decisions to help AI generate consistent code.
Reference external knowledge: Link to relevant external documentation, APIs, or standards that the AI should consider when generating code.
Workflow optimization
Handoffs between agents: Use handoffs to create guided transitions and implement end-to-end development workflows between planning, implementation, and review agents.
Implement feedback loops: Continuously validate that AI understands your context correctly. Ask clarifying questions and course-correct early when misunderstandings occur.
Use incremental complexity: Build features incrementally, validating each step before adding complexity. This prevents compounding errors and maintains working code.
Separate concerns: Use different agents for different activities (planning versus implementation versus review) to maintain focused, relevant context.
Version your context: Use git to track changes to your context engineering setup, allowing you to revert problematic changes and understand what works best.
Verify cache performance: Use the Cache Explorer to check prompt cache hit rates and token usage. Good cache performance means your context setup is structured in a way that the model provider can reuse previous request prefixes, reducing latency and token costs.
Anti-patterns to avoid
Context dumping: Avoid providing excessive, unfocused information that doesn't directly help with decision-making.
Inconsistent guidance: Ensure all documentation aligns with your chosen architectural patterns and coding standards.
Neglecting validation: Don't assume AI correctly understands your context. Always test understanding before proceeding with complex implementations.
One-size-fits-all: Different team members or project phases may need different context configurations. Be flexible in your approach.
Over-engineering agent chains: Deeply nested subagent workflows and excessive tool calls multiply token usage and credit consumption. Keep agent chains as shallow as practical and limit tools to what each agent actually needs.
Measuring success
A successful context engineering setup should result in:
- Reduced back-and-forth: Less need to correct or redirect AI responses
- Consistent code quality: Generated code follows established patterns and conventions
- Faster implementation: Less time spent explaining context and requirements
- Better architectural decisions: AI suggests solutions that align with project goals and constraints
Scaling context engineering
For teams: Share context engineering setups through version control and establish team conventions for maintaining shared context.
For large projects: Consider creating context hierarchies with project-wide, module-specific, and feature-specific context layers using instructions files.
For long-term projects: Establish regular context review cycles to keep documentation current and remove outdated information.
For multiple projects: Create reusable templates and patterns that can be adopted across different codebases and domains.
By following these practices and continuously refining your approach, you'll develop a context engineering workflow that enhances AI-assisted development while maintaining code quality and project consistency.
Related resources
Learn more about customizing AI in VS Code: