Managing Java Projects in VS Code
The Project Manager for Java extension helps you to manage your Java projects and their dependencies. It also helps you to create new Java projects, packages, and classes. To get the complete Java language support in Visual Studio Code, you can install the Extension Pack for Java, which includes the Project Manager for Java extension.
Install the Extension Pack for Java
For details on how to get started with the extension pack, you can review the Getting Started with Java tutorial.
Projects view
The Java Projects view helps you view your Java projects and their dependencies, and provides entry points for project management tasks.
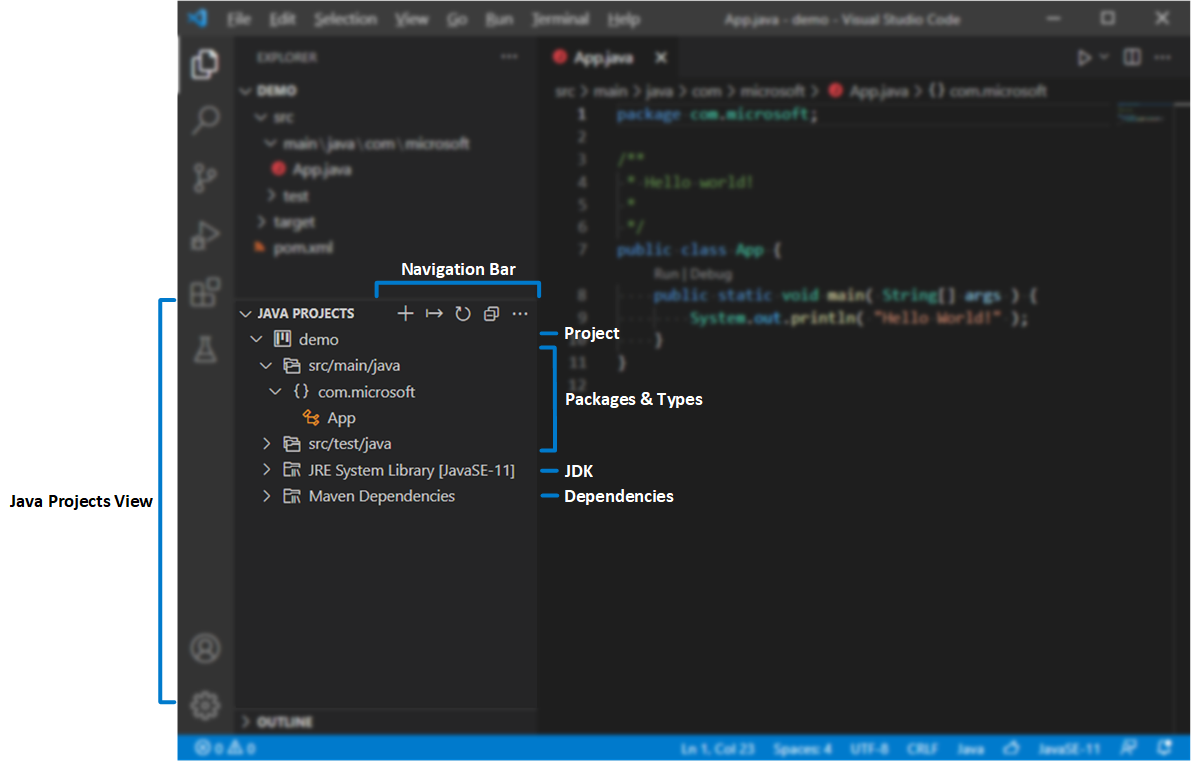
By default, the Java Projects view is displayed below the Explorer view. If you cannot see it, try clicking the
...button in the EXPLORER title bar and select Java Projects.
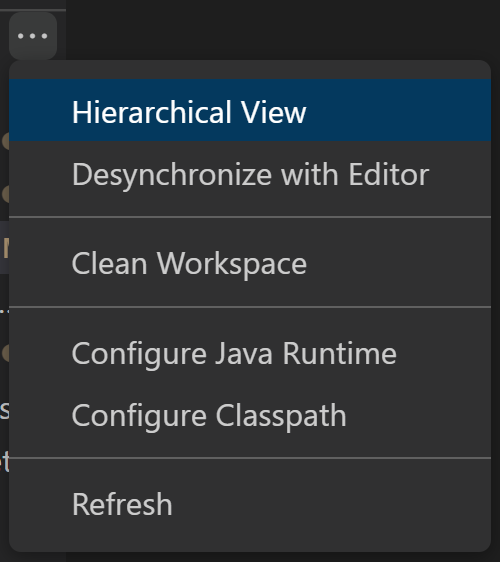
In the overflow button of the navigation bar, there are more options to use. For example, you can switch between hierarchical view and flat view.
You can find buttons next to the nodes in the Explorer, which provide useful shortcuts for some actions.

There are also many useful features in each node's context menu, you can right-click on the node in Explorer to toggle it out.

Create a new Java project
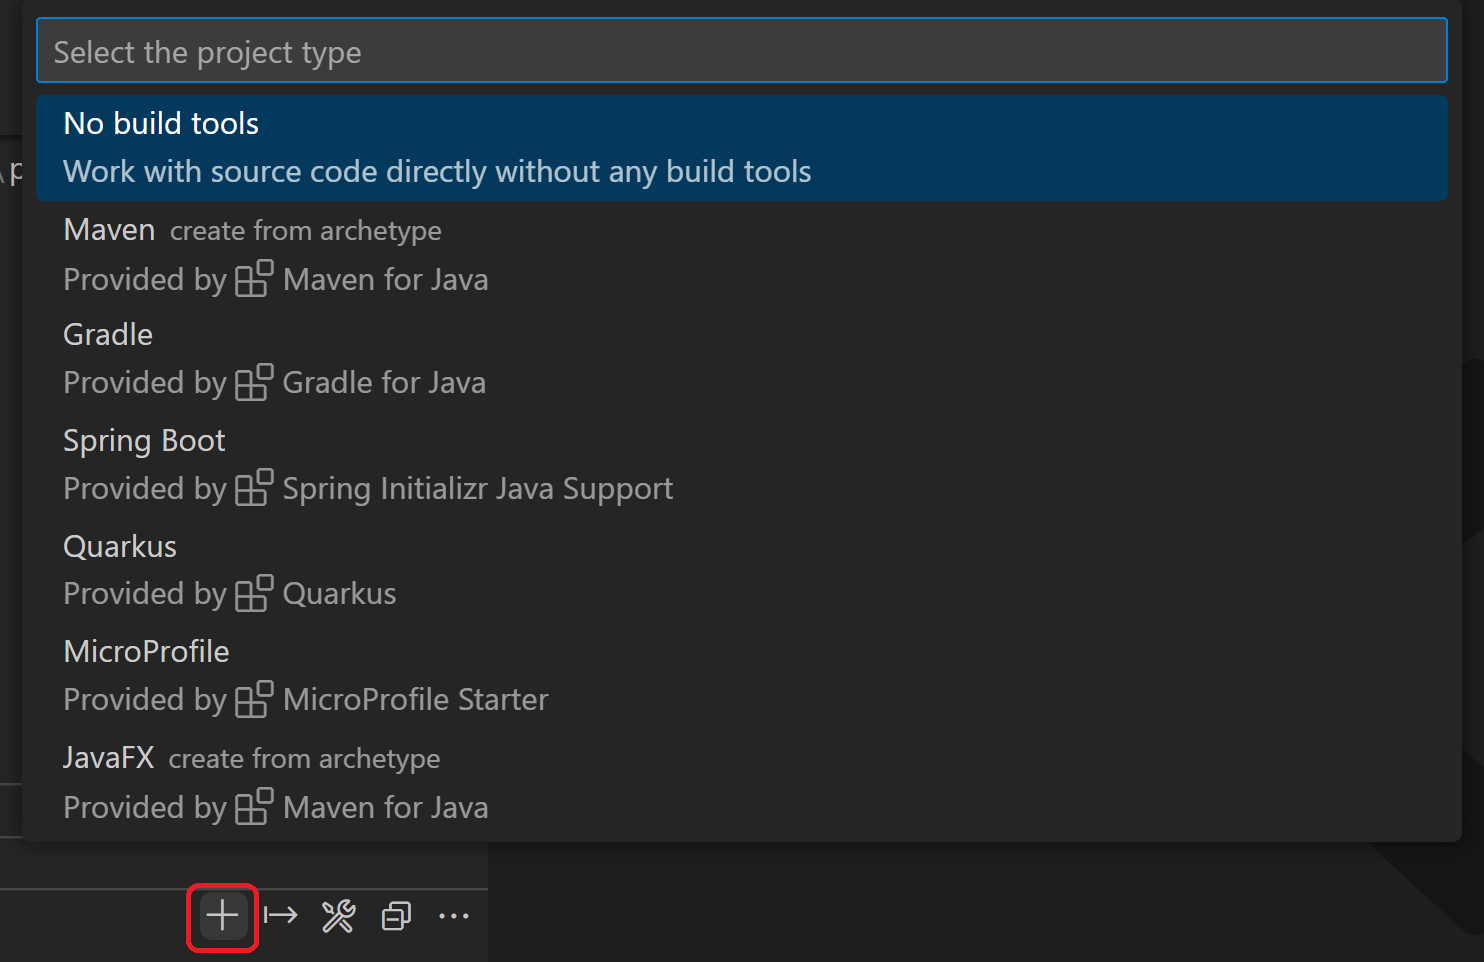
You can create a new Java project by clicking the + button in the navigation bar, or through the command: Java: Create Java Project... in Command Palette (⇧⌘P (Windows, Linux Ctrl+Shift+P)). During creation, VS Code will facilitate installing required extension(s) per your project type, if the extension(s) weren't already installed.
Import Java projects
You can directly import existing Java projects and modules to your workspace through File > Open Folder... (Make sure the opened folder contains your build tool scripts, for example, pom.xml or build.gradle). VS Code for Java will detect your projects and import them automatically.
When you add a new module into your projects, you can trigger the command Java: Import Java projects in workspace to import them to your workspace. This command helps to import new projects into the workspace without the need to reload the VS Code window.
Export to JAR
You can export your build to JAR from the projects view or by running the command Java: Export Jar....
Configure Runtime for Projects
As Java evolves, it's common that developers work with multiple versions of JDK. You can map them to your local installation paths via the setting: java.configuration.runtimes. The setting has following format:
"java.configuration.runtimes": [
  {
    "name": "JavaSE-1.8",
    "path": "/usr/local/jdk1.8.0_201"
  },
  {
    "name": "JavaSE-11",
    "path": "/usr/local/jdk-11.0.3",
    "sources" : "/usr/local/jdk-11.0.3/lib/src.zip",
    "javadoc" : "https://docs.oracle.com/en/java/javase/11/docs/api",
    "default":  true
   },
   {
    "name": "JavaSE-12",
    "path": "/usr/local/jdk-12.0.2"
   },
   {
    "name": "JavaSE-13",
    "path": "/usr/local/jdk-13"
   }
]
Note: You can set one of them to default by adding
"default": trueto the entry. The default JDK will be used for your unmanaged folders (with out build tools).
To see which JDKs are used for your projects, you can trigger the command Java: Configure Java Runtime in Command Palette (⇧⌘P (Windows, Linux Ctrl+Shift+P)). This command opens a view displaying the runtime information for your projects:

Change JDK for Maven and Gradle projects
If you want to change the JDK version for your Maven or Gradle projects, you need to update it in your build scripts (pom.xml or build.gradle). You can click to see how to make such changes. Click will navigate to the build script file of the project.
Change JDK for unmanaged folders
To change the JDK for unmanaged folders (with out any build tools), you can click the button. It will list all the JDKs and you can select one for your unmanaged folders.
Download JDKs
If you want to download a new JDK, you can click the download link, or trigger the command Java: Install New JDK in Command Palette (⇧⌘P (Windows, Linux Ctrl+Shift+P)). It will open a new view guiding you to download JDKs.

Note: To enable Java preview features, see How can I use VS Code with new Java versions.
Configure classpath for unmanaged folders
The Project Management for Java extension provides a user interface to configure the classpath for unmanaged folders. The classpath can be set manually in the classpath configuration page. You can open it by executing the Java: Configure Classpath command from the Command Palette (⇧⌘P (Windows, Linux Ctrl+Shift+P)).

In some rare cases, you may need to clean the Java workspace by executing the Java: Clean Java Language Server Workspace command from the Command Palette (⇧⌘P (Windows, Linux Ctrl+Shift+P)) to let the language server rebuild your dependencies.
Dependency management
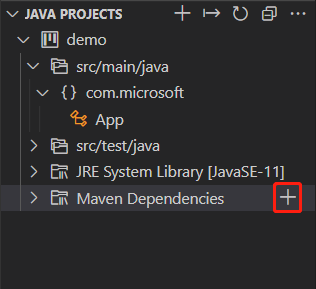
Add a Maven dependency
For Maven project, you can add a dependency by clicking the + icon next to Maven Dependencies node in project view.
Manage dependencies for unmanaged folder
If your project is an unmanaged folder without any build tools. You can manage the dependencies by clicking the + icon or the - icon on the Referenced Libraries
node or the items under it, or you can just directly drag your jar libraries to the node Referenced Libraries
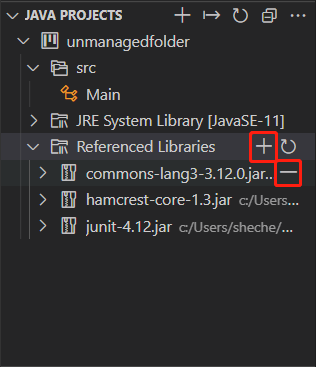
You can also manage the dependencies in the classpath configuration page. See: Configure classpath for unmanaged folder
Behind the scene, there's a setting java.project.referencedLibraries in settings.json. Below are details on how to customize this setting.
Include libraries
The libraries to reference are described using a set of glob patterns.
For example:
"java.project.referencedLibraries": [
    "library/**/*.jar",
    "/home/username/lib/foo.jar"
]
The settings above will add all .jar files in workspace's library folder along with foo.jar from a specified absolute path to the project's external dependencies.
The referenced libraries are then watched by VS Code, and the project will be refreshed if there is a change to any of these dependent files.
By default, VS Code will reference all JAR files in workspace's lib directory using the glob pattern lib/**/*.jar.
Exclude some libraries
If you want to exclude some libraries from the project, you can expand java.project.referencedLibraries to use include/exclude fields and add an exclude glob pattern:
"java.project.referencedLibraries": {
    "include": [
        "library/**/*.jar",
        "/home/username/lib/foo.jar"
    ],
    "exclude": [
        "library/sources/**"
    ]
}
In the example above, any binary JAR files in the library/sources folder are ignored as the project's external dependencies.
Attach source jars
By default, a referenced {binary}.jar will try to search {binary}-sources.jar under the same directory, and attach it as source if one match is found.
If you want to manually specify a JAR file as a source attachment, you can provide a key-value map in the sources field:
"java.project.referencedLibraries": {
    "include": [
        "library/**/*.jar",
        "/home/username/lib/foo.jar"
    ],
    "exclude": [
        "library/sources/**"
    ],
    "sources": {
        "library/bar.jar": "library/sources/bar-src.jar"
    }
}
In this way, bar-src.jar is attached to bar.jar as its source.
Lightweight Mode
VS Code for Java supports two modes, lightweight and standard. With lightweight mode, only source files and JDK are resolved by the language server; with standard mode, imported dependencies are resolved and the project is built by the language server. Lightweight mode works best when you need a quick-start and lightweight environment to work with your source files, for example, reading source code, navigating among source code and JDK, viewing outline and Javadoc, and detecting and fixing syntax errors. Also, code completion is supported within the scope of source files and JDK.
Lightweight mode doesn't resolve imported dependencies nor build the project, so it does not support running, debugging, refactoring, linting, or detecting semantic errors. For these features to be available, you need to switch your workspace from lightweight mode to standard mode.
You can control which mode to launch with by configuring java.server.launchMode with the options below:
Hybrid(default) - Firstly, a workspace is opened with lightweight mode. You will be asked whether to switch to standard mode if your workspace contains unresolved Java projects. If you choose Later, it will stay in lightweight mode. You can click the language status item on the Status bar to manually switch to standard mode.Standard- A workspace is opened with standard mode.LightWeight- A workspace is opened with lightweight mode. You can click the language status item on the Status bar to manually switch to standard mode.
The language status item indicates which mode the current workspace is in using different icons.
- - workspace opened with lightweight mode.
- - workspace in the process of being opened with standard mode.
- - workspace opened with standard mode.
Clicking the language status item switches to standard mode.

Build Status
When you edit Java source code in Visual Studio Code, the Java language server is building your workspace to provide you with the necessary language features. You can see the detailed build task status and watch what is happening behind the scene by clicking the language status item in the Status bar. You can also select the check details link when a notification shows the language server is opening Java projects to see the build task status.
Additional resources
There are several Visual Studio Code extensions to support different build systems for Java. Below are extensions for several popular build systems.
- Maven for Java
- Gradle for Java
- Bazel for Java (Bazel is for
BUILDfiles, without Java integration))
If you run into any problems when using the features above, you can contact us by filing an issue.
Next steps
Read on to find out more about:
- Java editing - Explore the editing features for Java in VS Code.
- Java debugging - Find out how to debug your Java project with VS Code.
- Java testing - Use VS Code for your JUnit and TestNG cases.
- Java extensions - Learn about more useful Java extensions for VS Code.