Use chat in VS Code
Chat in Visual Studio Code lets you use natural language for interacting with AI agents. Ask questions about your code, get help understanding complex logic, generate new features, fix bugs, and more, all through a conversational interface.
This article describes the mechanics of how to interact with chat: how to send a request, add context, choose a language model, write effective prompts, and review AI-generated changes. These mechanics apply to all chat surfaces in VS Code. For an overview of what agents can do and how to configure a session, see Build with agents in VS Code.
Ways to chat in VS Code
VS Code gives you two main surfaces for working with agents, plus lightweight options for quick interactions. You can choose the experience that best fits your current task and workflow, and switch between them as needed.
| Name | Description | How to open |
|---|---|---|
| Agents window | A dedicated, agent-first window for orchestrating tasks across multiple projects. Focus on high-level tasks and outcomes. |
|
| Chat view | A code-first experience running in the editor sidebar, to assist you with coding tasks in your workspace. |
|
| Inline chat | Quick, in-place code edits or terminal suggestions. |
|
| Quick Chat | A lightweight chat panel at the top of the editor. |
|
Send a chat request
Type your message in the chat input box and press Enter or select the Send button. The agent analyzes your code, makes the changes, and responds with a summary. You can then continue the conversation with follow-up messages. For example, you might start with a request like:
Add input validation to the signup form
To give extra project-specific context, you can add context to your prompt by referencing files, symbols, or other information with #-mentions.
For common tasks, you can use slash commands as shortcuts for frequently used prompts or to invoke agent skills. Type / in the chat input to see all available commands.
You can run multiple sessions in parallel to work on different tasks simultaneously. When you start a new session, the previous session remains active in the background, allowing you to switch back to it at any time without losing context. Learn more in Manage chat sessions.
Each session has configuration options that shape how the agent responds, such as the agent type, agent, permission level, and language model. Learn how to configure your agent session.
To get the best results, be specific about what you want, provide relevant context, and write clear instructions. For more information, see Get better responses.
Send messages while a request is running
You don't have to wait for a response to finish before sending your next message. While a request is in progress, the Send button changes to a dropdown that gives you three options for how to handle the new message.
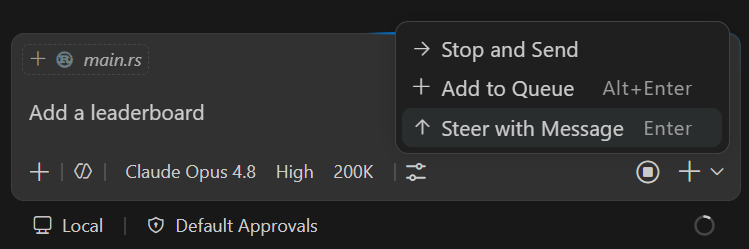
- Add to Queue: your message waits and sends automatically after the current response completes. The current response finishes uninterrupted.
- Steer with Message: signals the current request to yield after finishing the current tool execution. The current response stops and your new message processes immediately. Use this to redirect the agent when it's heading in the wrong direction.
- Stop and Send: cancels the current request entirely and sends your new message right away.
The default action for the Send button is configurable. Use
chat.requestQueuing.defaultAction
to set it to steer (default) or queue.
Reorder pending messages
When you have multiple pending messages (queued or steering), you can drag and drop them to change the order in which they are processed. A drag handle appears on hover when more than one message of the same type is pending.
Add context to your prompts
Providing the right context helps the AI generate more relevant and accurate responses.
-
Implicit context: VS Code automatically includes the active file, your current selection, and the file name as context. When you use agents, the agent decides autonomously if additional context is needed.
-
#-mentions: type#in the chat input to explicitly reference files (#file), folders, symbols, your codebase (#codebase), terminal output (#terminalSelection), or tools like#fetch. -
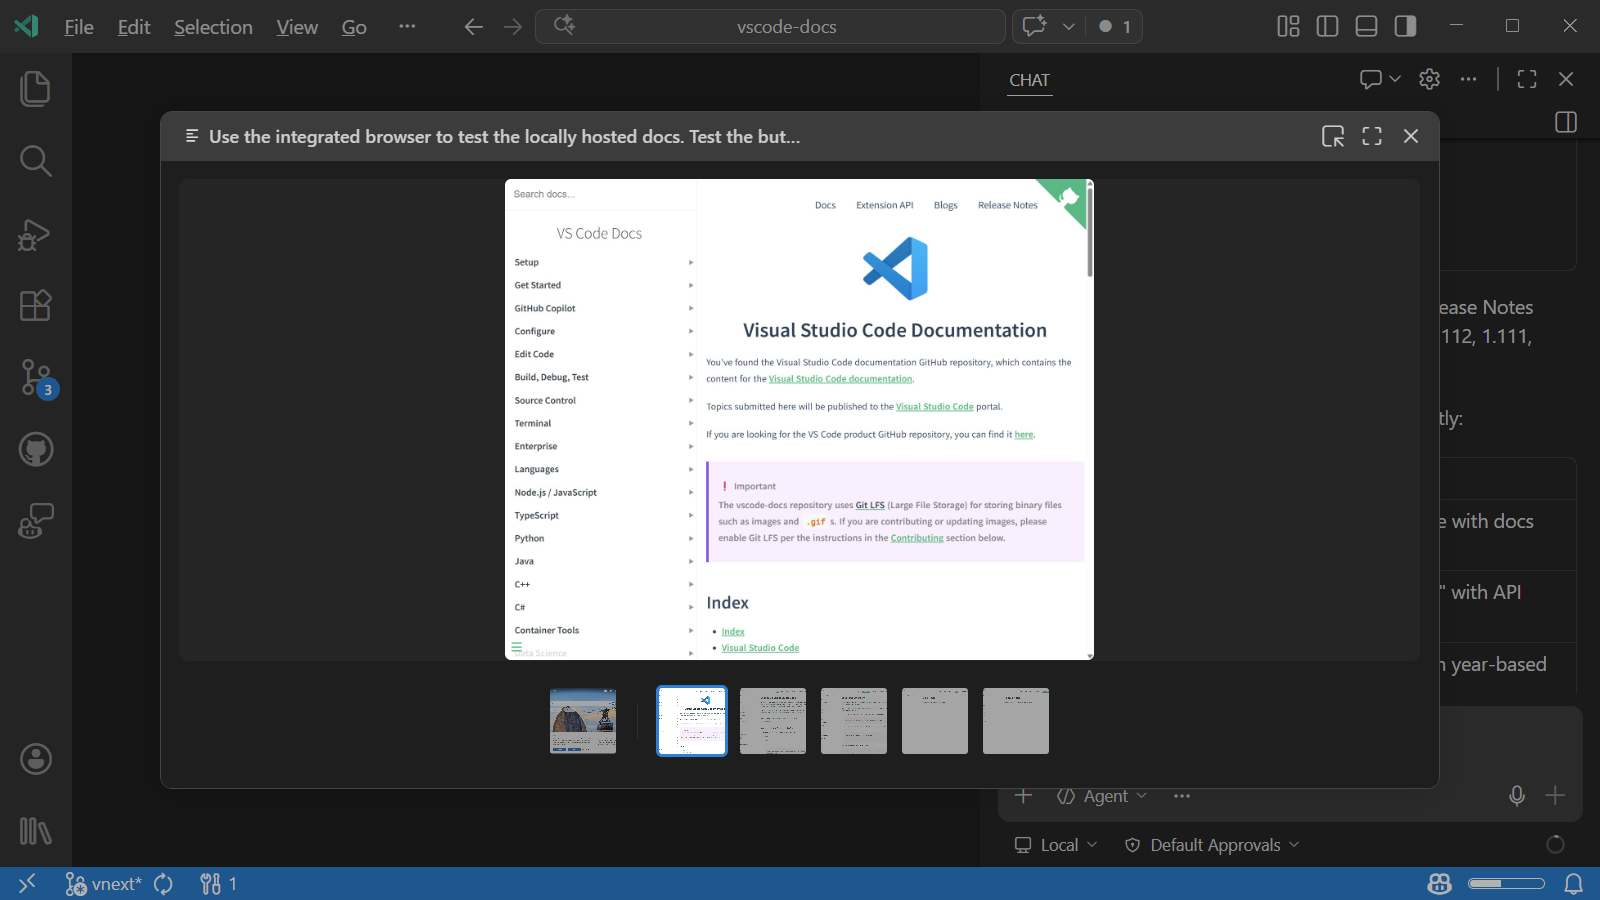
Vision: attach images, such as screenshots or UI mockups, as context for your prompt.
-
Browser elements: select elements from the integrated browser to add HTML, CSS, and screenshot context to your prompt.
Learn more about managing context for AI.
Image carousel (Experimental)
When imageCarousel.chat.enabled is enabled, you can select images or videos in chat responses to open a dedicated carousel view. Media files from tool results (such as the integrated browser, Playwright, or other MCP servers) and inlined in assistant messages are all accessible from the carousel.
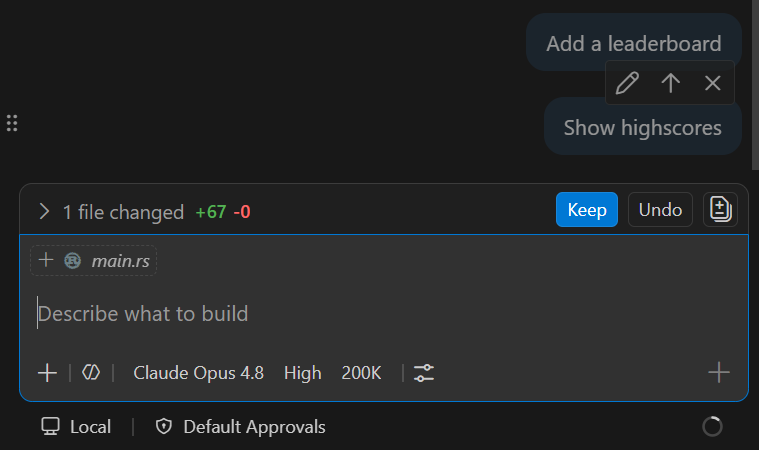
Review and manage changes
After the AI makes changes to your files, review and accept or discard them.
-
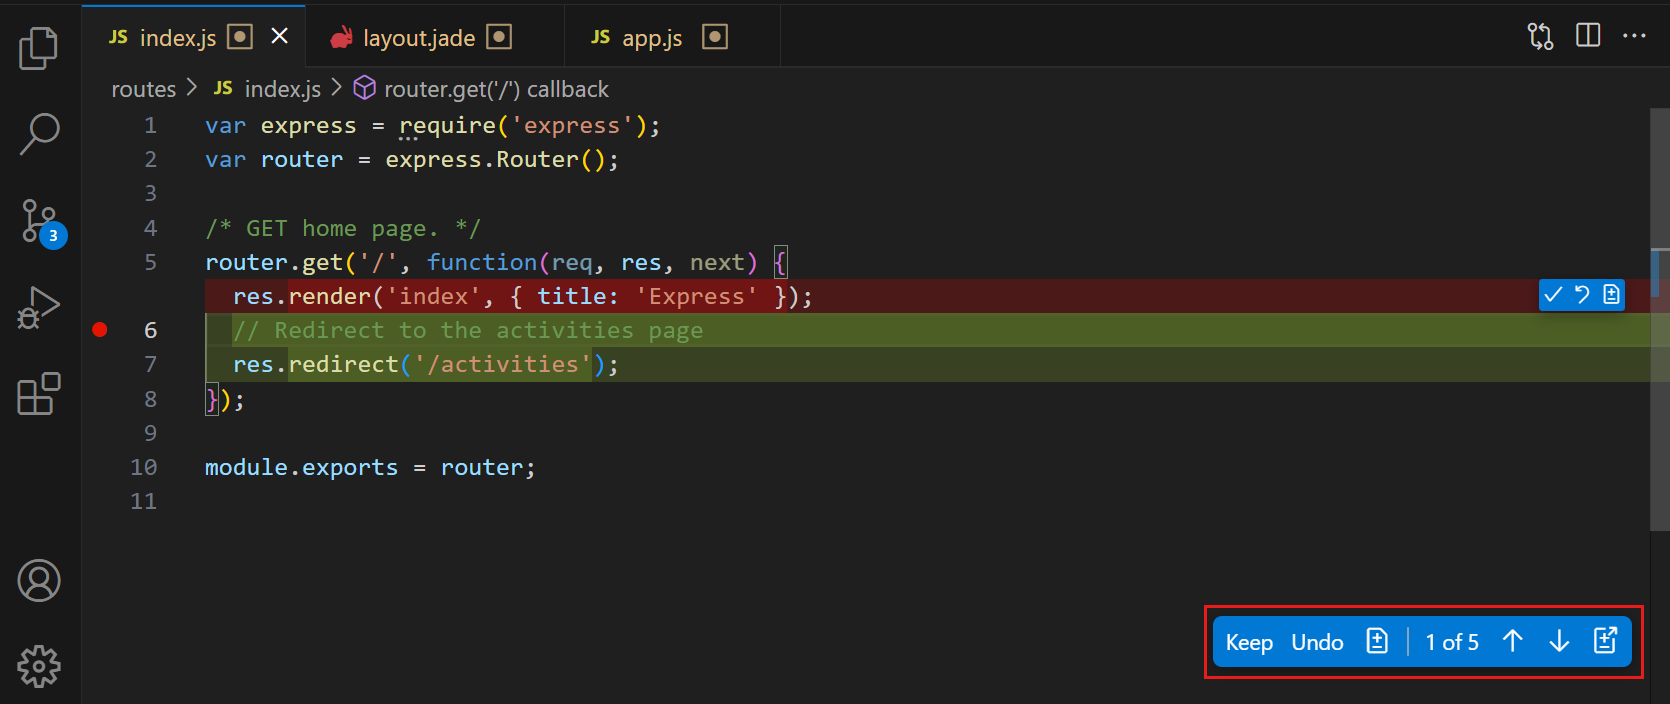
Review inline diffs: open a changed file to see inline diffs of the applied changes. Use the editor overlay controls to navigate between edits and Keep or Undo individual changes. For more information, see reviewing AI-generated code edits.
-
Use checkpoints: VS Code can automatically create snapshots of your files at key points during chat interactions, enabling you to roll back to a previous state. For more information, see checkpoints and editing requests.
-
Stage to accept: staging your changes in the Source Control view automatically accepts any pending edits. Discarding changes also discards pending edits.
Get notified about chat responses
When you're working in another window or application, VS Code can send you OS notifications to let you know about important chat events, so you don't have to keep checking back.
Use chat.notifyWindowOnResponseReceived to configure when you receive an OS notification when a chat response is received. The notification includes a preview of the response, and selecting it brings focus to the chat session.
Use chat.notifyWindowOnConfirmation to configure when you receive an OS notification when the agent needs your input or confirmation to continue.
Both settings have three possible values:
off: never show notificationswindowNotFocused(default): show notifications only when the VS Code window is not focusedalways: show notifications even when the VS Code window is in focus
Set the value to always if you want to stay aware of chat activity while working in other parts of VS Code, such as when running long agent tasks in the background.
Show request and completion timestamps
Chat can show timestamps for when you send a request and when a response completes. Hover over a completion timestamp to see elapsed response time.
Use chat.verbose to enable or disable these timestamps.
Navigate between prompts in a chat session
Use the following keyboard shortcuts to navigate between prompts in a chat session:
- ⌥⌘↑ (Windows, Linux Ctrl+Alt+Up): Go to the previous prompt in the chat session.
- ⌥⌘↓ (Windows, Linux Ctrl+Alt+Down): Go to the next prompt in the chat session.
- ⌥⌘PageUp (Windows, Linux Ctrl+Alt+PageUp): Go to the previous code block in the chat session.
- ⌥⌘PageDown (Windows, Linux Ctrl+Alt+PageDown): Go to the next code block in the chat session.
Get better responses
Chat provides several ways to improve the quality and relevance of AI responses:
-
Write effective prompts: be specific about what you want, reference relevant files and symbols, and use
/commands for common tasks. Get inspired by prompt examples or review the full prompt engineering guide. -
Customize the AI: tailor the AI's behavior to your project by adding custom instructions, creating reusable prompt files, or building custom agents for specialized workflows. For example, create a "Code Reviewer" agent that provides feedback on code quality and adherence to your team's coding standards.
-
Extend with tools: connect MCP servers or install extensions that contribute tools to give the agent access to external services, databases, or APIs.
For more information, see Customize agent behavior in VS Code.
Troubleshoot chat interactions
Use Agent Logs and the Chat Debug view to inspect what happens when you send a prompt. Agent Logs shows a chronological event log of tool calls, LLM requests, and prompt file discovery. The Chat Debug view shows the raw system prompt, user prompt, context, and tool payloads for each interaction. These tools are useful for understanding why the AI responded in a certain way or for troubleshooting unexpected results.
Support
Support for GitHub Copilot Chat is provided by GitHub and can be reached at https://support.github.com.
To learn more about Copilot's security, privacy, compliance, and transparency, see the GitHub Copilot Trust Center FAQ.