Copilot CLI sessions in Visual Studio Code
Visual Studio Code supports running agent sessions in the background by using GitHub Copilot CLI. You can start, monitor, and manage your Copilot CLI sessions from the unified Chat view in VS Code, while the agents run autonomously on your local machine while you continue other work in the editor. Run multiple Copilot CLI sessions in parallel to tackle independent tasks simultaneously.
To start a Copilot CLI session, you can either create a new session or hand off a local agent session to Copilot CLI, passing on existing context.
This article covers the key features of Copilot CLI agents, and how to start and manage background sessions from Copilot CLI.

If you primarily work with agents across multiple projects, you can also manage your Copilot CLI sessions in the Agents window, an agent-first surface that shares sessions with the main VS Code window.
Third-party providers like OpenAI Codex also offer background capabilities. Learn more about third-party agents.
What are Copilot CLI sessions?
Copilot CLI sessions run independently in the background on your local machine and use the Copilot CLI agent harness. VS Code integrates with these agents by using the Copilot SDK to start, stop, and monitor progress of your background sessions. VS Code automatically installs and configures the Copilot CLI for you.
Copilot SDK sessions run outside of VS Code and continue to run in the background when you close your VS Code window. This behavior is unlike local agents that use the VS Code agent harness inside the editor and stop running when VS Code stops.
You can interact with Copilot CLI sessions from the unified Chat view. When a background session requires your input or needs permissions to perform an action, you can do so from within chat. The agent status indicator also provides hints when a session needs input.
Because Copilot CLI sessions run in the background, they are well-suited for tasks that have a well-defined scope, have all necessary context, and don't require frequent user interaction. Examples include implementing a feature from a plan, creating multiple variants of a proof of concept, or implementing clearly defined fixes or features.
Copilot CLI supports slash commands in chat, including reusable prompts, agent skills, hooks, /compact to manage long conversations, /research to run deep research, and /yolo or /autoApprove to toggle auto-approval of tools. Type / in the chat input of a Copilot CLI session to see available commands.
Isolation modes
Copilot CLI supports two types of isolation modes to manage how changes from the agent are applied to your codebase: Worktree and Folder isolation. You can choose the isolation mode when you create a new Copilot CLI session.
To isolate changes from the Copilot CLI agent and prevent interference with your active work, use Worktree isolation. In this mode, VS Code creates a Git worktree in a separate folder for the Copilot CLI session. All changes made by the agent are applied to the worktree, keeping them separate from your main workspace until you're ready to review and apply them.
If you fork a Copilot CLI session that uses worktree isolation, the forked session continues to use the same worktree as the original session. VS Code removes the shared worktree only after the last linked session is deleted or archived.
If you want the changes from the Copilot CLI session to be applied directly to your current workspace, you can choose Folder isolation. In this mode, the agent operates directly in your current workspace, and changes are applied in place.
To use Git worktrees and worktree isolation, your workspace needs to be a Git repository.
Permissions and approvals
Copilot CLI sessions support the same permission levels as local agents. The available permission levels depend on the isolation mode you choose:
- Worktree isolation: the permission level is automatically set to Bypass Approvals and can't be changed. Because the agent operates on an isolated copy of your codebase (Git worktree), all tool calls are auto-approved without confirmation dialogs.
- Folder isolation: all three permission levels are available (Default Approvals, Bypass Approvals, and Autopilot), just like local agent sessions. Select a level from the permissions picker in the chat input area.
Create a Copilot CLI session
Authenticate with GitHub Enterprise
Copilot CLI sessions use the same GitHub authentication context as chat in VS Code. If you are signed in with a GitHub Enterprise account for Copilot, Copilot CLI sessions use that account as well.
For managed user accounts on GHE.com, complete the required account setup before you sign in. See Using GitHub Copilot with an account on GHE.com.
If Copilot CLI sessions can start but requests fail, verify that your Copilot subscription is active for the signed-in account and then sign out and sign in again in VS Code.
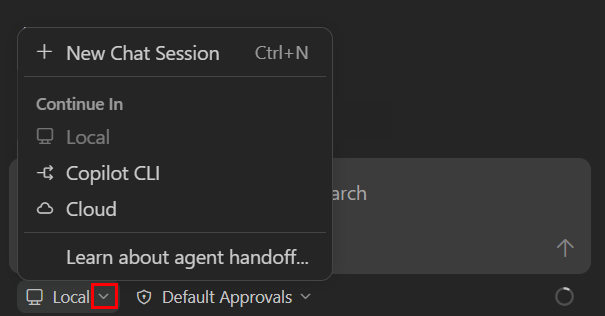
To create a new Copilot CLI session in VS Code:
-
Create a new session using either of these options
-
Open the Chat view (⌃⌘I (Windows, Linux Ctrl+Alt+I)) and select Copilot CLI from the Session Target dropdown
-
Select the New Chat icon at the top, and select New Copilot CLI Session
-
Run the Chat: New Copilot CLI command from the Command Palette (⇧⌘P (Windows, Linux Ctrl+Shift+P))
-
-
Choose between folder or worktree isolation mode
If you use worktree isolation, the agent automatically commits changes to the worktree at the end of each turn, so the session history stays aligned with the commit history.
TipYou can open the worktree of a session by right-clicking it in the session list and selecting Open Worktree in New Window. You can also view the worktree in the Source Control view repository explorer (
scm.repositories.explorer). -
Submit your prompt to start the agent. Optionally, add extra context or choose a specific language model and custom agent.
-
Track the session status in the Chat view.
You can create multiple Copilot CLI sessions to work on different tasks in parallel.
Hand off a local session to Copilot CLI
For complex tasks, it can be helpful to first interact with a local agent in VS Code to clarify requirements, and then hand off the task to Copilot CLI for autonomous execution in the background. This can be useful when using the Plan agent to create a plan and then hand off the implementation of that plan to Copilot CLI.
When you hand off a local agent conversation to a Copilot CLI session, the full conversation history and context is passed to the background session.
To hand off a local agent session to Copilot CLI:
-
Open the Chat view (⌃⌘I (Windows, Linux Ctrl+Alt+I))
-
Interact with a local agent until you're ready to hand off the task
-
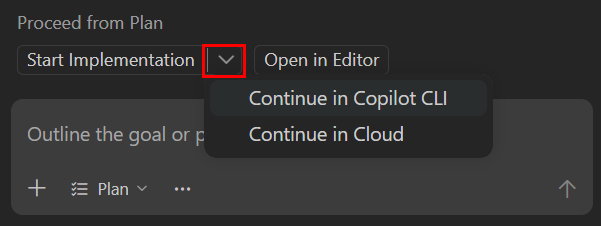
To hand off to Copilot CLI, you have the following options:
-
Open the Session Target dropdown and then select Copilot CLI
-
If you're using the Plan agent, select the Start Implementation dropdown and the select Continue in Copilot CLI to run the implementation in a Copilot CLI session
-
The Copilot CLI session starts automatically, carrying over the full conversation history and context.
Remote control Copilot CLI sessions
The "/remote on" command lets you remote control a Copilot CLI session from github.com or the GitHub Mobile app. With remote control, you can monitor and steer your ongoing Copilot CLI sessions from anywhere, giving you more flexibility to keep work moving without being tied to your machine. You keep the full session context and history in sync across both VS Code and GitHub.
Remote control is one of two ways to run agent sessions remotely. You can also connect the Agents window to a remote machine over SSH or a dev tunnel. Learn more about remote agent sessions.
When remote control is enabled, VS Code streams the session history, tool activity, and status updates to the linked GitHub task page in real time. Actions you take in one place are reflected in the other. If the session requires approval for a tool call or input for a question, the prompt is shown in both places and you can respond from either location.
To use remote control for a Copilot CLI session:
-
Start or resume a Copilot CLI session from the Chat view.
-
Enter
"/remote on"in the chat input to enable remote control and create the linked GitHub task page. -
Select Open on GitHub to open the linked task page or scan the QR code to open it on your mobile device.
Run "/remote" at any time to check the current remote-control status. The "/remote" command only shows status and does not enable or disable remote control.
To stop mirroring the session to GitHub, enter "/remote off" in the chat input.
To disable remote control support for Copilot CLI sessions in VS Code, disable the github.copilot.chat.cli.remote.enabled setting.
Remote control requires GitHub authentication in VS Code and a workspace that maps to a GitHub repository. If additional GitHub permissions are needed, VS Code prompts you to grant them before remote control is enabled.
Use Copilot CLI from the terminal
In addition to starting Copilot CLI sessions from the Chat view, you can use Copilot CLI directly from the VS Code terminal.
Open a Copilot CLI terminal
VS Code registers a GitHub Copilot CLI terminal profile that you can use to open a dedicated Copilot CLI terminal. You can open a Copilot CLI terminal in several ways:
-
Select the dropdown next to the + button in the Terminal panel and select GitHub Copilot CLI
-
Run the Chat: New Copilot CLI Session command from the Command Palette to open a Copilot CLI terminal in the panel, or run Chat: New CLI Session to the Side to open it in an editor tab beside your current editor
-
Run the Terminal: Create New Terminal (With Profile) command from the Command Palette (⇧⌘P (Windows, Linux Ctrl+Shift+P)) and select GitHub Copilot CLI
-
Type
copilotin any VS Code integrated terminal to start the Copilot CLI directly
The Copilot CLI terminal supports the following shells:
- bash and zsh on macOS and Linux
- PowerShell and Command Prompt on Windows
Start and resume sessions from the terminal
When you start a new session from the Copilot CLI terminal, VS Code automatically detects the session and displays it in the Chat view sessions list. You can then track progress, send follow-up prompts, or review changes from either the terminal or the Chat view.
To resume an existing Copilot CLI session in the terminal, right-click the session in the sessions list and select Resume in Terminal.
VS Code automatically handles authentication for the Copilot CLI terminal, so you don't need to sign in separately, including when you use GitHub Enterprise authentication in VS Code.
Multi-repository workspaces
If your workspace contains multiple Git repositories, VS Code displays a repository picker in the chat input when you start a Copilot CLI session. Use this picker to select which repository the worktree should be created in.
After the session starts, the repository picker becomes disabled for that session. The worktree appears under the selected repository in the Worktrees node in the Source Control Repositories view.
To view all repositories in your workspace, enable the scm.repositories.explorer setting and open the Source Control view.
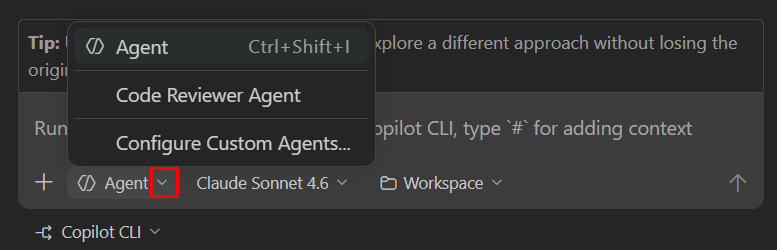
Use custom agents with Copilot CLI
Custom agents let you define custom personas and roles for agents in VS Code. For example, you might create a custom agent for performing code reviews. Custom agents can define specific instructions and behaviors.
When you create a Copilot CLI session, you can select a custom agent to handle the task. The custom agent operates according to the defined behavior.
To use custom agents with Copilot CLI:
-
Enable custom agents for Copilot CLI with the github.copilot.chat.cli.customAgents.enabled setting
-
Create a custom agent in your workspace with the Chat: New Custom Agent command from the Command Palette (⇧⌘P (Windows, Linux Ctrl+Shift+P))
-
Create a new Copilot CLI session and select the custom agent from the Agents dropdown
-
Enter a prompt and notice that the custom agent is used to handle the task
Currently, only custom agents defined in the workspace are available for Copilot CLI sessions. Learn more about creating a custom agent.
Run deep research with the research agent
The research agent in VS Code is currently in preview and available only in Copilot CLI (local) sessions in Insiders.
The research agent performs deep research on a topic and produces a thorough, well-cited Markdown report. It gathers and synthesizes information from your codebase, relevant GitHub repositories, and the web, which makes it useful for investigating unfamiliar code, comparing approaches, or understanding how a library or API works.
Unlike a regular chat response, which is optimized for quick answers, the research agent is optimized for depth. It has read-only access and produces a report instead of changing your code, so it's best suited for investigation rather than implementation.
To run the research agent, type /research followed by your topic in the chat input of a Copilot CLI session, for example:
/research How does the authentication flow work in this codebase?
For research that feeds directly into an implementation plan, use the Plan agent, which researches your task before proposing a plan. To delegate focused research within a session without producing a standalone report, use subagents.
For more information about the research agent, see Researching with GitHub Copilot CLI in the GitHub documentation.
Limitations of Copilot CLI sessions
-
Copilot CLI sessions can't access all VS Code built-in tools. You can explicitly add context in the chat input.
-
Don't have access to extension-provided tools and are limited to the models available via the CLI tool.
-
Can currently only access local MCP servers that don't require authentication.
Related resources
- Agents overview: Understand different agent types and how to hand off tasks between agents
- Custom agents: Create custom agent roles and personas
- Researching with GitHub Copilot CLI: Learn more about the research agent in the GitHub documentation
- GitHub Copilot CLI documentation