Prompt engineering in VS Code
This article covers tips to write prompts to get better and more relevant responses from AI in Visual Studio Code. Prompt engineering or prompt crafting is a common phrase you'll hear when discussing AI and refers to how and what information is packaged and sent to an AI API endpoint.
If you are new to VS Code or AI, you might want to review the AI in VS Code Overview article first or dive straight into the Getting started tutorial.
Getting the most out of inline suggestions
Inline suggestions help you code more efficiently by automatically offering suggestions to complete your code, comments, tests, and more. There are things you can do to help ("prompt") the AI to give you the best possible suggestions.
Provide context
The AI works best when it has sufficient context to know what you're doing and what you want help with. Just as you would provide a colleague with the context when asking for help with a specific programming task, you can do the same with AI.
Open files
For inline suggestions, VS Code looks at the current and open files in your editor to analyze the context and create appropriate suggestions. Having related files open in VS Code while using inline suggestions helps set this context and lets the AI see a bigger picture of your project.
Top level comment
Just as you would give a brief, high-level introduction to a coworker, a top level comment in the file you're working in can help the AI understand the overall context of the pieces you are creating.
Appropriate includes and references
It's best to manually set the includes or module references you need for your work. The AI can make suggestions, but you likely know best what dependencies you need to include. This can also help let the AI know what frameworks, libraries, and their versions you'd like it to use when crafting suggestions.
In the following TypeScript example, we want to log the output of the add method. When we don't have any includes, the AI suggests using console.log:
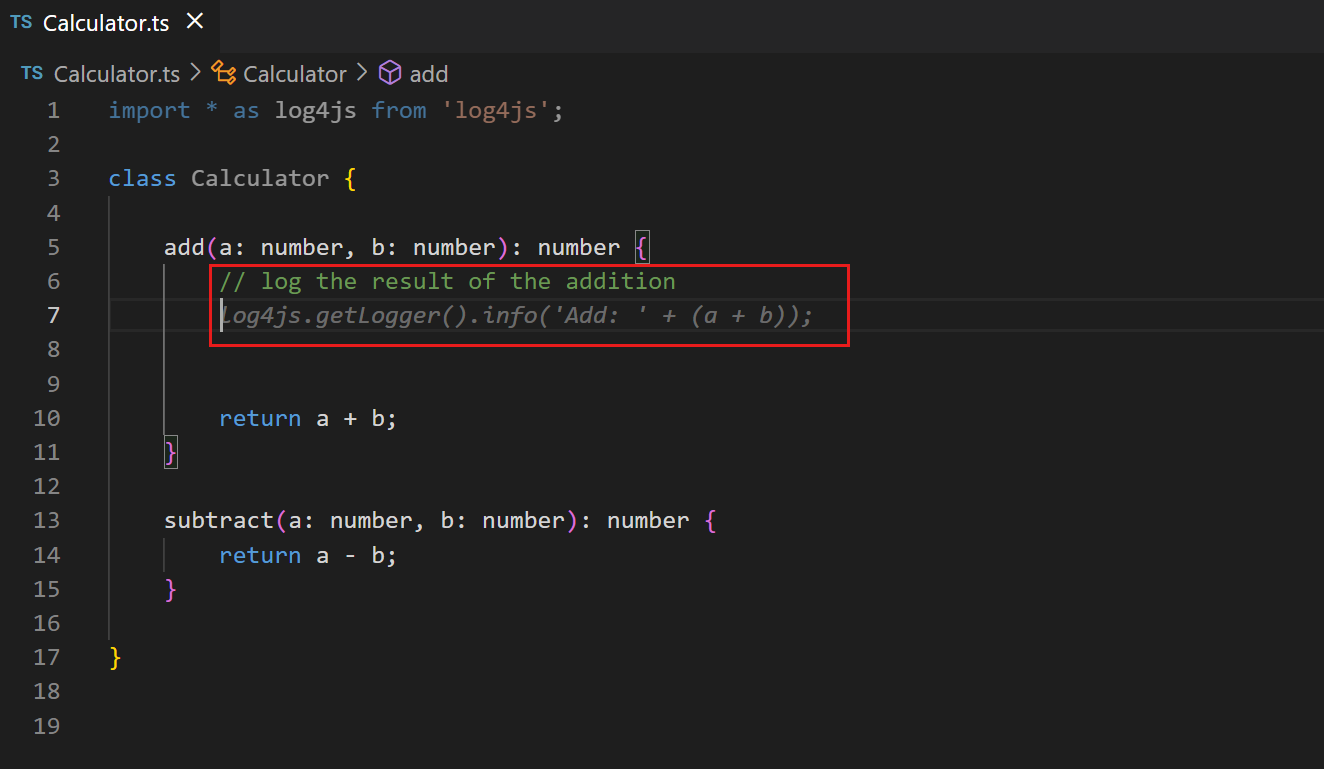
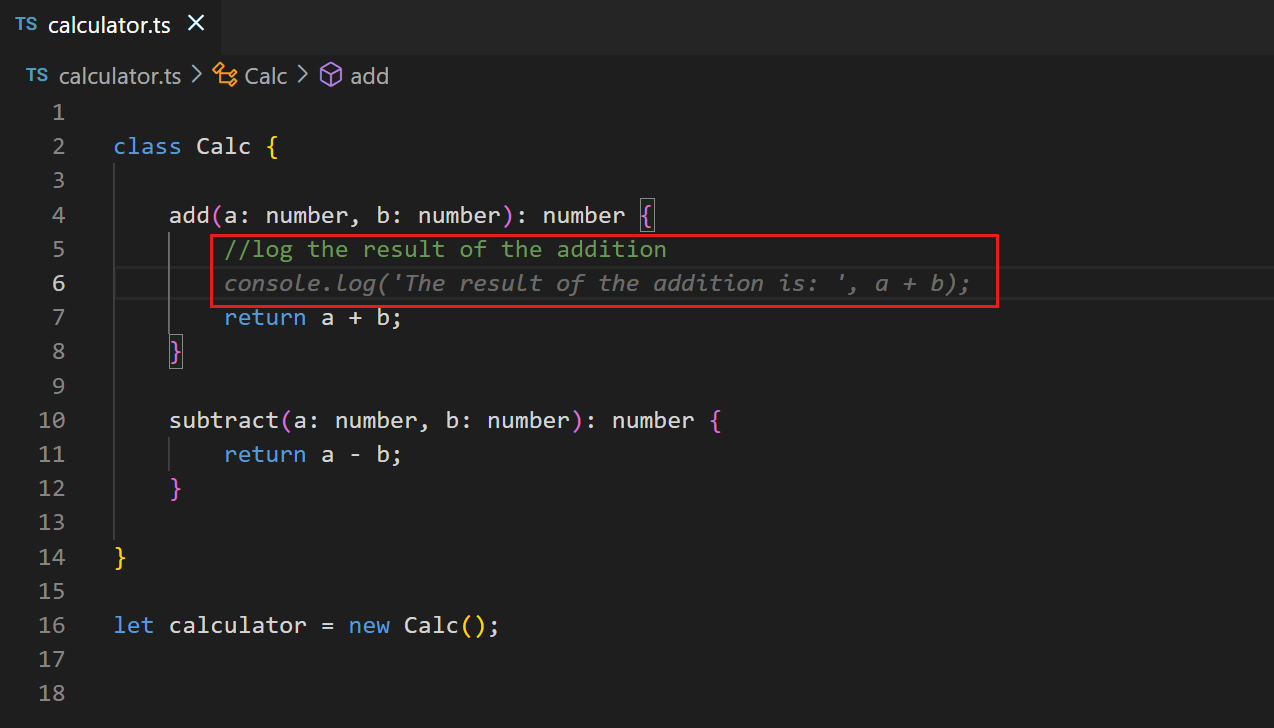 On the other hand, when you add a reference to
 Log4js, the AI suggests using that framework for logging the output:
Meaningful function names
Just as a method called fetchData() won't mean much to a coworker (or you after several months), fetchData() won't help the AI either. Using meaningful function names helps the AI provide a body that does what you want.
Specific and well-scoped function comments
A function name can only be so descriptive without being overly long. Function comments can help fill in details that the AI might need to know.
Prime AI with sample code
One trick to get AI on the right page, is to copy and paste sample code that is close to what you are looking for into your open editor. Providing a small example can help AI generate suggestions that match the language and tasks you want to achieve. Once AI begins providing you with the code you want and will actually use, you can delete the sample code from the file. This can be especially helpful to jumpstart AI to a newer library version when it defaults to providing older code suggestions.
Be consistent and keep the quality bar high
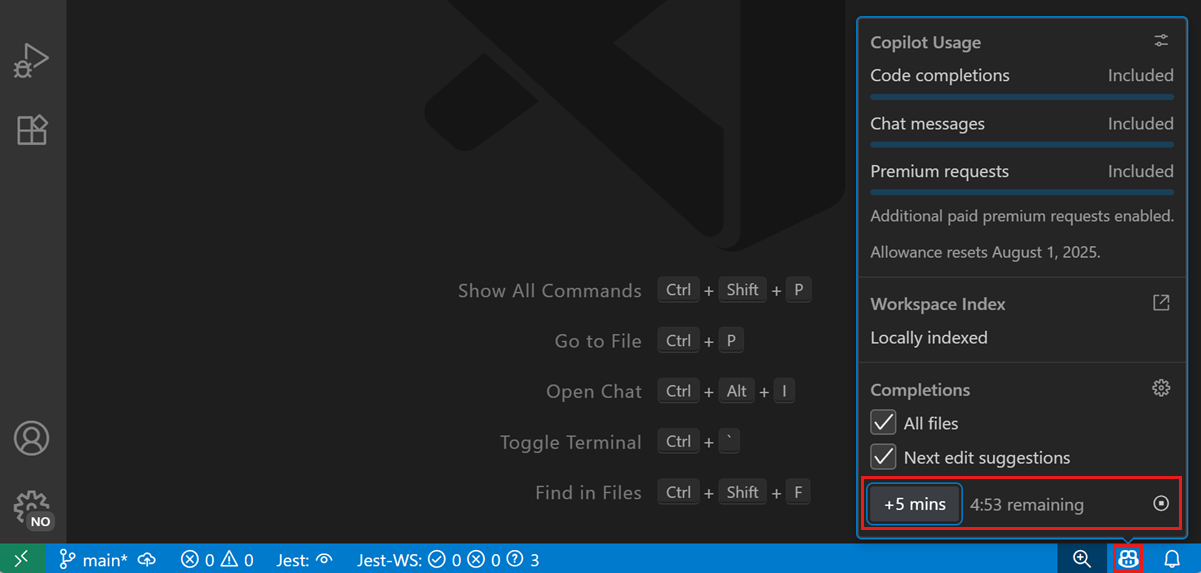
The AI is going to latch on to your code to generate suggestions that follow the existing pattern, so the adage "garbage in, garbage out" applies. Always keeping a high quality bar can take discipline. Especially when you're coding fast and loose to get something working, you might want to disable completions while in "hacking" mode. To snooze inline suggestions temporarily, select the Copilot menu in the Status Bar, and then select the Snooze button to increment the snooze time by five minutes. To resume inline suggestions, select the Cancel Snooze button in the Copilot menu.
Getting the most out of chat
When you're using chat, there are several things you can do to optimize your experience.
Add relevant context
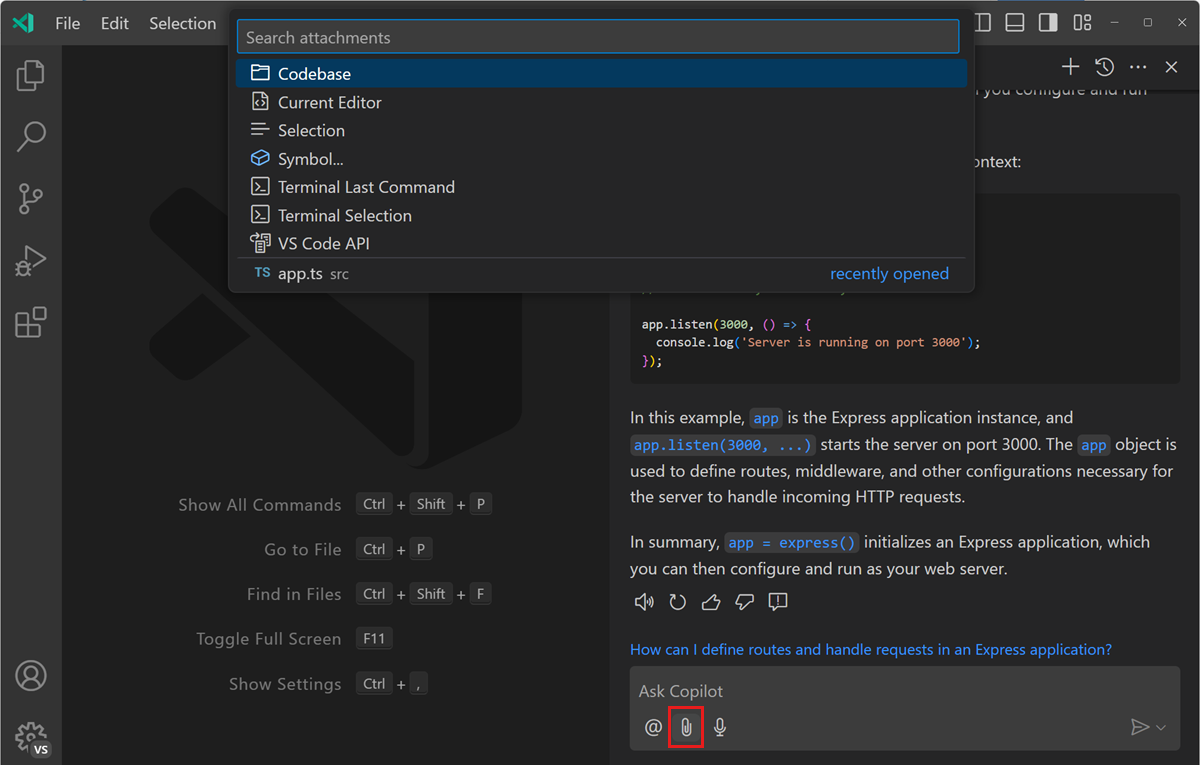
You can explicitly add context to your prompt by typing # followed by the context item you want to mention. VS Code supports different types of context items: files, folders, code symbols, tools, terminal output, source control changes, and more.
Type the # symbol in the chat input field to see a list of available context items, or select Add Context in the Chat view to open the context picker.
For example, with #<file name> or #<folder name> you can reference specific files or folders from your workspace in your chat prompt. This helps make the answers from Copilot Chat more relevant to your code by providing context about the file you are working with. You can ask questions like "Can you suggest improvements to #package.json?" or "How do I add an extension in #devcontainer.json?".
Instead of adding individual files manually, you can let VS Code find the right files from your codebase automatically by using #codebase. This can be useful when you don't know which files are relevant to your question.
Learn more about using context in chat.
Be specific and keep it simple
When you ask chat to do something, be specific in your ask and break down a large task into separate, smaller tasks. For example, don't ask chat to create an Express app, that uses TypeScript and Pug, and that has a products page that retrieves data from a MongoDB database. Instead, first ask to create the Express app with TypeScript and Pug. Next, ask to add a products page, and finally ask to retrieve the customer data from a database.
When you ask chat to do a specific task, be specific about the inputs, outputs, APIs, or frameworks you want to use. The more specific your prompt is, the better the outcome will be. For example, instead of "read product data from the database", use "read all products by category, return the data in JSON format, and use the Mongoose library".
Iterate on your solution
When asking chat for help, you aren't stuck with the first response. You can iterate and prompt chat to improve the solution. Chat has both the context of the generated code and also your current conversation. Here's an example using Inline Chat to create a function to calculate Fibonacci numbers:
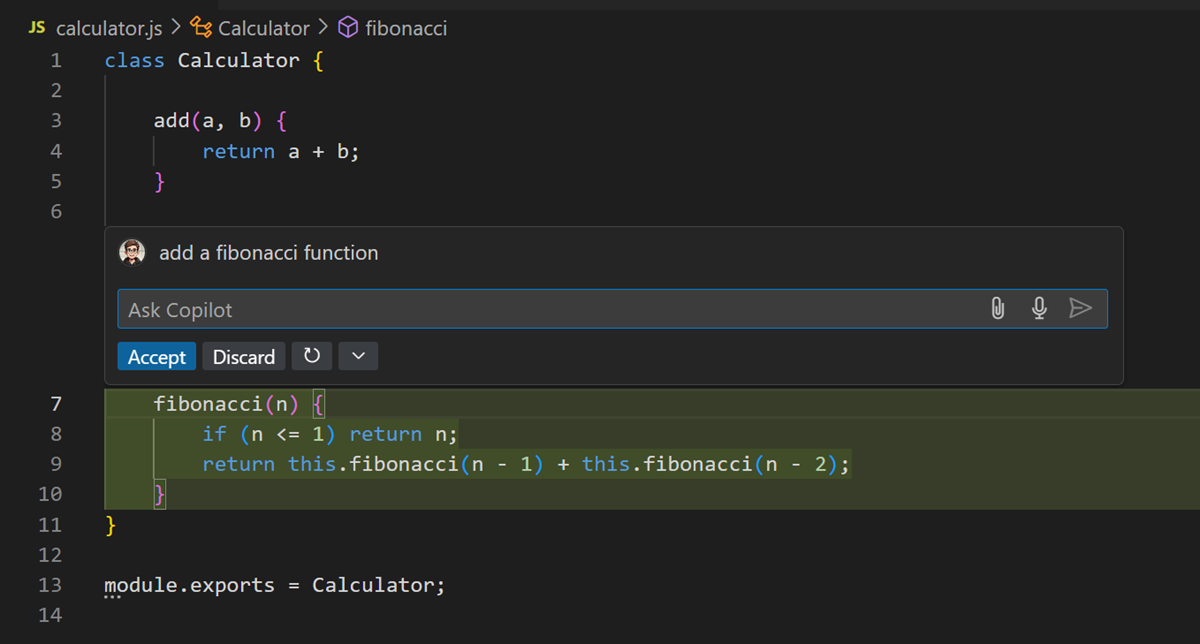
Maybe you prefer a solution that doesn't use recursion:
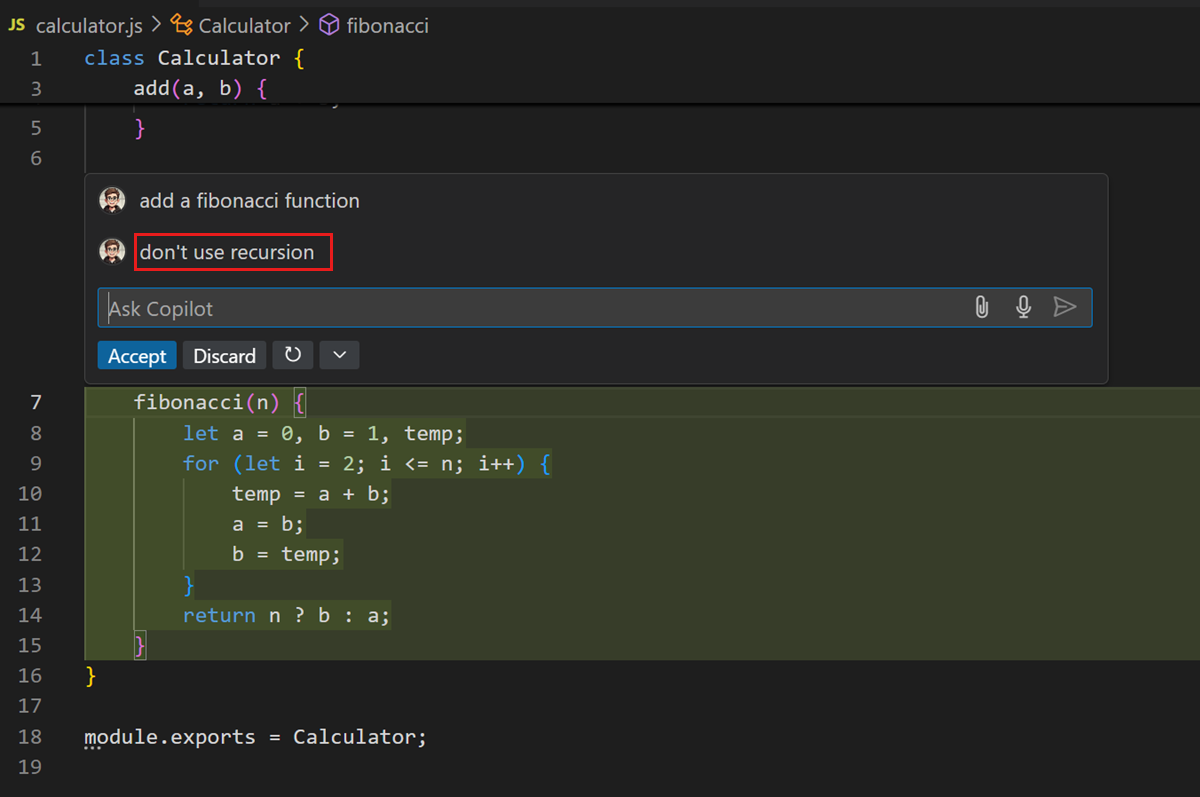
You can even ask AI to follow coding conventions or improve variable names:
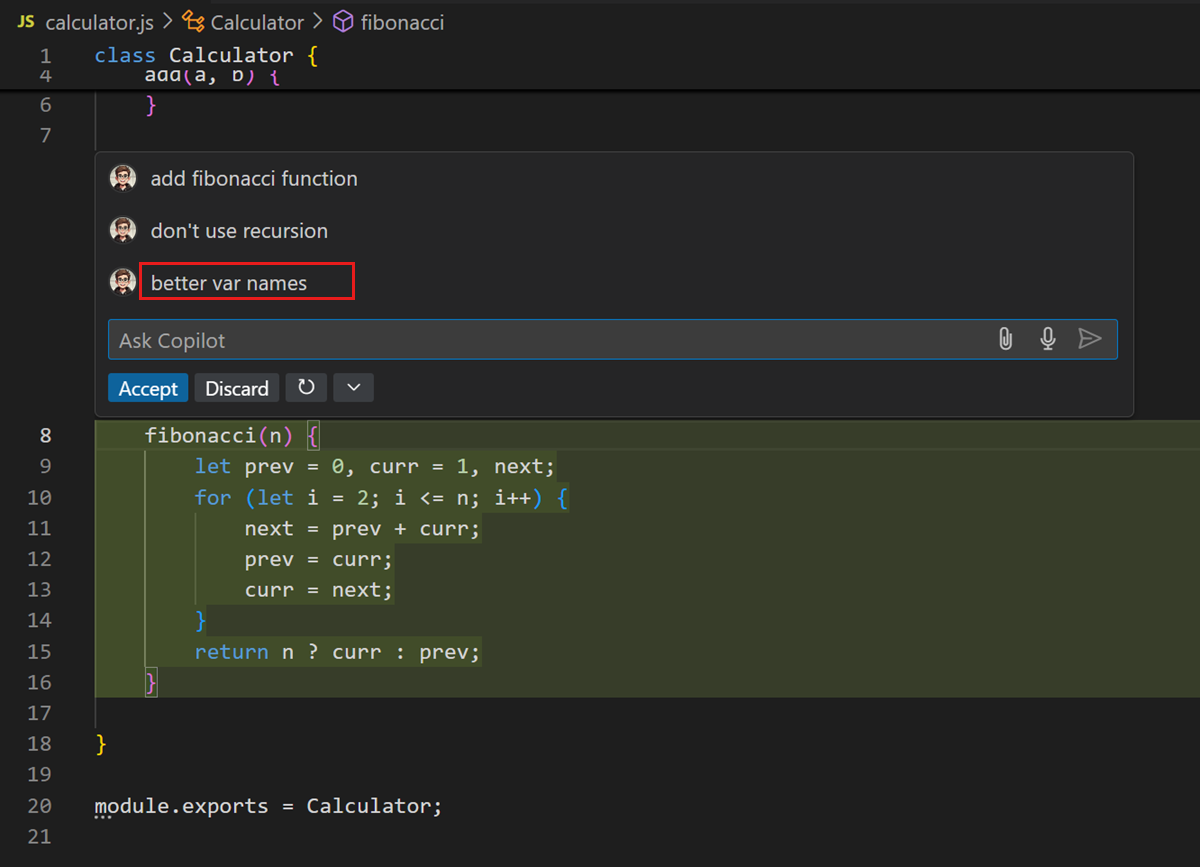
Even if you've already accepted a result, you can always ask AI to iterate on the code later.
More resources about prompting for Copilot
If you'd like to learn more about productively using GitHub Copilot, you can follow up with these videos and blog posts: