Python testing in Visual Studio Code
The Python extension builds on the built-in testing features in VS Code and provides test discovery, test coverage, and running and debugging tests for Python's built-in unittest framework and pytest.
Configure tests
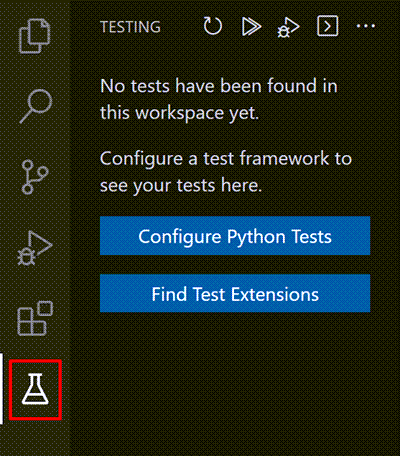
When the Python extension is installed and a Python file is open within the editor, a test beaker icon displays on the VS Code Activity Bar representing the Test Explorer view. Opening the Test Explorer shows a Configure Python Tests button if a test framework is not enabled. Selecting Configure Python Tests prompts you to select a test framework and a folder containing the tests. If you use unittest, you also select the file glob pattern used to identify your test files.
A file glob pattern is a defined string pattern that matches file or folder names based on wildcards to include or not include files.
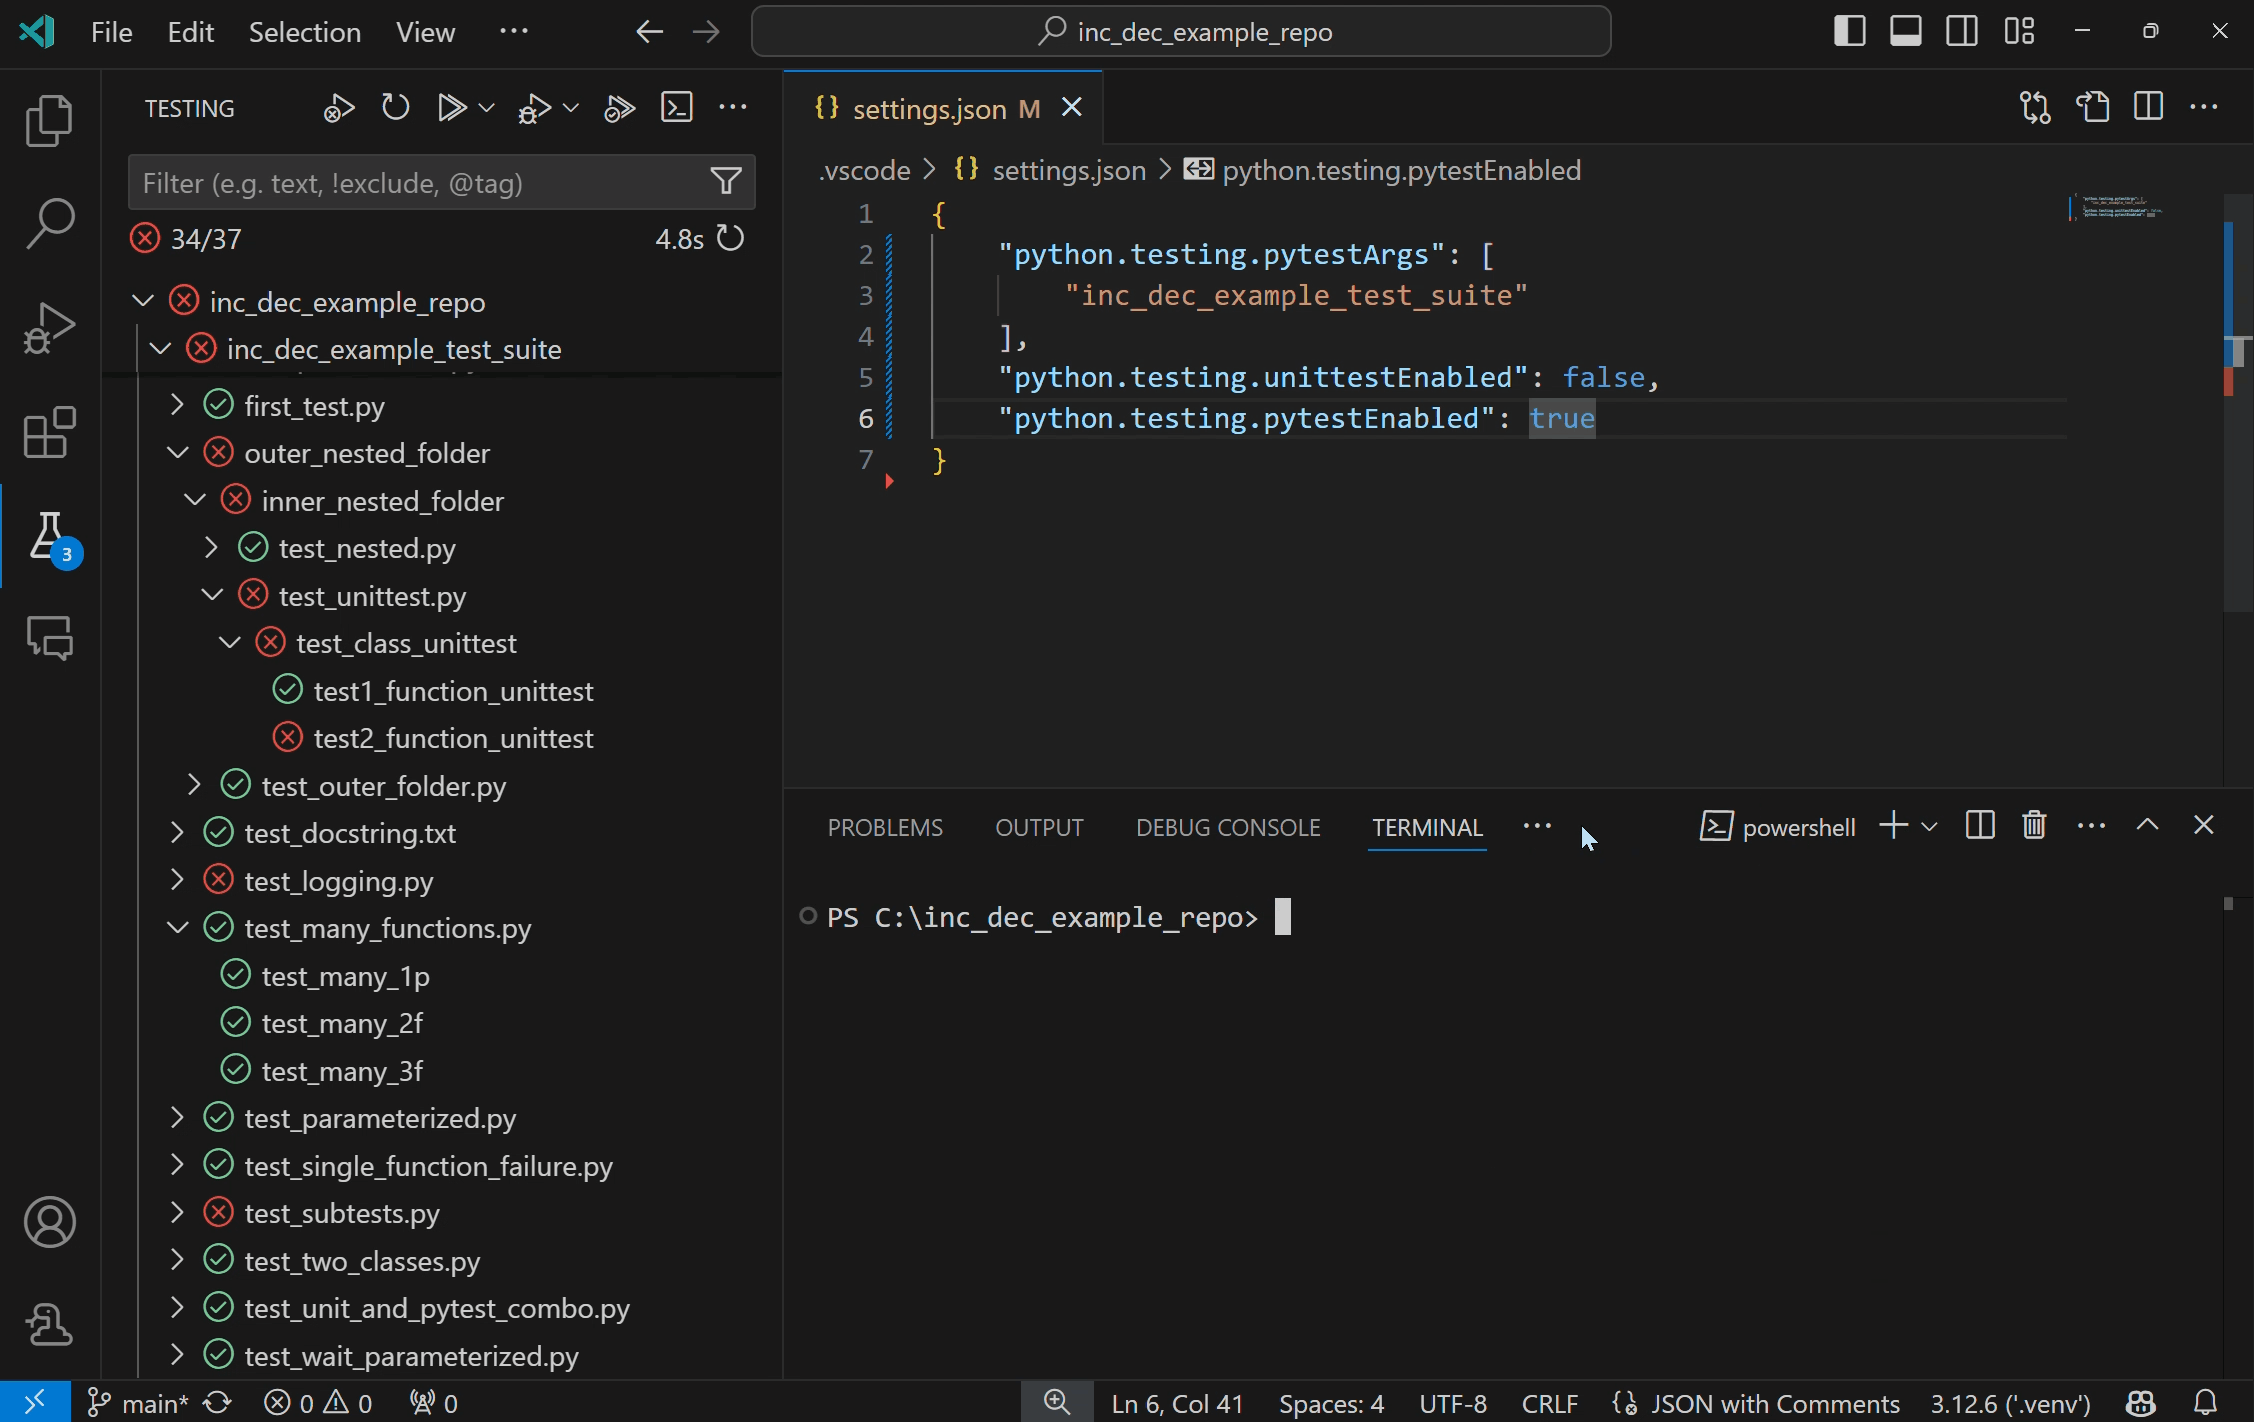
Tests can be configured anytime by using the Python: Configure Tests command from the Command Palette or by setting either python.testing.unittestEnabled or python.testing.pytestEnabled in the Settings editor or settings.json file as described in the VS Code Settings documentation. Each framework also has specific configuration settings as described under Test configuration settings for their folders and patterns.
If you enable pytest and it is not currently installed in the activated environment, the Python extension attempts to install it in the background. Furthermore, if both frameworks are enabled, the Python extension only runs pytest.
The minimum supported version of pytest for the python extension is 7.0.0.
Test discovery
By default, the Python extension attempts to discover tests once you enable a framework. You can trigger test discovery at any time using the Test: Refresh Tests command from the Command Palette.
python.testing.autoTestDiscoverOnSaveEnabled is set to true by default, meaning that test discovery occurs automatically whenever you add, delete, or update any Python file in the workspace. To disable this feature, set the value to false, which can be done either in the Settings editor or in the settings.json file as described in the VS Code Settings documentation. You need to reload the window for this setting to take effect. For more control over files included in auto test discovery, adjust the python.testing.autoTestDiscoverOnSavePattern setting, which defaults to **/*.py.
Test discovery applies the discovery patterns for the current framework (which can be customized using the Test configuration settings). The default behavior is as follows:
-
python.testing.unittestArgs: Looks for any Python (.py) file with "test" in the name in the top-level project folder. All test files must be importable modules or packages. You can customize the file matching pattern with the-pconfiguration setting, and customize the folder with the-tsetting. -
python.testing.pytestArgs: Looks for any Python (.py) file whose name begins with "test_" or ends with "_test", located anywhere within the current folder and all subfolders.
Sometimes tests placed in subfolders aren't discovered because such test files cannot be imported. To make them importable, create an empty file named __init__.py in that folder.
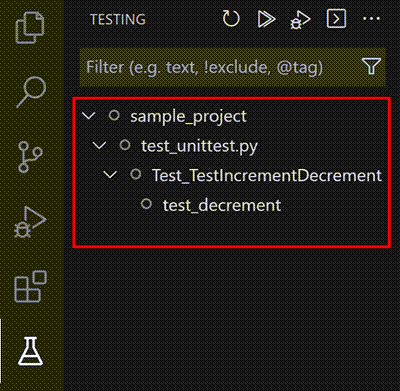
If the test discovery succeeds, you'll see tests listed in the Test Explorer:
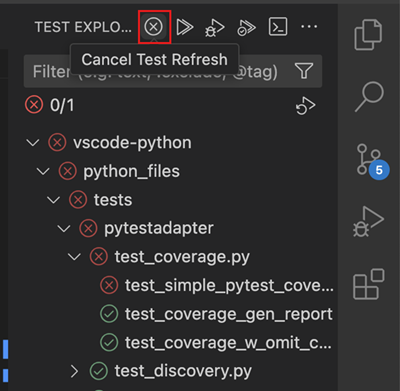
When triggering test discovery directly from the Test Explorer, you can also cancel an ongoing test discovery call. Use the Cancel button, which replaces the Refresh button during discovery.
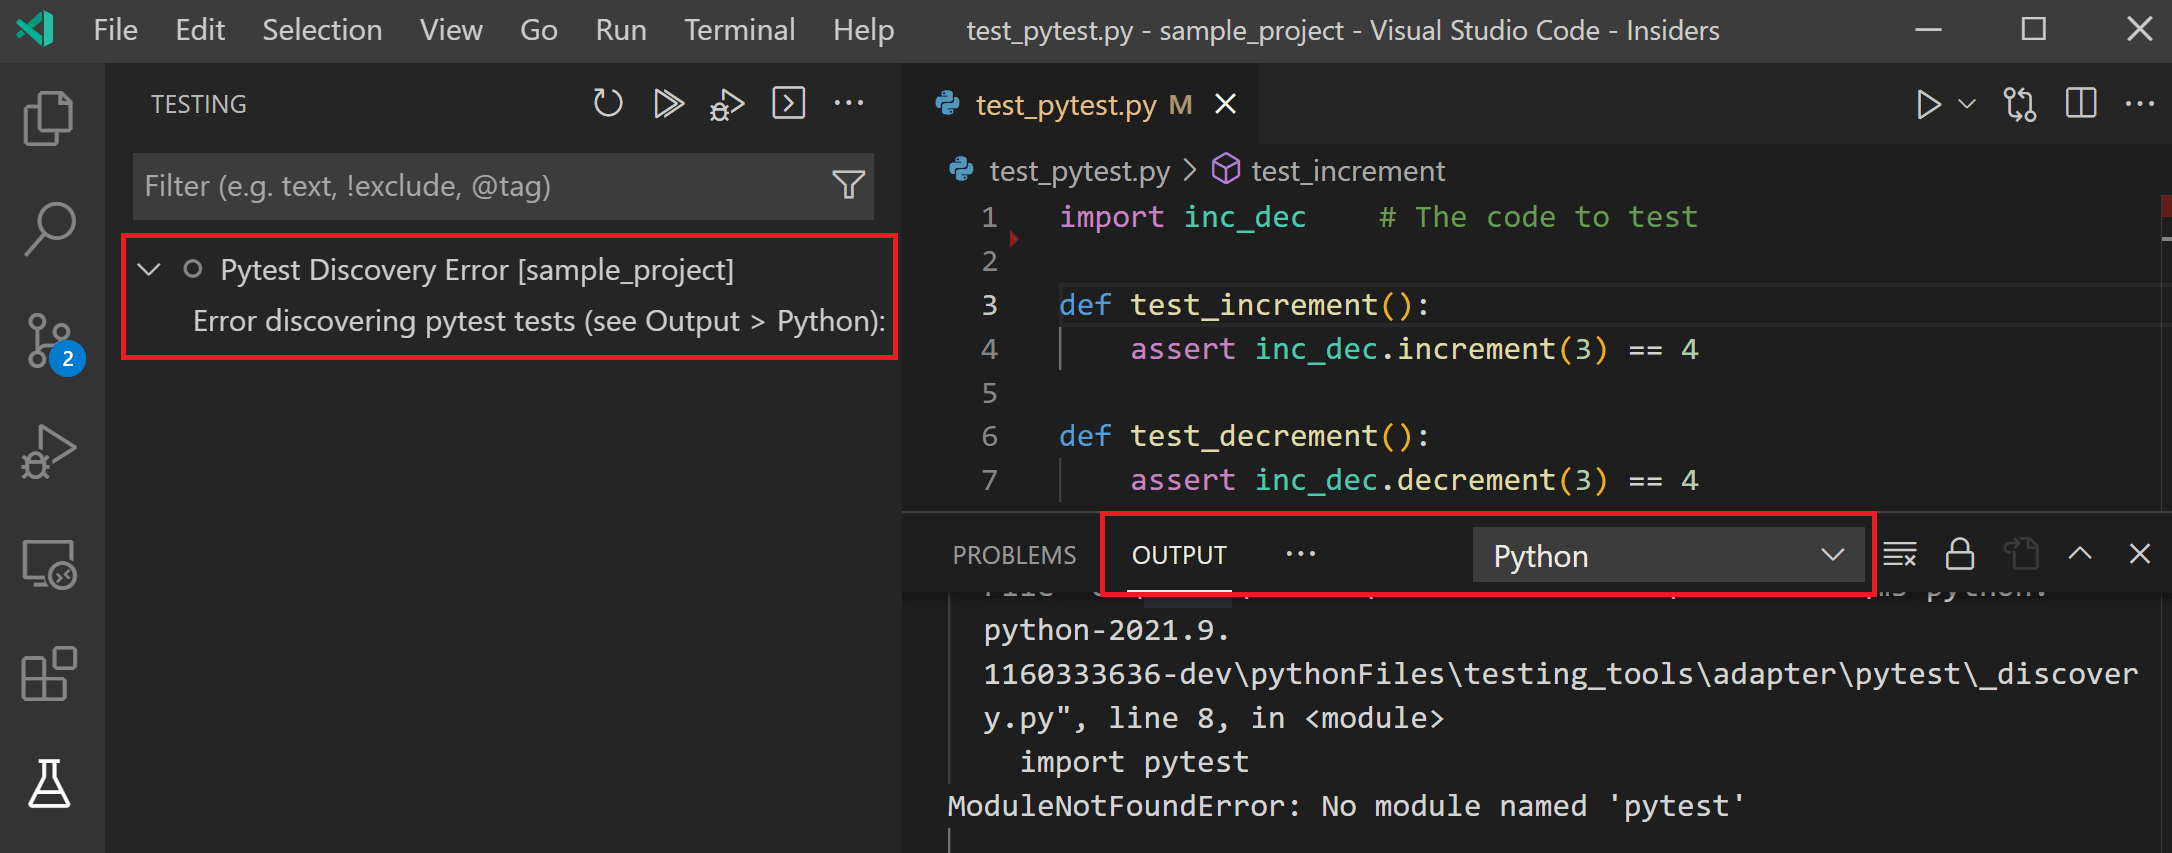
If discovery fails (for example, the test framework isn't installed or you have a syntax error in your test file), you'll see an error message displayed in the Test Explorer including a link to the logs. You can check the Python output panel to see the entire error message (use the View > Output menu command to show the Output panel, then select Python from the dropdown on the right side).
Run tests
You can run tests using any of the following actions:
-
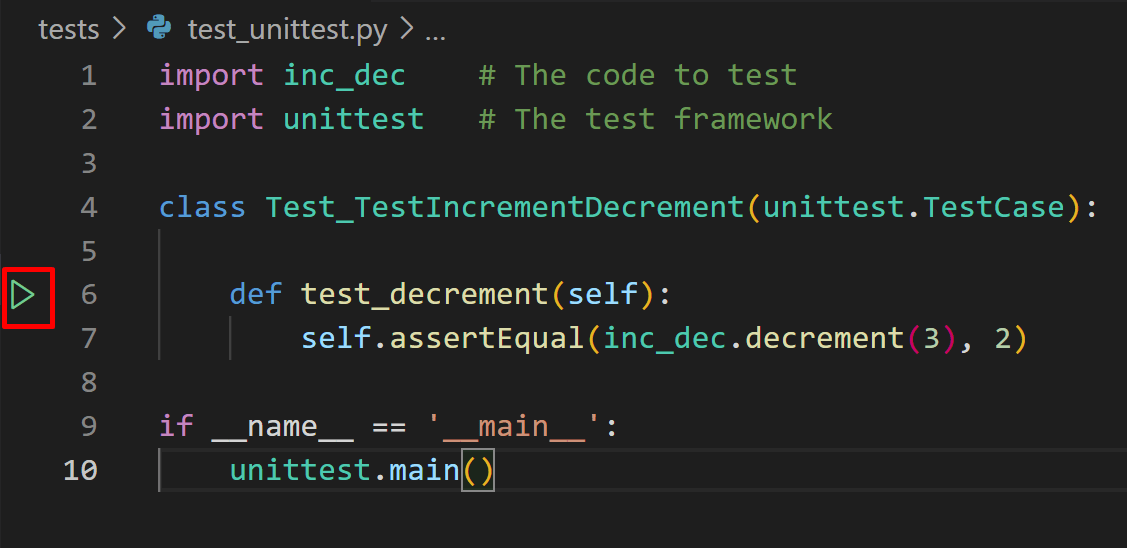
With a test file open, select the green run icon that is displayed in the gutter next to the test definition line, as shown in the previous section. This command runs only that one method.
-
From the Command Palette, by running any of the following commands:
- Test: Run All Tests - Runs all tests that have been discovered.
- Test: Run Tests in Current File - Runs all tests in a file that is open in the editor.
- Test: Run Test at Cursor - Runs only the test method under your cursor in the editor.
-
From the Test Explorer:
-
To run all discovered tests, select the play button at the top of Test Explorer:

-
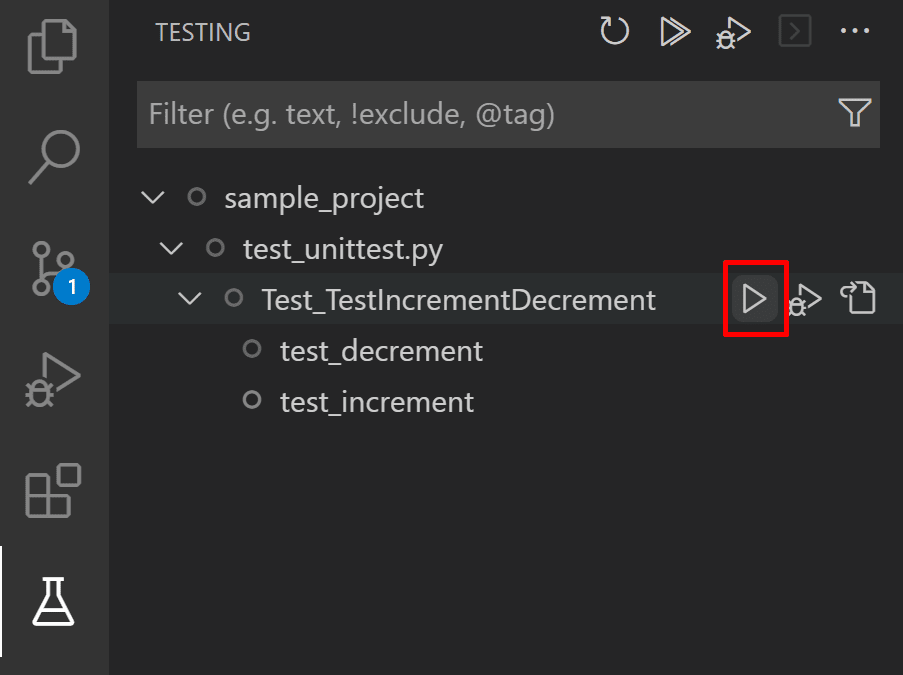
To run a specific group of tests, or a single test, select the file, class, or test, then select the play button to the right of that item:
-
You can also run a selection of tests through the Test Explorer. To do that, Ctrl+Click (or Cmd+Click on macOS) on the tests you wish to run, right-click on one of them and then select Run Test.
-
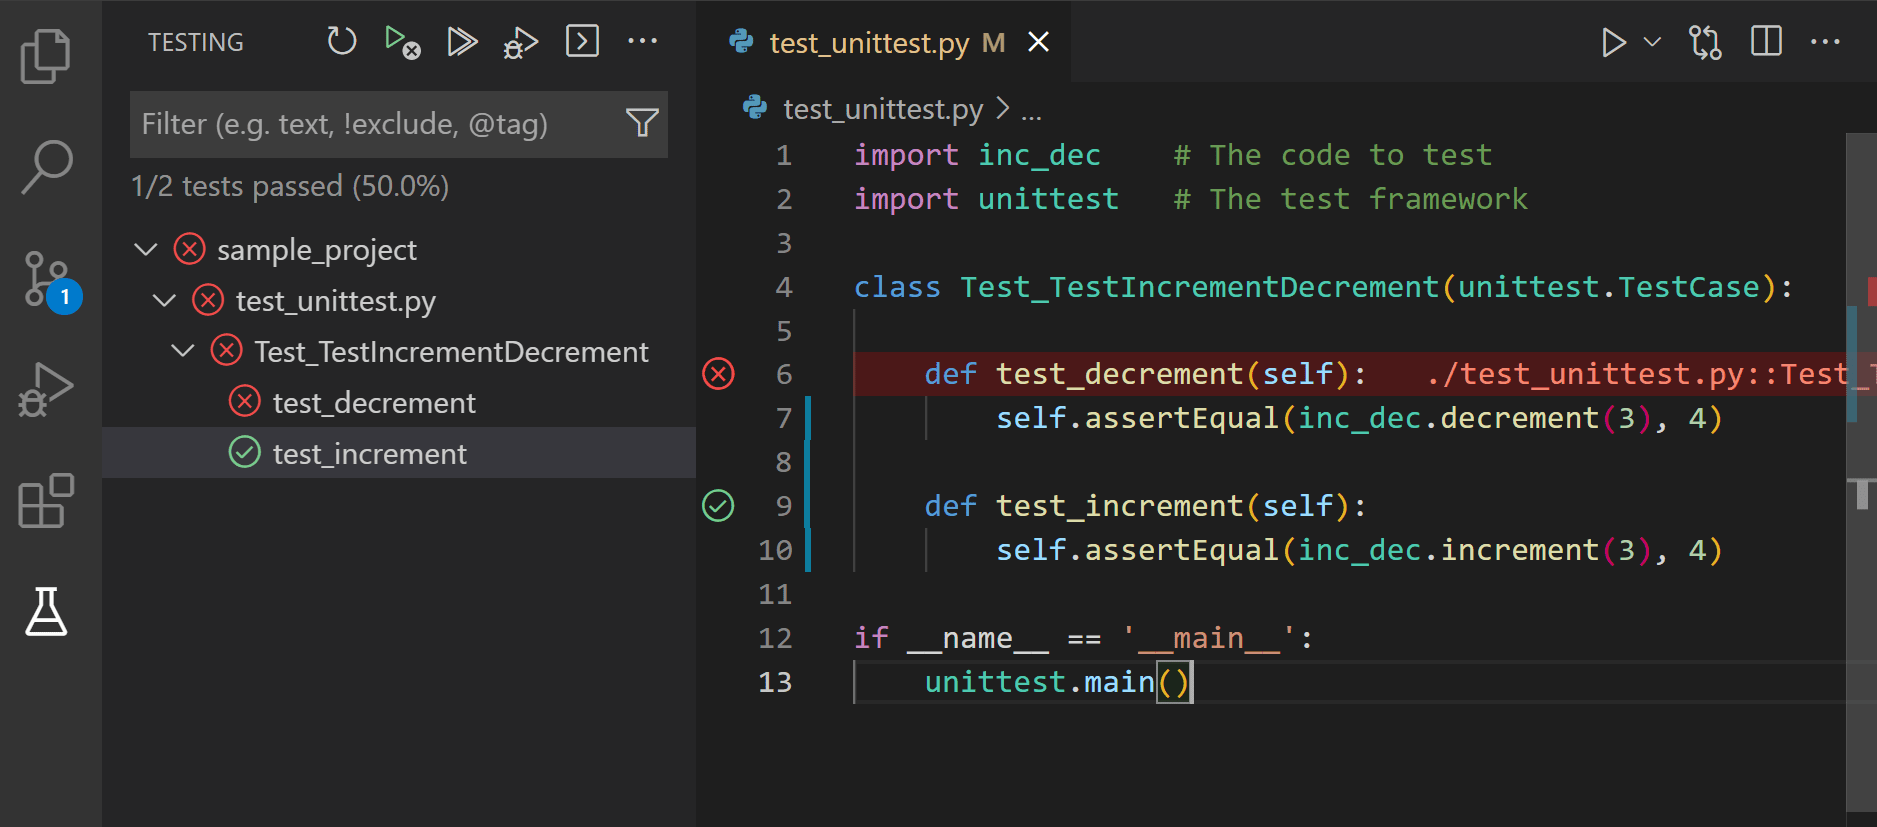
After a test run, VS Code displays results directly in the editor as gutter decorations. Failed tests will also be highlighted in the editor, with a Peek View that displays the test run error message and a history of all of the tests' runs. You can press Escape to dismiss the view, and you can disable it by opening the User settings (Preferences: Open Settings (UI) command in the Command Palette) and changing the value of the Testing: Automatically Open Peek View setting to never.
In the Test Explorer, results are shown for individual tests and any classes and files containing those tests. Folders will display a failure icon if any of the tests within that folder did not pass.
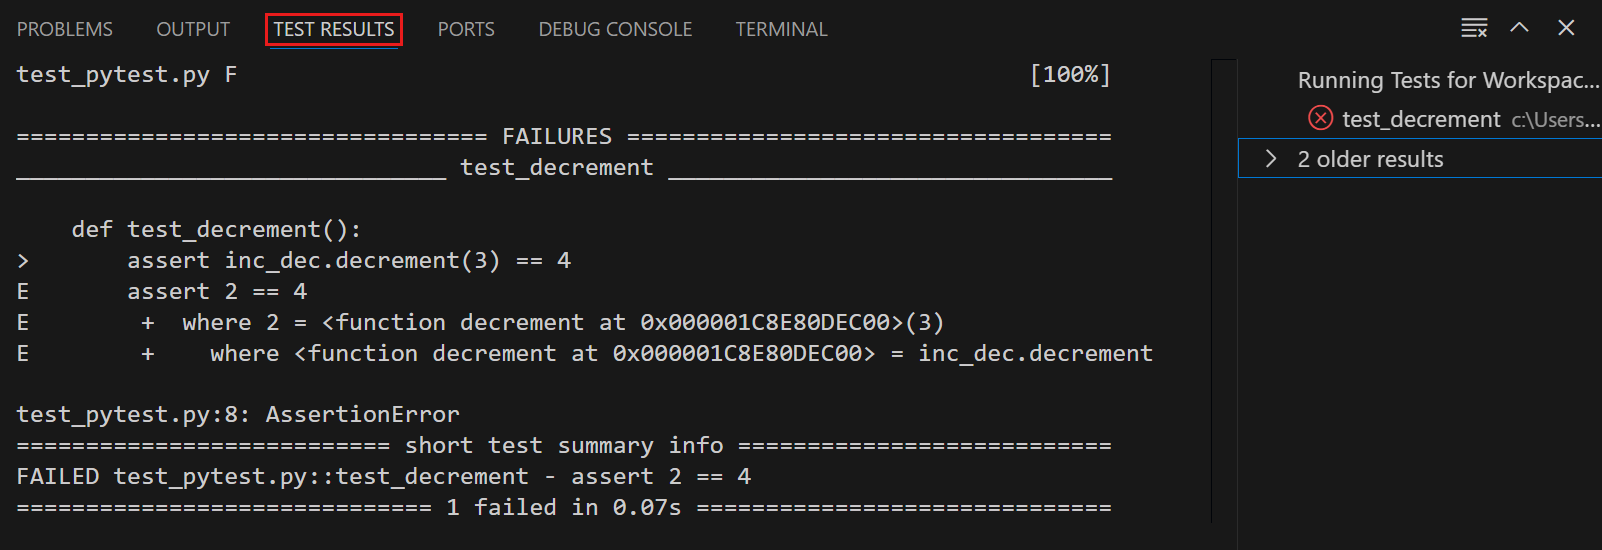
VS Code also shows test results in the Test Results panel.
Run tests with coverage
To run tests with coverage enabled, select the coverage run icon in the Test Explorer or the Run with coverage option from any menu you normally trigger test runs from. The Python extension runs coverage using the pytest-cov plugin if you are using pytest, or with coverage.py for unittest.
Before running tests with coverage, make sure to install the correct testing coverage package for your project. Branch coverage is only supported on coverage versions >= 7.7.
Once the coverage run completes, lines are highlighted in the editor for line-level coverage. Test coverage results appear as a "Test Coverage" sub-tab in the Test Explorer, which you can also navigate to with Testing: Focus on Test Coverage View in the Command Palette (⇧⌘P (Windows, Linux Ctrl+Shift+P)). On this panel, you can view line coverage metrics for each file and folder in your workspace, as well as branch coverage, if relevant.
For finer grain control of your coverage run when using pytest, you can edit the python.testing.pytestArgs setting to include your specifications. When the pytest argument --cov exists in python.testing.pytestArgs, the Python extension will make no additional edits to coverage args, to allow your customizations to take effect. If there is no --cov argument found, the extension will add --cov=. to the pytest args prior to run to enable coverage at the workspace root.
For more information on test coverage, visit VS Code's Test Coverage documentation.
Debug tests
To debug tests, right-click on the gutter decoration next to the function definition and select Debug Test, or select the Debug Test icon next to that test in the Test Explorer.

Running or debugging a test does not automatically save the test file. Always be sure to save changes to a test before running it, otherwise you'll likely be confused by the results because they still reflect the previous version of the file!
You can use the following commands from the Command Palette to debug tests:
- Test: Debug All Tests - Launches the debugger for all tests in your workspace.
- Test: Debug Tests in Current File - Launches the debugger for the tests you have defined in the file you have open in the editor.
- Test: Debug Test at Cursor - Launches the debugger only for the method where you have your cursor focused on the editor. You can also use the Debug Test icons in Test Explorer to launch the debugger for all tests in a selected scope and all discovered tests.
You can also change the default behavior of clicking on the gutter decoration to debug tests instead of run, by changing the testing.defaultGutterClickAction setting value to debug in your settings.json file.
The debugger works the same for tests as for other Python code, including breakpoints, variable inspection, and so on. To customize settings for debugging tests, you can specify test debug configs in either the launch.json or settings.json files in the .vscode folder from your workspace by adding the "purpose": ["debug-test"] to your config. This configuration will be used when you run Test: Debug All Tests, Test: Debug Tests in Current File and Test: Debug Test at Cursor commands.
For example, the configuration below in the launch.json file disables the justMyCode setting for debugging tests:
{
  "name": "Python: Debug Tests",
  "type": "debugpy",
  "request": "launch",
  "program": "${file}",
  "purpose": ["debug-test"],
  "console": "integratedTerminal",
  "justMyCode": false
}
If you have more than one configuration entry with "purpose": ["debug-test"], the first definition will be used since we currently don't support multiple definitions for this request type.
For more information on debugging or to understand how it works in VS Code, read the Python debugging configurations and general VS Code Debugging articles.
Run tests in parallel
Support for running tests in parallel with pytest is available through the pytest-xdist package. Visit their documentation, for more information on how to use pytest-xdist.
When xdist is enabled and no worker count is specified in the arguments, the number of workers is automatically optimized by the Python extension based on how many tests are selected in the Test Explorer.
Django unit tests
The Python extension also offers support for discovering and running Django unit tests! You can get your Django tests discovered with only a few additional setup steps:
- Set
"python.testing.unittestEnabled": true,in yoursettings.jsonfile. - Add
MANAGE_PY_PATHas an environment variable:- Create a
.envfile at the root of your project. - Add
MANAGE_PY_PATH='<path-to-manage.py>'to the.envfile, replacing<path-to-manage.py>with the path to your application'smanage.pyfile.Tip: you can copy the path by right clicking on the file in the Explorer view and selecting Copy Path.
- Create a
- Add Django test arguments to
"python.testing.unittestArgs": []in thesettings.jsonfile as needed, and remove any arguments that are not compatible with Django.
By default, the Python extension looks for and loads .env files at the project root. If your .env file is not at the project root or you are using VS Code variable substitution, add "python.envFile": "${workspaceFolder}/<path-to-.env>" to your settings.json file. This enables the Python extension to load the environment variables from this file when running and discovering tests. Get more info about Python environment variables.
Navigate to the Testing view, and select the Refresh Tests button to have your Django tests displayed!
Troubleshooting
If your Django unit tests are not showing in the Testing view, try the following troubleshooting steps:
- Search for error messages in the Python Output panel. They might provide a hint as to why your tests are not being discovered.
- Try to run the Django tests in the terminal. Then "translate" the same command into VS Code settings.
For example, if you run
python manage.py test --argin the terminal, you would addMANAGE_PY_PATH='./manage.py'to a.envfile, and set"python.testing.unittestArgs": [--arg]in the VS Code settings. Alternatively, you can also find the commands that are run by the Python extension in the Python Output panel. - Use the absolute path to the
manage.pyfile when setting theMANAGE_PY_PATHenvironment variable, if you initially used the relative path.
Test commands
Below are all the supported commands for testing with the Python extension in VS Code. These are all found via the Command Palette:
| Command Name | Description |
|---|---|
| Python: Configure Tests | Configure the test framework to be used with the Python extension. |
| Test: Clear All Results | Clear all tests statuses, as the UI persists test results across sessions. |
| Test: Debug All Tests | Debug all discovered tests. Equivalent to Python: Debug All Tests on versions prior to 2021.9. |
| Test: Debug Failed Tests | Debug tests that failed in the most recent test run. |
| Test: Debug Last Run | Debug tests that were executed in the most recent test run. |
| Test: Debug Test at Cursor | Debug the test method where you have your cursor focused on the editor. Similar to Python: Debug Test Method... on versions prior to 2021.9. |
| Test: Debug Tests in Current File | Debug tests in the file that is currently in focus on the editor. |
| Test: Go to Next Test Failure | If the error peek view is open, open and move to the peek view of the next test in the explorer that has failed. |
| Test: Go to Previous Test Failure | If the error peek view is open, open and move to the peek view of the previous test in the explorer that has failed. |
| Test: Peek Output | Opens the error peek view for a test method that has failed. |
| Test: Refresh Tests | Perform test discovery and updates the Test Explorer to reflect any test changes, addition, or deletion. Similar to Python: Discover Tests on versions prior to 2021.9. |
| Test: Rerun Failed Tests | Run tests that failed in the most recent test run. Similar to Python: Run Failed Tests on versions prior to 2021.9. |
| Test: Rerun Last Run | Debug tests that were executed in the most recent test run. |
| Test: Run All Tests | Run all discovered tests. Equivalent to Python: Run All Tests on versions prior to 2021.9. |
| Test: Run All Tests with Coverage | Run all discovered tests and calculate how much of your code is covered by your tests. |
| Test: Run Test at Cursor | Run the test method where you have your cursor focused on the editor. Similar to Python: Run Test Method... on versions prior to 2021.9. |
| Test: Run Test in Current File | Run tests in the file that is currently in focus on the editor. Equivalent to Python: Run Current Test File on versions prior to 2021.9. |
| Test: Show Output | Open the output with details of all the test runs. Similar to Python: Show Test Output on versions prior to 2021.9. |
| Testing: Focus on Test Explorer View | Open the Test Explorer view. Similar to Testing: Focus on Python View on versions prior to 2021.9. |
| Test: Stop Refreshing Tests | Cancel test discovery. |
Test configuration settings
The behavior of testing with Python is driven by general UI settings provided by VS Code, and settings that are specific to Python and to whichever framework you've enabled.
General UI settings
The settings that affect the UI of the testing features are provided by VS Code itself, and can be found in the VS Code Settings editor when you search for "Testing".
General Python settings
| Setting (python.testing.) |
Default | Description |
|---|---|---|
| autoTestDiscoverOnSaveEnabled | true |
Specifies whether to enable or disable auto run test discovery when saving a test file. You may need to reload the window after making changes to this setting for it to be applied. |
| cwd | null | Specifies an optional working directory for tests. The presence of this setting dynamically adjusts the --rootdir argument for pytest. |
| autoTestDiscoverOnSavePattern | **/*.py |
Specifies a glob pattern that determines which file changes trigger auto test discovery when autoTestDiscoverOnSaveEnabled is true. |
| debugPort | 3000 |
Port number used for debugging of unittest tests. |
| promptToConfigure | true |
Specifies whether VS Code prompts to configure a test framework if potential tests are discovered. |
unittest configuration settings
| Unittest setting (python.testing.) |
Default | Description |
|---|---|---|
| unittestEnabled | false |
Specifies whether unittest is enabled as the test framework. The equivalent setting for pytest should be disabled. |
| unittestArgs | ["-v", "-s", ".", "-p", "*test*.py"] |
Arguments to pass to unittest, where each element that's separated by a space is a separate item in the list. See below for a description of the defaults. |
The default arguments for unittest are as follows:
-vsets default verbosity. Remove this argument for simpler output.-s .specifies the starting directory for discovering tests. If you have tests in a "test" folder, change the argument to-s test(meaning"-s", "test"in the arguments array).-p *test*.pyis the discovery pattern used to look for tests. In this case, it's any.pyfile that includes the word "test". If you name test files differently, such as appending "_test" to every filename, then use a pattern like*_test.pyin the appropriate argument of the array.
To stop a test run on the first failure, add the fail fast option "-f" to the arguments array.
See unittest command-line interface for the full set of available options.
pytest configuration settings
| pytest setting (python.testing.) |
Default | Description |
|---|---|---|
| pytestEnabled | false |
Specifies whether pytest is enabled as the test framework. The equivalent setting for unittest should be disabled. |
| pytestPath | "pytest" |
Path to pytest. Use a full path if pytest is located outside the current environment. |
| pytestArgs | [] |
Arguments to pass to pytest, where each element that's separated by a space is a separate item in the list. See pytest command-line options. |
The default arguments for pytest are as follows:
rootdiris dynamically adjusted based on the presence of apython.testing.cwdsetting in your workspace.
You can also configure pytest using a pytest.ini file as described on pytest Configuration.
If you have the pytest-cov coverage module installed, VS Code doesn't stop at breakpoints while debugging because pytest-cov is using the same technique to access the source code being run. To prevent this behavior, include --no-cov in pytestArgs when debugging tests, for example by adding "env": {"PYTEST_ADDOPTS": "--no-cov"} to your debug configuration. (See Debug Tests above about how to set up that launch configuration.) (For more information, see Debuggers and PyCharm in the pytest-cov documentation.)
IntelliSense settings
| IntelliSense setting (python.analysis.) |
Default | Description |
|---|---|---|
| inlayHints.pytestParameters | false | Whether to display inlay hints for pytest fixture argument types. Accepted values are true or false. |
See also
- Python environments - Control which Python interpreter is used for editing and debugging.
- Settings reference - Explore the full range of Python-related settings in VS Code.