Debug code with Visual Studio Code
Use the debugger in Visual Studio Code to pause your application, inspect its state, and step through code to find the cause of a problem. This article explains how to start a session in your project and use the debugging tools to investigate it.
Choose a starting point:
-
New to debugging in VS Code: follow the debugging quickstart to find and fix a bug in a practice project.
-
Debug an existing project: check the prerequisites, then start a debugging session.
-
Customize how your application starts: create a debug configuration for arguments, environment variables, startup tasks, or attaching to a process.
-
Debugging isn't working: use the troubleshooting checks.
Prerequisites
Install the runtime or SDK needed to run your application, and confirm that the application builds or runs outside the debugger. VS Code includes a debugger for JavaScript, TypeScript, and Node.js, but it doesn't install their runtimes or build tools.
For other languages, install a debugger extension. Use the guide for your language or runtime to complete setup:
Start a debugging session
Running code normally executes it without pausing for inspection. Starting it with the debugger lets you pause at breakpoints and inspect the state before the next line runs.
To run your code until it reaches a breakpoint:
-
Open your project folder, and then open the source file that you want to debug.
-
Set a breakpoint by selecting the editor margin next to a line of executable code or by pressing F9.
A red circle indicates a breakpoint.
-
Start debugging with F5, or open the Run and Debug view (⇧⌘D (Windows, Linux Ctrl+Shift+D)) and select Run and Debug.
-
If prompted, select the debugger for your language or runtime.
For a simple application, VS Code tries to run the active file. If your application requires a specific entry point, command-line arguments, environment variables, or another custom setup, create a
launch.jsonconfiguration. -
When execution pauses at the breakpoint, inspect values in the VARIABLES section and review the function calls in the CALL STACK section. The highlighted execution line is the line that runs next.
-
Use Step Over (F10) to run the current line, and inspect how values change. Use Continue (F5) to run until the next breakpoint or the end of the program.
Keep the application paused while you inspect variables or evaluate expressions. If execution doesn't pause, see Troubleshoot debugging.
Debugger user interface
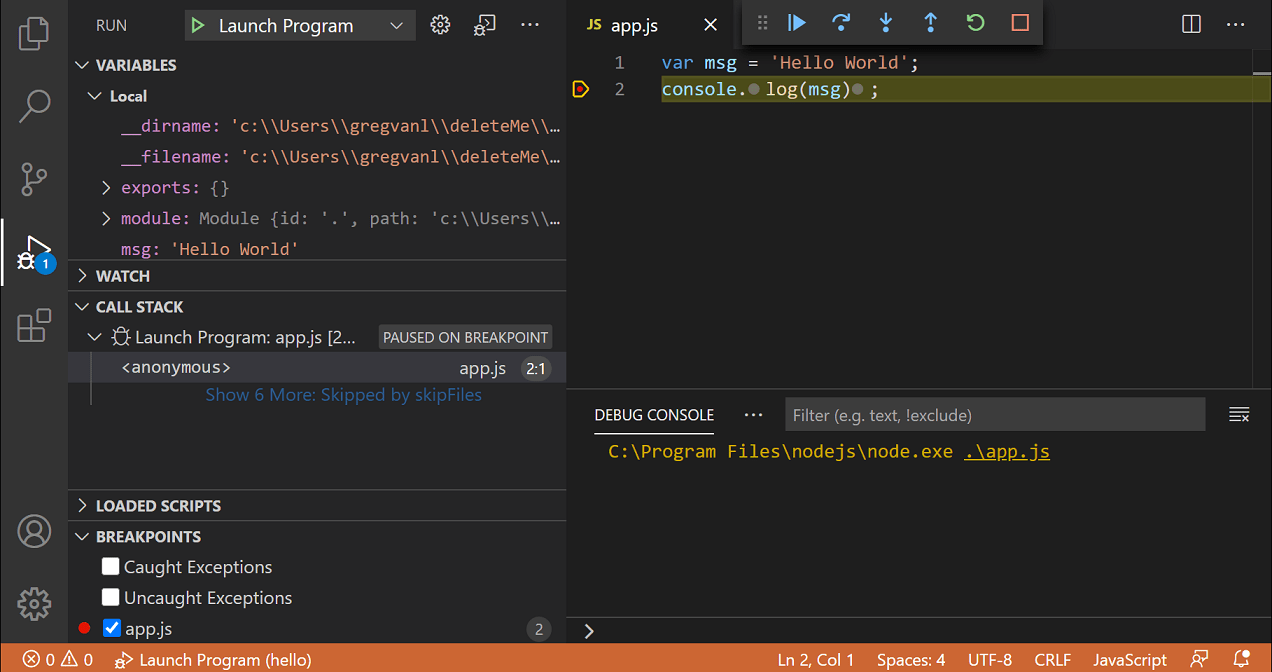
During a debugging session, use these areas of the interface:
- Run and Debug view: inspect variables and expressions, manage breakpoints, and navigate the call stack.
- Editor: see the current execution line, set breakpoints, and inspect values inline or by hovering over code.
- Debug toolbar: control the flow of the application.
- Debug Console: view debugger output and evaluate expressions.
- Debug status: select the active debug configuration from the Status Bar.
Data inspection
When execution pauses, inspect the current application state in the Run and Debug view or evaluate expressions in the Debug Console.
Run and Debug view
The selected stack frame determines which variables and expressions are available:
-
VARIABLES shows local and global variables for the selected stack frame. To modify a value during the session, open the variable context menu and select Set Value (Enter (Windows, Linux F2)).
-
WATCH evaluates expressions whenever the debugger pauses. Select + in WATCH and enter an expression to track it across pauses.
-
CALL STACK shows the active function calls. Select a stack frame to inspect its source location and variables.
To filter variables by name or value, focus the VARIABLES section, use ⌥⌘F (Windows, Linux Ctrl+Alt+F), and enter a search term.
You can also hover over an expression in the editor to inspect its current value. A variable assigned on the highlighted line doesn't have its new value until that line runs.
Debug console REPL
The Debug Console shows debugger output and lets you evaluate expressions in the context of the selected stack frame. This interactive input is a REPL, or read-eval-print loop.
Open it with View: Debug Console (⇧⌘Y (Windows, Linux Ctrl+Shift+Y)). Enter an expression and press Enter. For multiline input, use Shift+Enter between lines, and then press Enter to evaluate the complete expression.
For example, in a JavaScript debugging session, enter an expression that uses variables from the selected stack frame:
price * quantity;
With price set to 10 and quantity set to 3, the Debug Console returns 30. This expression calculates a value without changing your source code.
The Debug Console is different from the integrated terminal, where you run shell commands or provide input to your application. Program output appears in the console or terminal selected by the debug configuration.
Expression syntax and evaluation support depend on the debugger. To inspect variables in a function, pause in that function and select its stack frame. After the program exits, start a new debugging session to inspect its state again.
Debug actions
The Debug toolbar appears when a debugging session starts. The available actions can vary by debugger.
| Action | Description |
|---|---|
| Continue or Pause F5 |
Resume execution until the next breakpoint, or pause a running program. |
| Step Over F10 |
Run the current line without stepping into function calls on that line. |
| Step Into F11 |
Step into the function called on the current line. |
| Step Out ⇧F11 (Windows, Linux Shift+F11) |
Finish the current function and pause in the calling function. |
| Restart ⇧⌘F5 (Windows, Linux Ctrl+Shift+F5) |
Stop and start the application again with the current debug configuration. |
| Stop ⇧F5 (Windows, Linux Shift+F5) |
End the current debugging session. |
If you debug multiple targets, the toolbar also lets you select the active session.
Use the
debug.toolBarLocation
setting to show the Debug toolbar as floating, docked in the Run and Debug view, or hidden.
Breakpoints
A breakpoint pauses your application at a specific point so that you can inspect its state. Breakpoint behavior can vary by debugger and programming language.
Setting breakpoints
To set or remove a breakpoint on the current line, select the editor margin or use F9.
The breakpoint icon indicates its state:
- A filled red circle indicates an enabled breakpoint.
- A filled gray circle indicates a disabled breakpoint.
- A hollow gray circle indicates that the debugger could not register the breakpoint. This might happen when the line has no executable code or the debugger does not support the source file.
Use the BREAKPOINTS section in the Run and Debug view to enable, disable, edit, or remove breakpoints. To group breakpoints by file in a tree, set
debug.breakpointsView.presentation
to tree.
To also show breakpoints in the editor overview ruler, turn on the debug.showBreakpointsInOverviewRuler setting.
Breakpoint types
Debugger extensions determine which breakpoint types and conditions they support.
Conditional breakpoints
A conditional breakpoint pauses execution only when a specified condition is met. You can use:
- Expression condition: pause when an expression evaluates to
true. - Hit count: pause after the breakpoint is reached a specified number of times. Supported syntax varies by debugger.
- Wait for breakpoint: activate the breakpoint after another breakpoint is hit. This creates a triggered breakpoint.
To add a conditional breakpoint:
-
Open the editor margin context menu and select Add Conditional Breakpoint, or run Debug: Add Conditional Breakpoint from the Command Palette (⇧⌘P (Windows, Linux Ctrl+Shift+P)).
-
Select the condition type.
-
Enter the expression, hit count, or breakpoint that activates it, and then press Enter.
To add or change a condition on an existing breakpoint, open the breakpoint context menu and select Edit Breakpoint. You can also select the pencil icon for the breakpoint in the BREAKPOINTS section.
Triggered breakpoints
A triggered breakpoint is enabled after another breakpoint is hit. Use one when a failure occurs only after a specific code path or application state.
To create one, open the editor margin context menu, select Add Triggered Breakpoint, and then select the breakpoint that activates it.
Inline breakpoints
An inline breakpoint pauses at a specific column. This is useful for a line that contains multiple statements, such as minified code.
To set an inline breakpoint, use ⇧F9 (Windows, Linux Shift+F9) or the editor context menu during a debugging session. Inline breakpoints can also have conditions.
Function breakpoints
A function breakpoint pauses when execution enters a function. This is useful when you know the function name but do not have its source code open.
To create one, select the + button in the BREAKPOINTS section and enter the function name. Function breakpoints appear as red triangles.
Data breakpoints
A data breakpoint pauses when the value of a variable changes, is read, or is accessed. The available options depend on the debugger.
To create one, open the context menu for a variable in the VARIABLES section and select an available Break on action. Data breakpoints appear as red hexagons.
Logpoints
A logpoint writes a message to the Debug Console without pausing execution. Use logpoints to inspect values without adding logging statements to your source code.
To add a logpoint, open the editor margin context menu and select Add Logpoint, or run Debug: Add Logpoint from the Command Palette (⇧⌘P (Windows, Linux Ctrl+Shift+P)). Enter plain text and include expressions in curly braces, such as User ID: {user.id}.
Logpoints appear as diamond-shaped icons. You can add conditions and hit counts to them. To toggle logpoints with the middle mouse button in the editor margin, configure the debug.gutterMiddleClickAction setting.
Logpoints are available only when the debugger extension implements them.
Troubleshoot debugging
The debugger doesn't start
Confirm that the required runtime or SDK and debugger extension are installed. For a compiled language, check that the application builds. Read the error notification and debugger output for the failing command or missing dependency.
If you use launch.json, check the selected configuration and follow Troubleshoot launch configurations.
Execution doesn't pause at a breakpoint
- Use Run > Start Debugging, not Run Without Debugging. If you start your application from a terminal, follow your debugger's instructions for attaching to it.
- Confirm that the breakpoint is enabled and is on an executable line in the code being run. Hover over a hollow breakpoint to read why it couldn't be registered.
- Trigger the code path that contains the breakpoint. For example, a server might need a request before that code runs.
- If the wrong file runs, check the active editor or the selected configuration's entry point. For transpiled or compiled code, consult your debugger's guidance on source maps or debug symbols.
Variables or expressions aren't available
Pause execution and select the relevant frame in CALL STACK. Confirm that you entered expressions in the Debug Console, not shell commands in the terminal. If the program has finished, start debugging again.
Multi-target debugging
For applications with multiple processes, such as a client and a server, start one debug session and then start another. When more than one session is active:
- Each session appears as a top-level item in the CALL STACK section.
- The Debug toolbar shows the active session and provides a dropdown for switching sessions.
- Debug actions apply to the active session.
For a repeatable setup that starts multiple debug configurations together, create a compound launch configuration.
Remote debugging
Remote debugging support depends on the debugger extension. Review the extension's documentation for connection requirements and supported environments.
The built-in Node.js debugger supports remote debugging. For setup details, see Remote debugging with Node.js.
Debugger extensions
VS Code includes debugging support for Node.js and for JavaScript, TypeScript, and languages that compile to JavaScript.
For other languages and runtimes, install an extension from the Visual Studio Marketplace. You can also select Install Additional Debuggers from the Run menu.
Debugger extensions define their supported launch configurations, breakpoint types, expression syntax, and remote debugging capabilities. Consult the extension documentation when an option described in this article is unavailable.
Next steps
- Configure debugging - Create and customize reusable
launch.jsonconfigurations. - Debug Node.js applications - Learn about the built-in JavaScript and Node.js debugger.
- Fix coding errors with Copilot - Use AI-assisted tools to investigate and fix problems.
- Fix a bug with an agent: use your reproduction and debugger findings to add a regression test and verify a focused fix.