Configure the Agents window
The Agents window uses the AI providers and accounts configured in VS Code. It shares settings and the default profile with the main VS Code window. This article describes the shared account options and the window-specific layout, editor, setting, and extension configuration.
For instructions about starting and working with sessions, see Use the Agents window.
Manage AI providers and accounts
The Agents window uses the accounts and model credentials available in VS Code:
- GitHub Copilot: select the account icon in the top-right corner, and then sign in to GitHub. To switch accounts, sign out and then authenticate with a different GitHub account.
- Claude: configure a Claude API key or another supported bring-your-own-key (BYOK) option for Claude.
- Codex: select the account icon, and then select Sign in to ChatGPT.
- Bring your own key (BYOK): add a model in the Language Models editor and enable chat.agentHost.byokModels.enabled to make it available in the desktop Agents window. Learn how to configure BYOK models.
For account requirements, billing options, and integration setup, see Agent harness requirements and setup.
Claude, ChatGPT-backed Codex, and BYOK models can run in the desktop Agents window without GitHub sign-in when you enable chat.agentHost.allowSignedOutWhenUsable . This option is experimental. Features that require GitHub authentication prompt you to sign in when needed. The browser-based Agents window always requires GitHub sign-in.
Configure settings for the Agents window
The Agents window shares all of your VS Code settings. To use different behavior in the Agents window and the editor window, override individual settings for the Agents window without affecting the main VS Code setup.
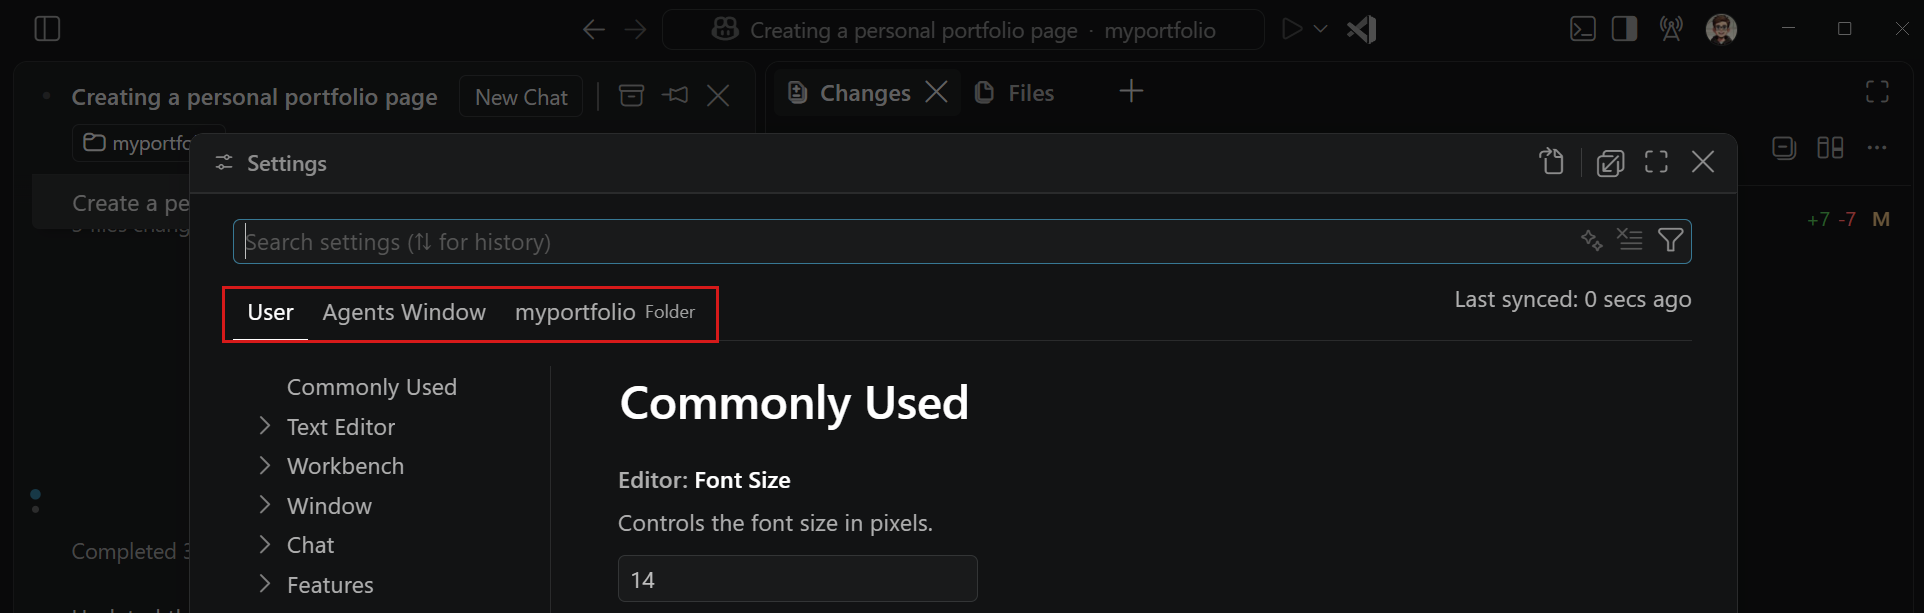
To override a setting for the Agents window only, edit your settings file and scope the value under the Agents window section. Open the Settings editor (⌘, (Windows, Linux Ctrl+,)) from the Agents window to see which scope a setting applies to.
Configure word wrap for code editors
Control how code editors in the Agents window wrap long lines with sessions.editor.wordWrap . This setting has the following values:
inherit(default): Follow the editor.wordWrap setting.on: Wrap lines at the editor viewport width.off: Never wrap lines.
To change this setting from a code editor, select More Actions (...) > Word Wrap. To temporarily override word wrapping for the current file, use ⌥Z (Windows, Linux Alt+Z). This keyboard shortcut doesn't change sessions.editor.wordWrap .
This setting doesn't affect diff editors in the Changes view. To configure word wrapping in those editors, see Configure word wrap in diff editors.
Configure the new-session experience
Personalize the welcome heading (Experimental)
Enable sessions.chat.experimental.welcomePhrases to show a rotating welcome phrase above the new-session composer in the Agents window.
To personalize the heading, select the pencil icon (Customize Welcome Message...), and then choose one of the following options:
- Name: Set the name used in welcome phrases. Clear the name to use the first name from your GitHub profile when available, or omit the name when your profile doesn't include one. You can also set the name with sessions.chat.experimental.welcomeName . The name syncs across devices.
- Phrases: Open sessions.chat.experimental.welcomeMessages to add custom phrases or replace the default phrases.
The following example adds two custom phrases to the default phrases:
"sessions.chat.experimental.welcomeMessages": {
    "mode": "append",
    "phrases": ["Ready, {name}?", "Let's ship it"]
}
Set mode to append to use your phrases and the default phrases, or set it to replace to use only your phrases. Use {name} anywhere in a phrase to insert the configured or GitHub profile name. If no name is available, VS Code removes the placeholder and its adjoining separator.
To hide the heading, right-click it and select Hide Welcome Message. This action turns off sessions.chat.experimental.welcomePhrases . Re-enable the setting to show the heading again.
When screen reader optimized mode is active, the heading is announced once when the composer appears. Turn off accessibility.verbosity.newSessionWelcome to omit the announcement.
Group the composer controls (Experimental)
Enable sessions.chat.experimental.newSessionComposerLayout to group the workspace, branch, worktree, and harness controls above the new-session chat input. This layout requires sessions.chat.unifiedWorkspacePicker.enabled .
With the unified workspace picker enabled, use ⌘K ⌘F (Windows, Linux Ctrl+K Ctrl+F) to focus the workspace picker or ⌘K ⌘H (Windows, Linux Ctrl+K Ctrl+H) to focus the harness picker. These commands don't require the experimental composer layout. To assign a keybinding, use the Configure Keybinding action in the picker's context menu.
Adjust the window layout
Use the single-pane editor panel (Experimental)
The experimental single-pane layout replaces the separate editor and side panel with one docked pane. A shared tab bar spans the editor and the Changes or Files detail view. Files and diffs open in the docked editor next to the chat instead of in a modal window.
To use the single-pane layout, enable sessions.layout.singlePaneDetailPanel and reload the window. The setting is read when the Agents window starts.
In the shared tab bar, select New Tab (+) to open Changes, Files, Browser, or Search. Use Hide Editor, Toggle Details, and Maximize Editor Area or Restore Editor Area to adjust the layout. Toggle Details is available only for tabs that support a detail panel.
Each session restores its side-pane width, open editors, active editor, and per-file collapsed state when you switch sessions or reload the window.
Automatically collapse the sessions sidebar (Experimental)
When you enable sessions.layout.autoCollapseSessionsSidebar , the Agents window hides the sessions sidebar on narrow windows when both the editor area and side panel are open. The sidebar appears again when there is room. The Agents window preserves a sidebar that you closed manually and suspends auto-collapse while multiple sessions are open side by side.
View and edit Markdown files
The Agents window supports Markdown Preview and the Markdown Editor for .md files. Which editor opens by default depends on
workbench.editor.markdownDefaultEditorInAgentsWindow
.
- When enabled,
.mdfiles open with Markdown Editor. - When disabled,
.mdfiles open with Markdown Preview.
This setting changes the default only in the Agents window. Learn how to open and use the editor in any window in Markdown Editor.
Use VS Code extensions in the Agents window
The Agents window can run VS Code extensions. Extensions that contribute only static content, such as themes, grammars, languages, and keybindings, activate automatically.
For other extensions, opt them in by ID with the extensions.supportAgentsWindow setting:
"extensions.supportAgentsWindow": {
    "myextension.id": true
}
The extension must be installed in your default VS Code profile. Extension support is still evolving. If an extension doesn't behave as expected, file an issue.
Personalize chat
Add a decorative chat background, use the interactive VS Code pet, or adjust how chat content appears. Learn how to personalize chat.
Next steps
- Choose an agent harness - compare options, select a harness, and review its setup requirements.
- Use the Agents window - start, monitor, review, and finish agent sessions across workspaces.
- AI settings reference - review settings for agents and chat.