Choose an agent harness
VS Code supports multiple agent harnesses, each with its own tools, customizations, and workflows. An agent harness coordinates the language model, context, and tools that an agent uses to complete your task.
Use this guide to compare the available options, identify which harness your session uses, select a harness or the Cloud execution target, and review its setup requirements.
For a deeper explanation of how harnesses work and differ from models and hosts, learn about agent harness concepts.
Compare agent harnesses
Start with the Copilot harness for day-to-day coding and agent tasks. Choose another harness or the Cloud target when you need different tools, customizations, or execution workflows.
| Harness | What runs | What this means for your work |
|---|---|---|
| Copilot | Run tasks using the Copilot SDK, which provides the shared agent experience across GitHub Copilot products. The agent works in the Agent Host. | Sessions run independently of the editor window and can continue in the background after you close it, while the Agent Host stays running. You can also continue sessions across supported interfaces. See Copilot requirements and limitations. |
| Local | Run tasks within VS Code's built-in agent harness. The agent works in VS Code's extension host. | The agent iterates via chat and works interactively to implement changes in your current workspace. The session is tied to the editor window: closing that window stops the agent's ongoing work. See Local requirements. |
| Claude | The Anthropic Claude Agent SDK is integrated into VS Code. | Sessions use Claude project configuration and provider workflows in your current workspace or an isolated worktree. See Claude requirements. |
| Codex | OpenAI Codex runs through the OpenAI Codex extension or the experimental Agent Host integration. | Sessions support interactive or background coding. Available interfaces depend on the integration. See Codex requirements. |
| Cloud | An available provider harness runs on provider-managed remote infrastructure. Cloud is an execution target, not a single harness. | The selected provider works against a GitHub repository and returns a pull request. The session does not use local editor context. See Cloud target requirements. |
For Agent Host sessions managed by desktop VS Code on your machine, keep the application running. Closing an editor window is different from quitting the application. Tools provided by a window also require that window to stay connected.
Changing the model or agent role does not change the harness. For example, selecting a Claude model in a Copilot harness session still uses the Copilot harness. Opening the same session in another supported interface also keeps its harness.
Local is a harness name, not a synonym for running on your machine. The Copilot, Claude, and Codex harnesses can also run on your machine.
Available models depend on the harness and how you access models, such as through a GitHub Copilot subscription, another supported account, or your own API key. Harness-specific customizations, including hooks, follow the selected harness.
Claude and Codex harnesses are disabled when Copilot enterprise-managed settings apply, including managed permission or sandbox settings. Contact the IT team that deployed the settings to discuss access. If you don't know the owner, ask your IT help desk to find the responsible administrator.
Select a harness
Select a harness before you submit the first prompt for a session:
-
Select New Chat (
+) in the Chat view, or select New in the Agents window. -
In the Agents window, select the folder or GitHub repository for the session.
-
Open the Session Target UI control and select an available harness or the Cloud target.
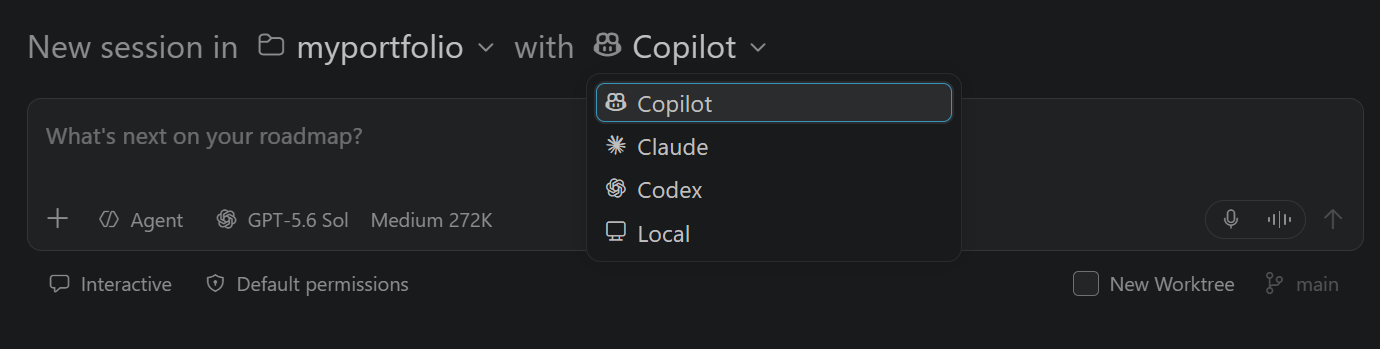
The control only lists targets whose requirements are met in the current window.
Choose a built-in agent
After selecting a harness, choose an available built-in agent from the agent picker. The available built-in agents depend on the harness:
| Harness | Built-in agents |
|---|---|
| Copilot |
|
| Local |
|
Switching agents doesn't change the harness. You can also select custom agents from the same picker. In the Copilot harness, Autopilot is a mode with its own workflow, not an additional built-in agent.
Your harness choice is separate from where the session changes code. In the Agents window, you can also choose between a folder and a worktree or run a session in a Dev Container.
Identify your current harness
To identify the current harness for a chat session, use one of the following methods:
-
In the editor window, the active harness is shown as a prefix in the chat title.
-
In the Agents window, the chat input box shows the active harness as the watermark.
-
In the Agents window, hover over the session entry in the sessions list to see a tooltip showing the harness.
Requirements and setup
Check the accounts, extensions, and settings needed for your chosen harness or the Cloud target. If a choice does not appear in the Session Target UI control, start with its requirements below.
Copilot
For GitHub sign-in and account requirements, follow the Copilot setup guide. Copilot harness sessions use the same GitHub authentication context as chat in VS Code, including your GitHub Enterprise account when configured.
For managed user accounts on GHE.com, complete the setup in Using GitHub Copilot with an account on GHE.com.
Before reusing a Local harness session's configuration, check tool availability and MCP configuration compatibility. Copilot harness sessions don't have access to every built-in or extension-provided tool. The shared SDK runtime also does not imply identical tools, models, permissions, or customizations across products, or that all sessions and personal settings synchronize.
For enterprise SDK Policy Hooks requirements, see enterprise hook configuration.
Local
Local harness sessions use the models configured in VS Code. Set up GitHub Copilot to use Copilot-provided models, or configure your own model credentials for a supported model.
Select Local in the Chat view and keep the editor window open while the agent works. Local harness sessions use different customization settings from Copilot harness sessions.
SDK Policy Hooks are not loaded in Local harness sessions. Check hook compatibility before reusing hooks from another harness.
Claude
Claude support is enabled by default unless enterprise-managed settings disable the harness. When organization policy permits it, turn support on or off with github.copilot.chat.claudeAgent.enabled .
To use Claude, configure one of these authentication and billing options:
- GitHub Copilot subscription: sign in to GitHub to use Copilot-routed models. Usage is billed through your Copilot subscription.
- Bring your own key (BYOK): use a Claude API key or another supported Claude BYOK option. Usage is billed by your configured provider.
When both options are available, the model picker groups models by Anthropic and Copilot. The model you select determines the provider and billing method for the next turn. You can switch between BYOK-backed and Copilot-routed models in an existing Claude harness session.
To use Claude without signing in to GitHub (Experimental), configure a Claude API key or another supported Claude BYOK option. For an Anthropic API key, set ANTHROPIC_API_KEY in your environment or in the env object in ~/.claude/settings.json. Learn more about Claude Code authentication.
Enable chat.agentHost.allowSignedOutWhenUsable to open the Agents window while signed out of GitHub. The model picker only shows models from your Claude BYOK configuration until you sign in. After you sign in to GitHub, Copilot-routed models are also available.
See Claude permission modes for approval behavior and related cautions.
Codex
Codex is not listed by default. Choose one of the following integrations. You don't need both.
Extension-based integration
To use Codex in the Chat view, install and enable the OpenAI Codex extension. Follow the extension's documentation for authentication and permissions.
Agent Host integration (Experimental)
The Codex Agent Host integration is disabled when enterprise-managed settings apply, even with a ChatGPT account or the integration's user setting set to true. Contact the IT team that deployed the settings to discuss access.
Enable chat.agentHost.codexAgent.enabled to make Codex available in the Agents window without the OpenAI Codex extension.
To also use this integration in the Chat view, enable chat.editor.codex.preferAgentHost and restart VS Code when prompted. Only one Codex implementation appears in each window. In the Session Target UI control, this setting replaces the Codex choice contributed by the OpenAI extension.
Sign in with one of these accounts for the Agent Host integration:
- GitHub Copilot subscription: sign in to GitHub to use Copilot-backed models. This option requires Copilot Pro+.
- ChatGPT subscription: open the account menu and select Sign in to ChatGPT. A free ChatGPT account is sufficient.
When both accounts are signed in, the model picker groups models by Copilot and ChatGPT. Your selection determines which subscription is used, and VS Code saves that provider with the session.
To use Codex without signing in to GitHub (Experimental), sign in to ChatGPT and enable chat.agentHost.allowSignedOutWhenUsable . The desktop Agents window then shows ChatGPT-backed models while signed out. Copilot-backed models prompt you to sign in to GitHub, and the browser-based Agents window still requires GitHub sign-in.
See Codex approval presets for approval behavior and related cautions.
Cloud target
Cloud sessions require a GitHub repository and access to an available cloud provider. VS Code supports the Copilot cloud agent and Claude and Codex cloud agents (Preview).
To use Claude or Codex in the cloud, turn on support in your Copilot account settings. See Managing policies for third-party cloud agents. You don't need the provider's VS Code extension for a cloud session.
Select Cloud from the Session Target UI control, then choose the cloud provider and, when available, a custom agent and model. In the Agents window, select a GitHub repository when you start the session.
Configure tools, MCP servers, and models in the cloud service. Cloud sessions can't use VS Code built-in tools or local development context.
Continue with a different harness
A handoff continues an ongoing task with a different harness or execution environment and carries the conversation history and context with it. The tools, permissions, and models might change because the new configuration provides different capabilities.
In a Copilot harness session, enter /delegate to continue a well-scoped task with a cloud agent.
Hand off from a Local harness session
From a Local harness session, you can select another harness or Cloud after work starts. Sessions that use the Copilot or Claude harness, and sessions that use the experimental Codex integration, can receive these handoffs but do not show a Session Target dropdown after the session starts.
To hand off a Local harness session:
-
Open the session.
-
In the chat input, open the Session Target dropdown.
-
Select Copilot, Claude, Codex, or Cloud to continue the work.
VS Code carries the conversation history and context to the destination session. To implement a plan or continue it with another supported session, see planning with agents.
Enterprise-managed sandbox or permission settings might automatically move a Local session to the Copilot harness so the Agent Host can enforce the policy. This policy-driven move preserves the conversation history and unsent input without submitting a prompt, and archives the original Local session as read-only. It is different from a user-initiated handoff. Learn more about Agent Host policy enforcement.
Changing a harness is different from starting another conversation or opening the same session in another interface. Learn more about sessions, forks, and handoffs.
Use canvases with the Copilot harness
Canvases are interactive visual surfaces shared by you and the agent. For example, you can inspect a diagram that the agent updates or adjust controls whose values flow back to the agent. Every canvas is provided by a canvas extension.
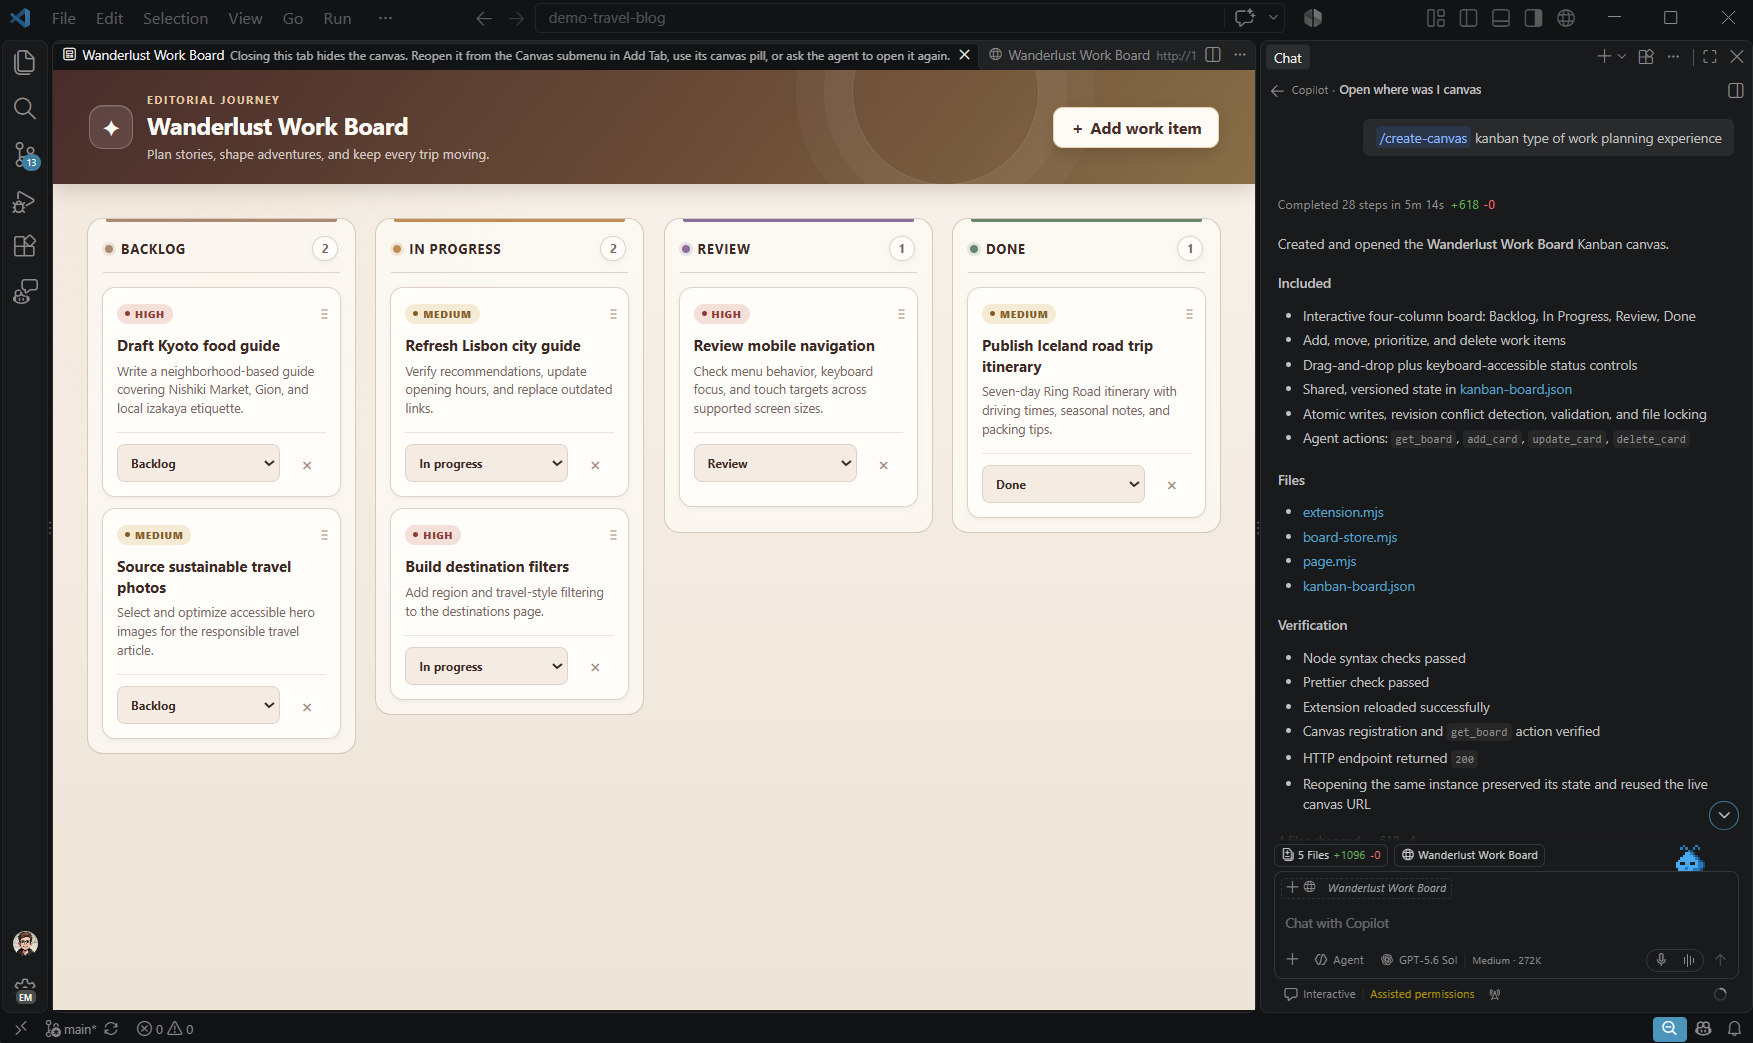
Before you create a new supported Copilot session, turn on chat.canvases.enabled . To get a canvas, use one of these options:
-
Create a canvas extension: When the
/create-canvasskill is available, enter/create-canvasin the chat input and describe the user interface you want for your project. The skill creates a canvas extension in your workspace and opens its canvas. -
Install a chat plugin: In the GitHub Copilot app, install a chat plugin that includes a canvas extension. Switch to VS Code and ask the agent in chat to list the available canvases and have it open one.
To open an available canvas without asking the agent, use one of these menus:
- In the editor window, select New Chat (+) > Canvas in the Chat view.
- In the Agents window, select Add Tab (+) > Canvas in the editor area.
In the editor window, the Canvas submenu appears after your first message in a supported Copilot harness session, when canvas support is enabled and canvas extensions are installed.
Whether you or the agent opens a canvas, it appears in an editor tab and remains associated with its owning chat. You can interact with the canvas directly. Depending on the extension, your interactions can update the session, and the agent can invoke actions exposed by the canvas to inspect or update its state. You can close and reopen a live canvas when the canvas supports it.
Canvas extensions are also supported in the GitHub Copilot app. Learn how to work with canvas extensions in the GitHub Copilot app. To explore examples, browse sample canvas extensions.
Canvases are available only on desktop in supported local Copilot Agent Host sessions. They aren't supported for Claude, Codex, extension-host Local sessions, remote Agent Host sessions, browser or web clients, or auxiliary-window hosting.
Frequently asked questions
What is the difference between Local and Copilot?
Both harnesses can run on your machine. Local uses VS Code's built-in proprietary agent harness and works in VS Code's extension host. Copilot uses the GitHub Copilot SDK, which is the agent experience shared consistently across GitHub Copilot products.
Both harnesses support tools, model selection, and agent customizations, but the available capabilities and configuration differ.
The Copilot harness provides these benefits:
-
A shared runtime across Copilot products: core capabilities and behavior are more consistent across VS Code, GitHub Copilot CLI, and the GitHub Copilot app.
-
Continuity between interfaces and machines: you can continue the same live session in the Chat view, the Agents window, and other GitHub Copilot interfaces. You can also connect remotely from another machine while the session continues to run on its host. Local sessions are available only in the editor's Chat view.
-
Work independent of an editor window: ongoing work can continue after you close the editor window, while the Agent Host remains running. Closing a Local harness session's editor window stops its ongoing work.
Which harness should I choose?
Start with Copilot for day-to-day coding and agent tasks, especially when you want to continue work between the Chat view and Agents window, or keep work running after closing an editor window.
If your workflow depends on specific tools or customizations that aren't supported by the Copilot harness, please let us know. Before moving an existing workflow, check tool availability, MCP configuration compatibility, and hook compatibility.
Can I keep Local available while migrating?
Yes. Local remains an editor harness option while you adapt integrations that depend on it. Start a new session in the editor's Chat view and select Local from Session Target. Local is not available in the Agents window.
For an unmanaged editor, the following experimental settings make Local visible and turn off automatic Copilot preference:
{
  "chat.editor.localAgent.enabled": true,
  "chat.defaultToCopilotHarness": false,
  "chat.editor.preferCopilotHarness": false
}
An organization policy can override user settings. Starting with version 1.142, administrators can set vscode.temporaryDefaultToLocalHarness to true in enterprise-managed settings. This temporary control keeps Local available and suppresses automatic Copilot routing, including routing triggered by managed sandbox and permission settings. It preserves explicit, remembered, and current harness choices.
Local does not enforce runtime-only sandbox and permission rules. Administrators must review the security impact before using the temporary Local default. Copilot harness sessions continue to enforce those rules.
For customization-specific blockers and next steps, see the migration FAQ.
Does running locally mean the language model runs on my machine?
No. The harness coordinates the session and its tools, but the language model can run elsewhere. A session that edits files and runs commands on your machine can still send model requests to a hosted service. The Local harness name does not mean that the model runs locally or that the session works offline. Learn how harnesses differ from models and execution environments.
Does selecting a different model change the harness?
No. Selecting a model changes the model used within the current harness. For example, selecting a Claude model in a Copilot session does not switch to the Claude harness. Changing the agent role, such as Ask or Agent, also does not change the harness. To check which harness you are using, see Identify your current harness.
Can I continue an existing Local session with Copilot?
Yes. In the Local session's chat input, open the Session Target dropdown and select Copilot. The handoff carries the conversation history and context to the destination session, but the available tools, permissions, and models might change. See Hand off from a Local harness session.