Use the Agents window
The Agents window runs agents in a dedicated Visual Studio Code window. Use it to assign higher-level tasks, coordinate work across projects, monitor multiple sessions, and review outcomes in one place.
Both the Agents window and Chat view let you direct agents and review their work. Choose based on whether you want to focus on orchestrating tasks or collaborating over code alongside your editor. For guidance, see Run agents in VS Code. This article shows how to start, monitor, review, and finish sessions in the Agents window. For conversation controls shared by both interfaces, see Use chat in VS Code.
Prerequisites
- Visual Studio Code installed. Download VS Code.
- One of the following authentication options:
- Access to GitHub Copilot. Follow the steps in Set up GitHub Copilot in VS Code to sign in and activate your subscription.
- A Claude API key or another supported bring-your-own-key (BYOK) configuration to use Claude without GitHub sign-in (Experimental).
- An existing ChatGPT sign-in for Codex to use Codex without GitHub sign-in (Experimental).
- A BYOK model configured for use in the Agents window.
Claude and Codex harnesses are disabled when Copilot enterprise-managed settings apply, even with separate provider credentials. Existing sessions are not deleted by this restriction. Contact the IT team that deployed the settings to discuss access.
Open the Agents window
The Agents window opens as a dedicated VS Code window alongside your main editor window. To open the Agents window, use one of the following methods:
-
Select the Open in Agents button in the VS Code title bar
-
Run the Chat: Open Agents window command from the Command Palette (⇧⌘P (Windows, Linux Ctrl+Shift+P))
-
Select Try out the new Agents window link from the VS Code welcome page
-
Run
code --agentsfrom the command line. -
On Windows, right-click the VS Code taskbar icon and select Agents Window from the Tasks jump list.
-
Open https://insiders.vscode.dev/agents in a browser to use the Agents window from any device. See remote agent sessions for setup instructions.
By default, the Agents window requires GitHub authentication to access your Copilot subscription and sessions. If you're already signed in to GitHub in VS Code, you'll also be signed in when the Agents window opens.
You can hide the Open in Agents button by right-clicking it in the title bar and selecting Hide 'Open in Agents'. You can still open the Agents window at any time from the Command Palette or command line.
Open without GitHub sign-in (Experimental)
On desktop, you can open the Agents window without signing in to GitHub when at least one of these options is available:
- Claude configured with an API key or another supported Claude BYOK option.
- Codex signed in to ChatGPT.
- A visible BYOK model configured in VS Code. Enable chat.agentHost.byokModels.enabled to make BYOK models available in the Agents window.
Enable chat.agentHost.allowSignedOutWhenUsable before you open the window. This setting is off by default.
To use a ChatGPT subscription, enable chat.agentHost.codexAgent.enabled , open the account menu in the Agents window, and select Sign in to ChatGPT. After you sign in, you can sign out of GitHub and continue to use ChatGPT-backed Codex models.
While you're signed out of GitHub, the model picker only shows models from providers with available credentials or keys. Sign in to GitHub from the account menu to add Copilot-backed models. If multiple providers offer a model with the same name, the model picker identifies the provider.
When VS Code discovers an existing Claude configuration, a notification indicates that Claude is available without GitHub sign-in. Dismiss the notification with X to hide it for the current window. Select Don't Show Again to hide it for future windows on the same machine.
If VS Code doesn't find a provider that can run with its own credentials, the Agents window shows the existing GitHub sign-in experience. Providers, models, and operations that require GitHub authentication prompt you to sign in when you select them. The browser-based Agents window always requires GitHub sign-in.
Agents window interface overview
The Agents window has the following main areas:
-
Sessions list: view and manage sessions across workspaces. By default, sessions are grouped by workspace. Select a session to make it active.
-
Customizations panel: access agent customizations for your workflow and preferences, and open Automations when enabled.
-
Chat area: view and interact with the active agent chat conversation
-
Changes panel: review changes for the active session
-
Files panel: browse the workspace associated with the active session
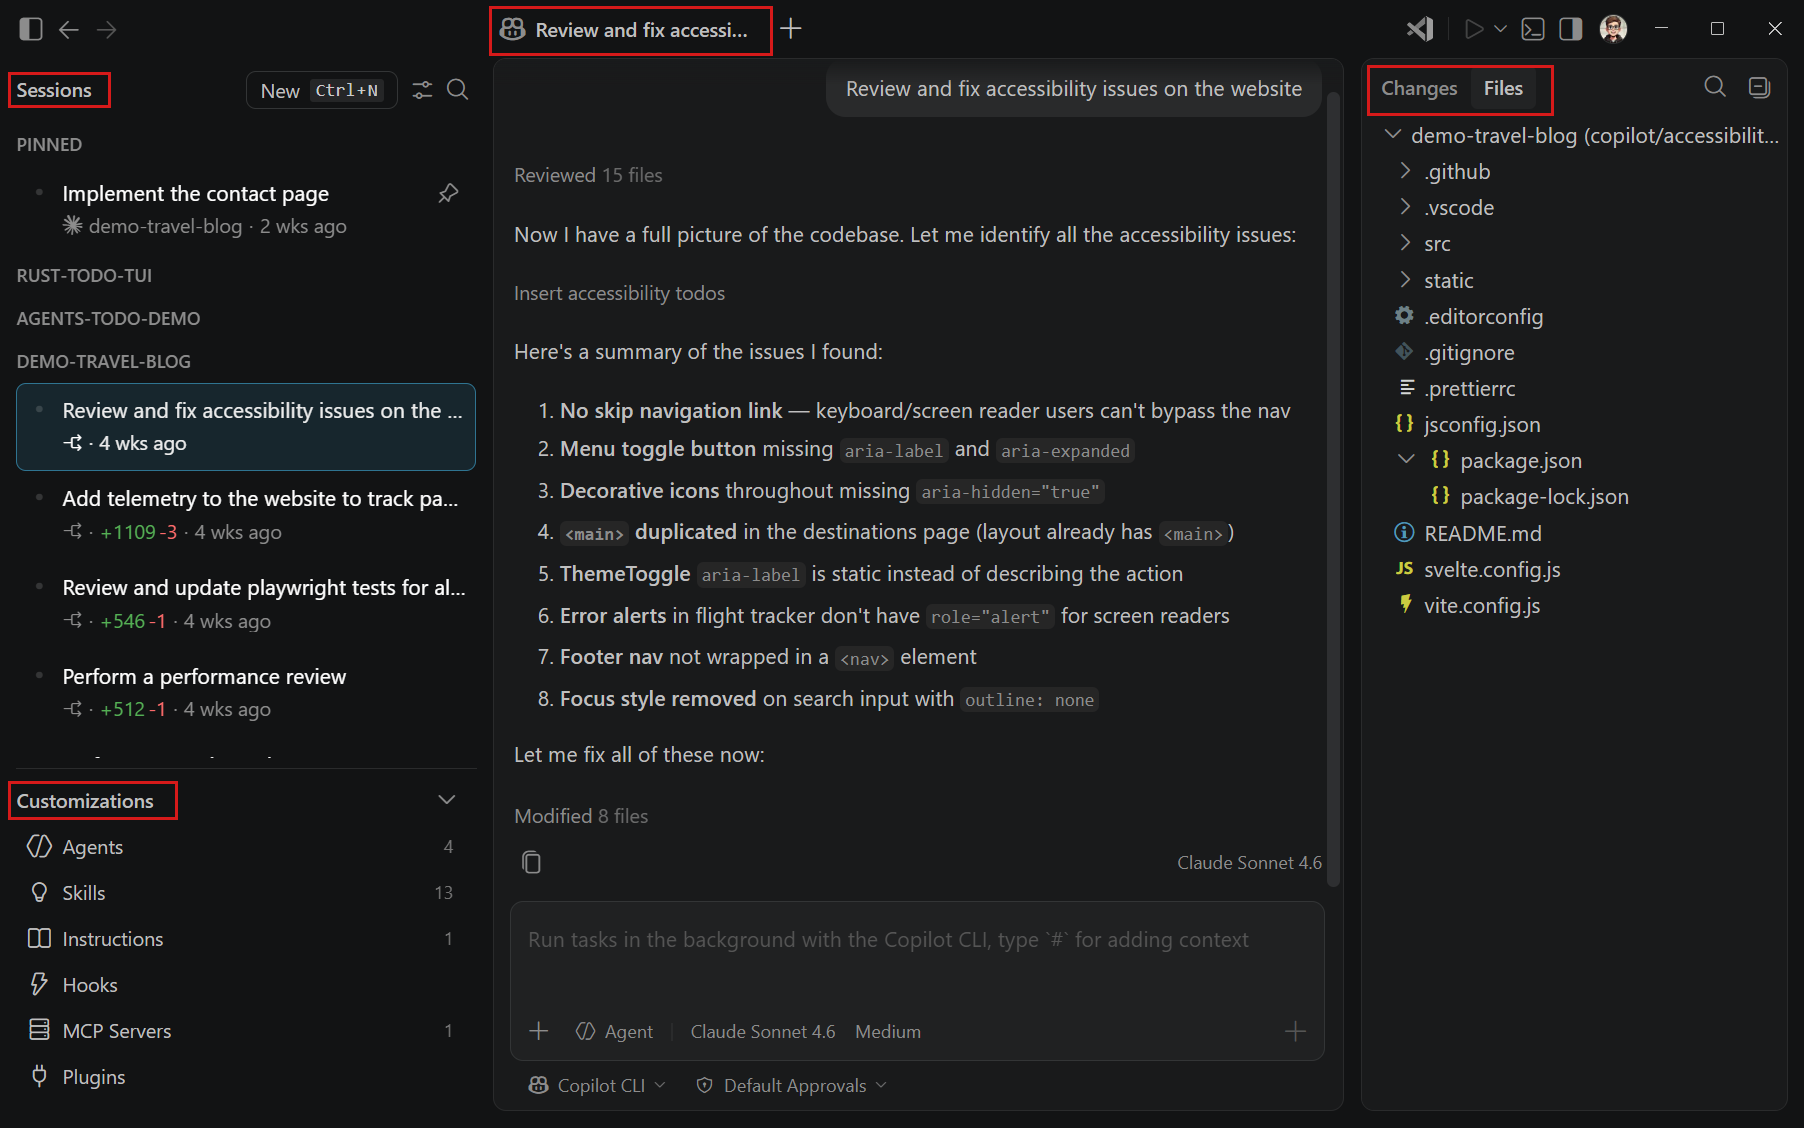
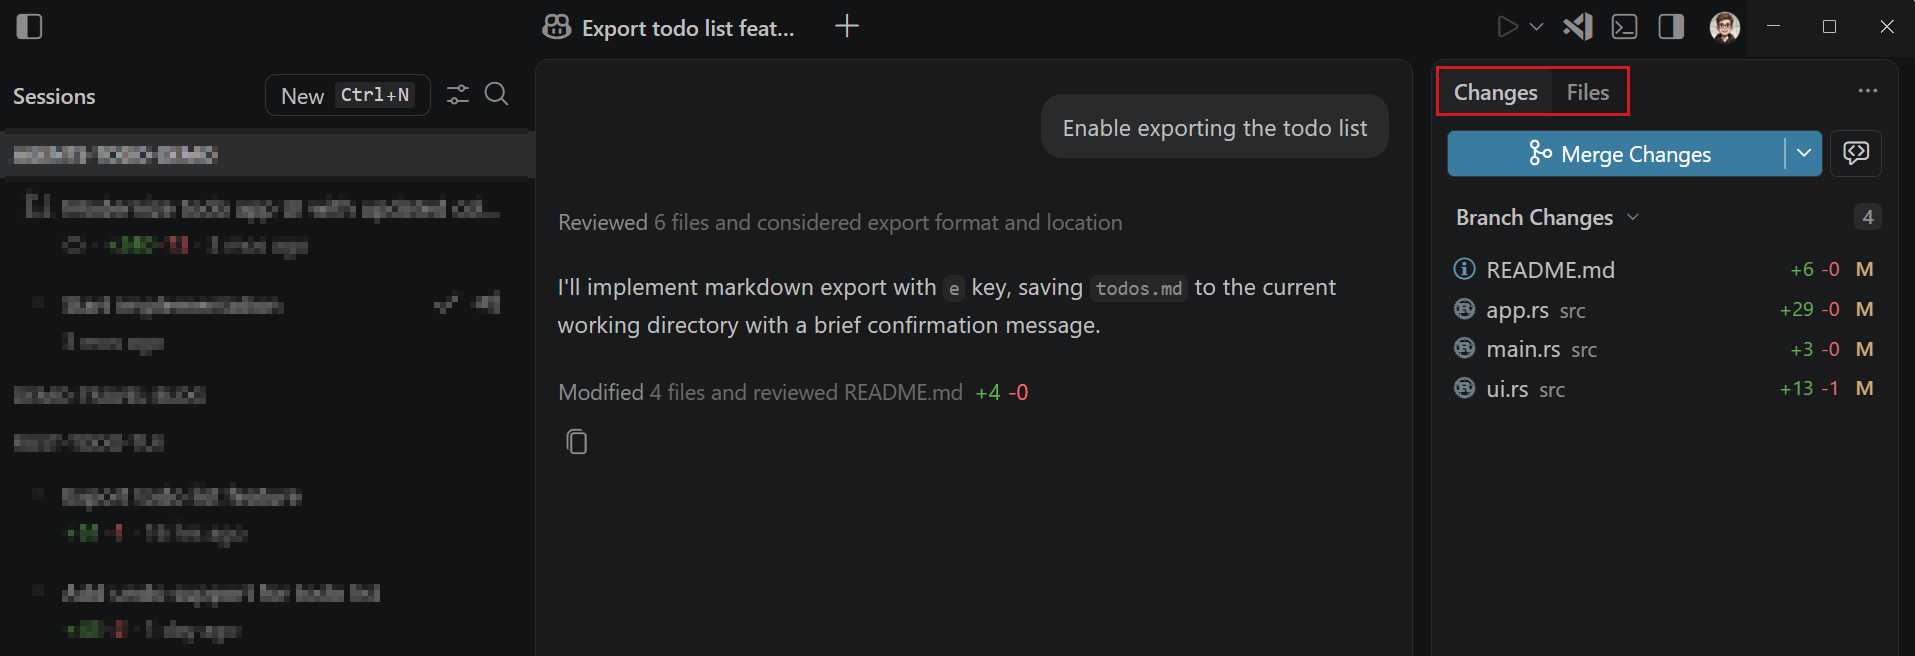
By default, the Changes and Files views appear in a separate side panel. Files and diffs open in an editor beside the chat or in a modal window.
Supported Copilot canvases Canvases is in preview and might change before it becomes generally available. Share feedback about Canvases (opens in new tab). open in the editor area. You can reopen a dismissed live canvas from the editor group's Add Tab (+) menu. Learn more about using canvases with the Copilot harness.
Understand the active session
The Agents window picks up your agent sessions across your workspaces. The active session is the session that currently has focus. Its conversation and project context determine what you see and which workspace your actions apply to.
Select a session in the sessions list to open it and make it active. When you open multiple sessions side by side, select anywhere in a session view to make that session active. The active session is highlighted in the sessions list.
The following parts of the window update when the active session changes:
| Area | What it shows for the active session |
|---|---|
| Chat | The conversation history and prompt input. |
| Files | The files in the session's workspace folder or worktree. This view includes all workspace files, not only files changed by the agent. |
| Changes | The changes and Git actions for the session. Use the dropdown to choose the branch changes, uncommitted changes, all changes, or changes from the last agent turn. |
| Terminal and Tasks | Commands and tasks that run in the session's workspace folder or worktree. |
| Browser | Browser tabs and page state that belong to the session. |
Quick chats aren't associated with a workspace. When a quick chat is active, the workspace-specific Files and Changes views aren't shown.
Start an agent session
Start a session for a local folder, GitHub repository, or remote workspace. You can attach other projects, issues, and pull requests as context before you send the first prompt. For work that doesn't belong to a project, start a quick chat.
To start a new agent session in the Agents window:
-
Select New at the top of the sidebar or press ⌘N (Windows, Linux Ctrl+N). To start directly in a specific workspace, hover over the workspace in the sessions list and select + (New Session).
-
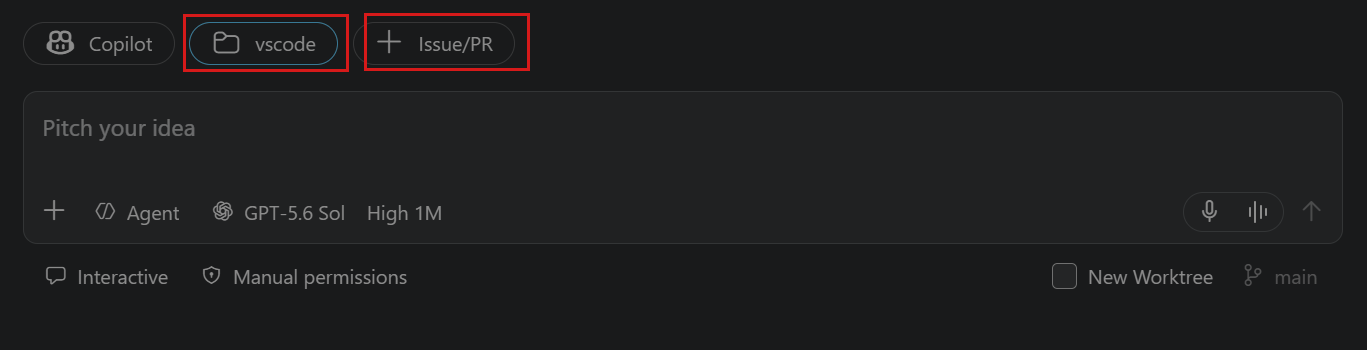
Select Folder or Repository to choose the primary execution workspace for the session. The first folder or repository you select determines where the agent runs and changes files.
To connect through SSH or a dev tunnel, select Remote Setup. If the workspace isn't trusted, review the Workspace Trust prompt before you continue.
-
Optionally, attach more context to the request:
- Select Folder or Repository to attach more projects as context without adding workspace roots.
- Select Add Context, and then select Issue... or Pull Request.... If multiple GitHub repositories are available, select a repository before you choose the issue or pull request.
- Paste a GitHub issue or pull request URL directly into the prompt. The URL remains in the prompt, and VS Code automatically adds the item as a context attachment.
-
Choose an available agent harness, and optionally configure the agent, language model, permission level, and isolation mode. For folder isolation in a local Git repository, you can also select an existing local branch to check out before the session starts. The available options depend on the workspace. Learn how to compare agent harnesses and choose where the agent makes changes.
-
Type a prompt that describes what you want to accomplish, and press Enter to submit it to the agent.
TipTo start a session in the background without leaving the current session, press Alt+Enter or hold Alt and select Send. The new session appears in the sessions list after you send the prompt.
The sessions list shows the session's status and change statistics while it works. The session is also available in the main VS Code window. Learn more about managing sessions.
Choose where an agent makes changes
For a workspace session in the Agents window, choose whether the agent edits your current folder or works in a separate Git worktree. Use a worktree to keep an agent's changes separate from your active workspace, especially when you run tasks in parallel.
Code isolation controls where the agent applies file changes. The permission level controls which actions require your approval. A worktree keeps changes out of your active workspace, but it does not restrict commands, network access, or access to files outside the worktree.
| Choice | Choose it for | Considerations |
|---|---|---|
| New Worktree | Parallel tasks that should not modify your active workspace | Starts from committed Git state and requires you to integrate the result |
| Folder | Small, interactive tasks that should use your current files and uncommitted changes | Agent edits appear immediately in your active workspace |
For a walkthrough with separate worktrees for two independent tasks, follow Delegate two tasks without mixing their changes.
When you start a session, select New Worktree and choose the base branch. The base branch provides the initial contents of the new worktree and does not change the branch in your active workspace.
If you leave New Worktree unselected, the agent works directly in the selected folder. For a local Git repository with at least one branch, you can select an existing local branch to check out before the agent starts. Checking out a branch changes the branch in your active workspace and requires a clean working tree. Commit or stash your changes before you select another branch. The branch selection is not remembered for later sessions.
Sessions that you start in the Chat view always use the current workspace. Local sessions also always apply changes in the active workspace.
In VS Code Insiders, sessions.useWorktree controls whether New Worktree is selected when you create your first workspace session. After you start a session, VS Code remembers your isolation choice across workspaces and uses it instead of this setting.
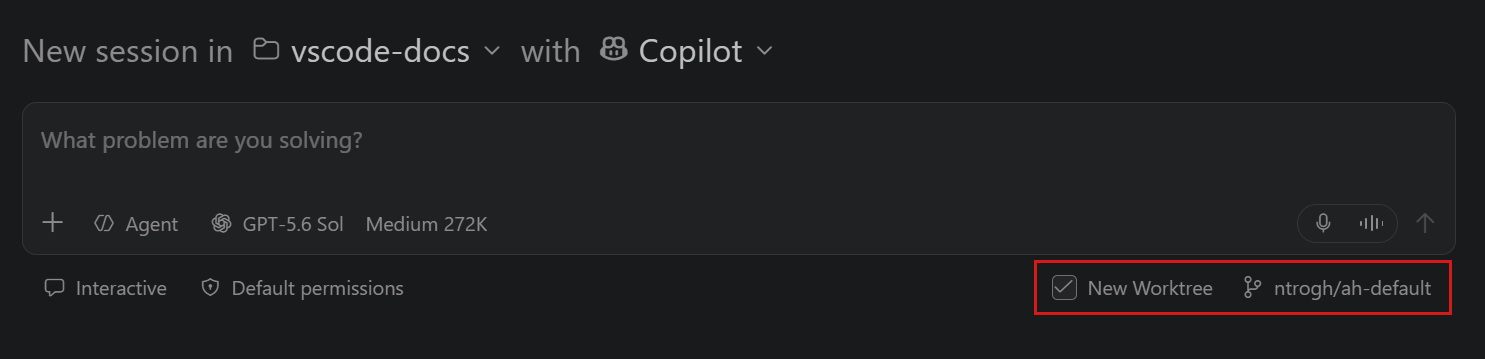
Worktree isolation requires a Git repository with at least one commit. A new worktree contains the committed files from the selected base branch. It does not automatically contain uncommitted tracked changes or untracked files from your primary worktree. Commit changes that the agent needs, or use folder isolation when the task depends on your current uncommitted state.
Git-ignored files, such as .env files and installed dependencies, are also absent by default. Use
git.worktreeIncludeFiles
to copy ignored files into new worktrees. For large ignored folders,
git.worktreeSymlinkFolders
(Experimental) can symlink a folder instead. Changes an agent makes through the symlink affect the folder in the original checkout.
Worktree sessions use Allow all and don't offer manual approval prompts. Folder sessions offer the permission levels supported by the selected harness. For operating system-level file system and network restrictions, configure agent sandboxing.
Dev Container sessions work directly in the container workspace and don't support New Worktree. See Run a session in a Dev Container.
Run a session in a Dev Container
Run a session in a Dev Container so the agent can build and test with your project's tools and dependencies. Use a local folder or, starting in VS Code 1.139, a folder on an SSH, Tunnel, or WSL host.
This option is available only in the desktop Agents window. Enable chat.agentHost.devContainer.enabled .
Before you start, make sure that:
- Docker is installed and running on the machine that contains the project folder, and the Docker CLI is available on that machine's
PATH. For a remote folder, Docker must run on the remote host. - The project folder contains a Dev Container configuration at
.devcontainer/devcontainer.jsonor.devcontainer.json. - For a remote folder, its SSH, Tunnel, or WSL connection is configured in the Agents window, and the source host advertises Dev Container support. Learn about connecting to remote hosts.
To run a session in a Dev Container:
-
Select New at the top of the sidebar.
-
In the workspace picker, expand the menu for an eligible local folder or a folder on a configured SSH, Tunnel, or WSL host, and select Use Dev Container.
The workspace label gains the - Dev Container suffix. To switch back before you start the session, expand the folder menu again and select Use Local for a local folder or Use Remote Host for a remote folder.
-
Choose an available agent harness, configure the session, and enter your prompt.
Dev Container sessions work directly in the container workspace and can't be combined with New Worktree. If the container fails to start, review the workspace-specific Dev Container channel in the Output view for setup and connection details.
The Use Dev Container option isn't available for unsupported hosts or for folders whose source is nested inside another remote environment.
When no session in the container is actively working, waiting for input, or holding an unsent draft, VS Code stops the container after five minutes. Approval prompts count as waiting for input and keep the container running. Continuing a session restarts the container and reconnects it without losing the conversation history.
Use
chat.agentHost.devContainer.idleTimeout
to change the inactivity period. The default is 300 seconds. Set the value to 0 to turn off automatic idle shutdown. Marking sessions as done or deleting them can still remove the container.
Start a session from a pull request
For a local GitHub-backed workspace, start a session from an existing pull request to ask questions about the proposed changes or continue working on the pull request. The session includes the pull request details, changes, and comments as context. It uses an isolated Git worktree that tracks the pull request branch.
To start a session from a pull request:
-
In the sessions list, group sessions by workspace.
-
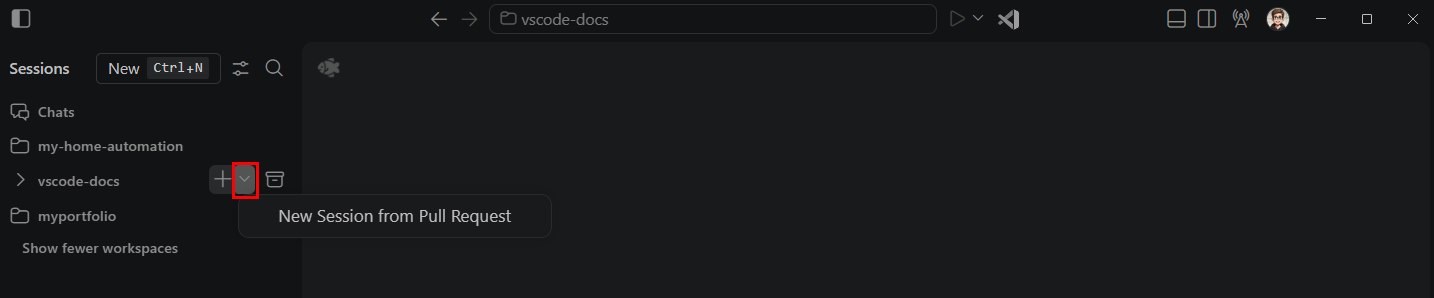
Hover over the workspace for the pull request, expand the + (New Session) action, and select New Session from Pull Request.
-
Select a pull request from the list.
The new session opens with the pull request title. Use the chat to ask questions about the pull request or enter a prompt to make more changes. The Changes view shows the pull request changes.
-
Review and validate the changes, then select Commit Changes and Sync Changes in the title bar.
Sync Changes updates the pull request branch on GitHub, so the existing pull request includes your commits.
Pull requests from forks are not supported and don't appear in the pull request picker.
Remove a pull request from a session
When a pull request is no longer relevant to a session, remove its artifact from the session:
- If the session has one pull request, right-click the pull request pill above the chat input, and then select Remove Pull Request Artifact from Session.
- If the session has multiple pull requests, select the pull requests pill to open the dropdown, and then select Remove Pull Request Artifact from Session for the pull request you want to remove.
Removing a pull request artifact only disassociates the artifact from the current session. It doesn't close the pull request on GitHub. If the session has a separate association with the same pull request, such as when you start a session from that pull request, that association remains unchanged.
Start a quick chat
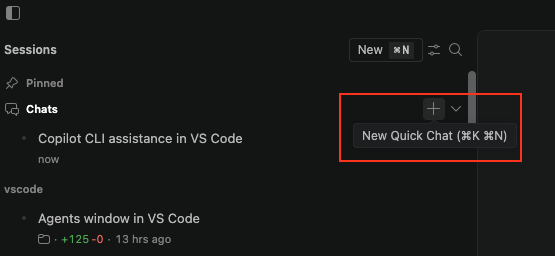
Quick chats are lightweight chats that aren't scoped to a workspace. Use a quick chat to ask a question or start a task that doesn't belong to a specific project. Quick chats appear in the Chats section at the top of the sessions list, separate from your workspace-scoped sessions.
To start a new quick chat in the Agents window:
-
Select + on the Chats section header (⌘K ⌘N (Windows, Linux Ctrl+K Ctrl+N)) or run New Quick Chat from the Command Palette (⇧⌘P (Windows, Linux Ctrl+Shift+P)).
-
Choose the agent harness from the dropdown.
-
Enter a prompt in the input box to submit it to the agent. The agent responds in the chat area.
To use speech instead of typing, start Voice Mode from the chat input. Voice Mode works with the active chat or agent session in the Agents window. Voice Mode is experimental and might change or be removed.
By default, the Chats group stays visible in the sessions list even when it's empty. To hide empty default groups, set
sessions.list.showEmptyDefaultGroups
to false.
Continue a quick chat in a workspace
If a quick chat becomes project-specific, attach a local workspace and continue the same conversation. The session retains its title, conversation history, and current request. After workspace setup finishes, the agent automatically continues your request with access to the project files.
This option is available for quick chats that use the Copilot or Codex harness. For Codex, use Interactive mode. The target must be a local folder. Worktree isolation requires a local Git repository with at least one commit.
To continue a quick chat in a workspace:
-
Ask the agent to continue the task in a specific local workspace.
-
When prompted, confirm the folder and choose whether the agent should make changes directly in the folder or use an isolated Git worktree.
-
Review and approve the Set Workspace tool confirmation.
If the folder isn't trusted, review the Workspace Trust prompt before you proceed.
-
Wait for workspace setup to finish. The quick chat becomes a workspace session and moves from the Chats group to the selected workspace in the sessions list. The agent then continues the original request.
If the chat already has a workspace, see Move a chat to another folder or worktree to continue the same task in a different location without starting a new conversation.
Review and finish an agent session
When an agent finishes a task, make the session active to inspect its workspace and access its validation and Git actions.
Inspect workspace files and changes
Select Files to browse the active session's workspace folder or worktree. Select Changes to review branch changes, uncommitted changes, all changes, or changes from the last agent turn. Open a changed file to inspect its diff or leave range-based feedback for the agent.
For complete instructions about feedback, revisions, checkpoints, and integrating changes, see Review AI-generated code edits.
Validate changes
Use the integrated browser to validate web applications in the active session. On desktop, opening a regular .html file in the active session opens it in the integrated browser by default. HTML diffs continue to open in the diff editor so you can review changes. You can also select a localhost link from the chat or terminal, right-click a file in Files and select Open in Integrated Browser, or run Open Integrated Browser from the Command Palette (⇧⌘P (Windows, Linux Ctrl+Shift+P)). Browser tabs and page state belong to the session where you open them. Learn how agents can use browser tools to inspect and interact with a web page.
To run a workspace task, select Tasks > Add Task, and then provide its name, command, run options, and save location. Run configured tasks from the Tasks dropdown. To run an ad hoc command in the active session's folder or worktree, select Open Terminal in the title bar.
Commit changes
If the active session has uncommitted changes, select Commit Changes in the Changes view. VS Code generates a commit message based on the changes and commits all current changes. Depending on the session type, you might also have a Commit and Sync Changes action.
Create a pull request
If the session doesn't already have a pull request, use the Create PR form to review the details and choose what happens after creation:
-
Open the Changes view, and then select Create PR.
The form opens while VS Code generates a title and description. You can edit these fields without waiting for generation to finish.
-
Review the repository, source branch, base branch, title, and description.
-
To keep the pull request in draft until it is ready for review, select Create as Draft.
-
Under After creation, choose one of these mutually exclusive options:
- Merge Manually: merge the pull request yourself when it is ready.
- Auto-Merge: let GitHub merge the pull request when required checks and approvals pass.
- Merge method: select Squash, Merge Commit, or Rebase.
- Agent merge: have agent merge monitor the pull request and ask the agent to address blockers.
- Blockers: select Address Reviews, Fix CI Failures, or Resolve Conflicts and Behind Branches.
- Merge Pull Request: select Off, If Unchanged, or When Ready. Off leaves the pull request open, If Unchanged merges it only if agent merge makes no changes, and When Ready merges it after required checks and approvals pass.
GitHub auto-merge is unavailable when Create as Draft is selected. It also does not fix failed checks or address review feedback.
-
Select Create PR.
Any uncommitted changes are committed and the branch is pushed before the pull request is created.
The form remembers the draft setting, merge options, agent merge options, and your last action (Create PR or Send Create PR Message). It does not remember titles or descriptions.
To have the agent create the pull request instead, open the Pull Request Actions menu in the Create PR form and select Send Create PR Message.
This action sends the title, description, draft status, and the Merge Manually or Auto-Merge choice to the session chat, including the merge method when you select Auto-Merge. It does not create the pull request directly. Agent merge options are not included in the message.
Finish a pull request with agent merge
Agent merge is an experimental feature that monitors the pull request associated with an agent session and asks the agent to address blockers until the pull request is ready to merge. Depending on how you configure it, agent merge can:
- Address unresolved review threads, changes-requested reviews, and new comments from repository maintainers or the Copilot pull request reviewer.
- Fix failed required CI checks.
- Update a branch that is behind its base branch and resolve merge conflicts.
- Merge the pull request or add it to the merge queue after the selected maintenance work is complete.
First, enable chat.agentMerge.enabled .
To enable agent merge for an existing pull request:
-
Open a session that is associated with a pull request. To create one, use the Create PR form or follow the steps in Start a session from a pull request.
-
Select Agent merge in the title bar, and then select Enable agent merge.
-
From the Agent merge menu, configure which blockers the agent should address and whether to merge the pull request when it is ready.
You can also run Configure agent merge for Active Session from the Command Palette (⇧⌘P (Windows, Linux Ctrl+Shift+P)). For a complete list of options, see the agent merge settings.
While the pull request is a draft, Mark Ready is available from the Changes view. While agent merge addresses blockers, select Mark Ready from the action menu to make the pull request ready for review. When required checks and actionable review feedback are clear, Mark Ready becomes the primary action.
Agent merge starts agent turns, changes and syncs the pull request branch, and consumes model requests. Enabling it changes the session to Autopilot with Assisted permissions. Review the agent merge options before you enable automatic merging.
Agent merge waits while required checks are pending and checks that the pull request is ready immediately before it merges or adds it to the merge queue. If the session starts tracking a different branch or pull request, agent merge turns off and requires you to enable it again.
To review the changes from the most recent agent merge repair cycle, open the Changes view and select Agent merge Changes from the changeset dropdown. This changeset compares the latest completed agent merge repair turn with the preceding completed user turn. It remains empty after your latest message until agent merge completes another repair turn.
To stop monitoring the pull request, select Agent merge in the title bar, and then select Disable agent merge.
Work with multiple sessions
The sessions list shows sessions across all your workspaces. You can group sessions by workspace or time, create custom groups, pin sessions, and rearrange items with drag and drop. Learn how to organize and manage sessions.
Arrange sessions in a grid
Arrange parallel sessions in a two-dimensional grid to monitor progress and compare results. To open another session in the grid:
- To keep the active session visible while you start a new session, hold Alt (Option on macOS) and select New.
- Right-click a session in the sessions list and select Open to the Side.
- Drag a session from the sessions list into the view area.
- Hold Alt and select a session in the sessions list.
Drag a session to the top, bottom, left, or right edge of another session to create a horizontal or vertical split. A placement preview shows where the session appears.
Only one session pane is active at a time. Select a pane to make it active and direct the Files, Changes, Terminal, Tasks, and browser actions to that session. Selecting another session in the list replaces an unpinned active view.
Open the Session Layout submenu from a session header or its overflow menu. From there, you can select Arrange Sessions in a Balanced Grid, focus a session in a direction, move the active session, or increase or decrease its width or height. The default directional focus shortcuts are ⌘K ⌘← (Windows, Linux Ctrl+K Ctrl+Left), ⌘K ⌘→ (Windows, Linux Ctrl+K Ctrl+Right), ⌘K ⌘↑ (Windows, Linux Ctrl+K Ctrl+Up), and ⌘K ⌘↓ (Windows, Linux Ctrl+K Ctrl+Down).
Use Maximize in the session header to expand the active session, and use Restore to return to the grid. These actions are separate from the Session Layout submenu.
Press ⌘K ⌘W (Windows, Linux Ctrl+K Ctrl+W) while a session has focus to close all visible panes and return to the new-session view. This action does not delete or archive the sessions.
The Agents window restores conversations, drafts, pane geometry, the active session, and the maximized state after a reload. At narrow or phone width, only the active session is shown. The grid returns when you widen the window.
Compare model results (Preview)
Run the same prompt with multiple models or harnesses in isolated worktrees, then compare their approaches and results. You can optionally use a Judge to evaluate the attempts and request a synthesized solution. See Compare model results for prerequisites and the full workflow.
Work with multiple chats in a session
With a harness that supports multiple chats, such as Copilot or Claude, use chat tabs and split groups to keep several conversations visible. Arrange interactive peer chats, side chats, and read-only subagent chats horizontally or vertically.
The main chat and interactive peer chats are also available in the editor's Chat view, where you select them from the Sessions view rather than the Agents window chat tabs.
For what chats share, how to create them, and the controls in each interface, see Run multiple chats in a session.
Schedule recurring tasks
Automations run recurring agent tasks from a saved prompt and schedule. Local automations run in your development environment on your computer. Cloud automations Cloud automations is experimental and might change or be removed. Share feedback about Cloud automations (opens in new tab). run remotely in GitHub and continue when you close VS Code or turn off your computer.
Enable chat.automations.enabled , and then select Automations in the sidebar to get started. For cloud execution, also enable chat.automations.cloud.enabled . You can run a task on demand or schedule it to run hourly, daily, or weekly.
Learn how to choose where an automation runs, create an automation, and review its results.
Configure the Agents window
You can personalize chat, adjust the window layout, configure settings and extensions, and choose how Markdown files open. See Configure the Agents window for all window-specific options.
Limitations
-
Sessions that use the experimental Codex integration can run in both the Agents window and the main VS Code window. Local harness sessions and Codex sessions from the OpenAI extension run only in the main VS Code window.
-
Copilot Cloud sessions are only supported for GitHub-backed repositories. For non-GitHub projects, you can still use Copilot in the Agents window.
-
The agents dropdown currently doesn't have the plan agent. You can use the
/plancommand in a Copilot or Claude agent session. In Copilot harness sessions, the plan agent is also automatically invoked when you ask it to create a plan. -
Running multiple chats in a single session is currently supported for sessions that use the Copilot or Claude harness.
-
Multi-root sessions are not yet supported in the Agents window. You can ask the agent to work across projects in a single session.
Next steps
- Use chat in VS Code - send and steer requests, add context, and navigate conversations.
- Manage agent sessions - organize, fork, archive, and export sessions.
- Review AI-generated code edits - inspect, revise, and integrate agent changes.