Manage agent sessions in VS Code
A session is the unit of work with an agent in Visual Studio Code. It brings together the workspace, code changes, and one or more chats for a task. Each chat has its own conversation history and context. This article describes how to manage these conversations and organize sessions across the Chat view and the Agents window.
Start an agent session
Claude and Codex harnesses are disabled when Copilot enterprise-managed settings apply. Existing sessions are not deleted by this restriction. Contact the IT team that deployed the settings to discuss access.
Start a new session when you begin an independent task or need a different workspace or configuration. For a fresh conversation that shares an existing session's workspace and code changes, start another chat in that session, where supported.
Choose the surface that matches your workflow:
- Use the Chat view for a workspace-scoped, code-first session beside the editor.
- Use the Agents window to start and monitor sessions across workspaces, attach related projects or GitHub items, or start from an existing pull request. On Windows, you can also launch the Agents window directly by right-clicking the VS Code application icon in the taskbar and selecting Agents Window.
You can continue supported sessions between these surfaces after starting work. Availability depends on the harness; see Sessions across surfaces. To choose an interface and follow the workflow, see Run agents. To send and steer requests after a session starts, see Use chat in VS Code.
For Local harness sessions: Continue the session in the Chat view in an editor window. These sessions aren't available in the Agents window. Sessions from the OpenAI Codex extension are also editor-only. To use Codex in both interfaces, configure the experimental Codex integration.
Move a chat to another folder or worktree
In the Agents window, move the current chat to another folder or a new Git worktree to continue a task without starting over. The move preserves its conversation history. This capability requires an Agent Host session that contains one chat and one local folder. Use the Copilot harness, or Codex on the Agent Host (Experimental) in Interactive mode.
Ask the agent to move the chat with a natural-language prompt. This is an agent-tool request, not a separate move button. To move the current chat to an existing local folder on the same host:
Move this chat to <absolute folder path> and continue the current task there.
To isolate implementation in a new Git worktree, use this prompt from a folder session before implementation begins:
Continue this task in a new Git worktree of the current repository before implementing it.
When prompted, confirm the destination and whether to use the folder directly or create a worktree. Review any tool approval or Workspace Trust request. The agent finishes the current turn and then moves the chat. Wait for the workspace-change notice and for the chat to continue automatically before you send more prompts.
A folder move uses the files already in the destination and doesn't move or copy your existing files. A new worktree starts from committed Git state. Your uncommitted changes stay in the original folder, except for files copied by configured worktree include rules. Creating a worktree requires a Git repository with at least one commit. For complete prerequisites, file-copy behavior, and security considerations, see Choose code isolation.
Manage session context
The context window control in the chat input shows how much of the model's context window the active chat is using. Hover over the control to see the token count, a usage breakdown by category, and the total AI credits consumed by the session.
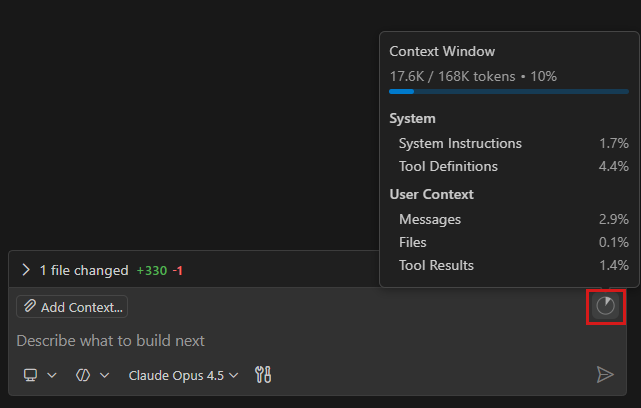
As the conversation grows, the control updates to reflect increasing context usage. The available context depends on the selected model.
How context changes across turns also affects prompt caching. Stable context lets the model provider reuse tokens from earlier requests, which lowers cost and latency. Use the Cache Explorer to check your cache hit rate.
Compact conversation context
Context compaction summarizes earlier conversation history to free space in the context window. Compaction lets you continue the same chat with less irrelevant history and reduces the tokens sent with subsequent requests.
VS Code automatically compacts the conversation when the context window fills. To turn off automatic compaction, set
github.copilot.chat.summarizeAgentConversationHistory.enabled
to false.
To compact the conversation manually:
- Type
/compactin the chat input. Optionally, add instructions for what the summary should retain, for example/compact focus on the database schema decisions. - Select the context window control, and then select Compact Conversation.
Manual compaction is available for Local, Copilot, and Claude agent sessions.
To start with fresh conversation history instead of a summary:
-
For related work in the same workspace, start another chat in the session, where supported. It shares the session's folder or worktree and code changes without inheriting the other chats' history.
-
For an independent task or a different project, start a new session. Select a separate worktree when code changes must be isolated.
Neither option clears saved files, applicable custom instructions, or persistent memory. To undo code changes rather than start a fresh conversation, review and revert the changes.
Learn more about AI credit consumption.
Run multiple chats in a session
With a harness that supports multiple chats, such as Copilot or Claude, use them to work on related tasks without interrupting an ongoing conversation. The session has a main chat and can contain additional interactive peer chats. Each chat has its own conversation history, title, and agent or language model selection, but all chats share the session's workspace and worktree.
A new chat starts blank and doesn't inherit the history of the other chats. To retain the source conversation's history, fork the conversation instead. Learn more about choosing a chat, a fork, or a new session.
Changes from all chats in a session go to the same folder or worktree and appear together in the session changes. Start separate worktree-isolated sessions when tasks must not modify the same files.
In the Agents window, create peer chats and use sessions.showChatTabs to choose how conversations appear:
- Multiple: Show each open chat as a tab. You can arrange tabs in split groups to monitor conversations side by side.
- Single: Show the active chat as the session view. Selecting another peer chat replaces the unpinned chat pane. A chat that you explicitly open to the side stays visible, and closing the last peer chat pane doesn't reopen the main chat.
To create a peer chat:
-
Right-click an active session in the sessions list and select New Chat in This Session. You can also use this action from the session header's ... menu, or press ⌘T (Windows, Linux Ctrl+T) while the session has focus.
A blank chat opens. When the session has more than one chat, a tab strip appears in the chat area. The new chat also appears beneath its owning session in the sessions list.
-
Type a prompt and press Enter to start the chat.
The action requires a harness that supports multiple chats. It isn't available for quick chats or archived sessions.
In the Multiple presentation, use the chat tabs and their context menus to:
- Switch chats: select a tab to show its conversation. Progress and unread indicators apply to that chat.
- Choose an agent or model: use the controls in each chat. Sibling chats can use different agents or models.
- Track changes: the session remains in progress while any chat is working. The session header Changes pill combines edits from all chats.
- Rename a chat: select Rename from the tab's context menu. Chat titles are independent of the session title.
- Close or reopen a chat: close a tab to hide it without deleting it. Use the Chats dropdown to show or hide chats, or press to reopen the most recently closed chat.
- Delete a chat: select Delete Chat from the tab's context menu, or press ⌘Backspace (Windows, Linux Delete) while the chat has focus. Deletion is permanent.
To arrange chats in multiple groups:
- Drag a chat tab to the center of another group to move it into that group.
- Drag a chat tab to the left, right, top, or bottom edge of a group to create a group in that direction.
- Run Sessions: Split Chat Group Right, Sessions: Split Chat Group Down, Sessions: Move Chat to Previous Group, or Sessions: Move Chat to Next Group from the Command Palette (⇧⌘P (Windows, Linux Ctrl+Shift+P)) to arrange chats with the keyboard.
- Press ⌘K ⌘← (Windows, Linux Ctrl+K Ctrl+Left) or ⌘K ⌘→ (Windows, Linux Ctrl+K Ctrl+Right) to move keyboard focus between groups.
When you close or move the last chat in a group, the empty group closes and the remaining groups expand to fill the available space.
Visible and hidden chats, including their conversation history, are restored when you reload the window and reopen the session. Chat group assignments, active chats, and split sizes are also restored when you switch sessions or reload the window.
In the editor window, use the Sessions view to continue the main chat or a peer chat beside your code:
-
Open the existing session in the Chat view. If you started in the Agents window, select Open in Editor in its title bar to open the session's workspace in an editor window.
-
Show the sessions list beside the Chat view by using the side-by-side layout.
-
Expand the main chat row to show its peer chats beneath it.
-
Select a peer chat to open its conversation in the existing Chat view. Select the main chat row to return to the main conversation.
When you switch chats, each chat keeps its own messages and unsent draft. Returning to a chat restores its draft so you can continue where you left off.
To open a peer chat in an editor tab, right-click its row and select Open as Editor. To open it in another editor group, select Open to the Side.
The editor's nested list doesn't include side chats or read-only subagent chats. Use the Agents window to view those chats and arrange them in chat groups.
To practice separating and monitoring independent work, follow Delegate two tasks without mixing their changes.
Ask side questions
Use a side chat to ask a question about the current conversation without adding the question or response to the main chat. A side chat opens in a group beside the source chat, so both conversations remain visible. It privately inherits the source conversation as context. Side chats favor explanation over action unless you ask the agent to make changes or perform a task.
Start a side chat in one of these ways:
- Type
/btw <question>in the chat input. The side chat branches from the latest turn, including a response that is still in progress. - Select text in a chat response, enter a question in the Ask Question input, and press Enter. The selected text and its response become context for the side chat.
Each question creates a new side chat. The side chat inherits the agent and language model from the source chat, but inherited messages remain hidden from its transcript.
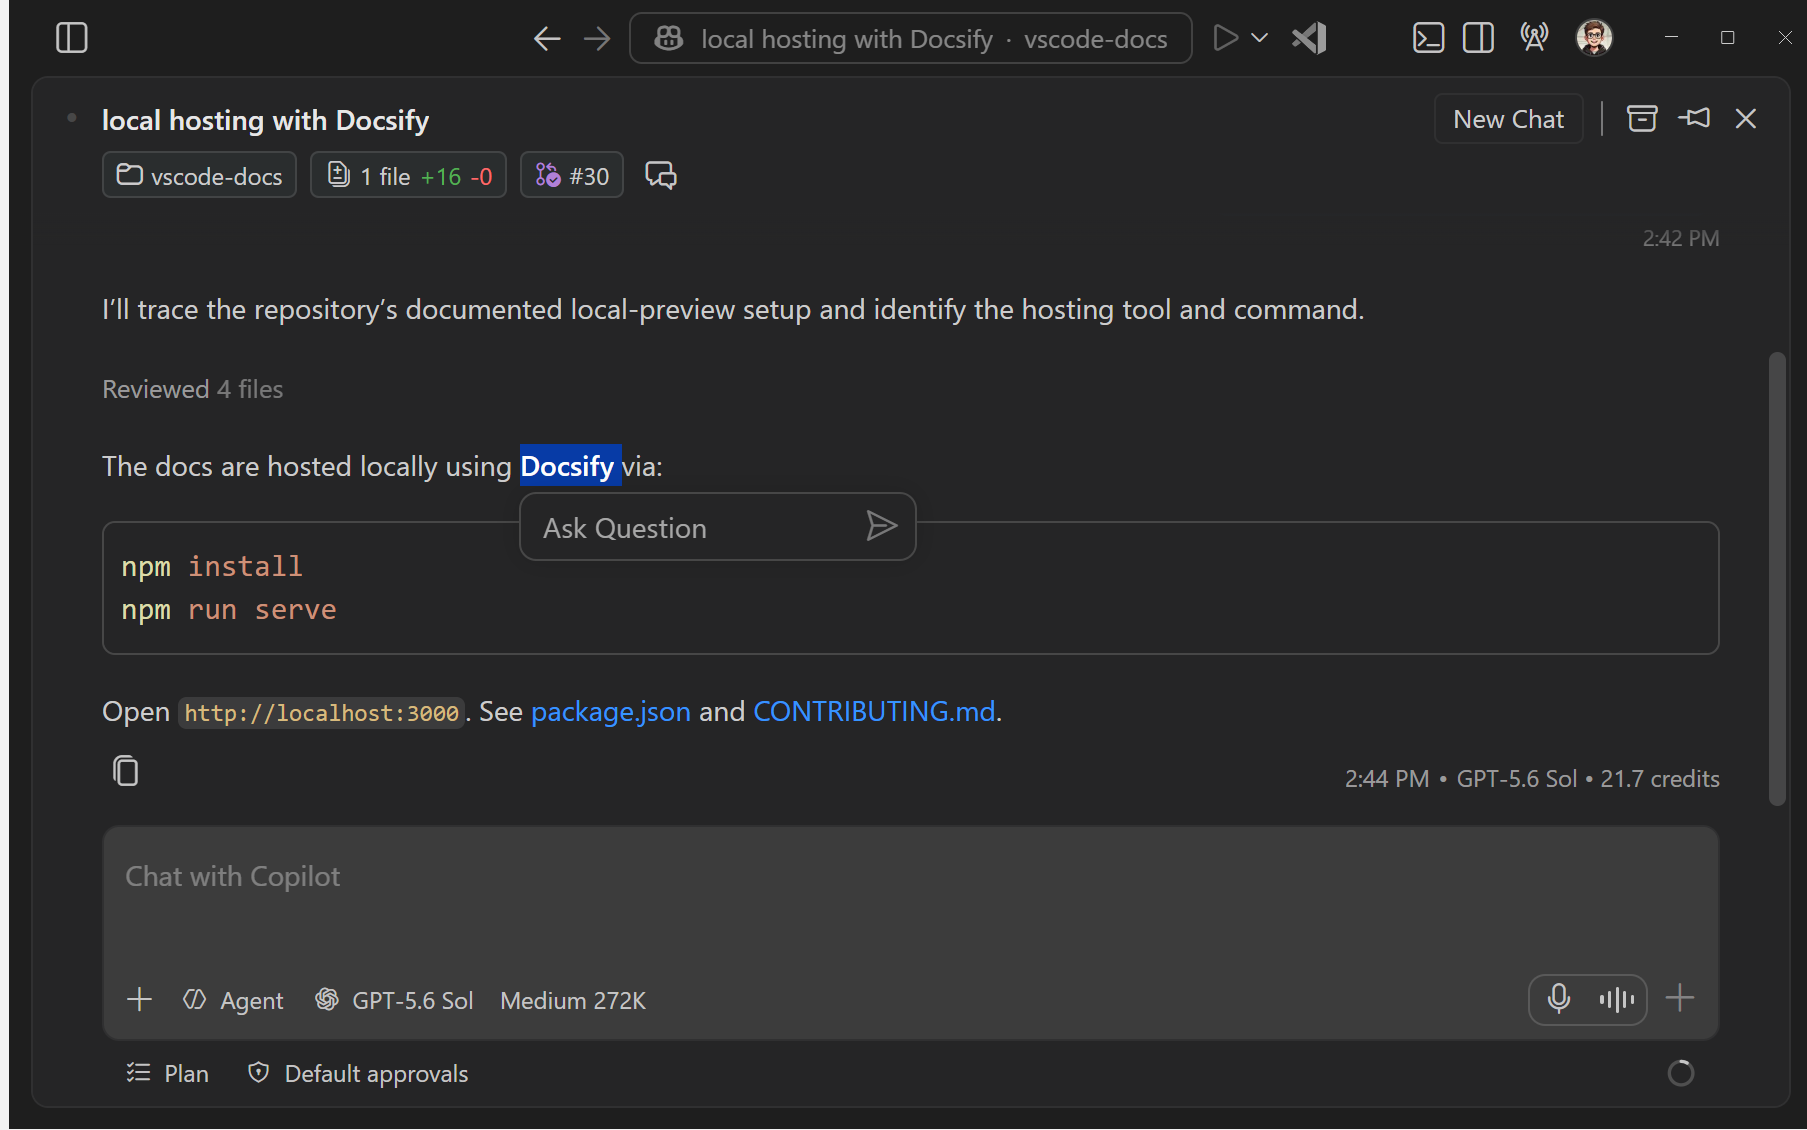
Side chats are available only in the Agents window for sessions that use the Copilot or Claude harness. They aren't available for sessions from the OpenAI Codex extension or in the Chat view.
Sessions list
The sessions list is your central hub for managing all your chat sessions, regardless of where you started them or where they are running. The sessions list shows your sessions with information about their status, type, and file changes.
Hover over a session to see actions for pinning or archiving it. Right-click a session in the list to see additional actions like deleting or changing the session's state. Some actions are specific to the session's harness and state. For example, you can check out a pull request for a cloud session.
Use the pinning action to keep important sessions easily accessible at the top of your list. Pinned sessions stay at the top of the list regardless of their activity or state, so you can quickly find and return to them.
In the Agents window, the sessions list is located in the left sidebar. It shows sessions from all your workspaces, so you can monitor work across projects from a single place. Each session item surfaces key information such as session name, workspace, harness, and file change stats.
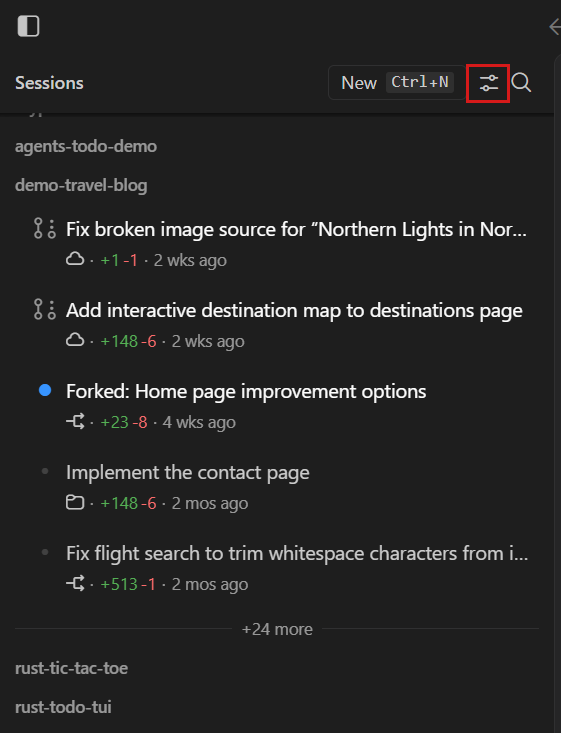
By default, the list is filtered to only show active sessions. You can change the filter to show sessions of different states, such as completed or archived.
Sessions are grouped by workspace by default, and you can switch the grouping to organize by timeframe instead. In the Agents window, you can also create custom groups to keep related sessions together. Collapse a group header when you want to reduce the sessions list.
To organize the sessions list in the Agents window:
-
Create a custom group from the sessions list controls.
-
Drag one or more sessions onto the group. An insertion line shows where the sessions land.
-
Hover over a group header to start a new session in that group, or mark all sessions in the group as done.
You can also drag sessions up or down to reorder them, drag group and workspace headers to rearrange sections, or drop a session on the Pinned section to pin it. Select multiple sessions to move them together.
You can hide the left sidebar by selecting the Toggle Sidebar button in the top-left corner of the Agents window or by using the ⌘B (Windows, Linux Ctrl+B) keyboard shortcut.
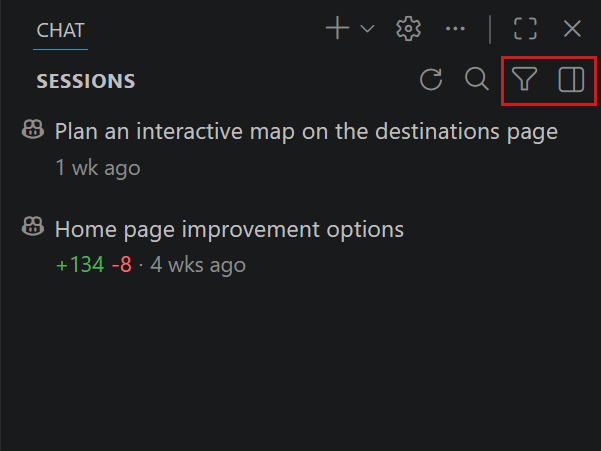
In the Chat view, the sessions list is scoped to your current workspace and groups sessions by time period, such as Today or Last Week. If you don't have a workspace open, the list shows all sessions across your workspaces.
By default, the list is filtered to only show active sessions. You can change the filter to show sessions of different states, such as completed or archived.
To hide the session list from the Chat view, right-click in an empty chat and unselect Show Sessions or use the chat.viewSessions.enabled setting.
The Chat view operates in two modes: compact and side-by-side. You can manually switch between compact and side-by-side mode by using the toggle control in the top-right corner of the Chat view.
-
Compact: The list of sessions is embedded in the Chat view. When you select a session from the list, the Chat view switches to that session. Use the back button to return to the sessions list.
-
Side-by-side: The list of sessions is shown side-by-side with the Chat view. Select a session from the list to view its details in the Chat view. You can further configure the orientations with the chat.viewSessions.orientation setting.
For sessions whose harness supports multiple chats, expand the main chat row to see its peer chats. Selecting a peer opens that conversation rather than a separate session. See Run multiple chats in a session for the workflow and the differences between interfaces.
Extension developers can learn how to integrate with the sessions view by using the proposed API chatSessionsProvider. The API is currently in a proposed state and subject to change.
View sessions from other applications
VS Code can discover local agent sessions created by supported applications outside VS Code. You can open and continue sessions from Copilot CLI, the GitHub Copilot app, Claude Code, and Codex in the Chat view or Agents window.
For Copilot harness sessions, discovery includes sessions that are associated with a repository and were updated within the last seven days.
By default, sessions created in other applications are hidden. To control which sessions appear, open the sessions list filter, select External, and choose one of these options:
- None: hide all external sessions.
- Recent: show the two most recently updated external sessions from the last seven days.
- Last 24 Hours: show external sessions updated within the last 24 hours.
- Last 7 Days: show external sessions updated within the last seven days.
- All: show all discovered external sessions.
The filter applies to the sessions lists in both the Chat view and Agents window. You can also configure it with the chat.agentSessions.showExternal setting.
When you open an external session in the Agents window, a one-time banner indicates that the session was created in another application. You can choose which external sessions to show from the banner. If your choice hides the open session, VS Code asks you to confirm the change.
When you open an external Codex session, only one application can write to the chat at a time. If the chat is still open in ChatGPT or Codex CLI, VS Code keeps the transcript, draft, and attachments available, but disables sending, queueing, and resending. The This chat is open in another app banner appears above the chat input.
To continue the chat in VS Code, fully quit the other application, and then select Retry in the banner. Retrying checks whether the chat is available without sending the draft or adding a transcript entry. After the banner disappears, send the draft yourself.
After you send a message from VS Code in an external session, the session is no longer external. The External filter no longer controls whether the session appears in the sessions list.
Use Copilot CLI from the terminal
To start a GitHub Copilot CLI session from VS Code, use one of these options:
- Open the GitHub Copilot CLI terminal profile.
- Run Chat: New Copilot CLI Session from the Command Palette (⇧⌘P (Windows, Linux Ctrl+Shift+P)).
- Enter
copilotin an integrated terminal.
If Copilot CLI isn't installed, the copilot command offers to install it. On macOS, you can also install it when you add code to PATH. On Windows, setup can also add the copilot command to PATH, so it works in any terminal.
VS Code adds the session to the sessions list. To continue an existing Copilot harness session from the terminal, right-click it in the sessions list and select Resume in Terminal.
Archive sessions
To keep the sessions list organized, archive or mark sessions as done when they're completed or you no longer need them. Archiving a session does not delete it. You can unarchive a session that you archived manually to restore it to the active sessions list.
If enterprise-managed sandbox or permission settings automatically move a Local session to the Copilot harness, the original Local session is archived as a read-only record. Continue the conversation in the Copilot session. The original remains read-only while the policy applies. Learn more about Agent Host policy enforcement.
When you archive (or mark as done) a session, its status changes so it moves out of the active sessions list. For a worktree session, VS Code commits uncommitted changes to the session branch before it removes the worktree folder. If VS Code can't preserve the changes or remove the worktree, the worktree remains. The branch and its commits are preserved, so restoring the session re-creates the worktree from that branch.
For a Dev Container session, marking a session as done removes the container without waiting for the idle shutdown period, but only when no other session or unsent draft uses it. Restoring the session starts a replacement container and preserves the conversation history.
To archive a session, hover over the session in the sessions list and select the Archive (Chat view) or Mark as Done (Agents window) option.
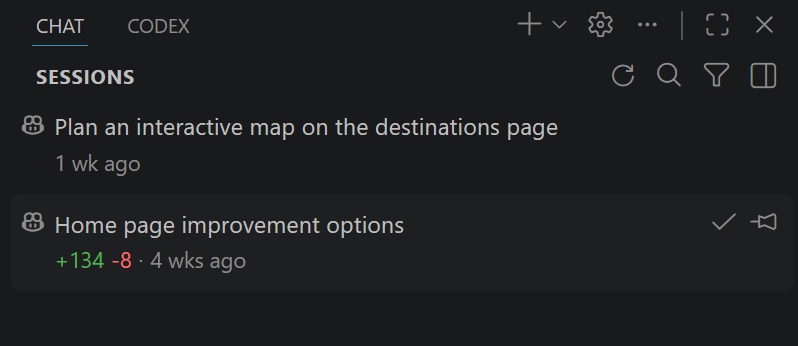
To view your archived sessions, use the filter options in the sessions list and select the Archived (Chat view) or Done (Agents window) filter.
Mark an individual chat as done
In the Agents window, you can mark an additional chat within a session as done without affecting the main chat, other chats, or the owning session:
-
Expand the owning session in the sessions list.
-
Right-click the chat, and then select Mark as Done.
Marking a chat as done hides it from the active sessions list and closes its tab, but does not delete it. The chat remains done after you reload the window, and its title and transcript are preserved.
To find a done chat, select the Done filter in the global sessions list. Alternatively, right-click the owning session and select Show Done Chats to show its done chats beneath it. Right-click the done chat and select Restore. The chat becomes active and usable again, with its title and transcript intact, so you can continue sending messages.
You can't mark the main chat, side chats, or subagent chats as done independently.
Delete sessions
To permanently delete a session, right-click the session in the sessions list and select Delete. Deleting a session removes it permanently and can't be undone. For Copilot harness sessions, deleting the session also removes any associated worktrees created for that session.
If multiple Copilot harness sessions share the same worktree, such as after you fork a session, deleting one session does not remove the shared worktree while another session still uses it. The worktree is removed only after the last linked session is deleted or archived.
For a Dev Container session, deleting the session removes the container only when no other session or unsent draft uses it. This cleanup also applies when automatic idle shutdown is turned off.
Deleting a session is irreversible. Integrate or commit worktree changes before you delete the session because uncommitted files that exist only in a removed worktree can be lost. If you only want to hide a session, archive it instead.
Clean up session worktrees
Worktree-isolated agent sessions can accumulate and use significant disk space. Run Chat: Open Worktree Cleanup to review inactive session worktrees and remove the ones you no longer need.
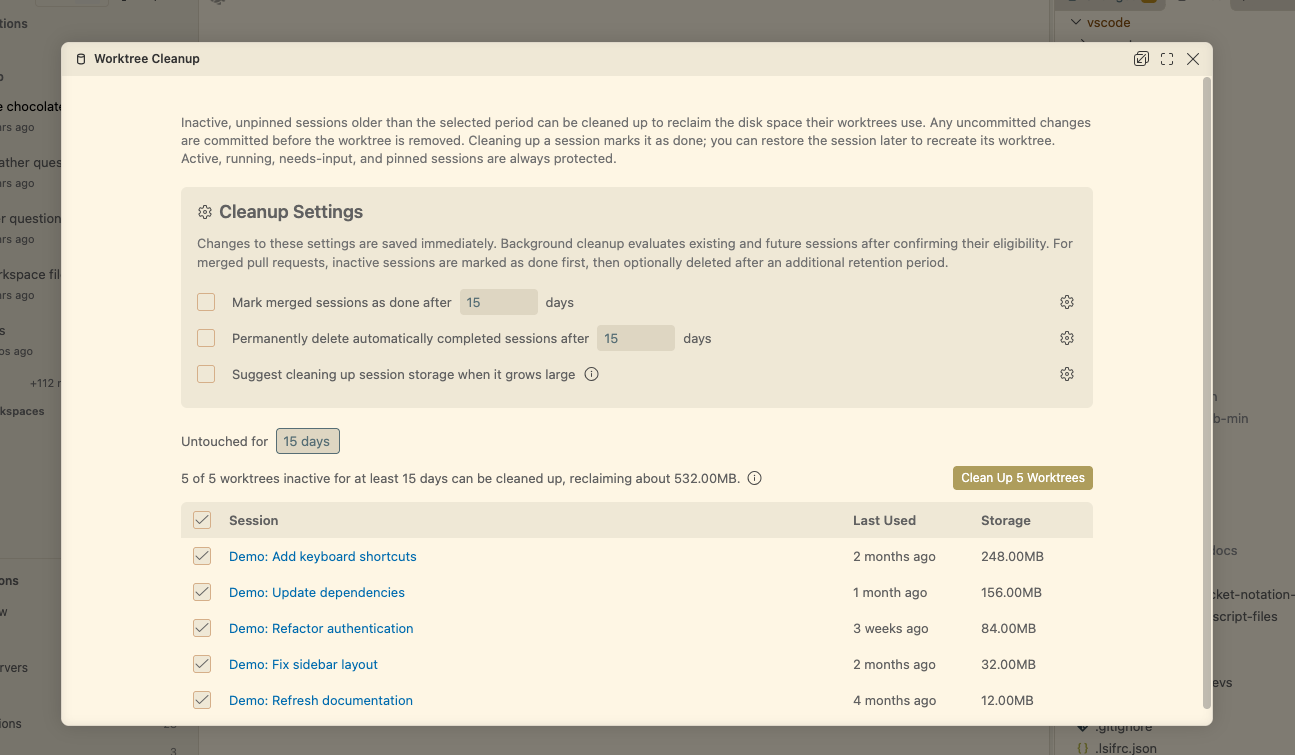
In the cleanup editor:
-
Choose how long sessions must be inactive. You can filter for sessions that have been inactive for 7, 15, 30, 60, or 90 days.
-
Review the estimated size of each worktree. Eligible worktrees are selected by default. Clear any worktrees that you want to keep.
-
Save any open file edits in the selected worktrees before you continue.
-
Confirm the cleanup for the selected worktrees.
Cleanup marks each selected session as done and schedules its worktree for removal. Before removing a worktree, VS Code commits uncommitted changes to the session branch. If the changes can't be preserved or the worktree can't be removed, the worktree remains. The session and its branch history are preserved, so restoring the session re-creates the worktree.
The cleanup editor excludes sessions that are active, running, waiting for input, pinned, done, archived, untitled, in an error state, or more recent than the selected inactivity period. It also excludes worktrees whose size can't be measured.
Use Cleanup Settings in the editor to configure:
- Mark merged sessions as done after and Permanently delete automatically completed sessions after: set the inactivity period before automatic completion and a separate retention period before permanent deletion. See automatically clean up merged sessions (Preview).
- Suggest cleaning up session storage when it grows large: turn storage cleanup suggestions (Experimental) on or off.
Get storage cleanup suggestions (Experimental)
Set chat.agentSessions.sessionStorageCleanupSuggestion.enabled to receive a suggestion in the Agents window when inactive worktrees use at least 5 GiB or 20 worktrees are eligible for cleanup. Selecting the suggestion opens the worktree cleanup editor.
Dismissing the suggestion hides it for the current window. To turn off future suggestions, select Don't Show Again in the suggestion or run Chat: Disable Session Storage Cleanup Suggestions.
Automatically clean up merged sessions
Configure automatic cleanup to keep inactive sessions that use the Copilot or Claude harness, and sessions using the experimental Codex integration, from accumulating after their pull requests merge. Both settings are disabled by default:
- chat.agentSessions.autoMarkAsDoneMergedSessionsAfterDays controls how many inactive days pass before an eligible session is automatically marked as done.
- chat.agentSessions.autoDeleteMarkedAsDoneMergedSessionsAfterDays controls the separate grace period between automatically marking an eligible session as done and permanently deleting it.
Set each setting to a positive whole number of days. The recommended value is 15. Set a setting to 0 to disable that part of the cleanup lifecycle.
A session is eligible when it isn't in progress, its last-modified time exceeds the configured threshold, it has at least one merged pull request, and none of its related pull requests are open. External sessions aren't eligible. VS Code checks for eligible sessions when it starts and every hour while either setting is enabled.
Permanent deletion applies only to sessions that VS Code automatically marked as done. Sessions that you mark as done manually aren't deleted automatically. Restoring an automatically completed session clears its deletion eligibility.
When cleanup marks a session as done or deletes it, VS Code removes the session worktree only when the branch tracks an upstream and has no outgoing commits or uncommitted changes. If Git state is unknown or the worktree doesn't meet these conditions, the worktree is retained. Cleanup never force-removes a worktree.
When a merged pull request makes a session eligible, select Configure Automatic Cleanup from the Mark as Done suggestion to open both settings without enabling them.
Fork a chat session
Forking a chat session branches off the conversation and inherits the conversation history from the original session. In single-chat sessions and sessions whose harness doesn't support multiple chats, the fork opens as a new independent session. The conversation is separate, but its code changes are isolated only if the fork uses a different folder or worktree.
For multi-chat Copilot sessions in the Agents window, the fork opens as a peer chat in the same session and runs independently from sibling chats.
For Copilot harness sessions that use worktree isolation, the fork continues to use the same worktree as the original session.
Forking is useful when you want to explore an alternative approach, ask a side question, or branch a long conversation in a different direction without losing the original context.
There are two ways to fork a chat session:
-
Fork the entire session: type
/forkin the chat input box and press Enter. The fork opens with the full conversation history copied from the current session. -
Fork from a checkpoint: hover over a chat request in the conversation and select the Fork Conversation button. The fork includes only the requests up to and including that checkpoint.
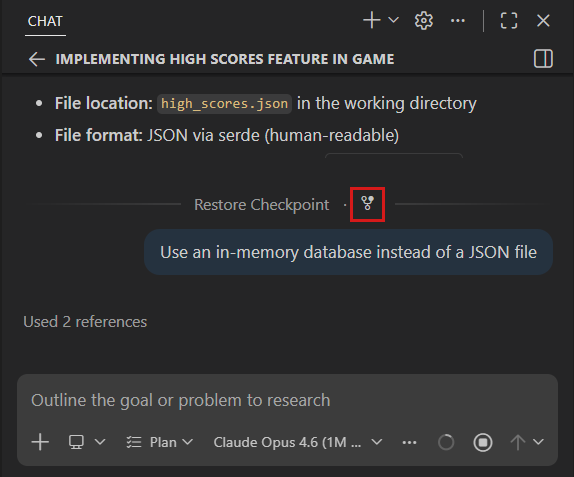
A forked session inherits the conversation history of the original, which preserves the prompt cache and reduces cost on the next request. Use the Cache Explorer to compare cache hit rates across sessions.
Name a fork or send a prompt
Use named and prompted forks to label an alternative approach or start exploring it immediately. These forms are available in supported Agent Host sessions, such as Copilot, in both the editor window's Chat view and the Agents window.
| Command | Result |
|---|---|
/fork |
Fork the current conversation without sending a new prompt. |
/fork <title> |
Fork the conversation with the title you provide, without sending a new prompt. |
/fork prompt <prompt> |
Fork the conversation and immediately send the prompt and any attached context to the fork. |
For example, explore an alternative design while retaining the discussion so far:
/fork prompt Compare this design with an event-driven approach. Do not change any files.
The prompted fork uses the source conversation's agent and model, not a new selection you make in the input pickers before forking.
A named fork retains the title you provide. Without an explicit title, the fork starts with a default title and can receive an automatically generated title. For prompted forks, title generation can use the original title and the new prompt.
Coordinate work across sessions
In sessions that use the Copilot or Claude harness, agents can use built-in session-management tools to coordinate work across multiple sessions and chats. These tools are also available with the experimental Codex integration.
With these tools, an agent can:
- List your sessions and inspect metadata like status, workspace, and file changes.
- Create a new session for a sub-task, or create a new chat in an existing session.
- Read recent conversation context from another session before continuing work.
- Send a message to another session or chat to start or steer a follow-up task.
Choose the session relationship first, and then choose the workspace and code isolation:
- Related work: Use
currentSessionto create a peer chat in the current session. The peer chat shares the current workspace and checkout, so use this option for related research, planning, or other work that doesn't need isolated file changes. - Unrelated work or a separate deliverable: Use
independentto create a separate session. Omit the workspace when the task doesn't need repository files. If it does, choose a trusted folder or worktree. Request a new worktree when file changes must be isolated from your current checkout.
In your prompt, state both the session relationship and the workspace choice. For related, read-only work that needs the current repository context:
Create a peer chat in this session that reuses the current workspace and checkout to review the authentication flow. Do not modify files.
For unrelated work that doesn't need repository files:
Create an independent session with no workspace to research licensing options for a separate project.
When the task needs repository files, you can refer to a workspace by its project name instead of providing an absolute path or workspace URI. For example:
Create an independent session in the vscode workspace with a new worktree to implement and test the authentication change.
If multiple workspaces have the same project name, the agent reports the possible matches instead of choosing one. Session-management tools also support remote workspace URIs and preserve the project URI and working directories for multi-root workspaces.
When a tool creates or targets a session, VS Code shows an Open Session pill in chat so you can jump directly to it.
To keep this workflow safe and predictable:
- Sending a message to another session always requires your confirmation.
- Agents cannot send messages to the same chat they are currently running in.
- Burst sends are capped to avoid unbounded fan-out.
- Archived sessions are excluded from listings unless explicitly requested.
chat.agentHost.agentOrchestrationLimits
controls the process-wide limits for sessions and chats that agents create, messages they send, and recursive session creation. The default on value enforces limits that support coordination-heavy workflows. Set it to off to remove the limits. Changes apply without restarting the Agent Host, and reaching a limit doesn't interrupt work that is already running.
Removing orchestration limits doesn't change confirmation requirements or input validation. The safety guidance in this section continues to apply.
Save and export chat sessions
You can save chat sessions to preserve important conversations or reuse them later for similar tasks.
Export a chat session as a JSON file
You can export a chat session to save it for later reference or share it with others. Exporting a chat session creates a JSON file that contains all prompts and responses from the session.
To export a chat session:
-
Open the chat session you want to export in the Chat view.
-
Run the Chat: Export Chat... command from the Command Palette (⇧⌘P (Windows, Linux Ctrl+Shift+P)).
-
Choose a location to save the JSON file.
Copy chat messages as Markdown
The Chat view supports different options for copying chat messages as Markdown to the clipboard, available through the context menu when you right-click a message or the chat background.
-
Copy: Copy an individual prompt or response to the clipboard - the Markdown contains the response text, thinking steps, and tool calls.
-
Copy All: Copy the entire chat session in Markdown format, including all prompts, responses, thinking steps, and tool calls.
-
Copy Final Response: Copy just the final Markdown section of the agent's response, after the last tool call. This is useful for sharing or reusing the final output without the intermediate steps.
Monitor sessions from the application icon (Preview)
The application icon can show how many unarchived sessions in the Agents window need your attention. The badge appears on the dock icon on macOS, the launcher icon on Linux, or the taskbar icon on Windows.
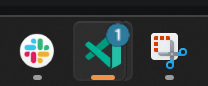
The badge counts sessions that:
- Have unread results and are no longer in progress.
- Are waiting for your input.
- Have failing CI checks on an open, non-draft pull request and are no longer in progress.
Unread sessions that are still in progress aren't included. The count updates as sessions change state. Reading or archiving a session removes it from the count when it no longer needs your attention.
Use the
sessions.showApplicationBadge
setting to control the application badge. The setting defaults to true in Insiders and false in Stable.
Session status indicator (Experimental)
The session status indicator provides quick access to your sessions directly from the command center in the title bar. The indicator displays visual badges for unread messages and in-progress sessions, so you can stay informed about AI activity without switching views.
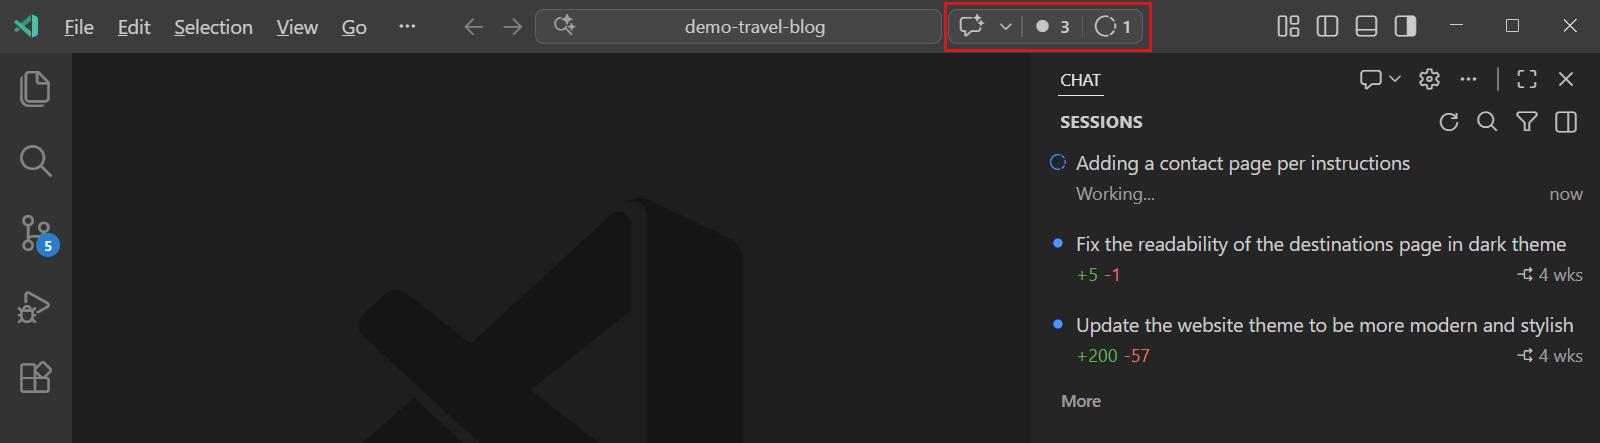
The indicator shows:
- Unread sessions badge: shows the count of chat sessions with new messages. Select the badge to filter the sessions list to show only unread sessions.
- In-progress sessions badge: shows the count of sessions with running agents. Select the badge to filter the sessions list to show only in-progress sessions.
- Sparkle icon: provides quick access to chat and session management options.
You can configure the status indicator's visibility by using the chat.agentsControl.enabled setting.
View sessions on the VS Code welcome page
The VS Code welcome page can act as your startup experience for working with chat sessions. It provides quick access to your recent chat sessions, an embedded chat widget for starting new tasks, and quick actions for common tasks.
To configure the VS Code welcome page as your startup experience, set
workbench.startupEditor
to agentSessionsWelcomePage.