Use tools with agents
Tools let an agent inspect your project and check results instead of only suggesting code or commands for you to apply. For example, it can read the implementation behind a failing test, make a change, and run the test to check whether the change works.
This guide explains how to work with tools in a Copilot harness session, review their results, and change which capabilities are available. For other harnesses, check their supported tools and setup requirements. Existing Local harness workflows have separate compatibility guidance.
Three controls serve different purposes:
- Tool availability determines which tools the agent can choose from.
- A tool reference in your prompt directs the agent to a particular available tool.
- Tool approval determines whether a specific call can run without your confirmation. Making a tool available or referencing it doesn't bypass approvals and permissions.
For background on built-in tools, extension tools, and Model Context Protocol (MCP) tools, see Tools concepts.
Use tools in a request
By default, the agent chooses from the available tools based on your request and the current context. You don't need to select a tool for every step.
-
In the chat input, select the Copilot harness and an agent that can implement changes, such as Agent.
-
Describe your goal and how the agent should verify its work. For example:
Find the cause of the failing tests in this project, fix it, and run the relevant tests to verify the change.To request a particular tool, type
#in the chat input and select an available tool. Names depend on the harness, and not every built-in tool supports a reference. If it isn't listed, describe the action you want instead.The
#picker also lets you attach context such as files and editor selections, which supplies information rather than requesting a tool action. -
Follow the tool calls in the conversation. Expand a call to inspect its inputs and output. When the task is complete, review the agent's response, code changes, and validation results.
Review tool calls and results
If an approval prompt appears, review the tool's inputs and the command, file, or destination it will act on. Choose Allow Once to approve that call, or Skip to decline it. In Copilot sessions, generic and terminal confirmations don't let you edit the parameters. If an action is wrong, skip it and tell the agent what to change.
Not every tool call prompts. Your permission level, runtime decisions, and saved approvals affect whether a call needs review. Use Manage approvals and permissions to configure those decisions. Review the results even when a call runs automatically.
Change how tool calls are grouped in chat
Use the experimental
chat.agent.thinking.collapsedTools
setting to change the grouping: off keeps tools separate, withThinking groups them with reasoning when available, and always groups them. When
chat.agent.thinkingStyle
is collapsed, reasoning and grouped calls can appear in separate collapsible sections.
Manage available tools
Use the Tools tab in the Agent Customizations editor to see which capabilities are available to your Copilot session and turn optional tools on or off. For example, you can stop offering an extension's tools without uninstalling the extension. To keep a tool available but review its actions before they run, configure approvals instead.
Tool selections aren't limited to the current request. They persist for the harness across windows and user profiles, and can affect other sessions using that harness and host. Remote sessions have a separate selection for each remote host and harness. Check the session before changing the selection.
-
Select the intended Copilot session and check its workspace and whether it runs on your machine or a remote host.
-
Open the Agent Customizations editor:
- In the Chat view, select Open Customizations in the title bar, or run Chat: Open Customizations from the Command Palette (⇧⌘P (Windows, Linux Ctrl+Shift+P)).
- In the Agents window, select Customizations in the sidebar.
-
Select Tools, then select or deselect an editable tool group. Expand a group to change individual tools.
The Copilot group lists built-in tools for Copilot itself, for example: file editing, command execution, and other core capabilities.
Tools provided by an extension require that extension to run and the editor or Agents window that contributes them to remain connected.
Add tools
If the agent is missing a capability, you can add tools from different sources.
| Your task | Where to start |
|---|---|
| Connect a service supported by a Copilot connector. | Copilot connectors Copilot connectors is in preview and might change before it becomes generally available. . |
| Use another service or program through an MCP server. | Add an MCP server. |
| Install a packaged integration that bundles MCP tools with other customizations. | Install an agent plugin. |
| Use tools contributed by a VS Code extension. | Add extension tools in the editor or Agents window. |
After setup, return to the intended session and ask the agent to perform a small task with the new capability. If the tools aren't available, check that their source is enabled, connected, and authenticated where required. Installing or connecting a tool doesn't approve its actions automatically.
Add extension tools for the Copilot harness
An extension must be installed and enabled in the window that provides its tools. You can then control which tools the agent can use from the Tools tab. Enabling an extension, making its tools available, and approving a tool call are separate decisions.
-
Open the Agent Customizations editor's Tools tab and select Browse Extensions.
-
Search for an extension and review its description and contributed tools.
-
Select Install. If the extension is already installed, make sure it's enabled.
-
Select Customizations in the sidebar, then Extensions. If Extensions isn't visible, turn on extensions.experimental.agentsWindowManagement in User settings.
-
Find an extension that contributes the tools you need. Select Install for a Marketplace result, or turn on an installed extension.
-
Review any compatibility warnings. If prompted, select Restart Extensions or Reload Window to apply the change.
Extension enablement in the Agents window is separate from the editor window. Extensions must be installed in your default VS Code profile. See Agents window extension support for compatibility and profile details.
After installing and enabling the extension, return to your Copilot session, open Customizations > Tools, and check that the extension's tool group is enabled. Ask the agent to use one of the capabilities described by the extension.
If the group is missing, confirm that the extension contributes agent tools, is enabled in the window you're using, and has finished any required reload. Keep that window connected while the agent uses its tools.
Uninstalling an extension removes all its contributions, not only its tools. Uninstalling from the Agents window also removes it from the VS Code installation. To stop the agent from using a tool without removing the extension, deselect the tool instead.
To build your own tools, use the Language Model Tools API or create an MCP server.
Common built-in tool workflows
Run terminal commands
Copilot sessions use the built-in shell tool to install dependencies, run builds, and execute tests. Commands run in the session's environment: on your machine for a local session, or on the remote machine for a remote agent session. Inspect the command and its output in the chat conversation to check the result.
To change when a command prompts or reuse a saved approval, see terminal command approvals. To limit what a command can access, configure agent sandboxing. Approving a command doesn't expand its sandbox access.
The integrated-terminal controls described later apply to the Local harness and compatible integrated-terminal tools, not the default Copilot shell.
Load your shell profile for agent commands
If a command depends on your shell profile, turn on
chat.agentHost.shellTool.initScript.enabled
in User settings. For Copilot sessions on your machine using the default shell, this loads ~/.bashrc on macOS and Linux or your PowerShell profiles on Windows before each command.
With Python Environments installed and
python-envs.terminal.autoActivationType
set to shellStartup, the selected workspace environment is also activated.
This setting doesn't apply to remote sessions or the Agent Host custom terminal tool.
Interact with the browser
Browser tools let an agent validate a web application by interacting with pages, inspecting page content and console errors, and checking the result of a change. The integrated browser tools are built into VS Code and don't require an external MCP server.
Start the app, open it in the browser, and test the password reset flow.
Fix any issues you find and repeat the flow to verify the fix.
The agent can use the integrated browser in VS Code or drive an external browser through the browser use extension. See Use browser tools with agents for setup, page sharing, remote sessions, and privacy controls.
Coordinate work across sessions
In Copilot and Claude sessions, agents can create new sessions, inspect their status and recent context, and send follow-up messages. These tools are also available with the experimental Codex integration.
Tell the agent how the work relates to your current task and where it should run:
-
Related work: request a nested session that shares your current workspace and checkout. For example, delegate research while keeping the main conversation focused on implementation.
-
Independent work: request a separate session. Specify a workspace and ask for a new worktree if its edits must be isolated. For research that doesn't need project files, request a session without a workspace.
For related, read-only work:
Create a nested session under this session that reuses the current workspace and checkout to review the authentication flow. Do not modify files.
For isolated implementation:
Create an independent session in the vscode workspace with a new worktree to implement and test the authentication change.
Sending a message can start work in another session. Review the target and requested action when an approval prompt appears; whether it prompts depends on the applicable permissions. Select Open Session in a tool result to follow the work. For reviewing and finishing sessions yourself, see Manage agent sessions.
Session creation and messaging limits
The experimental
chat.agentHost.agentOrchestrationLimits
setting defaults to on. It limits session and chat creation, messaging within a sliding one-hour window, and recursive creation depth. Reaching a limit doesn't interrupt work already running.
Setting it to off removes these limits without changing approval requirements or input validation. Changes apply without restarting the Agent Host.
Control desktop applications
Use computer use when a task needs a desktop application that the agent's other tools can't reach. For web applications, use browser tools instead.
Computer use is available for local Copilot harness sessions on macOS and Windows. It isn't available for the Local, Claude, or Codex harnesses, Linux, or remote or cloud hosts.
For shared capabilities, permission controls, and limitations, see GitHub's computer use guide.
Computer use can read and change content in applications outside your workspace. Review requested access and avoid exposing sensitive information. See GitHub's computer use security guidance for limitations and responsible use.
Turn on computer use
Computer use is off by default. To use it:
-
Turn on chat.agentHost.computerUse.enabled in Settings, and restart VS Code.
-
Start a new local Copilot chat in the Chat view or Agents window. The plugin downloads automatically on first use.
-
Run
/computer onin the chat, or ask the agent to perform a task in a desktop application and follow the activation prompt. -
On macOS, select Set Up Computer Use in the chat card and follow the prompts to grant the required system permissions. Review application-access requests when prompted.
Activation persists across chats and also applies to Copilot CLI on the same computer.
Turn off computer use
Run /computer off in a Copilot chat to turn off computer use, including for Copilot CLI on the same computer.
To stop offering the integration in VS Code, turn off chat.agentHost.computerUse.enabled and restart.
Troubleshoot computer use
- Computer use isn't offered: Check the supported platform and harness, confirm that the setting is on, and restart before starting a new chat. On first use, allow time for the plugin to download.
- The agent doesn't ask to turn it on: The activation prompt isn't shown in Autopilot or chats with automatic replies. Run
/computer onyourself. Use the command if you previously selected Not Now, which suppresses further activation prompts in that chat. - The macOS setup dialog closes before you finish: Finish granting permissions in System Settings, then ask the agent to retry the task.
Local harness compatibility
The Local harness is deprecated The Local harness is deprecated and will be removed in February 2027. Move your workflows to the Copilot harness before then. Learn more about Local harness deprecation. . The following controls support existing Local workflows and differ from the Copilot instructions above. See Move to Copilot when migrating.
Select tools for a Local request
-
In the Chat view, select the Local harness and then Agent from the agent picker.
-
Select Configure Tools.
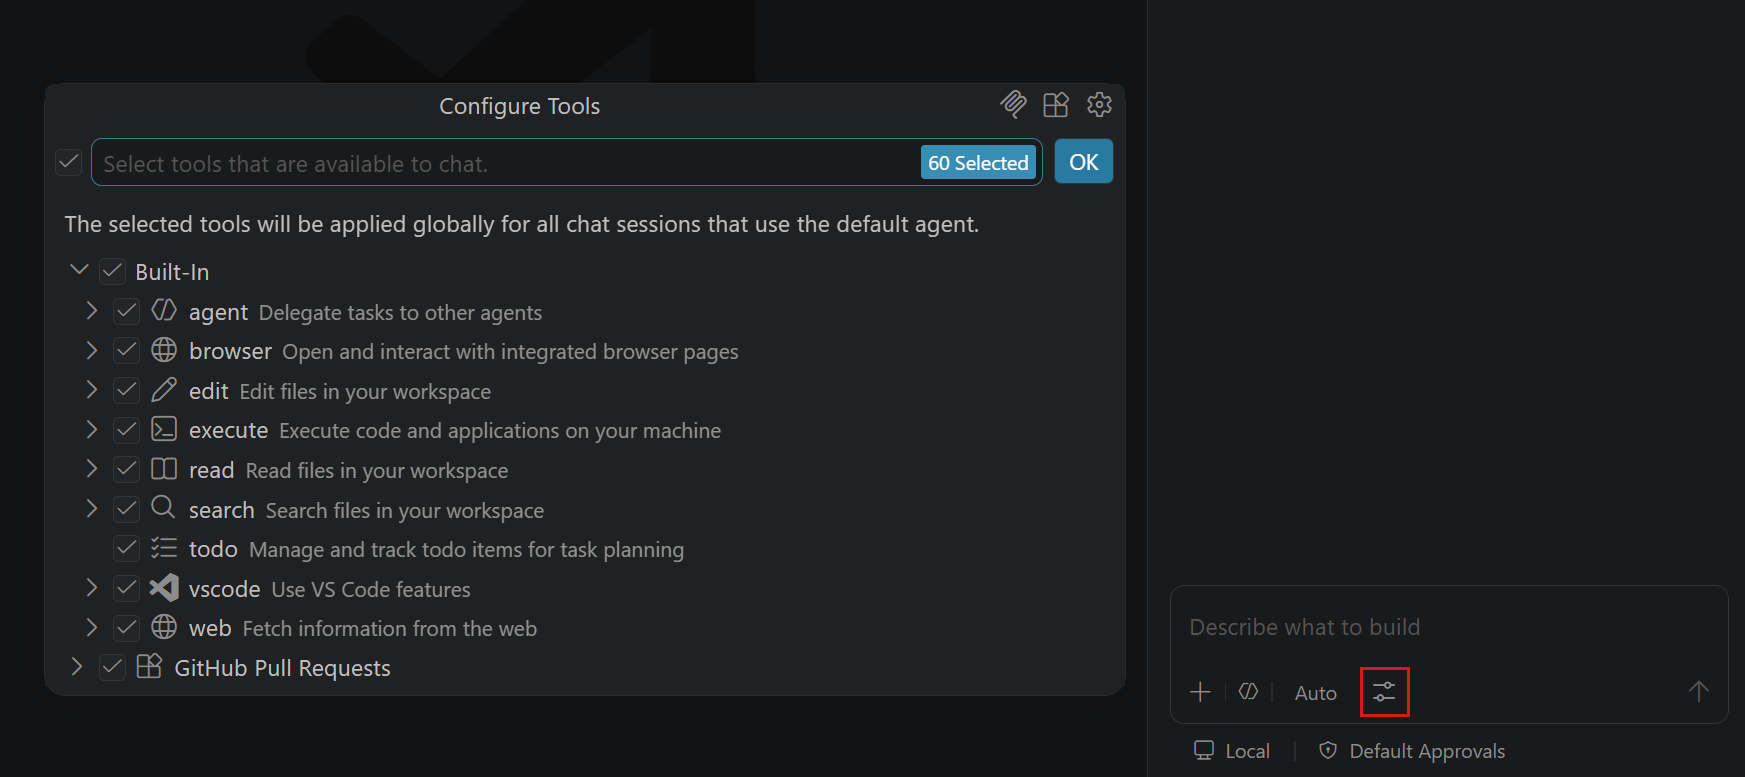
-
Select or deselect the tools available for the request.
Local tools can also be selected through a prompt file or custom agent. See the tool list priority order.
Edit tool parameters
Local harness and extension tool confirmations can support editing parameters before execution. If the confirmation provides editable fields, expand the tool details, change the parameters, and select Allow. If the fields are read-only, skip the call and ask the agent to correct it.
Integrated-terminal controls
The integrated terminal tool runs commands in a VS Code terminal. Select Show Output (>) beside a command to inspect its output in chat, or Show Terminal to open the full terminal.
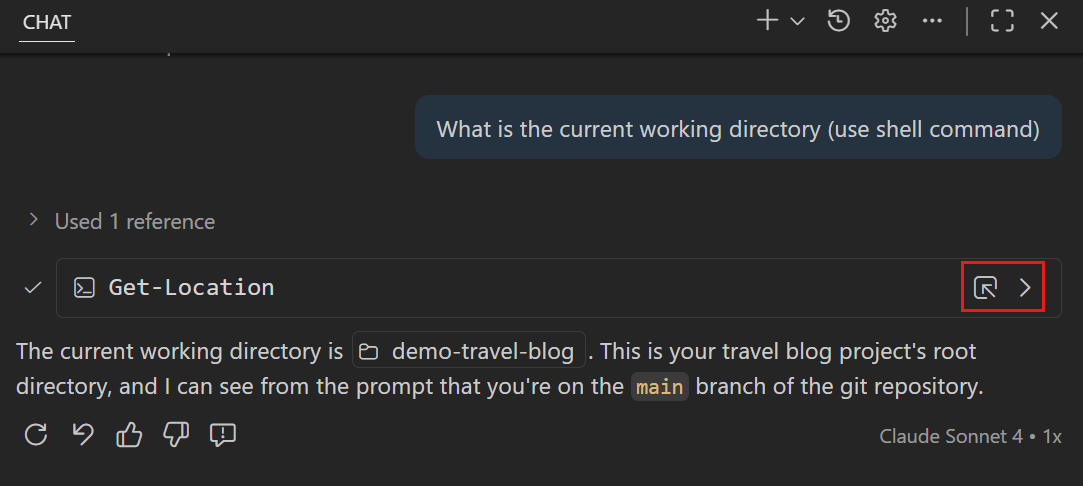
Use the experimental chat.tools.terminal.outputLocation setting to choose whether output appears in chat or the terminal. Turn off chat.tools.terminal.outputReflow if you need to preserve the terminal's column layout in chat previews rather than wrap long lines.
Continue terminal commands in background
For a long-running command, select Continue in Background when the button appears. The agent can continue with other work and check the command's output later.
The agent can also start a command in the background or set a timeout for waiting. chat.tools.terminal.enforceTimeoutFromModel controls whether to honor that timeout. Reaching it returns the output collected so far rather than waiting for completion.
Background terminals that you haven't revealed are cleaned up when their command finishes. To keep one open for inspection, select Show in the tool invocation header. Its output remains in chat even if the terminal is cleaned up.
Troubleshoot Local tools
The request reports more than 128 tools
If a Local request reports Cannot have more than 128 tools per request, select Configure Tools and deselect unneeded tools or MCP servers. The experimental
github.copilot.chat.virtualTools.threshold
setting controls when to group tools for on-demand discovery. Setting it to 0 turns that grouping off.
The integrated terminal uses a different shell
The Local terminal tool relies on shell integration to track commands and their output. It avoids cmd on Windows and sh on macOS and Linux because those shells don't support shell integration. Prefer PowerShell on Windows or bash or zsh on macOS and Linux.
To override the integrated tool's shell, use chat.tools.terminal.terminalProfile.windows , chat.tools.terminal.terminalProfile.osx , or chat.tools.terminal.terminalProfile.linux . These settings don't configure the default Copilot shell.