Get started with Visual Studio Code
Use this guide to install Visual Studio Code, open your code, and choose a hands-on path for your first task. You can learn the editor and write code yourself, use an AI agent, or combine both approaches.
AI features are optional. You don't need an account to use the core editor.
Get started in three steps
-
Install VS Code. Download the installer for your platform and follow the installation steps.
-
Open your code. Open an existing folder, clone a repository, or create a folder for a new project.
-
Complete your first task. Follow the editor tutorial to learn the basics, use the agents quickstart to build an app from a natural-language prompt, or choose an AI feature for a smaller task.
Install VS Code
- Download the User Setup installer (
.exe). - Run the installer and follow the prompts.
- Open VS Code. The installer adds
codeto your PATH, so you can also open a folder from the terminal withcode ..
For System Setup, ZIP archive, or other options, see the full Windows setup guide.
- Download the
.dmginstaller. - Open the
.dmgfile and drag Visual Studio Code.app to the Applications folder. - Open VS Code from the Applications folder or Spotlight.
To use the code command in the terminal, open the Command Palette (⇧⌘P (Windows, Linux Ctrl+Shift+P)) and run Shell Command: Install 'code' command in PATH. For more options, see the full macOS setup guide.
Choose your distribution for installation instructions. Installing the package sets up the apt or dnf repository for automatic updates. For Snap, Arch, Nix, and other options, see the full Linux setup guide.
-
Debian or Ubuntu
- Download the
.debpackage from the VS Code download page. - Install it with
sudo apt install ./<file>.deb.
- Download the
-
Fedora or RHEL
- Download the
.rpmpackage from the VS Code download page. - Install it with
sudo dnf install ./<file>.rpm.
- Download the
Review the system requirements before you install VS Code on an older or managed device.
On a managed device, your organization might control installation and available AI features. Developers should check their organization's policies or contact their administrator. Administrators can manage AI settings.
Open your code
In VS Code, a folder that contains your project files is called a workspace. Opening a folder gives the editor, terminal, source control, debugger, and AI agents access to the same project context.
-
Open VS Code and select File > Open Folder....
-
Select an existing project folder. To start a new project, create a folder in the dialog and then open it.
-
If the Workspace Trust dialog appears, review the folder contents and choose whether you trust its authors.
Only trust code from sources you know. You can safely browse unfamiliar code in Restricted Mode. Learn more about Workspace Trust.
When the folder name and files appear in the Explorer view, you're ready to start working. You can also clone a GitHub repository directly from VS Code.
Choose your first task
Choose a guided path based on how you want to start. Both paths introduce the workspace and core VS Code features.
Learn the editor basics
Create and edit files, use extensions and source control, and run and debug code.
Complete a task with an AI agent
Build and validate a small web app, then review the generated changes.
If you're new to both code editors and AI, start with the editor tutorial, then try the agents quickstart. If you already use agents in other tools, skip the sample app and follow the experienced-agent fast track in your own repository. If you want suggestions, focused edits, or answers without delegating a task, choose a lighter-weight AI feature.
Enable AI features
We recommend GitHub Copilot for getting started with AI in VS Code. It provides inline suggestions and access to multiple language models, and is the option used in the agents quickstart. You can also use AI without a Copilot subscription.
To get started with Copilot:
-
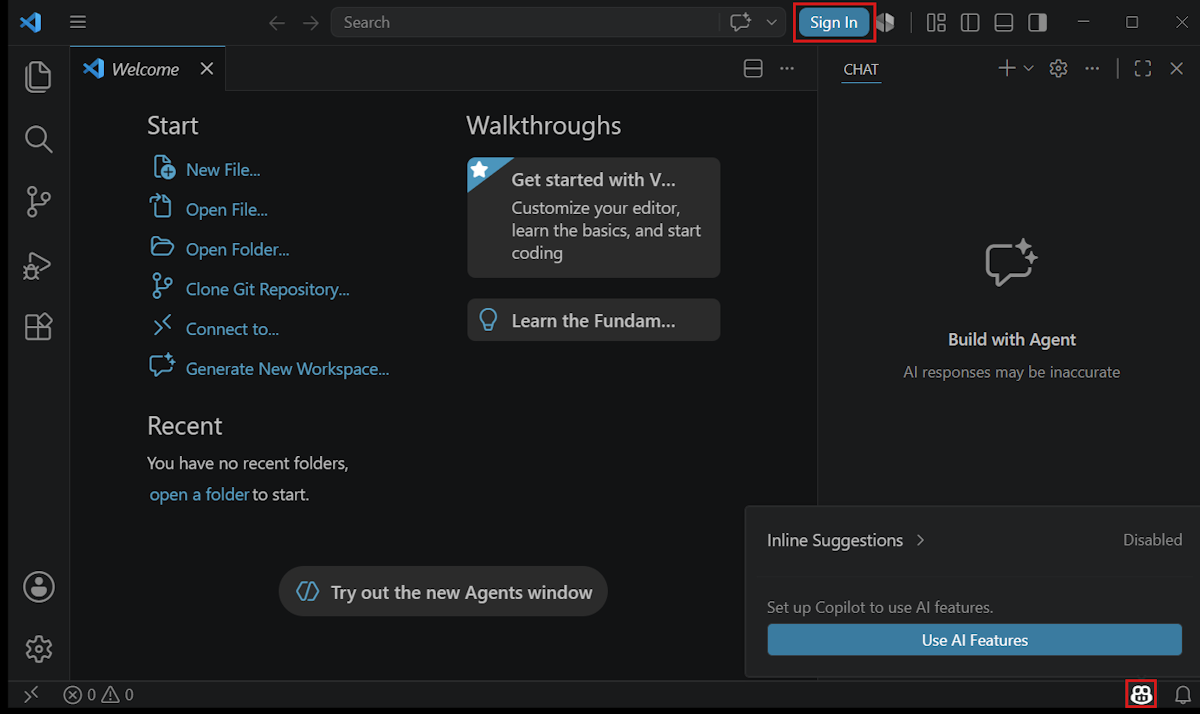
Select Sign In from the VS Code title bar, or hover over the Copilot icon in the Status Bar and select Enable AI features.
-
Choose a sign-in method and follow the prompts.
-
If your account has a Copilot subscription, VS Code uses that subscription.
-
If you don't have a Copilot subscription, you can sign up for the Copilot Free plan, which includes a monthly allowance of inline suggestions and AI credits.
-
If agents don't appear after sign-in, review the agent availability troubleshooting steps.
Use AI without a Copilot subscription
You don't need a GitHub Copilot subscription to use AI in VS Code. You can bring your own models or use another provider's agent:
- Bring your own key (BYOK): Connect a supported model provider or use Claude with an API key or another supported BYOK option (Experimental).
- Provider subscription: Use Codex with your ChatGPT account.
- Local model: Run a model on your own machine, such as Ollama, including offline.
Setup, available features, and usage charges depend on the provider and integration. API-key and local models don't provide features that rely on the GitHub Copilot service, such as inline suggestions, semantic search, and embeddings.
For agent workflows, choose a harness or the Cloud target that fits your provider, sign-in, and execution-location requirements.
Can I use VS Code without signing in?
Yes. You don't need an account to use the editor, terminal, debugger, source control, extensions, or other core features.
AI doesn't always require GitHub sign-in either. You can use API-key or local models without a GitHub account. You can also use Claude with a supported BYOK configuration or Codex with a ChatGPT account. Running these agents in the Agents window without GitHub sign-in is experimental. Follow the linked setup instructions for your chosen option.
To hide the built-in AI features, see Remove AI features from VS Code.
Explore the main parts of VS Code
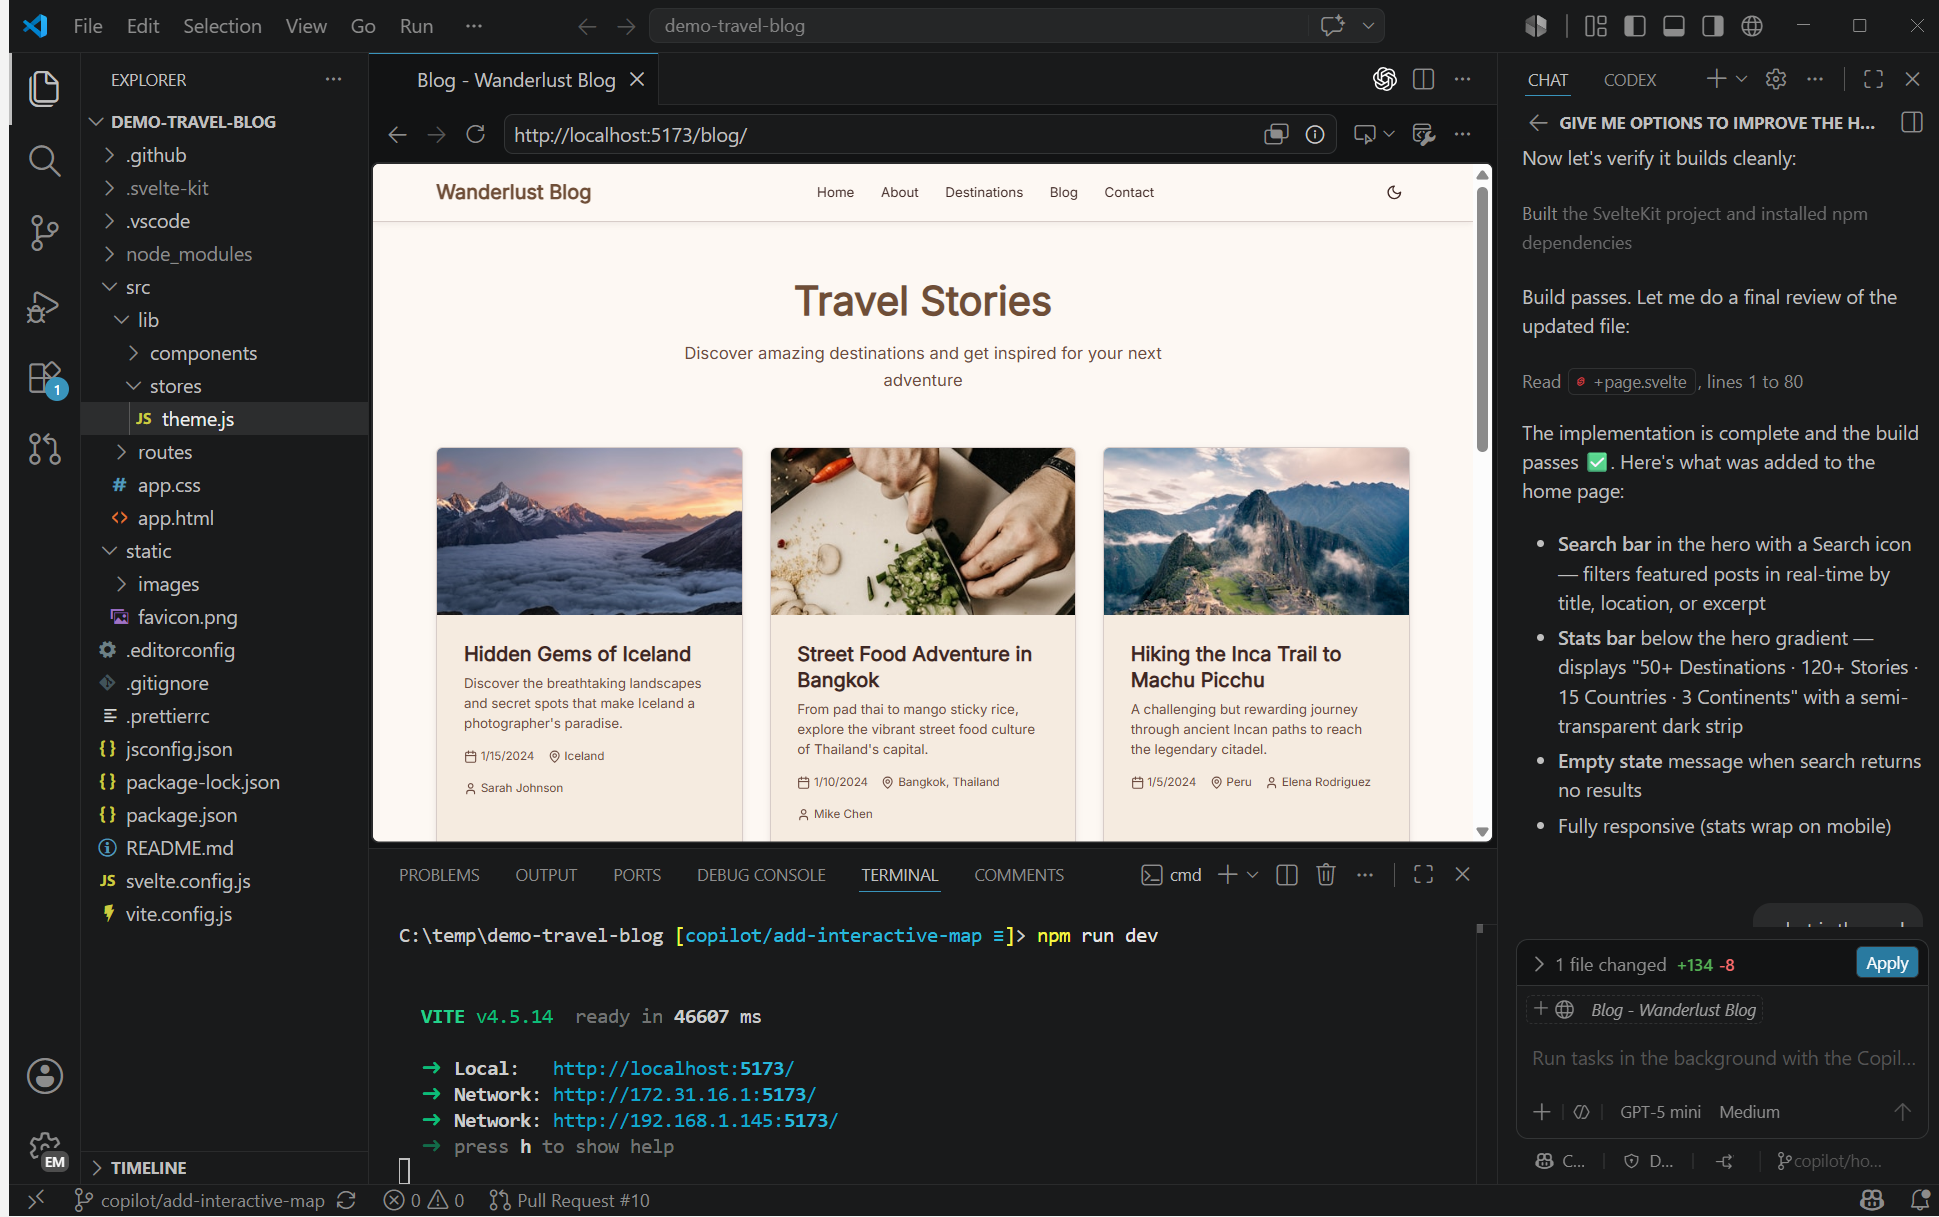
The VS Code interface brings your project files, editing tools, terminal, source control, and AI chat into one workspace.
For keyboard, screen reader, and low-vision workflows, learn how to use the Accessible View and other accessibility features.
-
Explorer and editor: Browse project files and edit code with IntelliSense, refactoring, and multi-cursor support.
-
Run, debug, and test: Run your application, set breakpoints, inspect program state, and run tests without leaving the editor.
-
Source Control: Review changes and work with Git repositories through the built-in source control interface.
-
Extensions and settings: Add support for your programming languages and tools, then personalize the interface and editor behavior.
-
AI chat and agents: Ask coding questions or delegate a task to an agent that can edit files, run commands, and verify its work.
Next steps
Add language support
Set up editing, running, and debugging for your programming language.
Personalize your setup
Configure settings, keyboard shortcuts, themes, and display language.
Use source control
Track changes and collaborate with built-in Git support.
Common questions
How do I create and run a new project?
VS Code doesn't include a File > New Project dialog or preinstalled project templates. Install the components for your development workflow, and then use the tools for your programming language or framework to create and run a project.
Should I use Stable or Insiders?
Stable releases ship weekly and update automatically. Install the Insiders build to preview upcoming features in a nightly build that runs side by side with Stable.
Can I use VS Code in a browser or on a remote machine?
Yes. Use VS Code for the Web in a browser, or connect your desktop editor to a remote machine. For supported agent workflows, you can also view sessions from other applications.
For installation and update troubleshooting, see the VS Code FAQ.