Review and revert agent changes
When you work with an agent in Visual Studio Code, it can change multiple files in your project. This article explains how to inspect, revise, integrate, or discard these AI-generated changes.
The available review controls depend primarily on the agent harness:
| Session | How changes are tracked | Review workflow |
|---|---|---|
| Copilot, Claude, and Codex harness sessions | Edits are saved directly in the session's folder or isolated Git worktree. They don't wait in a pending review state. | Inspect diffs in the Chat view, Agents window, or Source Control. Use checkpoints or Git to revert unwanted changes. |
| Local harness sessions and existing extension-host sessions | Edits are saved directly. Supported edits are also marked as pending. | Inspect each pending edit in the editor. Use Keep to acknowledge it or Undo to revert it. |
| Cloud sessions | Changes are committed to a branch and returned through a pull request. | Review the pull request on GitHub or check out the branch locally. |
The change-review experience for Copilot harness sessions is under active development. The user interface and available controls might change in upcoming releases.
Review agent changes
Agents can change files through editing tools, terminal commands, scripts, and MCP tools. Review the resulting files before you commit or integrate them, including changes that might not appear in a tool-specific list of edits.
For keyboard and screen reader access to a diff, use the Accessible Diff Viewer, which presents changes in a unified patch format.
The Chat view and Agents window provide different ways to inspect saved changes.
-
Above the chat input, a pill indicates the number of affected files and diff statistics. Select the pill to view a multi-diff editor with all the changes.
-
Select a changed file in the agent's response to open its diff in the editor.
-
Use the Source Control view to see the list of changed files and any untracked files. Select a file to open its diff in the editor.
-
To request revisions, send a follow-up prompt or edit the files directly in the editor.
-
Open the Changes view in the side panel by using the layout controls in the title bar, or using the ⌥⌘B (Windows, Linux Ctrl+Alt+B) keyboard shortcut.
-
Select a file in the Changes view to open a diff of the agent's edits.
The Changes view groups edits outside the workspace under Other Files. These files, such as plans in the session-state folder, aren't committed with workspace changes. Files changed only through terminal commands or scripts might not appear in tool-specific change tracking. Review the session's folder or worktree in Source Control as well, including untracked files.
TipUse the Branch Changes dropdown to choose which changeset to review.
-
To provide feedback, select a range of code in a changed file, and enter feedback in the inline comment box that appears.
-
Continue reviewing and providing feedback on other changes as needed. Select Submit Feedback to send them to the agent.
The agent reads your comments, makes the requested edits, and resolves each comment. Resolved comments disappear from the diff view.
-
Select Mark as Reviewed in a file's toolbar to track files you've reviewed in the Branch Changes changeset. The reviewed state clears if you or the agent changes the file again.
Review changes from the sessions list
When a session completes and makes code changes to your project, the sessions list shows the file change statistics for that session. Select the session to open its details and review the changes.
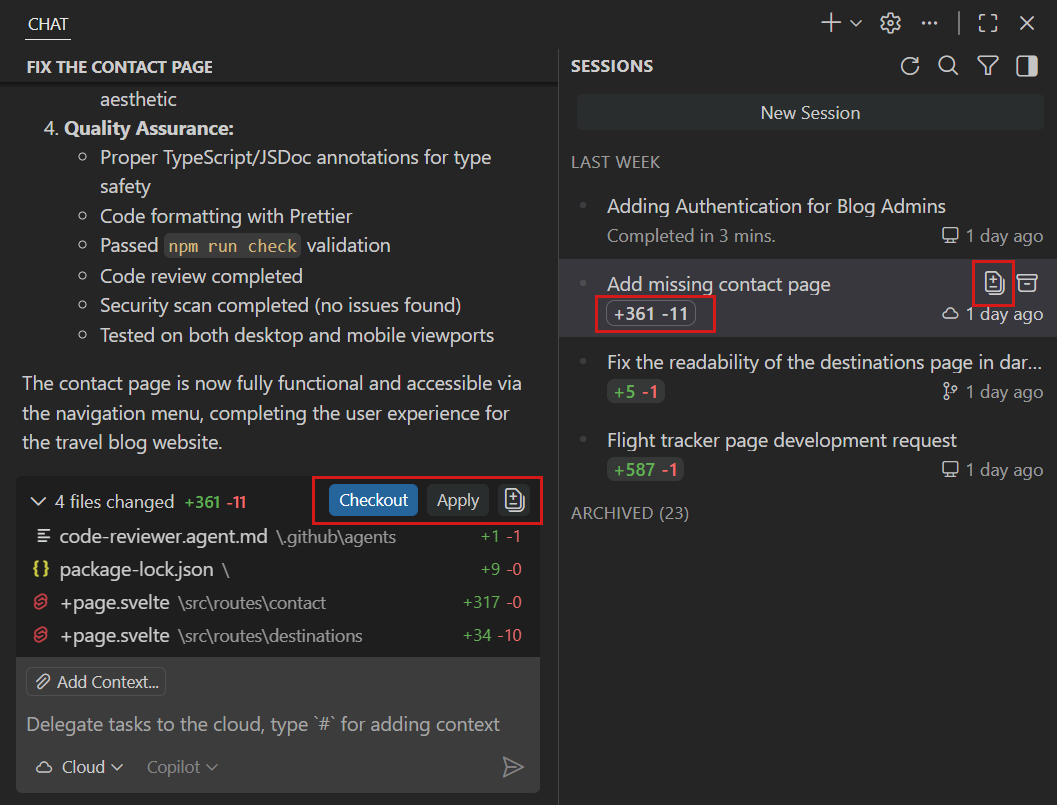
Depending on the agent harness and isolation mode, you can apply or merge changes into your local workspace, or check out the branch from a cloud session.
Add pull request review comments
For a session that uses the Copilot or Claude harness, or the experimental Codex integration, you can add a review comment to its open GitHub pull request directly from the Changes view in the Agents window. This is different from agent feedback, which asks the agent to revise its changes.
-
Enable the chat.experimental.agentsWindowPRComments setting.
-
Open a changed file from the Changes view and select a range of code.
-
Select Add Feedback and enter your comment.
-
Select Add PR Comment to add the review comment to the pull request. If the session is associated with multiple pull requests, the action identifies the target as
owner/repository#number.
The selected range must contain only lines that are part of the pull request diff. If the range isn't eligible, VS Code reports that a pull request comment can't be added to the line.
Add PR Comment adds the comment to GitHub and doesn't send it to the agent. To ask the agent to change the code instead, add the comment as feedback and select Submit Feedback.
Customize change review in the Agents window
By default, selecting a file in the Changes view opens a multi-file diff editor with all the session changes. To open a focused single-file diff, enable sessions.changes.openSingleFileDiff .
Use the diff toolbar to show the editor side by side with chat or in a modal window. To change the diff layout, select More Actions (...) > Diff View, and then select Inline, Side by Side, or Automatic. With Automatic, the Changes editor shows files side by side when there is enough space and switches to inline when the editor is narrow.
Configure word wrap in diff editors
Control how diff editors in the Changes view wrap long lines with sessions.diffEditor.wordWrap . This setting has the following values:
inherit(default): Follow the editor.wordWrap setting.on: Wrap lines at the editor viewport width.off: Never wrap lines.
This setting only affects diff editors and doesn't affect code editors in the Agents window. To configure word wrapping in code editors, see Configure word wrap for code editors.
To change this setting from a diff editor, select More Actions (...) > Word Wrap. This action updates sessions.diffEditor.wordWrap independently of the code editor setting.
Review changes in the single-pane layout (Experimental)
When you enable the experimental single-pane editor panel, the Changes view and diff editor share one docked pane.
Use Expand All Diffs or Collapse All Diffs to control all files at once. The keybinding toggles the preferred diff view in the Agents window.
The Changes editor restores each file's expanded or collapsed state when you switch sessions or reload the window. The editor tab title shows the next integration action, such as Create Pull Request, and switches to an icon when space is limited.
Review Local harness session changes
The following controls apply when you select Local from the Session Target UI control or continue an existing extension-host session in the Chat view. These sessions track supported file edits as pending changes that you can keep or undo individually.
After the agent edits and saves a file, VS Code marks the edits as pending. Pending means that you can keep or undo the saved edit. It doesn't mean that the edit is waiting to be written to disk. Files with pending edits have a squared-dot indicator in the Explorer view and editor tabs. The pending state is restored when you reopen VS Code.
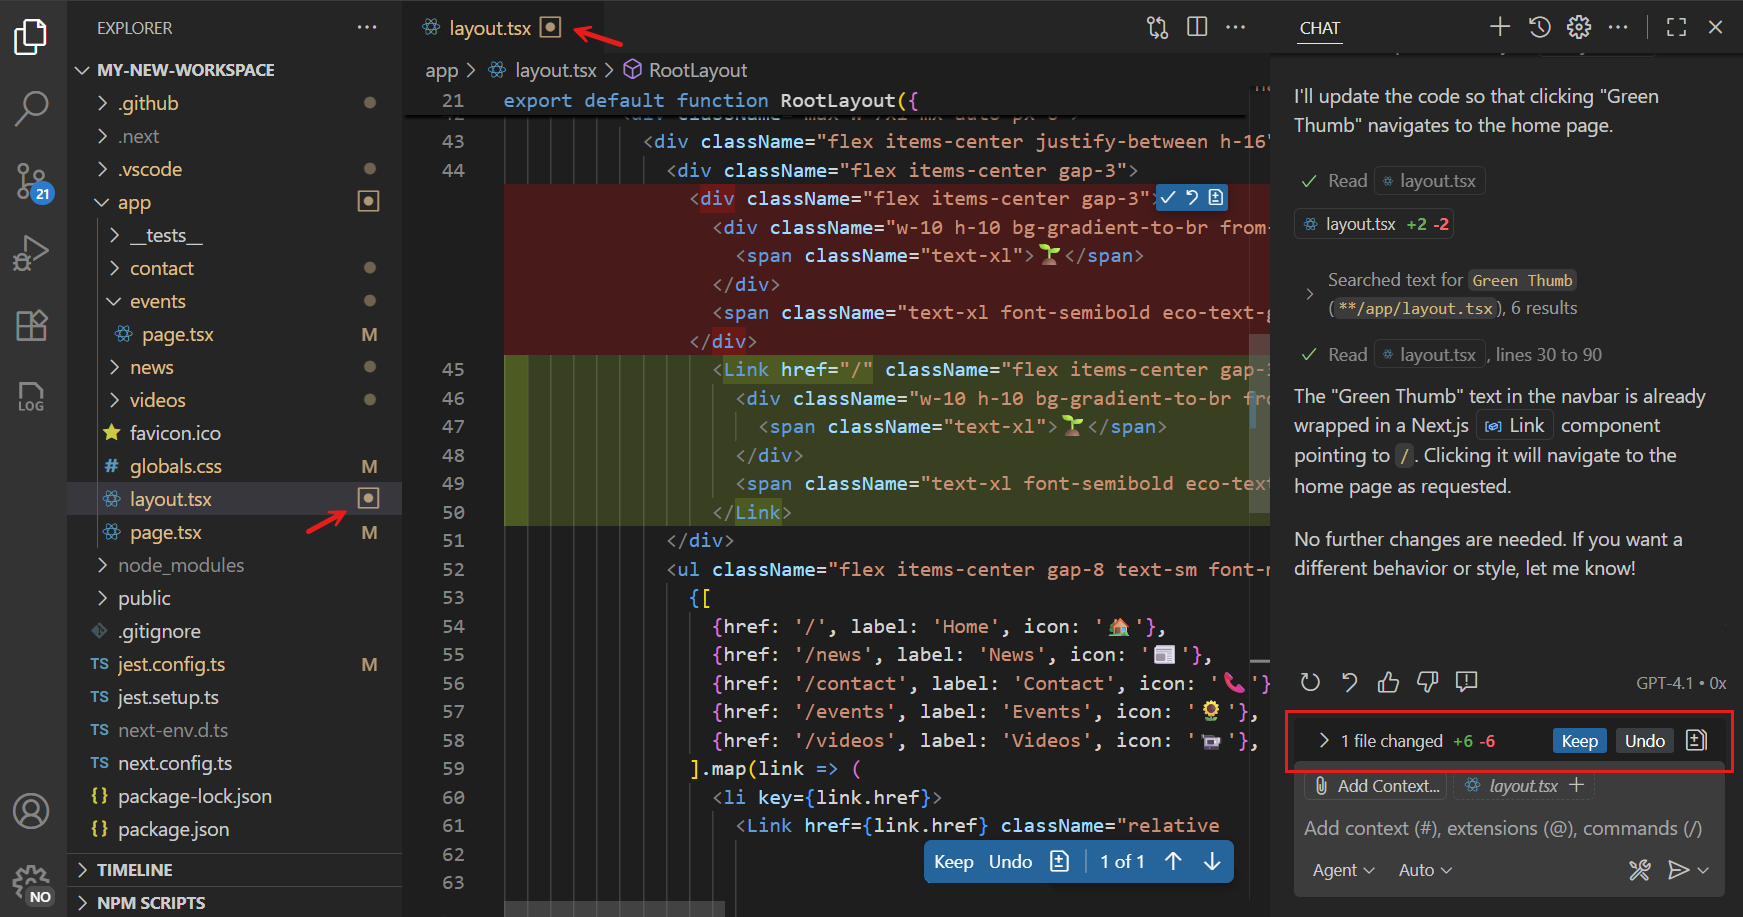
To review pending edits:
-
Open a file from the changed-files list in the Chat view or from the Explorer view.
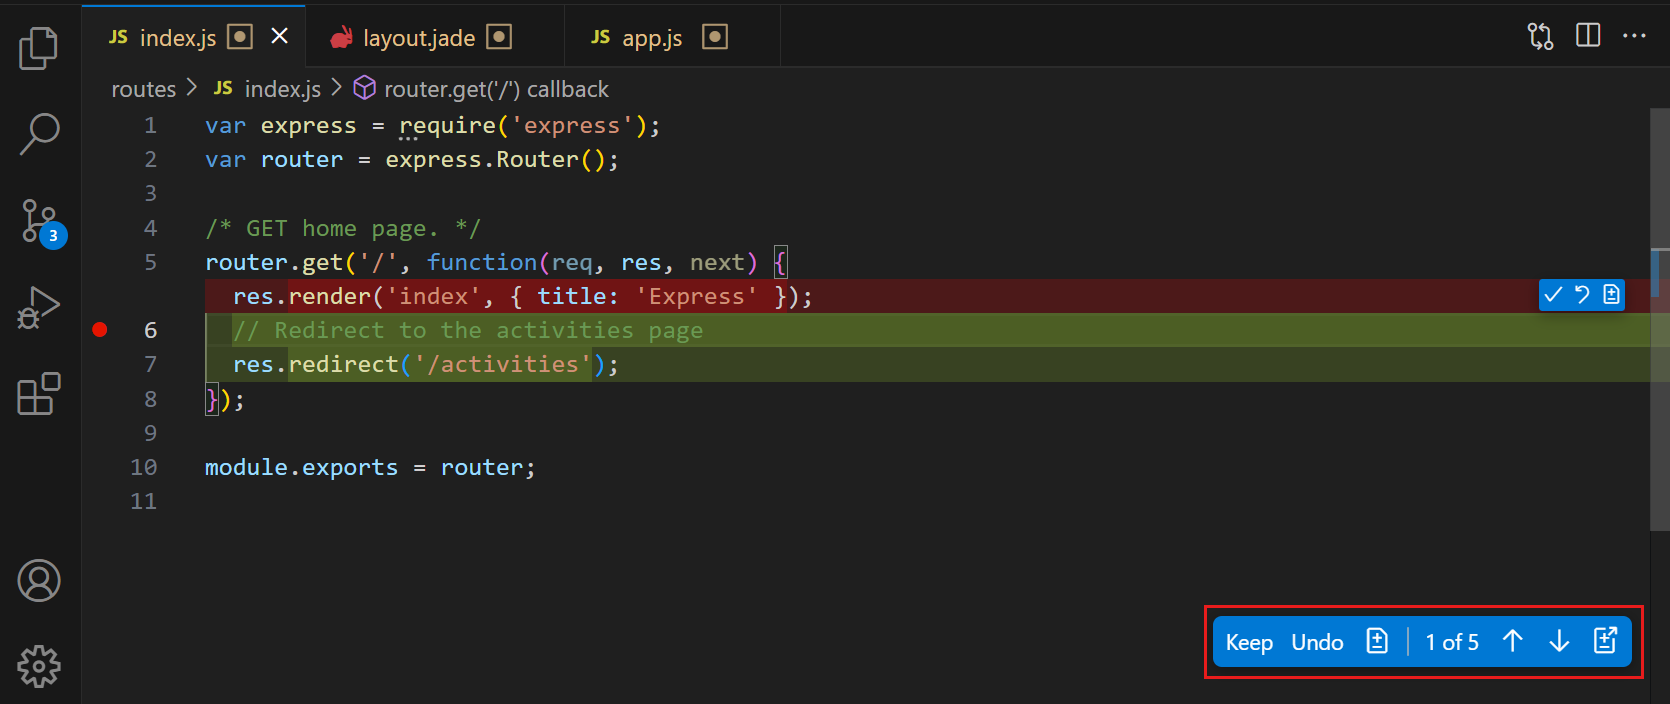
-
Use the Up and Down controls in the editor overlay to navigate between edits.
-
For each edit, choose one of the following actions:
- Select Keep to acknowledge the saved edit and clear its pending-review state.
- Select Undo to reject and revert the edit.
- Hover over an inline change to keep or undo that specific change without affecting other edits in the file.
You can also keep or undo all pending edits from the Chat view. When you resolve an edit, the editor automatically opens the next file with pending edits. To stay in the current file, set
chat.editing.revealNextChangeOnResolve
to false.
Source Control integration
If you stage your changes in the Source Control view, any pending edits are automatically kept. If you discard your changes, any pending edits are also discarded.
Auto-accept edits
Use chat.editing.autoAcceptDelay to automatically keep pending edits after a configurable delay. Hover over the editor overlay controls to stop the countdown.
If you automatically keep all edits, review the changes before you commit them in source control. Learn more about the security considerations of using AI in VS Code.
Validate and revise changes
Before you integrate agent changes:
-
Review all changed and untracked files in Source Control.
-
Run the relevant tests.
-
Use the debugger, language diagnostics, or other editor tools to validate the result.
-
Send a follow-up prompt, add feedback in the Agents window, or edit the files directly to correct issues.
Get a second opinion with Rubber Duck
In a Copilot harness session, use Rubber Duck to get a second opinion on the agent's plans, code, and tests. This built-in, read-only critic uses a complementary model to look for substantive issues, such as logic errors, design flaws, security vulnerabilities, and missing test coverage. Rubber Duck groups its feedback into blocking issues, non-blocking issues, and suggestions. The Copilot harness summarizes the critique and decides how to act on it, but Rubber Duck doesn't edit files or run commands that change your environment.
For non-trivial work, the Copilot harness might consult Rubber Duck automatically at key points, such as:
- After creating a plan, before implementation.
- During a complex implementation.
- After writing tests.
- After repeated failures or unexpected results.
For smaller tasks, the Copilot harness typically skips this review. To request a review at any time, ask the agent in natural language:
Get a second opinion on the changes made so far.
You can also enter /rubber-duck <question> in the chat input. For example, enter /rubber-duck What edge cases are missing?.
Rubber Duck is available only when the main session uses a Claude or GPT model and a suitable complementary model is available. The additional model pass adds latency and model usage.
Learn more about the Rubber Duck agent in the GitHub documentation.
Undo changes at the right scope
Choose a recovery action based on how much work you want to undo:
| Action | Scope | What happens |
|---|---|---|
| Undo in a Local harness session | One pending edit, an inline change, or all pending edits | Reverts the selected saved edits without rewinding the conversation. |
| Edit a previous request | The selected request and every later request | Reverts their file changes and resends the revised request. |
| Restore a checkpoint | A request and all later file changes and conversation turns | Restores affected workspace files and removes subsequent conversation turns. |
| Discard with Source Control | The files or changes you select | Reverts repository changes without changing the conversation. |
| Use an external service's recovery controls | Deployments, issues, pull requests, databases, or other external state | Reverses effects that VS Code checkpoints and Git don't control. |
For help choosing an action, see Get an agent back on track.
Edit a previous chat request
Each request in your conversation history is editable. When you edit a previous request, VS Code reverts file changes made by the original request and subsequent requests, and then sends the updated request to the language model.
Before you resend the request, review the affected changes so you understand which work will be removed. Select the request in the conversation, modify it, and resend it. Configure or turn off request editing with chat.editRequests .
Restore a checkpoint
Checkpoints are enabled by default for supported chat sessions. Before processing each request, VS Code creates a snapshot of affected workspace files. Set chat.checkpoints.enabled to control checkpoints.
To restore your workspace to an earlier checkpoint:
-
Navigate to a previous request in the conversation.
-
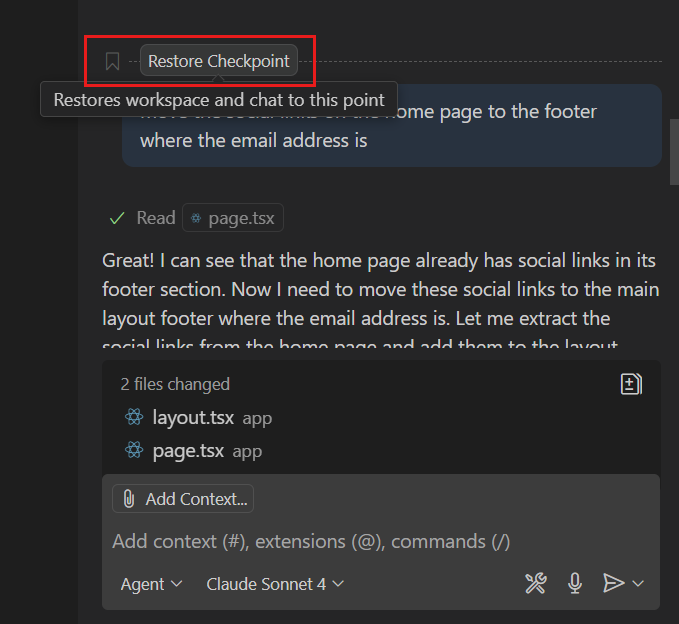
Hover over the request and select Restore Checkpoint.
-
Confirm that you want to restore the checkpoint.
VS Code removes subsequent requests from the conversation history and restores the workspace files to their state at the checkpoint.
A checkpoint restores affected workspace files and chat history. It doesn't reverse completed terminal commands, network requests, deployments, or changes that tools made to external services. Use Git and the external service's recovery controls for those effects.
Redo after restoring
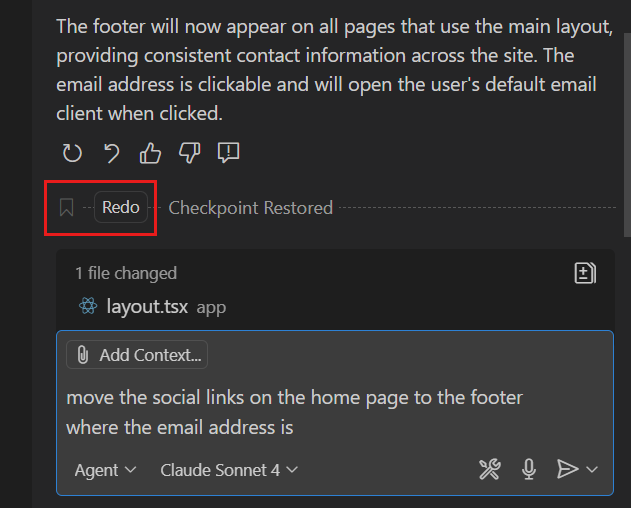
After restoring a checkpoint, select Redo to recover the changes that were undone.
View file changes in checkpoints
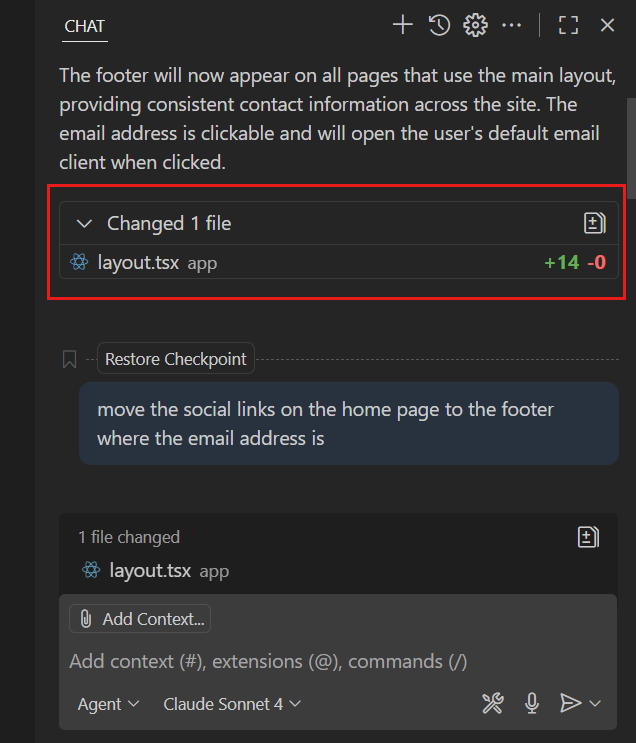
Set chat.checkpoints.showFileChanges to show the files changed by each request and the number of lines added or removed. Use this summary to understand the effect of a request before restoring its checkpoint.
Fork from a checkpoint
Hover over a request and select Fork Conversation to create an independent session that includes the conversation up to that checkpoint. Learn more about forking agent sessions.
Checkpoints are temporary and don't replace Git version control. Use Git for permanent version history and collaboration.
Integrate approved changes
After you review and validate the result, choose the integration workflow for the session:
- Folder-isolated session: stage and commit the intended changes with Source Control.
- Worktree-isolated session: apply the changes to your current workspace, merge or check out the session branch, or discard the worktree.
- Cloud session: review and merge the pull request, or check out its branch locally for more changes.
Integrate worktree changes
A worktree session keeps the agent's branch and working files separate from your primary worktree. After you review and validate the result, choose how to continue:
- Apply or migrate the changes: transfer the worktree changes into your current workspace for further editing and commit them with your existing work.
- Commit or merge the branch: preserve the work on the session branch and merge it into the destination branch.
- Check out the branch: open the session branch in an editor window to continue working on it manually.
- Discard the changes: remove changes that you don't want to keep.
Before you apply or merge changes:
- Confirm the session's base branch and the destination branch in your primary workspace.
- Commit or stash unrelated changes in the destination workspace.
- Review all changed files, including untracked files, and run the relevant tests.
- Select the integration action and resolve any merge conflicts.
- Test the integrated result before you archive or delete the session.
The available actions and labels depend on the selected harness and whether you use the Chat view or Agents window. Keep the session until you verify that the changes are present on the intended destination branch.
For a walkthrough of reviewing two results separately, integrating them one at a time, and testing the combined change, follow Delegate two tasks without mixing their changes.
Require approval before sensitive edits
Sensitive-file approval is separate from reviewing changes after the agent saves them. To prevent inadvertent edits to files such as workspace configuration or environment settings, VS Code can show a diff and ask you to approve or reject the edit before it is applied.
Use the chat.tools.edits.autoApprove setting to configure which files require approval. The setting uses glob patterns to match file paths in your workspace.
The following example configuration automatically allows edits to all files except for JSON files in the .vscode folder and files named .env, which you are prompted to approve:
"chat.tools.edits.autoApprove": {
  "**/*": true,
  "**/.vscode/*.json": false,
  "**/.env": false
}