Run and manage remote agent sessions
The Agents window lets you connect to remote machines to start agent sessions or check in on existing ones. You can connect over SSH, through a dev tunnel, or use the Agents window directly in a browser from any device.
This is useful when you want to take advantage of a remote machine's resources, work from a mobile device, or check in on your agent's progress when you're away from your main development machine.
The agent works with files and development tools on the remote machine, not the machine where you connect to the session. When you connect, the Agents window automatically installs and starts the VS Code CLI on the remote machine. Keep the remote machine powered on and the session running. To connect and manage the session, the machine must be accessible over the network.
Start a chat without a workspace on a remote host
Use a chat without a workspace when a task needs the resources or environment of a remote host but doesn't need a repository. First, enable sessions.chat.unifiedWorkspacePicker.enabled and connect the host over SSH or a dev tunnel.
To start a chat without a workspace:
-
Select New or press ⌘N (Windows, Linux Ctrl+N) to start a new agent session.
-
In the workspace picker, select the Chat entry for a connected remote host without choosing a folder. The entry identifies the host where the chat runs.
-
Choose an agent harness, enter your prompt, and press Enter.
The main workspace picker also shows folders from connected remote hosts alongside local folders. Select a remote folder there when the task needs an existing workspace.
Connect via SSH
Prerequisite: the remote machine must be accessible over SSH. No extra agent installation is needed on the remote machine.
To start a session on a remote machine via SSH:
-
Select New or press ⌘N (Windows, Linux Ctrl+N) to start a new agent session.
-
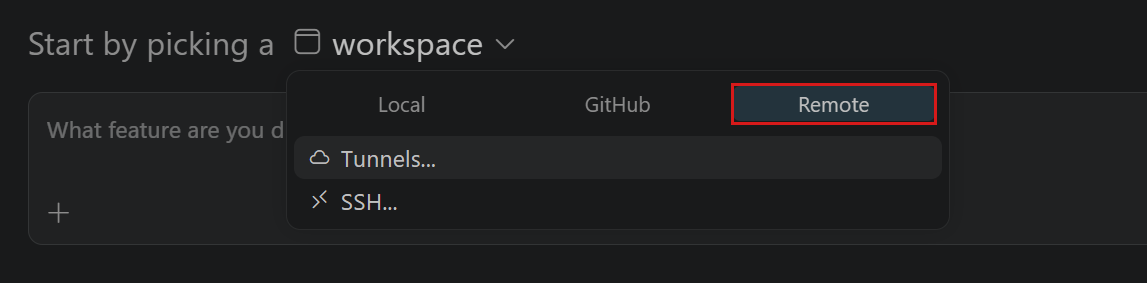
In the workspace dropdown, select the Remote tab, and then select SSH. If you've already set up SSH connections, they appear as options in the dropdown.
-
Enter the SSH connection string for the remote machine (for example,
user@hostname). -
Select the folder on the remote machine to use for the session.
-
Type a prompt and press Enter to start the session.
Connect via dev tunnel
Prerequisite: a dev tunnel is already running on the remote machine. See Developing with Remote Tunnels for setup instructions.
To start a session on a remote machine via dev tunnel:
-
Select New or press ⌘N (Windows, Linux Ctrl+N) to start a new agent session.
-
In the workspace dropdown, select the Remote tab, and then select Tunnels and choose your account type.
-
Choose the active dev tunnel from the list.
-
Select the folder on the remote machine to use for the session.
-
Type a prompt and press Enter to start the session.
Ensure your dev tunnel requires authentication (GitHub or Microsoft account). If the tunnel allows anonymous access, anyone who discovers the URL can reach your machine and start agent sessions. This is especially dangerous when auto-approval modes are active, because unauthorized users can trigger AI-assisted command execution with your credentials. For more information, see Security.
Delegate tasks to remote machines (Experimental)
In the Agents window, ask the agent to delegate a task to a connected remote machine. Enable both chat.remoteAgentHostsEnabled and chat.remoteSessions.tools.enabled , and connect the machines that the agent can use. You don't need to select the target machine in the workspace picker.
The remote delegation tools let an agent:
- Use
list_agent_hoststo discover connected remote machines, available models, resource capacity, and session load. - Use
create_remote_sessionto start a session on a specific remote machine or choose a target automatically. For automatic placement, specify criteria such as Windows, Linux, or macOS, minimum memory, logical CPU count, and an optional model. Among matching machines, placement favors the machine with the fewest running sessions and pending session creations. If no connected machine meets all the criteria, the tool reports an error instead of selecting a nonmatching machine. - Use
get_remote_sessionto check a remote session's status and latest response. - Use
send_remote_messageto send follow-up work or report results and questions to the exact originating chat. If that chat is busy, the message waits in its queue.
For repository work, specify an existing trusted folder on the target machine, either directly or in a new Git worktree. The tools don't clone or copy the coordinating session's workspace to the remote machine. If you don't specify a workspace, the remote session starts without one.
Normal approval requirements still apply to delegated work and messages. Review the selected host, folder, and worktree before you approve a tool call, especially when the agent uses automatic placement.
Keep the coordinating Agents window open and connected while delegated work runs so messages can flow between sessions. A remote session's final response isn't forwarded automatically. Ask the remote agent to use send_remote_message to report its result.
Turning off chat.remoteSessions.tools.enabled removes the remote delegation tools, but doesn't disconnect remote machines or stop remote sessions that are already running.
Run a session in a remote Dev Container
Run agents inside your remote project's Dev Container to use its configured tools and dependencies without installing them directly on the remote machine. Starting in VS Code 1.139, this is supported for SSH, Tunnel, and WSL connections in the desktop Agents window.
Before you start, enable chat.agentHost.devContainer.enabled . Docker must be installed and running on the remote host, and the project must contain a Dev Container configuration.
To run a session in a remote Dev Container:
-
Connect over SSH, through a tunnel, or to WSL, and select the project folder in the workspace picker.
-
Expand the menu for the remote folder and select Use Dev Container.
The workspace label gains the - Dev Container suffix.
-
Choose an available agent harness, configure the session, and enter your prompt.
The Use Dev Container option appears only when the source machine advertises Dev Container support. It isn't available for unsupported machines or for folders whose source is nested inside another remote environment. For more information about prerequisites, switching back to the source machine, and troubleshooting, see Run a session in a Dev Container.
Use the Agents window in the browser
The Agents window is also available as a web client at https://insiders.vscode.dev/agents, so you can manage agent sessions from any device with a browser. This is useful when you're away from your main development machine, working from a mobile device, or want to check in on sessions running on a remote machine without installing Visual Studio Code locally.
The browser-based Agents window connects to your development machine through a dev tunnel. Agent sessions run on the remote machine. The browser acts only as a client for chatting, reviewing changes, and managing sessions.
Set up a dev tunnel
Before you can use the Agents window in the browser, start a dev tunnel on the machine you want to connect to:
-
On your remote machine, run the following command to start a dev tunnel:
code-insiders tunnelIf you're using the stable release, run
code tunnelinstead.The first time you run this command, you're prompted to authenticate with your GitHub or Microsoft account. The tunnel requires authentication by default for security.
-
After the tunnel is running, open https://insiders.vscode.dev/agents in a browser on any device.
-
Sign in with Continue with GitHub when prompted. If you're already authenticated, the Agents window loads directly.
-
Your tunnel host appears in the hosts bar at the top of the window. Select it to connect.
-
Choose a folder on the remote machine, select an agent, and start a session.
Host management
The hosts bar in the browser-based Agents window shows machines with configured dev tunnels. Each machine displays its connection status:
- Online: the host is reachable and you can start or continue sessions on it.
- Offline: the tunnel on the host is not running. Start the tunnel on the host to bring it back online.
You can connect and disconnect from machines directly through the hosts bar. If a machine goes offline while you have an active session, the session shows a disconnected state. When the machine comes back online, the session reconnects automatically.
Remote control Copilot harness sessions
To monitor and steer an existing Copilot harness session from GitHub.com or the GitHub Mobile app, enter /remote on in the session. This provides another way to access a running session without selecting the Cloud target or starting a new session on a remote host.
Session history, tool activity, status, approvals, and questions stay synchronized. Remote control requires GitHub authentication and a workspace that maps to a GitHub repository.
Enter /remote off to stop sharing the session. Keep the session's host running while you use remote control. For desktop-managed sessions on your machine, keep VS Code running.
Related resources
- Use the Agents window - agent-first workflows across multiple projects.
- Developing with Remote Tunnels - set up and manage dev tunnels.
- Agent Host architecture - technical details about remote connections and session execution.