Tutorial: Generate AI-powered code annotations by using the Language Model API
In this tutorial, You'll learn how to create a VS Code extension to build an AI-powered Code Tutor. You use the Language Model (LM) API to generate suggestions to improve your code and take advantage of the VS Code extension APIs to integrate it seamlessly in the editor as inline annotations that the user can hover over for more information. After you complete this tutorial, you will know how to implement custom AI features in VS Code.
Prerequisites
You'll need the following tools and accounts to complete this tutorial:
Scaffold out the extension
First, use Yeoman and VS Code Extension Generator to scaffold a TypeScript or JavaScript project ready for development.
npx --package yo --package generator-code -- yo code
Select the following options to complete the new extension wizard...
# ? What type of extension do you want to create? New Extension (TypeScript)
# ? What's the name of your extension? Code Tutor

### Press <Enter> to choose default for all options below ###

# ? What's the identifier of your extension? code-tutor
# ? What's the description of your extension? LEAVE BLANK
# ? Initialize a git repository? Yes
# ? Bundle the source code with webpack? No
# ? Which package manager to use? npm

# ? Do you want to open the new folder with Visual Studio Code? Open with `code`
Modify the package.json file to include the correct commands
The scaffolded project includes a single "helloWorld" command in the package.json file. This command is what shows up in the Command Palette when your extension is installed.
"contributes": {
  "commands": [
      {
      "command": "code-tutor.helloWorld",
      "title": "Hello World"
      }
  ]
}
Since we're building a Code Tutor extension that will be adding annotations to lines, we'll need a command to allow the user to toggle these annotations on and off. Update the command and title properties:
"contributes": {
  "commands": [
      {
      "command": "code-tutor.annotate",
      "title": "Toggle Tutor Annotations"
      }
  ]
}
While the package.json defines the commands and UI elements for an extension, the src/extension.ts file is where you put the code that should be executed for those commands.
Open the src/extension.ts file and change the registerCommand method so that it matches the command property in the package.json file.
const disposable = vscode.commands.registerCommand('code-tutor.annotate', () => {
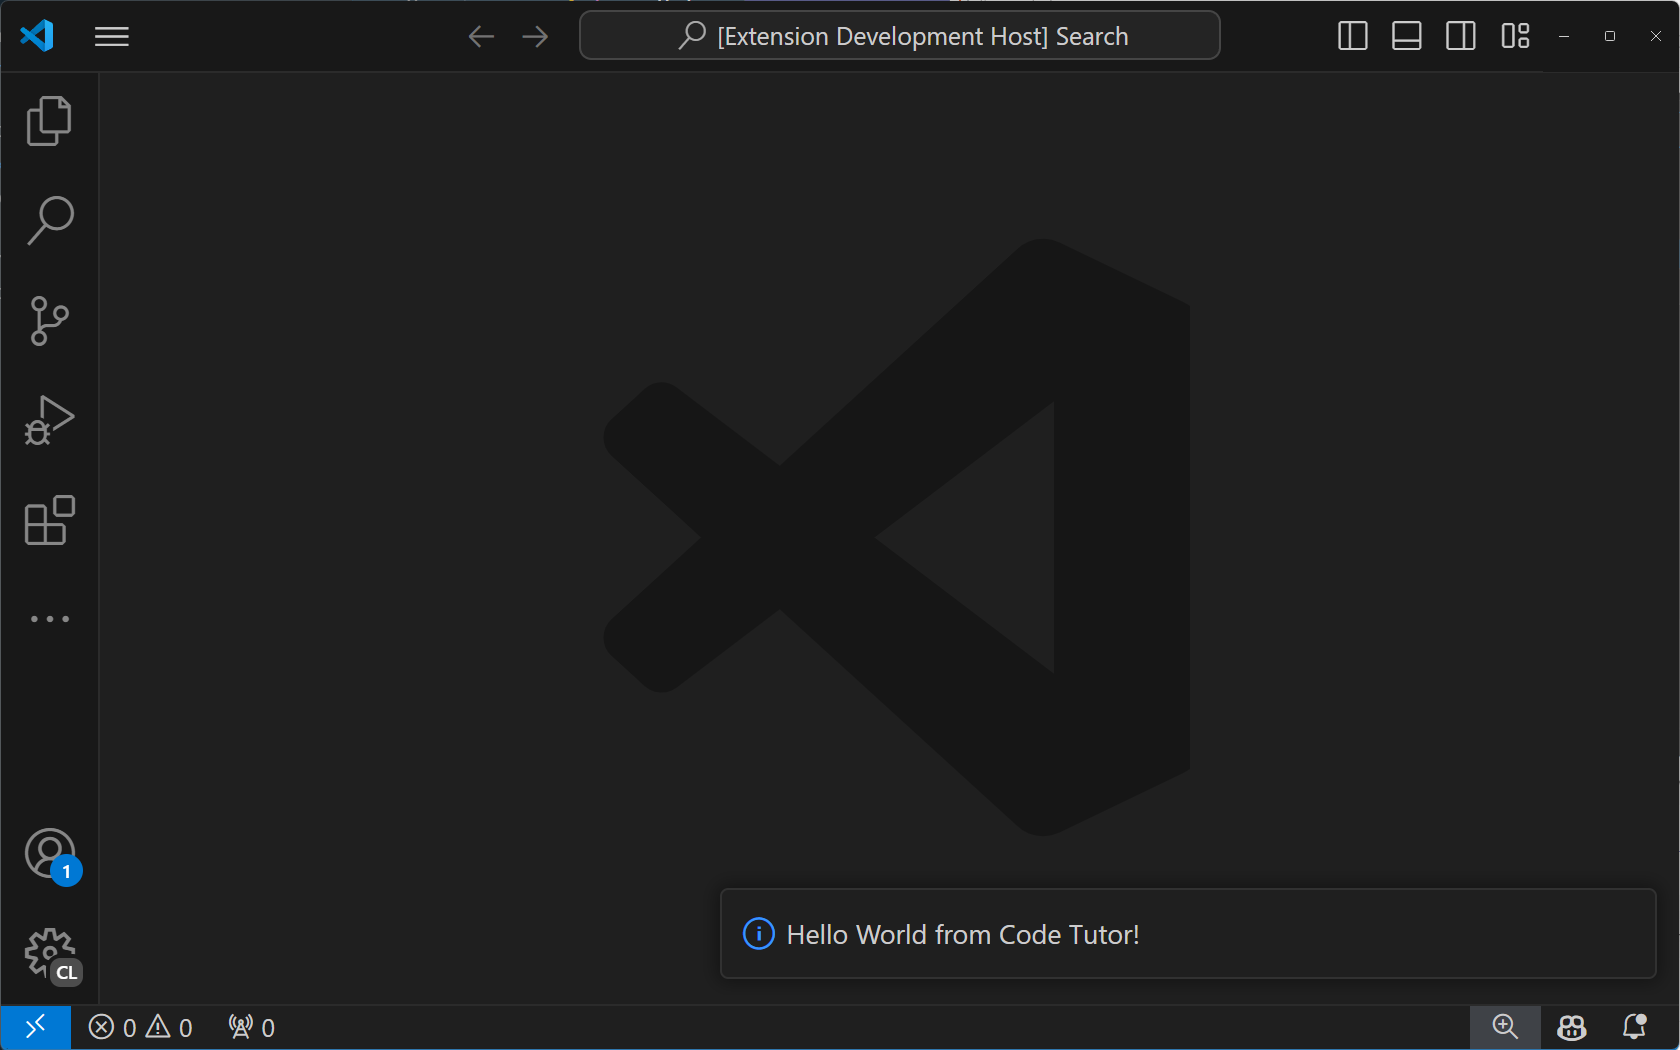
Run the extension by pressing F5. This will open a new VS Code instance with the extension installed. Open the Command Palette by pressing ⇧⌘P (Windows, Linux Ctrl+Shift+P), and search for "tutor". You should see the "Tutor Annotations" command.
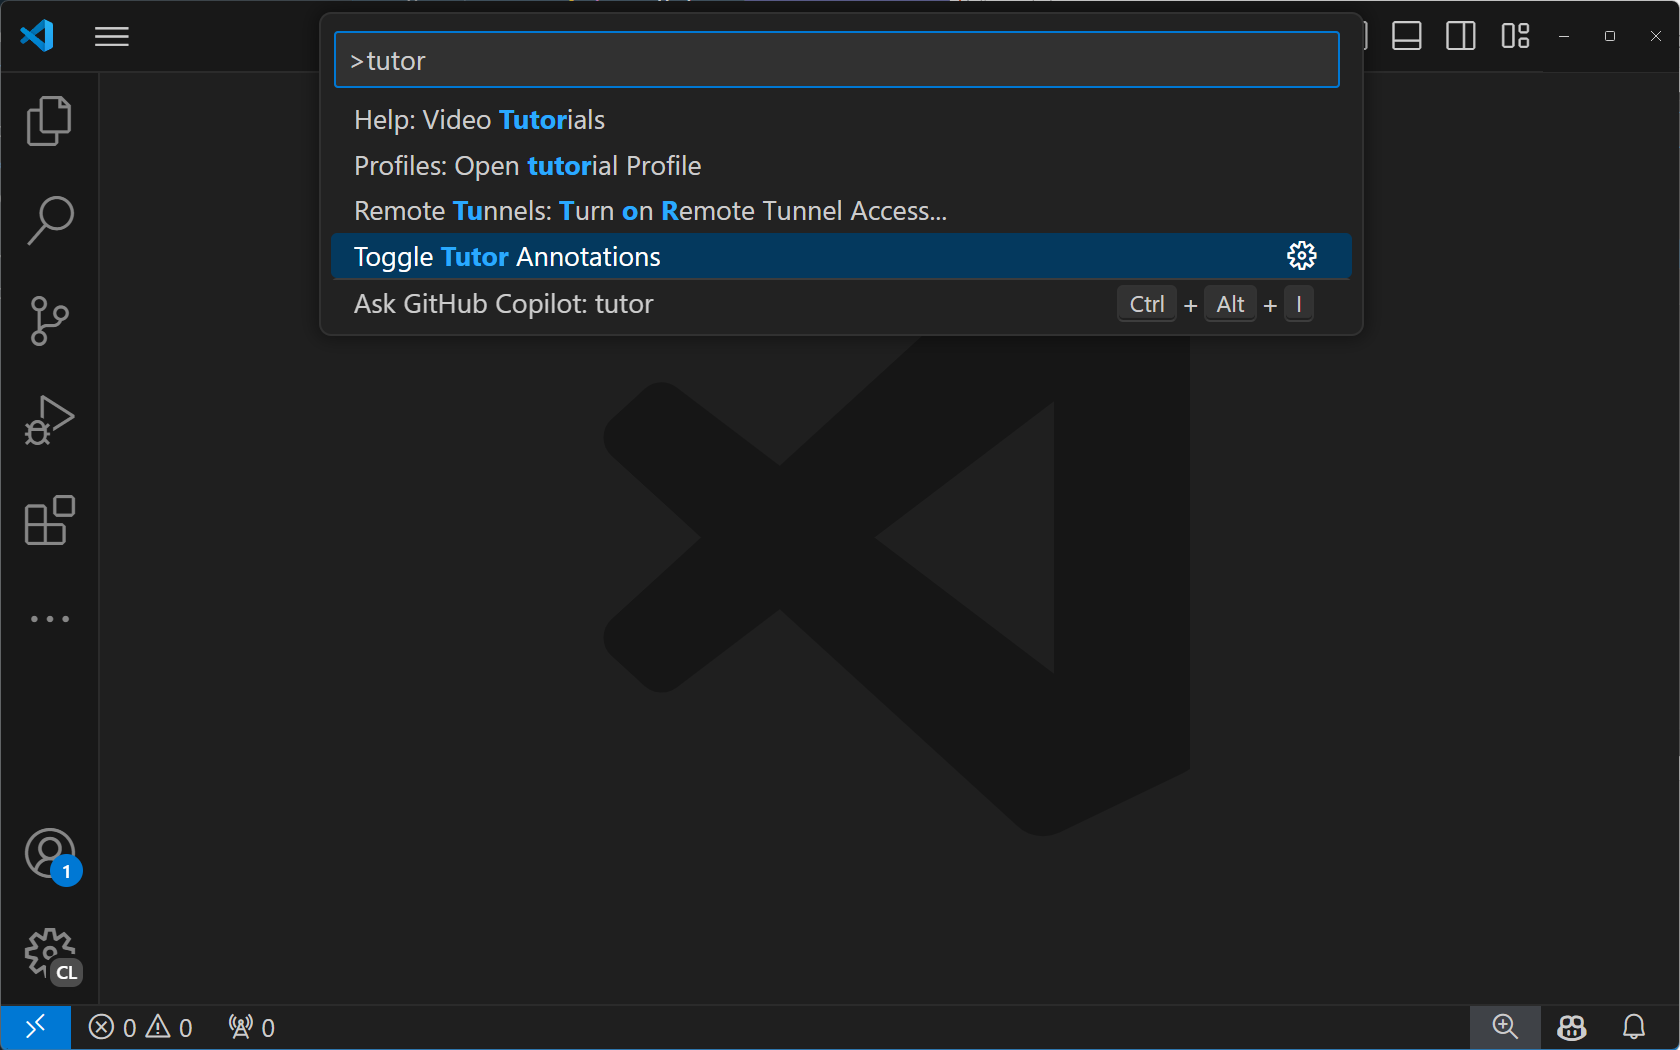
If you select the "Tutor Annotations" command, you'll see a "Hello World" notification message.
Implement the "annotate" command
To get our Code Tutor annotations working, we need to send it some code and ask it to provide annotations. We'll do this in three steps:
- Get the code with line numbers from the current tab the user has open.
- Send that code to the Language Model API along with a custom prompt that instructs the model on how to provide annotations.
- Parse the annotations and display them in the editor.
Step 1: Get the code with line numbers
To get the code from the current tab, we need a reference to the tab that the user has open. We can get that by modifying the registerCommand method to be a registerTextEditorCommand. The difference between these two commands is that the latter gives us a reference to the tab that the user has open, called the TextEditor.
const disposable = vscode.commands.registerTextEditorCommand('code-tutor.annotate', async (textEditor: vscode.TextEditor) => {
Now we can use the textEditor reference to get all of the code in the "viewable editor space". This is the code that can be seen on the screen - it does not include code that is either above or below what is in the viewable editor space.
Add the following method directly above the export function deactivate() { } line at the bottom of the extension.ts file.
function getVisibleCodeWithLineNumbers(textEditor: vscode.TextEditor) {
  // get the position of the first and last visible lines
  let currentLine = textEditor.visibleRanges[0].start.line;
  const endLine = textEditor.visibleRanges[0].end.line;

  let code = '';

  // get the text from the line at the current position.
  // The line number is 0-based, so we add 1 to it to make it 1-based.
  while (currentLine < endLine) {
    code += `${currentLine + 1}: ${textEditor.document.lineAt(currentLine).text} \n`;
    // move to the next line position
    currentLine++;
  }
  return code;
}
This code uses the visibleRanges property of the TextEditor to get the position of the lines that are currently visible in the editor. It then starts with the first line position and moves to the last line position, adding each line of code to a string along with the line number. Finally, it returns the string that contains all the viewable code with line numbers.
Now we can call this method from the code-tutor.annotate command. Modify the implementation of the command so that it looks like this:
const disposable = vscode.commands.registerTextEditorCommand(
  'code-tutor.annotate',
  async (textEditor: vscode.TextEditor) => {
    // Get the code with line numbers from the current editor
    const codeWithLineNumbers = getVisibleCodeWithLineNumbers(textEditor);
  }
);
Step 2: Send code and prompt to language model API
The next step is to call the GitHub Copilot language model and send it the user's code along with instructions to create the annotations.
To do this, we first need to specify which chat model we want to use. We select 4o here because it is a fast and capable model for the kind of interaction we are building.
const disposable = vscode.commands.registerTextEditorCommand(
  'code-tutor.annotate',
  async (textEditor: vscode.TextEditor) => {
    // Get the code with line numbers from the current editor
    const codeWithLineNumbers = getVisibleCodeWithLineNumbers(textEditor);

    // select the 4o chat model
    let [model] = await vscode.lm.selectChatModels({
      vendor: 'copilot',
      family: 'gpt-4o'
    });
  }
);
We need instructions - or a "prompt" - that will tell the model to create the annotations and what format we want the response to be. Add the following code to the top of the file directly under the imports.
const ANNOTATION_PROMPT = `You are a code tutor who helps students learn how to write better code. Your job is to evaluate a block of code that the user gives you and then annotate any lines that could be improved with a brief suggestion and the reason why you are making that suggestion. Only make suggestions when you feel the severity is enough that it will impact the readability and maintainability of the code. Be friendly with your suggestions and remember that these are students so they need gentle guidance. Format each suggestion as a single JSON object. It is not necessary to wrap your response in triple backticks. Here is an example of what your response should look like:

{ "line": 1, "suggestion": "I think you should use a for loop instead of a while loop. A for loop is more concise and easier to read." }{ "line": 12, "suggestion": "I think you should use a for loop instead of a while loop. A for loop is more concise and easier to read." }
`;
This is a special prompt that instructs the language model on how to generate annotations. It also includes examples for how the model should format its response. These examples (also called, "multi-shot") are what enable us to define what the format the response will be so that we can parse it and display it as annotations.
We pass messages to the model in an array. This array can contain as many messages as you like. In our case, it contains the prompt followed by the users code with line numbers.
const disposable = vscode.commands.registerTextEditorCommand(
  'code-tutor.annotate',
  async (textEditor: vscode.TextEditor) => {
    // Get the code with line numbers from the current editor
    const codeWithLineNumbers = getVisibleCodeWithLineNumbers(textEditor);

    // select the 4o chat model
    let [model] = await vscode.lm.selectChatModels({
      vendor: 'copilot',
      family: 'gpt-4o'
    });

    // init the chat message
    const messages = [
      vscode.LanguageModelChatMessage.User(ANNOTATION_PROMPT),
      vscode.LanguageModelChatMessage.User(codeWithLineNumbers)
    ];
  }
);
To send the messages to the model, we need to first make sure the selected model is available. This handles cases where the extension is not ready or the user is not signed in to GitHub Copilot. Then we send the messages to the model.
const disposable = vscode.commands.registerTextEditorCommand(
  'code-tutor.annotate',
  async (textEditor: vscode.TextEditor) => {
    // Get the code with line numbers from the current editor
    const codeWithLineNumbers = getVisibleCodeWithLineNumbers(textEditor);

    // select the 4o chat model
    let [model] = await vscode.lm.selectChatModels({
      vendor: 'copilot',
      family: 'gpt-4o'
    });

    // init the chat message
    const messages = [
      vscode.LanguageModelChatMessage.User(ANNOTATION_PROMPT),
      vscode.LanguageModelChatMessage.User(codeWithLineNumbers)
    ];

    // make sure the model is available
    if (model) {
      // send the messages array to the model and get the response
      let chatResponse = await model.sendRequest(
        messages,
        {},
        new vscode.CancellationTokenSource().token
      );

      // handle chat response
      await parseChatResponse(chatResponse, textEditor);
    }
  }
);
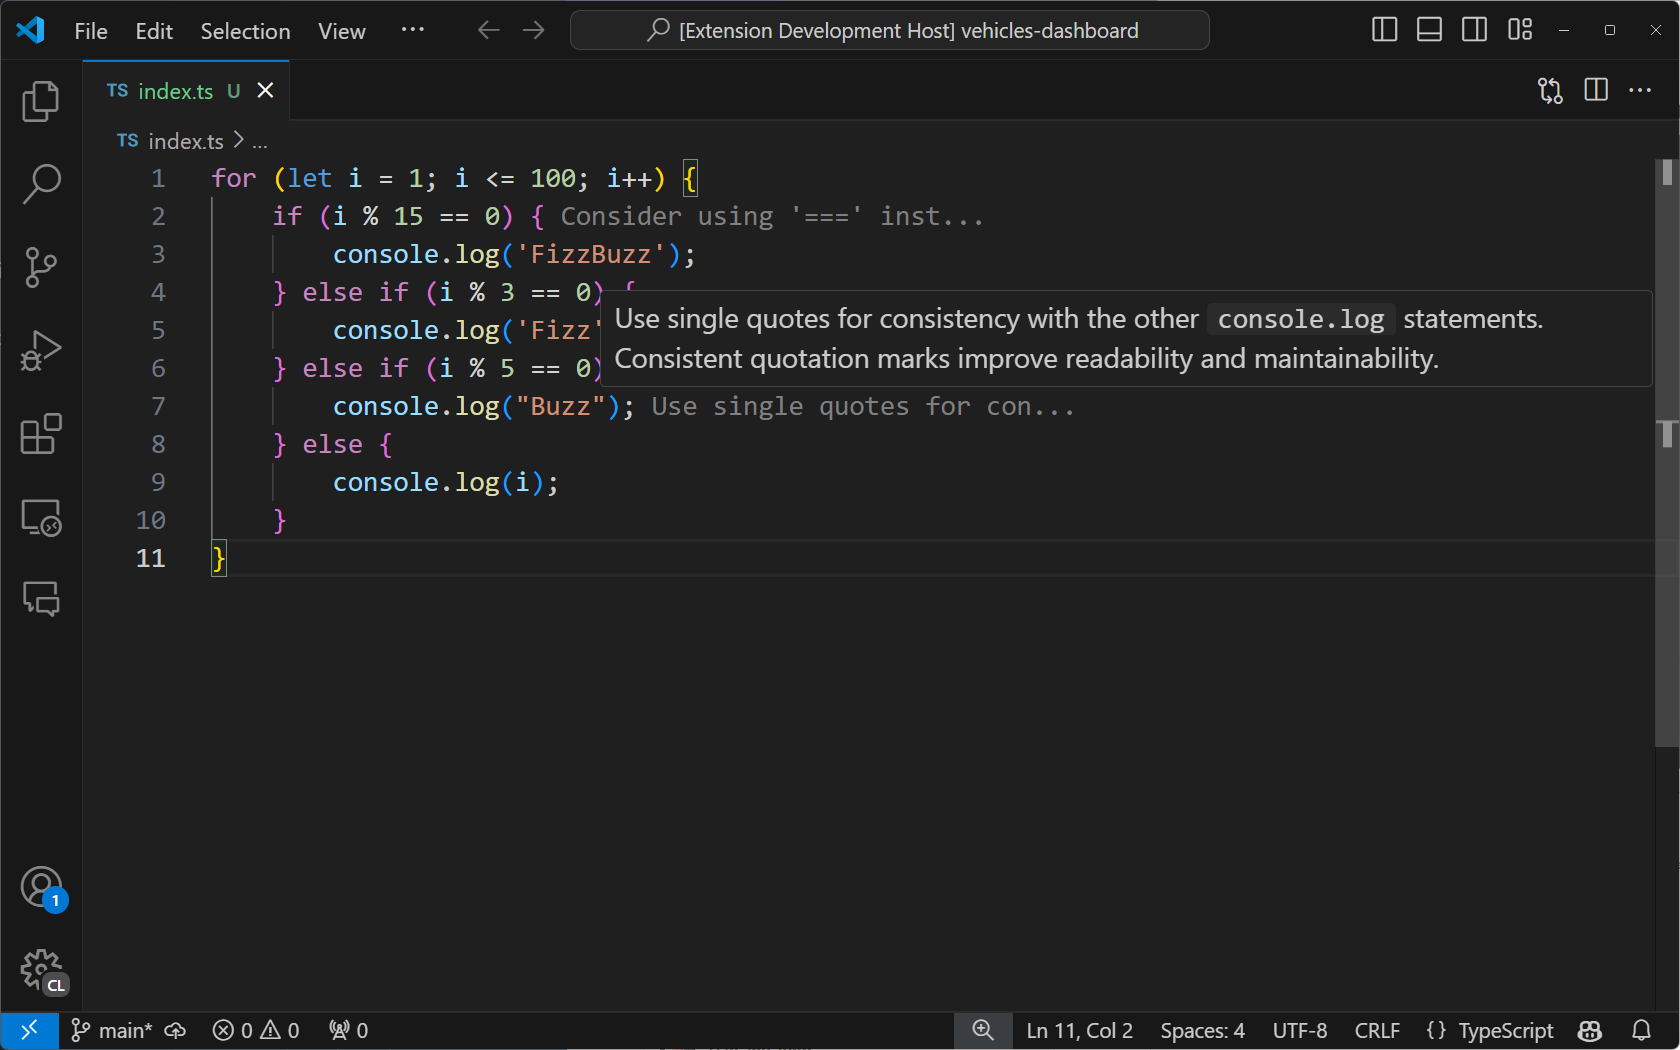
Chat responses come in as fragments. These fragments usually contain single words, but sometimes they contain just punctuation. In order to display annotations as the response streams in, we want to wait until we have a complete annotation before we display it. Because of the way we have instructed our model to return its response, we know that when we see a closing } we have a complete annotation. We can then parse the annotation and display it in the editor.
Add the missing parseChatResponse function above the getVisibleCodeWithLineNumbers method in the extension.ts file.
async function parseChatResponse(
  chatResponse: vscode.LanguageModelChatResponse,
  textEditor: vscode.TextEditor
) {
  let accumulatedResponse = '';

  for await (const fragment of chatResponse.text) {
    accumulatedResponse += fragment;

    // if the fragment is a }, we can try to parse the whole line
    if (fragment.includes('}')) {
      try {
        const annotation = JSON.parse(accumulatedResponse);
        applyDecoration(textEditor, annotation.line, annotation.suggestion);
        // reset the accumulator for the next line
        accumulatedResponse = '';
      } catch (e) {
        // do nothing
      }
    }
  }
}
We need one last method to actually display the annotations. VS Code calls these "decorations". Add the following method above the parseChatResponse method in the extension.ts file.
function applyDecoration(editor: vscode.TextEditor, line: number, suggestion: string) {
  const decorationType = vscode.window.createTextEditorDecorationType({
    after: {
      contentText: ` ${suggestion.substring(0, 25) + '...'}`,
      color: 'grey'
    }
  });

  // get the end of the line with the specified line number
  const lineLength = editor.document.lineAt(line - 1).text.length;
  const range = new vscode.Range(
    new vscode.Position(line - 1, lineLength),
    new vscode.Position(line - 1, lineLength)
  );

  const decoration = { range: range, hoverMessage: suggestion };

  vscode.window.activeTextEditor?.setDecorations(decorationType, [decoration]);
}
This method takes in our parsed annotation from the model and uses it to create a decoration. This is done by first creating a TextEditorDecorationType that specifies the appearance of the decoration. In this case, we are just adding a grey annotation and truncating it to 25 characters. We'll show the full message when the user hovers over the message.
We are then setting where the decoration should appear. We need it to be on the line number that was specified in the annotation, and at the end of the line.
Finally, we set the decoration on the active text editor which is what causes the annotation to appear in the editor.
If your extension is still running, restart it by selecting the green arrow from the debug bar. If you closed the debug session, press F5 to run the extension. Open a code file in the new VS Code window instance that opens. When you select "Toggle Tutor Annotations" from the Command Palette, you should see the code annotations appear in the editor.
Add a button to the editor title bar
You can enable your command to be invoked from places other than the Command Palette. In our case, we can add a button to the top of the current tab that allows the user to easily toggle the annotations.
To do this, modify the "contributes" portion of the package.json as follows:
"contributes": {
  "commands": [
    {
      "command": "code-tutor.annotate",
      "title": "Toggle Tutor Annotations",
      "icon": "$(comment)"
    }
  ],
  "menus": {
    "editor/title": [
      {
        "command": "code-tutor.annotate",
        "group": "navigation"
      }
    ]
  }
}
This causes a button to appear in the navigation area (right-side) of the editor title bar. The "icon" comes from the Product Icon Reference.
Restart your extension with the green arrow or press F5 if the extension is not already running. You should now see a comment icon that will trigger the "Toggle Tutor Annotations" command.
Next Steps
In this tutorial, you learned how to create a VS Code extension that integrates AI into the editor with the language model API. You used the VS Code extension API to get the code from the current tab, sent it to the model with a custom prompt, and then parsed and displayed the model result right in the editor using decorators.
Next, you can extend your Code Tutor extension to include a chat participant as well which will allow users to interact directly with your extension via the GitHub Copilot chat interface. You can also explore the full range of API's in VS Code to explore new ways of building custom AI experiences your editor.
You can find the complete source code for this tutorial in the vscode-extensions-sample repository.