Expose your Java operations to GitHub Copilot with MCP
GitHub Copilot is very good at writing Java. It is far less good at knowing what is currently in your running application, because it cannot see it.
That gap is not a model problem. It is a plumbing problem, and it has a standard fix.
In this chapter, we'll take the TodoService behind this sample's Todo page — the one
the web form already calls — and publish its operations as Model Context Protocol tools.
Then we'll ask Copilot to create a todo, and watch it appear on that page as if a human
had typed it.
One service. Two callers. No duplicated logic.
What You Will Learn
The interesting part of this chapter is not the chat prompt. It is how little code it takes to get there.
In this chapter, you will learn to:
- Add an MCP server to a Spring Boot app: One starter dependency turns the application into an MCP server.
- Publish Java methods as tools: Annotate ordinary Spring bean methods so a client can discover and call them.
- Choose the right transport: Understand the one property that decides whether the
/mcpendpoint exists at all. - Connect Visual Studio Code: Register the server in
.vscode/mcp.jsonand confirm the tools were discovered. - Drive it from Copilot Chat: Enable the tools in Agent mode and give Copilot a task that needs two of them in sequence.
- Verify the result independently: Confirm in the browser that Copilot changed real application state.
Here is how the pieces connect.
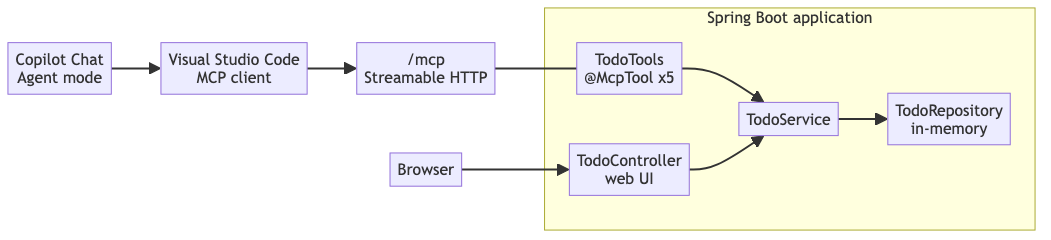
Fig 1: The MCP tools and the web page are two front doors onto one service and one repository.
Problem Framing: Tools Beat Instructions
You can describe your API to an assistant in a prompt. It will then guess at URLs, invent parameters, and confidently report success it cannot verify.
A tool is different. It has a name, a description, a typed parameter list, and a real implementation on your side of the wire. The assistant does not guess — it picks a tool and passes arguments, and your code decides what actually happens.
Try this
Look at any operation in your own service layer that you would be comfortable letting an assistant call. If you can name it and describe one required parameter in a sentence, it is already most of the way to being an MCP tool.
Prerequisites
This chapter runs the finished sample rather than building it up, so the setup is short.
- A cloned copy of the sample: Clone microsoft/github-copilot-java-mcp-demo and open it in Visual Studio Code.
- JDK 25 and both extension packs: The Extension Pack for Java and the Spring Boot Extension Pack.
- GitHub Copilot: Installed and signed in, with Agent mode available in Chat.
- A clean starting state: The app stopped and port 8080 free.
- Permission to run tools: Allow MCP tool use when Visual Studio Code prompts for trust or confirmation.
Expected warnings: Startup prints three
BeanPostProcessorCheckerwarnings about the MCP annotation scanner, immediately above theRegistered tools: 5line. They are normal.
What Is the Model Context Protocol?
The Model Context Protocol (MCP) is an open standard for connecting AI assistants to external systems. A server publishes capabilities; a client — here, Visual Studio Code — discovers them and offers them to the model.
The capability type this chapter uses is a tool: a named, described, typed operation the assistant can invoke.
- Name: What the model asks for, such as
add_todo. - Description: Plain-English guidance the model uses to decide when the tool applies.
- Parameters: Typed inputs, each with its own description and whether it is required.
- Implementation: Your Java method. The model never sees it — only its result.
Spring AI's MCP server starter supplies all of the protocol handling. Your job reduces to annotating methods that already exist.
The dependency
In pom.xml, spring-ai-starter-mcp-server-webmvc is the single dependency that lets
the application act as an MCP server over HTTP. There is no separate server to deploy and
no second process to manage — the MCP endpoint is served by the same embedded web server
that serves the Todo page.
The tools
Open src/main/java/com/example/tododemo/mcp/TodoTools.java. It is an ordinary
@Component, which is what lets the MCP annotation scanner discover it. It holds five
@McpTool methods, in source order:
| Tool | What it does |
|---|---|
list_todos |
Lists all todo items with id, title, and completion status. |
get_todo |
Fetches a single item by id. |
add_todo |
Creates an item from a title. |
complete_todo |
Marks an item complete. |
delete_todo |
Deletes an item. |
Each annotation supplies the tool name and the description the model reads.
@McpToolParam describes each input and marks it required, so add_todo advertises that
it needs a title and get_todo that it needs an id.
@McpTool(name = "add_todo", description = "Create a new todo item with the given title.")
public Todo addTodo(
        @McpToolParam(description = "The title of the new todo", required = true) String title) {
    return service.add(title);
}
Note what the body does not do. It contains no validation, no id generation, and no
storage — it delegates to the same TodoService the web controller uses. That is the
whole point: the MCP surface adds a caller, not a second implementation.
The transport
Tools are useless without a transport the client can reach. In application.properties,
one line decides it:
spring.ai.mcp.server.protocol=STREAMABLE
That publishes the modern Streamable HTTP endpoint at /mcp. Without it, this starter
falls back to its older Server-Sent Events transport and POST /mcp returns 404 —
which is a genuinely confusing failure, because the dependency, the annotations, and the
startup log all look correct.
Exercise - start the server and connect Visual Studio Code
- Select the Spring Boot Dashboard icon in the Activity Bar, find springboot-mcp-demo, and select Run.
- When startup finishes, find
Registered tools: 5in the app's log in the Terminal panel. That message confirms Spring discovered every annotated method. Leave the app running. - Open
.vscode/mcp.jsonand check thetodo-mcpserver'stypeandurl. - Select the Start code-lens above the server entry, and wait until the code-lens reads Running with 5 tools.

Fig 2: The workspace configuration points Visual Studio Code at http://localhost:8080/mcp, and the code-lens reports the connection state and the number of discovered tools.
The Start action connects an MCP client. It does not launch the Java process — that is why the app has to be running first. The tool count is cached between sessions, so wait for Running rather than treating the count as proof of a live connection.
Exercise - let Copilot use the tools
-
Open Copilot Chat and select Agent mode.
-
Select Configure Tools... in the chat input, find
todo-mcp, enable its five tools, and close the picker. -
Enter the following prompt and select Send:
Use the todo-mcp tools to add a todo called 'Email the stakeholders', then list all todos. -
If prompted, review the tool name and arguments before choosing Allow Once. Wait for the final response.
-
In Chat, find Email the stakeholders in the structured
list_todosresult. -
Open http://localhost:8080 in a browser. The same title appears in the Todo list.

Fig 3: Copilot picks add_todo and passes the title as an argument, and the tool returns a structured result. The frame is scrolled to that first call — the list_todos call the prompt also asked for follows below it. The id reads 4 because this run already held items; on a clean start the first todo is 1.
The prompt deliberately needs two tools in sequence, because that is where tool use gets interesting: the assistant chooses the order, and the structured result of the second call is evidence rather than a claim.

Fig 4: Proof the call was real — the item created from Chat is rendered by the web controller, from the same in-memory repository.
That last check matters more than it looks. The browser knows nothing about MCP. It
rendered that row because TodoController asked TodoService for the list, and the list
contains an item that a chat prompt created.
Exercise - shut down
- Select Stop for
todo-mcpin.vscode/mcp.json, while the server is still running. - Select Stop for springboot-mcp-demo in the Spring Boot Dashboard.
- Confirm it is no longer running, and that port 8080 is free.
Because the repository is in memory, stopping the process clears the todo created during this chapter.
Quick Question
The MCP tools and the web page produce the same result. If you were adding a sixth
operation to this application, where would you implement it, and what would you have to
change in TodoTools?
Answer
Implement it in TodoService, once. TodoTools then needs a method that delegates to it,
annotated with @McpTool and a description written for a model rather than a developer —
plus @McpToolParam on each input. Nothing else changes: no transport configuration, no
registration list, no client-side edit, because the annotation scanner discovers the
method at startup and the log's tool count goes from five to six. The reason this stays so
cheap is that the tool layer holds no logic of its own; the moment it starts validating or
storing anything, you have two implementations to keep in step.
What's Next
Your Java application can now be called by an assistant, and you have verified that the calls change real state rather than producing plausible text.
In Chapter 4, Let Copilot Test Your App with Playwright, we point Copilot at the other side of the app. Instead of calling your service directly, it drives a real browser against the running page — filling the form, clicking the checkbox, deleting the row, and asserting each result along the way.
Learn more
- Model Context Protocol — the specification and its core concepts.
- MCP servers in Visual Studio Code — configuration, trust, and tool management.
- Spring AI reference documentation — the MCP server starter and its annotations.
- Use agent mode in Visual Studio Code — how tool selection and confirmation work.
- Demo source on GitHub — the sample used in every chapter.
Chapter 3 of 4 · Previous: Debug and Inspect a Spring Boot Request · Next: Let Copilot Test Your App with Playwright