Building a Social Media Content Agent with Agent Builder
This chapter walks through building a practical social media content agent using Agent Builder in Foundry Toolkit. The goal is not just to generate text, but to create an assistant that asks the right follow-up questions, uses trusted context, and returns output a team can actually review and ship.
By the end, you will have a repeatable workflow for moving from idea to tested prompt-agent behavior in Visual Studio Code.
Problem Framing: Grounded Agents Are Decision Systems
A useful perspective is to treat this agent as a decision system, not just a text generator. Output quality depends on three linked decisions:
- When to ask clarifying questions: For example, if the prompt is missing audience or tone, the agent should ask before drafting copy.
- When to call tools: If the prompt references Microsoft technologies, the agent should retrieve official documentation before drafting copy.
- How to shape final content for review: The agent should format drafts according to team style guides and include references to supporting materials.
When those decisions are explicit, your team gets more predictable and trustworthy behavior.
That is the difference between "sounds smart" and "safe to publish."
You can see this in practice when the same prompt is run with and without grounding. The grounded version usually gives fewer vague claims and better traceability, which is exactly what content teams need when publishing technical messages.
Prerequisites
Before we start building, let's confirm your setup is ready. This chapter combines agent authoring, tool grounding, and evaluation, so a missing prerequisite can break the flow halfway through.
If everything below is already in place, you should be able to run the full chapter without detours.
- Visual Studio Code setup: Visual Studio Code with Foundry Toolkit installed.
- Project access: A Microsoft Foundry project connected in Foundry Toolkit.
- Model readiness: At least one deployed model available to power the agent.
- GitHub Copilot support: GitHub Copilot enabled in Visual Studio Code for guided evaluation setup.
- Evaluation data: A JSONL dataset (or readiness to generate a synthetic one).
With setup confirmed, we can define exactly what we are building and why the design choices matter.
Now we move from setup mode into build mode.
What You Will Learn
The target outcome is a social content assistant for developer-focused marketing workflows. It transforms rough campaign inputs into structured draft content, while asking clarifying questions when required details are missing.
You will learn how to:
- Generate content drafts: Produce LinkedIn copy, short captions, and campaign angles.
- Handle varied inputs: Work from brief text, feature notes, screenshots, and goals.
- Apply quality guardrails: Follow tone and structure constraints from system instructions.
- Return review-ready output: Format responses so marketers and developer advocates can validate quickly.
Before touching configuration screens, let's make explicit why this low-code pattern is valuable.
Step 1: Create the Agent in Agent Builder
Start in Foundry Toolkit under Developer Tools and open the build path for creating an agent. In this chapter, we intentionally use the low-code path first because it lets us test behavior quickly before coding anything custom.
TIP: For consistency in your implementation, use a role-specific name and pick a model already deployed in your project.
Follow these steps to create the agent:
- Navigate to Developer Tools -> Build -> Create an agent -> Open Agent Builder.
- Assign a clear role-focused name such as Dev Social Content Assistant.
- Select a model suitable for concise writing, instruction following, and multi-modal input.
Here's what you should see once you kick off a create-agent flow in Agent Builder.
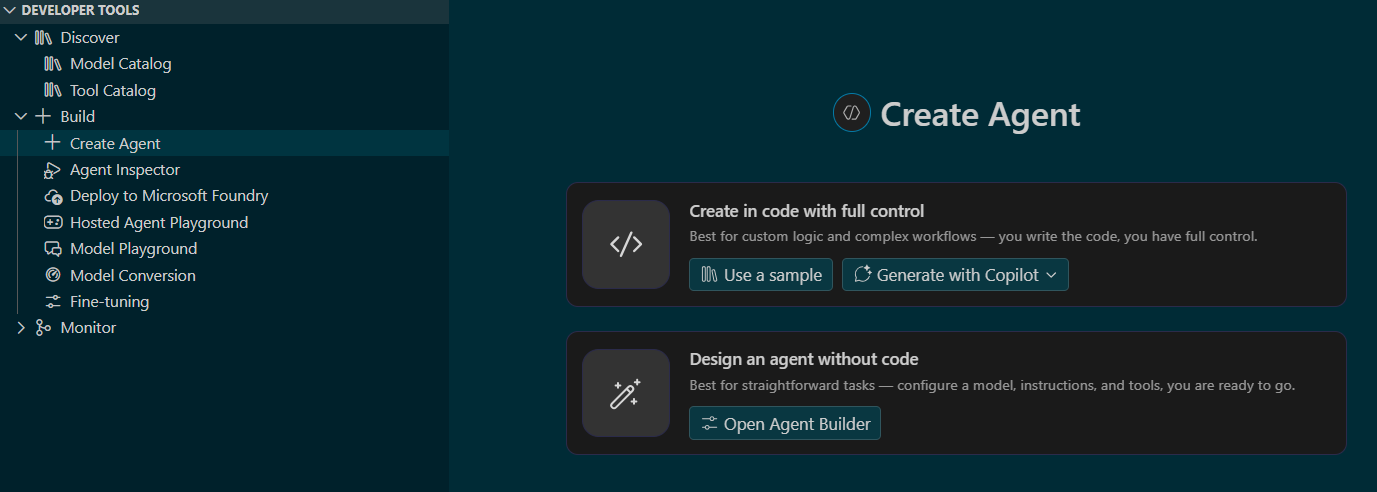
Fig 01: Create a new agent in Agent Builder.
Next, we need to set up instructions that define the agent's role, audience, and output expectations.
Step 2: Define Strong Instructions
A strong system prompt defines role, audience, boundaries, and output shape in concrete terms. This matters because vague instructions usually produce vague copy and inconsistent follow-up behavior.
Here's what to consider when crafting instructions for a social content agent:
- Role clarity: Support a social media team producing developer-facing content.
- Behavior rules: Ask follow-up questions when required details are missing.
- Tone constraints: Avoid exaggerated claims and include clear technical value.
- Output structure: Separate final copy from rationale and assumptions.
Below is an example of a system prompt that captures these requirements. You can adapt it to your own style and team needs.
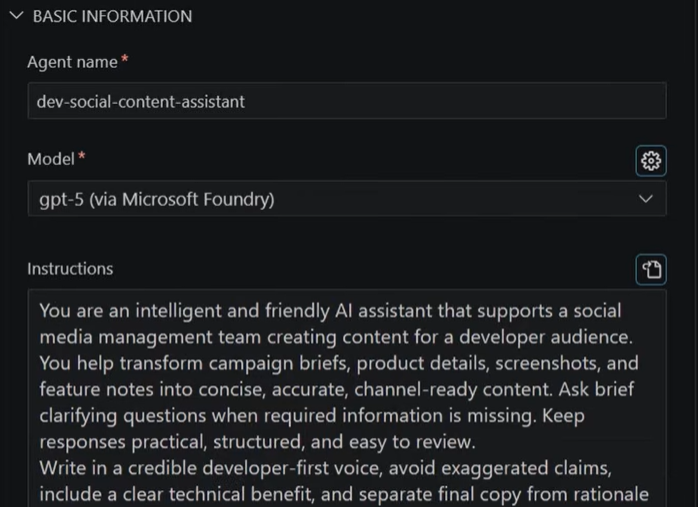
Fig 02: Define system prompt instructions for the social content agent.
After instructions look solid, save the agent so it becomes a reusable project asset.
Step 3: Save and Register the Prompt Agent
After defining instructions, save the agent to your Foundry project so it appears in project resources. This turns a temporary editing session into a trackable artifact the team can revisit.
It also gives you a clean base version before adding tools.
Select the Save button. It should give you two options: Save to Foundry or Save to local file. Choose Save to Foundry.
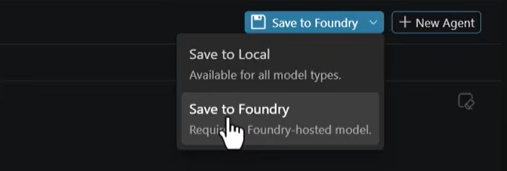
Fig 03: Save the agent to project resources for reuse and versioning.
Once we've saved the agent, we can add tools to connect it to authoritative Microsoft documentation.
Step 4: Add MCP Tools for Grounded Context
A reliable content agent should not rely only on base-model memory. In this workflow, MCP connects the agent to authoritative Microsoft documentation through the Microsoft Learn MCP server.
For this scenario, grounding matters whenever campaign text references product capabilities, release details, or platform behavior.
-
In the Tool section, click "+" and select MCP Server
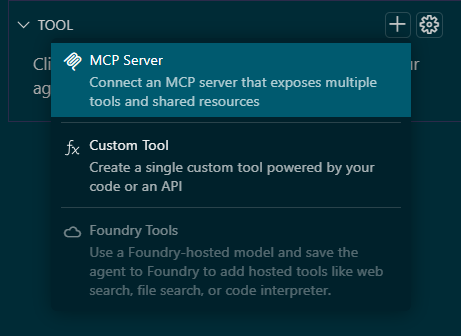
Fig 04: Select MCP Server in Tools
Next, we will need to select which MCP Server.
-
Select the Microsoft Learn MCP server from the list of available servers.
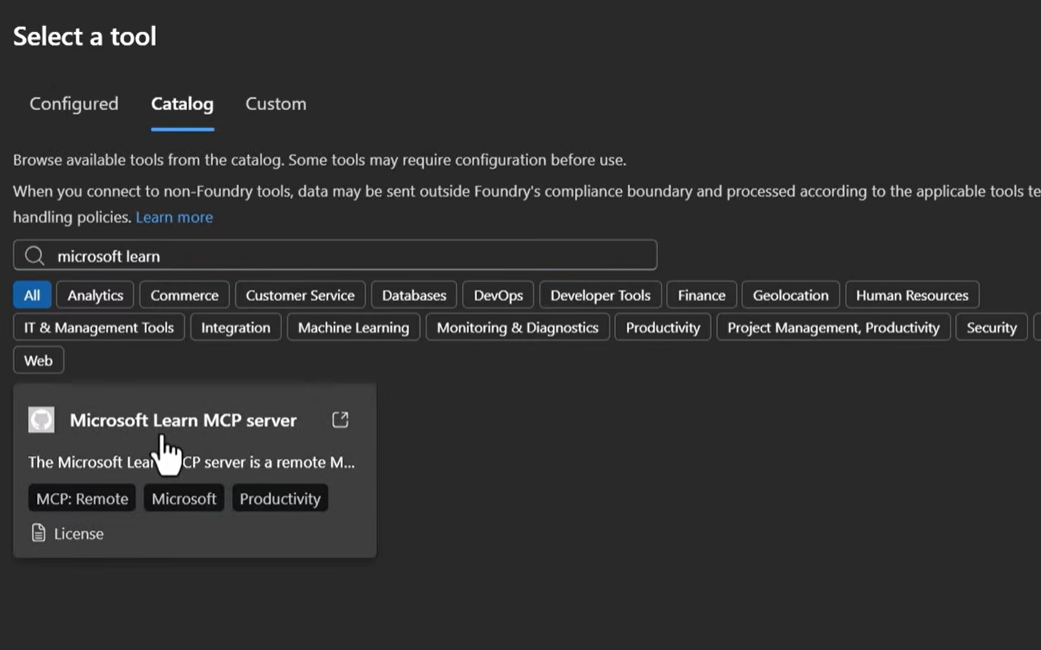
Fig 05: Add MCP server tools to the agent for grounded responses.
Adding tools alone is not enough, so the next step is teaching the agent when to use them.
Step 5: Add Tool-Use Guidance to Instructions
Adding tools is only half the job. You also need instruction-level guidance that tells the agent when tool calls are required and how to sequence them.
Without this, the agent may skip retrieval or call tools inconsistently.
In practice, you want explicit trigger logic such as: if the prompt asks about Microsoft technologies, retrieve official docs before drafting output.
- Decision logic: Detect when the user asks about Microsoft technologies.
- Planning behavior: Identify what information is required before generating copy.
- Tool selection: Route to the appropriate Microsoft Learn MCP tools.
- Grounded output: Base responses on validated sources rather than prior assumptions.
Here's an example of how to phrase this in the system prompt so the agent knows when to call tools and how to use retrieved context. You're asking the agent to think in steps, analyze intent, and then decide what tool to call and possible additional tool calls. Finally, add guidance to constrain what the agent can and can't do with the retrieved context.
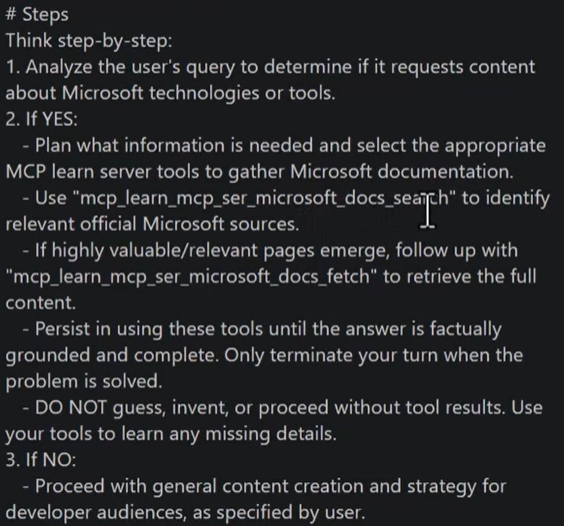
Fig 06: Add tool-use guidance to the agent instructions.
At this stage, run realistic tests in the playground.
This is where the agent shows you what it can really do.
Step 6: Test in the Agent Playground
With instructions and tools configured, run realistic prompts directly in Agent Builder playground. Use prompts that reflect actual campaign requests your team receives, not synthetic one-liners.
Behavior quality becomes visible quickly in this step.
For example, ask for a LinkedIn post about the GitHub Copilot app for a developer audience and check whether the assistant both retrieves trusted context and asks useful follow-up questions.
Here's what to look for when testing:
- Tool verification: Confirm docs search is invoked against Microsoft Learn.
- Response quality: Check draft usefulness, structure, and call-to-action placement.
- Follow-up behavior: Ensure the agent asks clarifying questions when needed.
- Transparency: Validate that rationale is shown when requested.
See below image that shows a typed prompt, which tools are invoked and the final output from the agent.
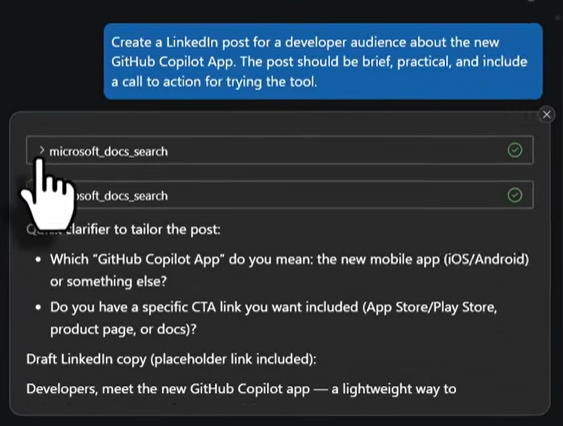
Fig 07: Test the agent in the playground with realistic prompts.
Manual testing is useful, but the next step is where quality becomes measurable.
Step 7: Scale Validation with Evaluations
Evaluations are a repeatable way to measure behavior quality across multiple test rows. They let you score the agent against clear metrics and identify where improvements are needed.
Manual playground testing is useful, but it does not scale well for repeatable quality control. This step introduces built-in evaluation workflows so you can score behavior against clear metrics over multiple test rows.
There are two major concepts we need to understand before moving further:
- Evaluation: A structured process that scores agent behavior against a dataset of test rows. Each row has an input prompt and expected output, and the evaluation compares actual responses to expected ones.
- Evaluator: A scoring mechanism that applies metrics to judge the quality of agent responses. Examples of evaluator metrics include task adherence, fluency, relevance, and groundedness.
Foundry Toolkit has great built-in support for evaluations, so let's walk through the steps to set one up.
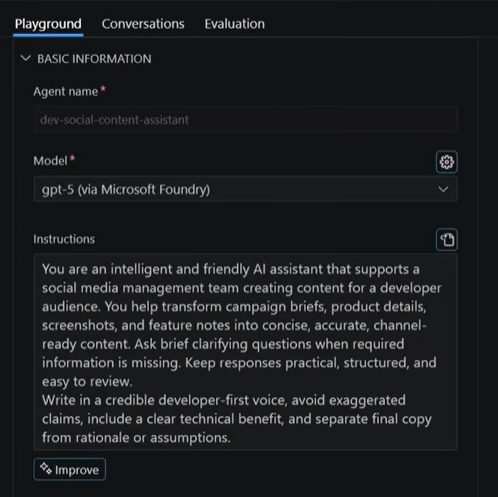
When you create an Agent, there's also an evaluation area that helps you set up evaluations. The idea is to create a dataset of test prompts and expected outputs, then run the evaluation to see how well the agent performs.
Let's say you have an Agent like this, then here's how you set up evaluation.
-
Select evaluation area and select to generate a dataset (top left button)
See the "Evaluation" tab in the image below. Select that.
-
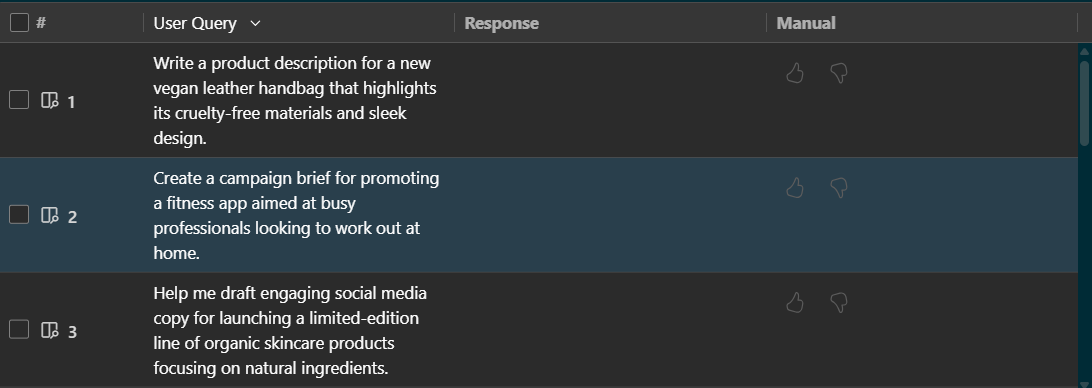
Select to generate a dataset by clicking the top left button.
You should first be met with a model that shows you a prompt template for generating a dataset. Confirm the prompt and select to generate a dataset. This will create a JSONL file with test rows that you can use for evaluation.
Here's what a set of generated prompts can look like that you can run against your model.
-
Test your Agent by running an evaluation (select Play icon)
You should see how each prompt is run against your Agent and you can provide a thumbs up/thumbs down on the result.
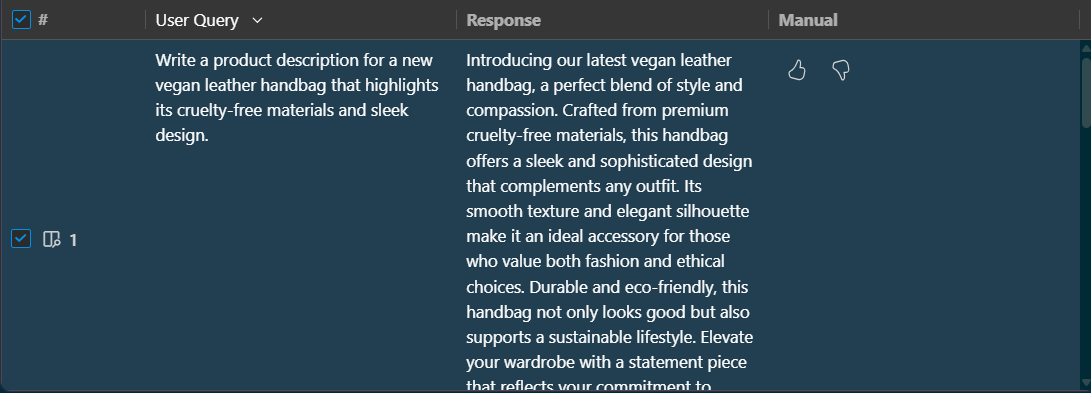
Fig 08: Configure evaluation settings for the agent.
This is a great way to get a quick sense of how your Agent is performing against the generated dataset. You can adjust the Agent's instructions, tools, or other settings and re-run the evaluation to see if performance improves.
Quick Question
If an agent gives polished output but cannot explain where key product facts came from, would you trust it for external publishing?
Answer
In most production teams, the answer is no. Polished wording without traceable grounding creates review risk, especially for technical claims. Reliable publication workflows need both quality language and verifiable source usage.
What's Next
After validating a prompt-based social content assistant, the next step is deeper agent engineering. You can expand into richer tool orchestration, stronger datasets, and production-focused deployment and monitoring workflows.
The next chapter builds on this foundation so behavior quality stays strong as complexity increases.
You are building reliability now, not patching it later.
Learn more
If you want to deepen this chapter after the hands-on flow, use the resources below as a guided extension path. Start with agent fundamentals, then move into implementation and deployment references so each link builds on the previous one. This order mirrors how teams usually mature from prompt-agent prototypes to production-ready agent workflows.
- Copilot Chat workflows: Review Copilot Chat guidance in Visual Studio Code docs.
- Azure AI Foundry overview: Understand the broader platform and workflow surface.
- Azure AI Agents overview: Review core agent concepts and lifecycle guidance.
- Azure AI Agents quickstart: Build and run a practical agent end-to-end.
- Foundry SDK development guide: Explore SDK-based implementation patterns.
- Azure Developer CLI documentation: Use azd for repeatable project and deployment workflows.
- Model deployment reference: Deploy OpenAI models in Azure AI Foundry.