Building a Hosted Agent with GitHub Copilot and Microsoft Foundry
Low-code agents are great for proving behavior quickly, but most teams eventually need stronger control over code, deployment, and integration. In this chapter, we move into a code-first workflow and build a hosted agent that can be developed locally, debugged with tooling, and deployed into Microsoft Foundry.
By the end, you will have a practical blueprint for going from prompt idea to production-oriented hosted execution.
This is where agent development starts to feel like real engineering.
Every part of this flow is useful on its own. The real magic happens when scaffold, debug, tools, and deploy all connect into one repeatable system.
Problem Framing: Code-First Agents Improve Operational Reliability
The biggest shift in this chapter is not just writing code instead of prompts, it is moving to an operationally reliable lifecycle. In low-code mode, behavior can be validated quickly, but deployment shape, tooling integration, and debugging depth are often constrained.
In code-first mode, you gain repeatability: the same repo defines runtime behavior, tool wiring, and deployment flow.
One repo. One source of truth. Fewer surprises.
An easy way to see the value is to compare how issues are diagnosed. In a code-first workflow, traces, config, and source changes can be reviewed together, which usually shortens time-to-fix when behavior drifts in hosted environments.
Prerequisites
Before we start, make sure your environment can support both local debugging and hosted deployment. This chapter combines GitHub Copilot CLI, Foundry Toolkit, and Azure deployment assets, so missing setup usually slows things down in the middle.
If you validate these prerequisites first, the rest of the chapter stays focused on agent engineering, not environment troubleshooting.
- Editor and extension: Visual Studio Code with Foundry Toolkit installed.
- GitHub Copilot access: GitHub Copilot available in Visual Studio Code and terminal workflows.
- Cloud context: An Azure subscription and Microsoft Foundry project.
- Model deployment: A GPT-5 model instance already deployed in your project.
- CLI readiness: Azure Developer CLI and ability to sign in to Azure.
What You Will Learn
In this chapter, you create a code-based social campaign assistant for developer-focused content creation. Unlike a prompt-only prototype, this version is source-controlled, inspectable, and deployable as a hosted agent.
Think of it as the bridge between experimentation and production-ready team workflows.
You will learn how to:
- Scaffold an agent project: Generate a coded project with GitHub Copilot CLI prompts.
- Attach reusable tools: Configure a Foundry toolbox with Microsoft Learn MCP and web search.
- Run a local runtime loop: Use an HTTP-based local agent service for invoke and debug cycles.
- Deploy to a hosted target: Publish to a managed hosted agent in Foundry.
Before we get hands-on, it helps to anchor the practical reason teams choose this model.
Why Move to a Code-Based Agent
Teams choose coded agents when they need deeper control than a low-code builder can provide. That usually includes business-specific logic, deterministic configuration files, repeatable deployment, and direct integration with application code.
In other words, code-based agents are not about complexity for its own sake. They are about control, reliability, and team-scale maintainability.
If you have ever asked, "How do we make this agent predictable across environments?" this is the workflow that answers that question.
- Control: Version prompts, runtime settings, and dependencies in source control.
- Extensibility: Add custom logic and richer tool orchestration patterns.
- Repeatability: Reproduce environments through config and infrastructure files.
- Production fit: Deploy and operate through a hosted agent lifecycle.
Step 1: Scaffold the Solution with GitHub Copilot CLI
Start by launching GitHub Copilot CLI in the terminal and describing the target solution in natural language. For this chapter, the scaffold prompt includes campaign-assistant behavior, clarifying-question behavior, retrieval tools, GPT-5 model usage, and hosted deployability.
Here's what we need to think about first.
- The prompt: Describe behavior, tools, model, and deployment intent.
- GitHub Copilot CLI: Allow GitHub Copilot to execute multi-step setup with fewer interruptions. To do this, use Autopilot mode.
Let's walk through the steps to scaffold a new agent project:
-
Open a terminal in your working folder.
-
Start GitHub Copilot CLI in that folder. Run
copilot. -
Enable Autopilot mode (/autopilot on) so setup can run with fewer interruptions.
-
Confirm you see the message Autopilot mode enabled with all permissions.
-
Enter a natural language prompt that describes the agent behavior, tools, and deployment intent.
Use this prompt from the example image:
Create a Foundry agent solution for a developer social media campaign assistant promoting developer productivity tools. The agent should ask clarifying questions, use data retrieval tools to extract the right context for the campaign and generate social post options. The agent should be configured to use a Foundry toolbox, including the MS MCP Learn server to retrieve Microsoft official documentation and the web search tool to access fresh data. It should be deployable as a hosted agent. Use a gpt-5 model instance. Open project folder when done. -
Confirm generated files are created in the intended project location.
See the example prompt below:

Fig 01: GitHub Copilot CLI scaffold prompt and generated project output.
At this point, you should already have a project skeleton on disk. Next, let's take a look at what was generated and confirm that it matches your intent.
Step 2: Review What GitHub Copilot Generated
Let's see what was generated. Here's what you should expect to see in the project folder:
- Main runtime:
main.pycontains the core assistant logic and runtime wiring. - Agent config:
agent.yamldefines behavior, hosting, protocol, and runtime settings. - Tool config:
toolbox.yamldescribes connected tools and tool endpoints. - Deployment config:
azure.yamlandinfra/Bicep templates drive provisioning and deploy.
If any file role looks unclear here, stop and resolve it before deployment. Ambiguity at this step usually becomes expensive once cloud resources are involved.
Step 3: Verify Creation and Setup of Tools
Now that you saw what was scaffolded at high level, let's dive into the tools that were setup as part of the scaffold.
In your open project, open the toolbox.yaml file and confirm that at least two tools were created: one for Microsoft Learn MCP and one for web search.
Here's what they will do for us:
- Web Search: Retrieve current web context for time-sensitive or trending information.
- Microsoft Learn MCP: Retrieve trusted product facts and documentation context.
See below how these tools are configured:
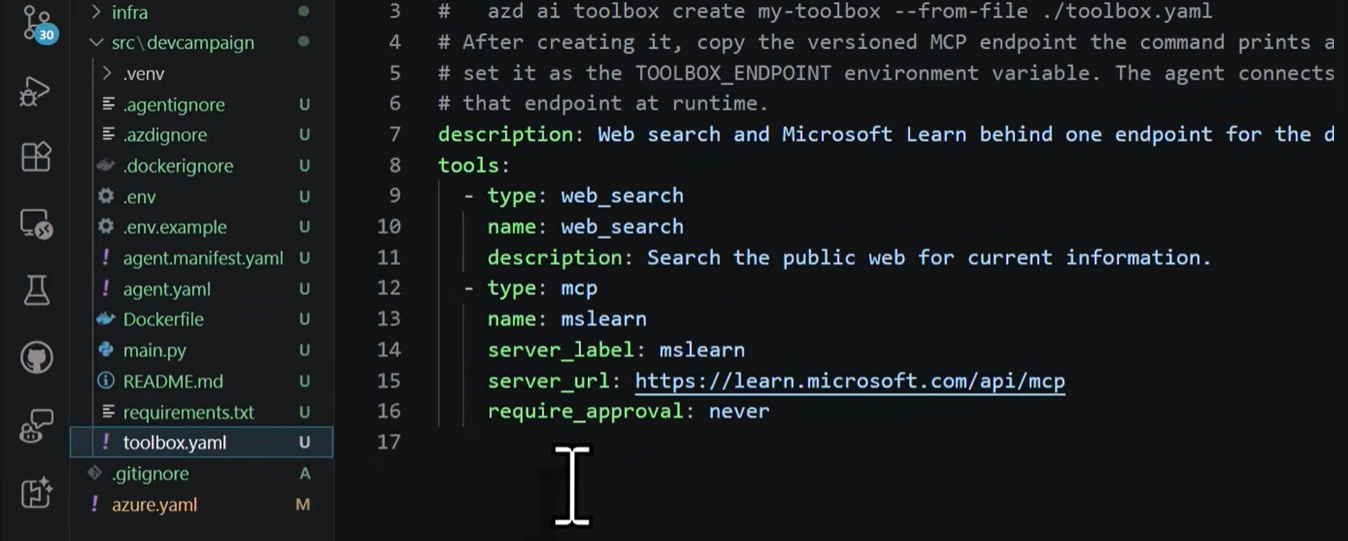
Fig 02: Foundry Toolbox configuration.
With tools attached, spend a minute reading the generated assets so you can predict behavior before you execute anything.
Step 4: Run and Invoke the Agent Locally
Before deploying, validate local behavior from terminal-based commands. This gives you a fast feedback loop and catches instruction or runtime issues before cloud resources are involved.
In the chapter flow, local invoke confirms expected clarifying-question behavior.
-
Run
azd ai agent runfrom the project root.This command installs needed dependencies, starts the local runtime, and serves the agent as an HTTP service.
-
Wait until the local runtime reports it is ready and then open a new terminal to invoke the agent.
-
Run the agent in a separate terminal with
azd ai agent invokeand a realistic campaign prompt.You should see a result similar to:

Fig 03: Local agent run and prompt invocation.
Step 5: Configure Agent Inspector Integration
To inspect and troubleshoot deeply, configure the project for Agent Inspector. The chapter flow uses GitHub Copilot to verify HTTP serving requirements, install dependencies, and prepare Visual Studio Code debug configuration.
This is where your project becomes easy to debug repeatedly, not just runnable once.
-
Set up the inspector by running a prompt in GitHub Copilot Chat that describes how to wire the local agent to the inspector.
See below image, but in short, you need to tell it to install a tool and configure tasks.json and launch.json for Visual Studio Code.
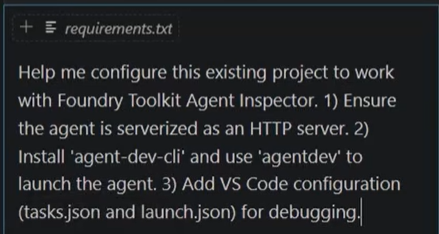
Once inspector wiring is in place, you can evaluate cause and effect directly instead of guessing from final output text.
Step 6: Debug with Agent Inspector
Now it's time to run the inspector:
Start debugging and open Agent Inspector to observe live runtime behavior. This gives you direct visibility into events, streaming deltas, metadata, traces, and tool calls.
You should see a playground you can interact with and traces on the right side. What you see should look similar to the image below.
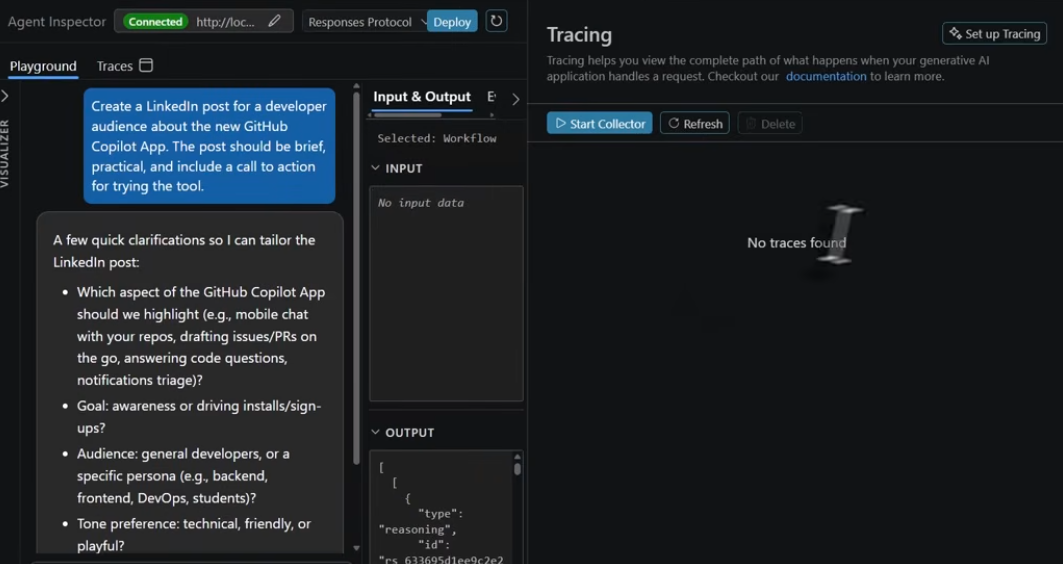
Fig 04: Agent Inspector debug session with event timeline and trace views.
This is where agent development shifts from black-box guessing to inspectable engineering.
As you test prompts, watch the event timeline and trace views to confirm that responses are progressing as expected and not silently skipping retrieval logic.
- Event timeline: Inspect response lifecycle states and token progression.
- Tool visibility: Review each tool call input, output, and invocation reason.
- Trace analysis: Use tracing views to diagnose behavior divergence quickly.
- Iteration loop: Prompt, inspect, refine instructions, and retest.
TIP: After one clean trace, force a prompt that cannot be answered well without retrieval so tool wiring gets a real stress test.
Step 7: Follow up prompt to confirm retrieval behavior
At this point, the Agent is started and it's asking you follow up questions. Now we want to answer something back while also ensuring the agent is actually using the retrieval tools we configured.
Type a prompt like so:
Highlight the mobile chat feature, drive installs, general dev audience, technical tone, #github copilot
Now you should see tools being invoked and a response being produced like so:
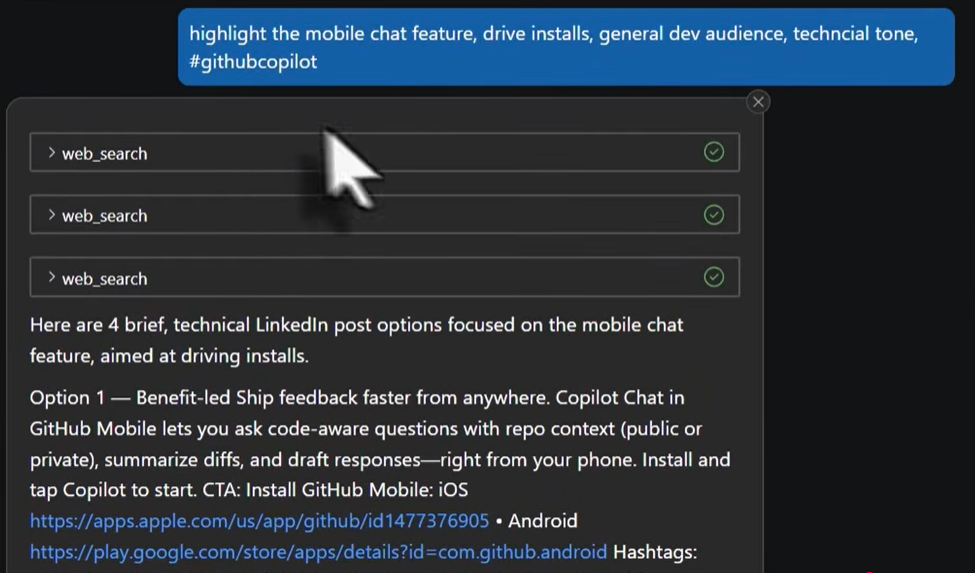
Fig 05: Follow-up prompt response with tool invocation and structured output.
Step 8: Deploy as a Hosted Agent
Next, deploy the agent to a hosted environment. This step uses the same project assets you just debugged locally, so you can be confident that behavior will be consistent.
-
Click Deploy button in the Agent Inspector in top right corner.
You should see the following screen:
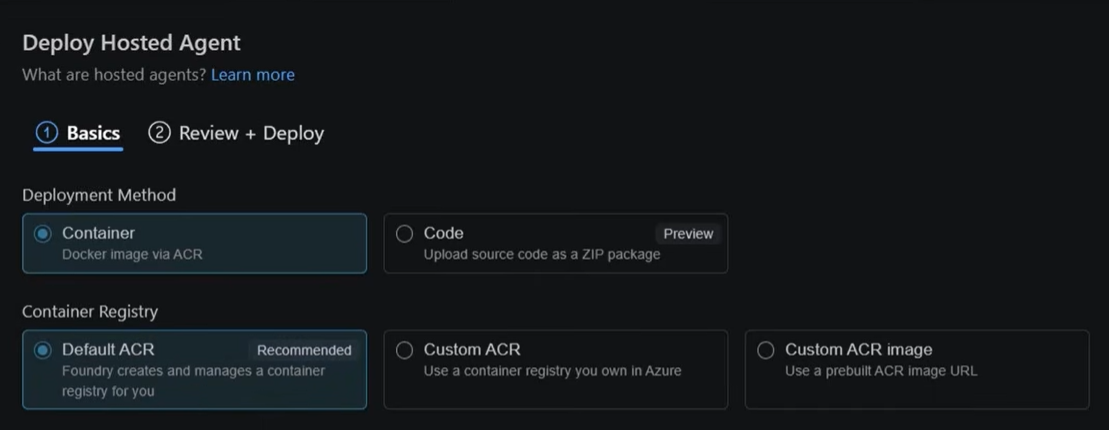
Fig 06: Deploy via Agent Inspector.
-
Click Next.
-
In Review and Deploy, choose Select Existing Dockerfile and locate it in your computer. Finally click Deploy to start the deployment process.
Quick Question
If local runs look correct but hosted responses drift, what should you check first: prompt wording, tool calls, or runtime/deployment configuration?
Answer
Start with runtime and deployment configuration plus tool-call traces, then revisit prompt wording. Hosted drift often comes from environment or integration differences that are invisible in prompt text alone. Once runtime parity is confirmed, prompt refinements become much more reliable.
What's Next
After shipping a hosted code-based agent, the next step is hardening the lifecycle for ongoing releases. Focus on stronger evaluation pipelines, tracing-driven debugging practices, and automation for deployment and regression checks as agent scope grows.
The next chapter should feel like an extension of this workflow, not a reset.
Your Challenge
Now that you have seen the full hosted flow, try a small production-style exercise on your own. The goal is to prove that you can move from scaffold to repeatable validation without guessing. Use this checklist as your action plan.
- Scaffold a new hosted agent for a different scenario using GitHub Copilot CLI.
- Add at least one grounding tool and one instruction rule for when it must be used.
- Validate behavior locally with at least two prompts that force tool usage.
- Deploy the agent and compare one local trace to one hosted trace.
- Document one behavior difference and the fix you applied.
Success target: you can explain the full path from prompt input to hosted output and show evidence for each stage.
Learn more
If you want to go deeper after this chapter, the best path is to pair platform guidance with hosted-agent deployment references. This gives you production context and practical next steps for what to do next. Use the links below as a practical continuation path.
- GitHub Copilot in Visual Studio Code: Review Copilot workflows in Visual Studio Code docs.
- Azure AI Foundry overview: Understand the broader Azure AI Foundry platform and workflows.
- Azure AI Agents overview: Review hosted-agent concepts and lifecycle guidance.
- Azure Developer CLI documentation: Use azd for repeatable setup and deployment workflows.