Using third-party agents in VS Code
Third-party agents let you use provider-specific agent experiences inside VS Code. In this guide, you will choose between local and cloud sessions, start a Claude or Codex session, and pick a permission mode that matches the task.
Prerequisites
Before you start, install VS Code, enable AI features, and sign in to GitHub Copilot. For cloud partner agents, follow the GitHub documentation to enable third-party coding agents for your account. You do not need the provider's VS Code extension for cloud partner agents. For local Codex sessions, install the OpenAI Codex extension.
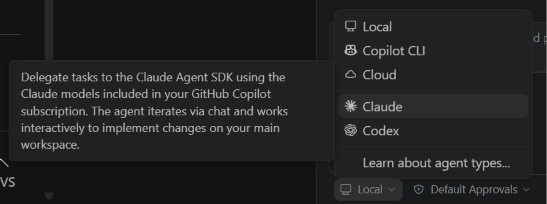
Choose the session type
Third-party agents come from providers such as Anthropic and OpenAI. VS Code uses the provider's SDK and agent harness, while keeping the session in the VS Code chat experience.
Cloud-based third-party agents are currently in preview.
Before starting, decide which kind of session fits the task.
| Session type | Use it when | Example |
|---|---|---|
| Local third-party agent | You want the provider agent to work directly in your local workspace. | Ask Claude to refactor a small module and run local tests. |
| Cloud partner agent | You want a provider agent to work in a cloud session through your Copilot setup. | Hand off a longer coding task that can run away from your editor. |
| Built-in VS Code agent | You want the standard VS Code agent with your current tool selection and customizations. | Make a focused edit using selected tools and approvals. |
Use third-party agents when you specifically want the provider's agent behavior or SDK. Use the built-in VS Code agent when the task mainly depends on VS Code tools, custom agents, tool sets, or the approval model you already configured.
Start a Claude session
Try Claude with a contained task first, such as asking it to inspect a small feature and propose a plan.
-
Open the Chat view.
-
Select New Chat.
-
For a local session, choose Claude from the Session Type dropdown.
-
For a cloud session, choose Cloud from the Session Type dropdown, then choose Claude from the Partner Agent dropdown.
-
Send a prompt that defines the desired scope.
Inspect the current branch and propose a plan for one small refactor. Do not edit files yet.
Starting with a planning prompt gives you a low-risk way to see how the provider agent approaches the repository before it changes files.
Start a Codex session
Use Codex when you want OpenAI Codex agent behavior for a coding task. Cloud Codex sessions use the cloud partner flow. Local Codex sessions require the OpenAI Codex extension and a Copilot Pro+ subscription for authentication.
-
Open the Chat view.
-
Select New Chat.
-
For a local session, choose Codex from the Session Type dropdown.
-
For a cloud session, choose Cloud from the Session Type dropdown, then choose Codex from the Partner Agent dropdown.
-
Send a focused coding task.
Find one failing or missing test around the current change, add the smallest useful test, and explain how to validate it.
Claude agent slash commands
Inside a Claude session, type / in the chat input to see the available commands.
| Slash command | Description |
|---|---|
/agents |
Wizard for creating and managing Claude sub-agents. |
/hooks |
Configure lifecycle hooks that run at key points during a session. |
/memory |
Open and edit the CLAUDE.md memory file used across sessions. |
/init |
Initialize a new CLAUDE.md memory file for the project. |
/pr-comments |
Get comments from a pull request. |
/review |
Review code changes in a pull request. |
/security-review |
Run a security review on pending changes. |
Try one command after you start a Claude session. For example, use /review when you want Claude to inspect pending changes, or use /init when you want it to create project memory for future Claude sessions.
Enable cloud partner agents
Before you can use cloud partner agents, enable third-party coding agents for your GitHub Copilot account by following the GitHub documentation.
After third-party coding agents are enabled for your account, return to VS Code and start a session with Claude or Codex from the chat agent picker.
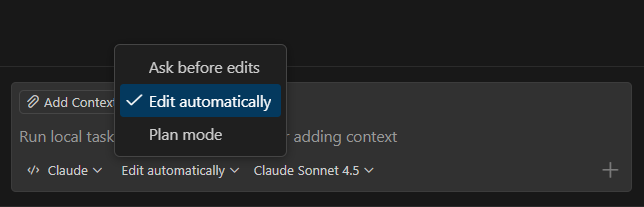
Choose the right permission mode
Claude agent runs with one of three permission modes that you can pick from the chat input:
- Edit automatically: Claude makes workspace changes autonomously as it works.
- Request approval: Claude asks for your review before making changes.
- Plan: Claude outlines its intended approach before starting work.
Pick the mode that matches the task:
- Use Plan when you are exploring an unfamiliar area or want to review the approach first.
- Use Request approval when the agent can edit files, but you want to approve changes before they land.
- Use Edit automatically for contained work where you are comfortable reviewing the final diff after the agent iterates.
For sensitive work, keep approval in the loop and combine the agent with sandboxing when possible.
The github.copilot.chat.claudeAgent.allowDangerouslySkipPermissions setting bypasses all permission checks. Only enable it in isolated sandbox environments with no internet access.
Compare the result
Run the same small planning prompt in two places:
-
Start with the built-in VS Code agent.
-
Run the same prompt in Claude or Codex.
-
Compare the plan, tool use, and amount of control you had during the session.
This comparison helps you decide when a provider-specific agent adds value and when the built-in agent is enough.
Why this matters
Third-party agents let you keep your coding workflow in one place while still using provider-specific capabilities. The practical choice is not "which agent is best," but which session type fits the work, risk, and amount of review you want.
What's next
You now have the four course topics covered. Review the tool choices, MCP server setup, plugin packaging, and third-party agent session types, then apply the smallest setup that fits your next real task.