Manage approvals and permissions
Agents in Visual Studio Code can run tools and terminal commands to complete tasks. To keep you in control, VS Code asks for your approval before the agent runs actions that modify files, run commands, or access external resources.
This article describes how to set the agent's permission level, manage tool and URL approvals, automatically approve terminal commands, and sandbox agent commands. For information about using tools in chat, see Use tools in chat. For background on why these controls exist, see Trust and safety.
VS Code provides several controls to govern what the agent can do. Permission levels are the high-level dial for the session, while the other mechanisms give you fine-grained control over specific actions.
| Mechanism | What it controls | Key setting |
|---|---|---|
| Permission levels | Overall agent autonomy for the session | chat.permissions.default |
| Tool approval | When individual tools can run | chat.tools.eligibleForAutoApproval This setting is managed at the organization level. Contact your administrator to change it. |
| URL approval | Access to specific URLs and domains | chat.tools.urls.autoApprove |
| Terminal command approval | Which terminal commands run automatically | chat.tools.terminal.autoApprove |
| Sandboxing | File system and network access for agent commands | chat.agent.sandbox.enabled This setting is managed at the organization level. Contact your administrator to change it. |
Permission levels
Permission levels are the high-level control for how much autonomy the agent has during a session. They sit on top of the finer-grained approval settings described in the rest of this article, such as tool approval, URL approval, and terminal command auto-approval.
Select a permission level from the permissions dropdown in the chat input area to choose how tool calls and approvals are handled.
The permission level applies to the current chat session, and can be changed at any time. New sessions start with the default permission level, which you can configure with the chat.permissions.default setting.
| Permission level | Description |
|---|---|
| Default Approvals (default) | Uses your configured approval settings. Tools that require approval show a confirmation dialog before they run. When in doubt, the agent asks clarifying questions. |
| Bypass Approvals | Auto-approves all tool calls without showing confirmation dialogs. When in doubt, the agent asks clarifying questions. |
| Autopilot | Auto-approves all tool calls without showing confirmation dialogs. When questions arise, the agent automatically responds to clarifying questions. |
The permission level determines whether your finer-grained settings apply. Default Approvals respects the per-tool, URL, terminal, and sandbox settings you configure in the following sections. Bypass Approvals and Autopilot override those settings and approve everything automatically.
Bypass Approvals and Autopilot bypass manual approval prompts, including for potentially destructive actions like file edits, terminal commands, and external tool calls. The first time you enable either level, a warning dialog asks you to confirm. Only use these levels if you understand the security implications. See the Security considerations for more details.
How Autopilot works
When you select the Autopilot permission level, the agent behaves differently from a standard agent session:
- Continuous iteration: the agent keeps working autonomously until it determines the task is complete.
- Auto-approve all tools: all tool calls are approved automatically, similar to the Bypass Approvals level.
- Auto-retry on errors: the agent automatically retries when it encounters errors.
- Auto-respond to questions: tools that normally block and ask your input, such as clarifying questions, auto-respond so the agent does not stall waiting for a reply. This behavior is specific to Autopilot and does not apply to Bypass Approvals.
With autopilot, the agent keeps iterating until it considers the task is complete. You can enable advanced autopilot (preview), which delegates this decision to a separate model instead. After each autopilot turn, a small, fast model evaluates whether your original request is complete. If it isn't, autopilot keeps working and uses that evaluation as guidance for the next turn.
To use advanced autopilot (preview) functionality, set
chat.autopilot.advanced.enabled
to true.
Autopilot consumes AI credits in the same way as using chat in an interactive way. Learn more about usage-based billing.
Tool approval
Some tools require your approval before they can run. This is a security measure because tools can modify files or change your environment. In addition, the data a tool returns might contain prompt injection attempts that try to manipulate the agent.
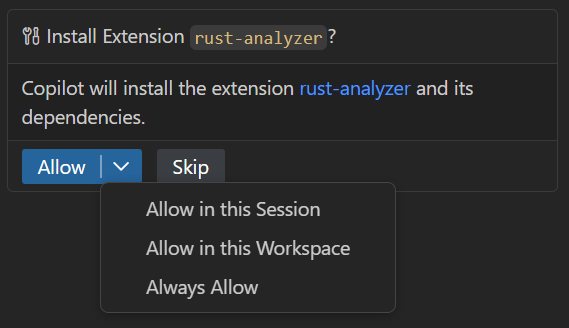
When a tool requires approval, a confirmation dialog appears with the tool name and its input parameters. Review this information carefully, then choose the scope of your approval: a single use, the current session, the current workspace, or all future invocations.
Some files in your workspace, such as .env files or configuration files, can hold secrets or sensitive settings. Learn how to require explicit approval for edits to sensitive files.
Always review tool parameters carefully before approving, especially for tools that modify files, run commands, or access external services. See the Security considerations for using AI in VS Code.
Manage tool approvals
Use the Chat: Manage Tool Approval command from the Command Palette (⇧⌘P (Windows, Linux Shift+cmd+P)) to centrally review and configure tool approvals. The Quick Pick shows all tools grouped by their source, such as an MCP server or extension.
For each tool, you can configure two types of approvals:
- Pre-approval ("without approval"): skip the confirmation dialog before the tool runs.
- Post-approval ("without reviewing result"): skip reviewing the tool's output before it is added to the chat context. This is relevant for tools that return external data, where the content might contain prompt injection attempts.
Expand a source to configure approvals for individual tools, or select the top-level checkboxes to trust all tools from a specific MCP server or extension at once.
Prevent tools from being auto-approved
When a tool asks for approval, you can choose to approve it for all future invocations, which auto-approves it from then on. For sensitive tools, you might want to remove that option so the tool always requires manual approval and can't be auto-approved by accident.
Use the
chat.tools.eligibleForAutoApproval
This setting is managed at the organization level. Contact your administrator to change it. setting to control which tools are eligible for auto-approval. Set a tool to false to always require manual approval for it.
Organizations can also use device management policies to enforce manual approvals for specific tools. Learn more in the Enterprise documentation.
Reset tool confirmations
To clear all saved tool approvals, use the Chat: Reset Tool Confirmations command in the Command Palette (⇧⌘P (Windows, Linux Shift+cmd+P)).
To review and selectively change individual tool approvals instead of clearing all of them, use the Chat: Manage Tool Approval command.
URL approval
When a tool attempts to access a URL, for example the #web/fetch tool, VS Code uses a two-step approval process to protect you from malicious or unexpected content. Each step shows a confirmation dialog in the Chat view for your review.
-
Pre-approval: approve the request to the URL
This step confirms that you trust the domain being contacted, and prevents sensitive data from being sent to untrusted sites.
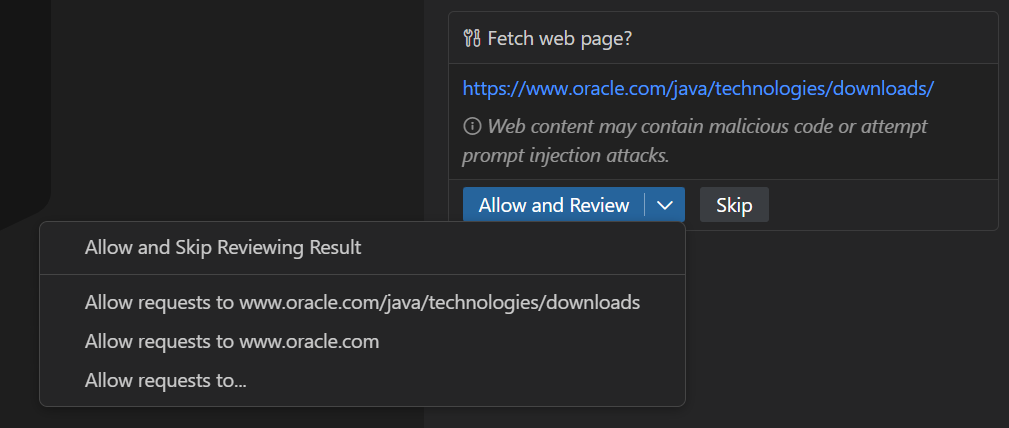
You can approve the request once, or automatically approve future requests to the specific URL or domain. Approving a request does not approve the response: you still review the fetched content in the next step. To configure both the request and response approvals at the same time, select Allow requests to.
NoteThe pre-approval respects the "Trusted Domains" feature. If a domain is listed there, requests to it are automatically approved and the response reviewing step is deferred.
-
Post-approval: approve the response content fetched from the URL
This step lets you review the fetched content before it is added to the chat or passed to other tools, which helps prevent prompt injection attacks.
For example, you might approve a request to fetch content from a well-known site like GitHub.com. But because content such as issue descriptions or comments is user-generated, it could contain harmful content that manipulates the agent.
You can approve the response once, or automatically approve future responses from the specific URL or domain.
ImportantThe post-approval step is not linked to the "Trusted Domains" feature and always requires your review. This is a security measure to prevent issues with untrusted content on a domain that you would otherwise trust.
The
chat.tools.urls.autoApprove
setting stores your auto-approve URL patterns. The value is either a boolean that enables or disables auto-approval for both requests and responses, or an object with approveRequest and approveResponse properties for granular control. You can use exact URLs, glob patterns, or wildcards.
URL auto-approval examples:
{
"chat.tools.urls.autoApprove": {
    "https://www.example.com": false,
    "https://*.contoso.com/*": true,
    "https://example.com/api/*": {
        "approveRequest": true,
        "approveResponse": false
    }
}
Automatically approve terminal commands
The agent uses a single terminal tool to run terminal commands, but that tool can run any command. Approving the terminal tool once would be too broad, so terminal commands are approved per command rather than per tool.
By default, VS Code already auto-approves a set of safe commands and blocks risky ones, such as rm and del, that always require manual approval. Use the
chat.tools.terminal.autoApprove
setting to extend or override these defaults with your own allow and deny list:
- Set commands to
trueto automatically approve them - Set commands to
falseto always require approval - Use regular expressions by wrapping patterns in
/characters
For example:
{
  // Allow the `mkdir` command
  "mkdir": true,
  // Allow `git status` and commands starting with `git show`
  "/^git (status|show\\b.*)$/": true,

  // Block the `del` command
  "del": false,
  // Block any command containing "dangerous"
  "/dangerous/": false
}
By default, patterns match against individual subcommands. For a command to be auto-approved, all subcommands must match a true entry and must not match a false entry.
For advanced scenarios, use object syntax with the matchCommandLine property to match against the full command line instead of individual subcommands.
Related settings:
- chat.tools.terminal.enableAutoApprove This setting is managed at the organization level. Contact your administrator to change it.: turn off terminal command auto-approval entirely, so every command requires manual approval
-
chat.tools.terminal.blockDetectedFileWrites
(experimental): when set to
outsideWorkspace(default), require approval for terminal commands that write files outside your workspace. Writes to the OS temporary folder (/tmpon macOS and Linux,%TEMP%on Windows) are exempt when session-level command approval is active. - chat.tools.terminal.ignoreDefaultAutoApproveRules (experimental): ignore the built-in default allow and deny rules, so only the rules you define in chat.tools.terminal.autoApprove apply.
Automatically approving terminal commands provides best effort protections and assumes the agent is not acting maliciously. It's important to protect yourself from prompt injection when you enable terminal auto approve, as it might be possible for some commands to slip through. Here are some examples where the detection can fall over:
- VS Code uses PowerShell and bash tree sitter grammars to extract sub-commands, so patterns are not detected if these grammars don't detect them.
- VS Code uses bash grammar because there is no zsh or fish grammar, so some sub-commands are not detected.
- Detection of file writes is currently minimal, so it might be possible to write to files with the terminal that would not be possible by using the file editing agent tools.
- Subverting auto approval is possible through various techniques such as quote concatenation. For example
find -execis normally blocked, butfind -e"x"ecis not, despite doing the same thing.
If prompt injection is a possibility or you're in a high-risk environment, consider enabling agent sandboxing or running VS Code within a container.
Sandbox agent commands
Agent sandboxing is currently in preview and might further evolve.
For an overview of how sandboxing works, what it protects against, and OS-level implementation details, see Agent sandboxing.
Agent sandboxing restricts file system and network access for commands executed by the agent, including Copilot CLI agent-host sessions that use the VS Code agent terminal integration. When sandboxing is enabled, terminal commands that run inside the sandbox are auto-approved without requiring user confirmation, because they run in a controlled environment.
Agent terminal sandboxing is available on macOS and Linux, including WSL2 environments.
Sandbox enablement and unrestricted network access are configured independently:
-
Sandbox enablement controls whether agent terminal commands run in the sandbox. On macOS and Linux, use chat.agent.sandbox.enabled This setting is managed at the organization level. Contact your administrator to change it., which accepts the following values:
Value Description off(default)Sandboxing is disabled. onSandboxing is enabled with file system and network isolation. All outbound network access is blocked unless domains are explicitly allowed. The Sandboxing for terminal checkbox in the permission picker maps its checked state to these values and updates the setting.
-
Unrestricted network access controls whether sandboxed commands can reach any network domain. Set chat.agent.sandbox.allowNetwork This setting is managed at the organization level. Contact your administrator to change it. to
trueto permit all outbound network traffic while keeping file system restrictions in effect. This setting applies only when sandboxing is enabled and defaults tofalse.
When file system access is restricted, the following rules apply to agent commands:
- Commands have read access to workspace folders, the sandbox runtime temp folder, and any per-command paths that VS Code adds automatically (for example, paths required by
git,node,npm,dotnet). Reads from your home directory ($HOME) are denied by default. - Commands have write access only to the current working directory and its subdirectories
- Commands run without the user confirmation prompt
When network access is restricted, the following rules apply to agent commands:
- All outbound network access is blocked unless domains are explicitly allowed.
- You can configure domain-level exceptions with chat.agent.allowedNetworkDomains This setting is managed at the organization level. Contact your administrator to change it. and chat.agent.deniedNetworkDomains This setting is managed at the organization level. Contact your administrator to change it.. Denied domains take precedence over allowed domains.
- When chat.agent.sandbox.allowNetwork This setting is managed at the organization level. Contact your administrator to change it. is enabled, all outbound network traffic is permitted and domain settings are ignored.
If the required OS dependencies for sandboxing are not installed, VS Code offers to install the necessary components. If you choose not to install them, sandboxing is not enabled.
Try commands in the sandbox before elevation
By default, when a sandboxed command fails or sandbox restrictions would block it, the agent asks for confirmation to run the command outside the sandbox. This behavior is controlled by the chat.agent.sandbox.allowUnsandboxedCommands This setting is managed at the organization level. Contact your administrator to change it. setting, which applies only when sandboxing is enabled.
Because the agent attempts the command inside the sandbox first and only surfaces the confirmation to run outside the sandbox when the sandboxed attempt fails, you avoid an elevation prompt for commands that succeed within the sandbox. If you disable this setting, commands that the sandbox blocks are not offered for elevation.
Configure file system access
Use the platform-specific file system sandbox setting to control file system access: chat.agent.sandbox.fileSystem.mac on macOS and chat.agent.sandbox.fileSystem.linux on Linux and WSL2.
You can specify allow rules for read and write access, and deny rules for both read and write access. These rules don't support glob patterns. The denyWrite and denyRead rules take precedence over allowWrite and allowRead rules.
Workspace folders, the sandbox runtime temp folder, and per-command read paths are allowed automatically, so you typically only need allowRead to grant access to tool configurations or data outside your workspace.
{
  "chat.agent.sandbox.fileSystem.mac": {
    // Allow writes to the working directory
    "allowWrite": ["."],
    // Allow reads from an additional path outside the workspace
    "allowRead": ["/Users/me/.config/myapp"],
    // Block writes to specific subdirectories
    "denyWrite": ["./secrets/"],
    // Block reads from specific paths
    "denyRead": ["/etc/passwd"]
  }
}
Configure network access
You can restrict which domains agent tools (fetch tool, integrated browser) can access by enabling the chat.agent.networkFilter This setting is managed at the organization level. Contact your administrator to change it. setting. When enabled, network access is controlled by the chat.agent.allowedNetworkDomains This setting is managed at the organization level. Contact your administrator to change it. and chat.agent.deniedNetworkDomains This setting is managed at the organization level. Contact your administrator to change it. settings. When both lists are empty, all domains are blocked.
When sandboxing is enabled and chat.agent.sandbox.allowNetwork This setting is managed at the organization level. Contact your administrator to change it. is off, these network rules additionally apply to terminal commands executed by the agent. When chat.agent.sandbox.allowNetwork This setting is managed at the organization level. Contact your administrator to change it. is on, sandboxed terminal commands can reach any domain while file system restrictions remain in effect.
Denied domains always take precedence over allowed domains. Both settings support wildcards like *.example.com.
When a sandboxed command is blocked by network restrictions and chat.agent.sandbox.retryWithAllowNetworkRequests is enabled (default), the agent asks for confirmation to retry the command inside the sandbox with unrestricted network access. The file system restrictions still apply to the retried command. If you disable this setting, the agent instead falls back to the confirmation to run the command outside the sandbox, which is controlled by chat.agent.sandbox.allowUnsandboxedCommands This setting is managed at the organization level. Contact your administrator to change it..
{
    "chat.agent.networkFilter": true,
    "chat.agent.allowedNetworkDomains": [
        "api.github.com"
    ],
    "chat.agent.deniedNetworkDomains": [
        "example.com"
    ]
}
Frequently asked questions
Can I automatically approve all tools and terminal commands?
You have several options for auto-approving tool calls:
- Permission level: select the Bypass Approvals or Autopilot permission level from the permissions picker to auto-approve all tools for the current session.
- Global setting: enable the
chat.tools.global.autoApprove
This setting is managed at the organization level. Contact your administrator to change it. setting to auto-approve all tools across all your workspaces. You can also toggle this directly from chat by using the
/yoloor/autoApproveslash command to enable it, or/disableYoloor/disableAutoApproveto disable it. The first time you enable global auto-approval, a warning dialog asks you to confirm.
Both approaches disable manual approval prompts, including for potentially destructive actions. They remove critical security protections and make it easier for an attacker to compromise the machine. Only use these options if you understand the implications. See the Security documentation for more details.
The chat.tools.global.autoApprove This setting is managed at the organization level. Contact your administrator to change it. setting applies globally across all your workspaces. Use a session-scoped permission level if you prefer to limit auto-approval to the current session.