Learning with VS Code on Chromebooks
December 3, 2020 by Alessandro Segala, @ItalyPaleAle
For the last few years, Chromebooks running Google Chrome OS have been providing an alternative to "traditional" laptops. Thanks to lots of choices, from very affordable models to high-end ones, Chromebooks are especially popular among students, who can use them for learning, completing assignments, and attending classes virtually.
While Chromebooks and Chrome OS are typically centered around the web browser, you can also enable a Linux environment that allows installing native desktop applications, including Visual Studio Code!
With VS Code running on your Chromebook, you can start coding easily and quickly in a variety of languages and frameworks. This includes languages such as Python, JavaScript and Node.js, Java, and C#, among many more!
In this article, the first of two, we'll look at how to install Visual Studio Code on a Chromebook and how to set up an environment to start coding in Python or JavaScript/Node.js. In a later post, we'll also look at how to leverage the Remote Development extensions for VS Code to connect to more powerful development environments.
What you'll need
VS Code runs on any recent Chromebook, as long as you are able to enable Linux applications via Crostini, which we'll look at how to do in just a moment.
Visual Studio Code is a lightweight editor, so you will be able to run it on low-powered Chromebooks, with a minimum of 1 GB of RAM. In addition, VS Code is now available for Linux on ARMv7 and ARM64, which means that you can run it on Chromebooks powered by an ARM chip as well!
For this tutorial, I'll be using an entry-level Chromebook, with an ARM64 CPU, 4 GB of RAM, and a 32 GB-disk. Despite the modest specs, VS Code runs just fine on this machine!
Enable Linux on your Chromebook
Before we can install VS Code on Chrome OS, we need to enable support for native Linux apps, using Crostini.
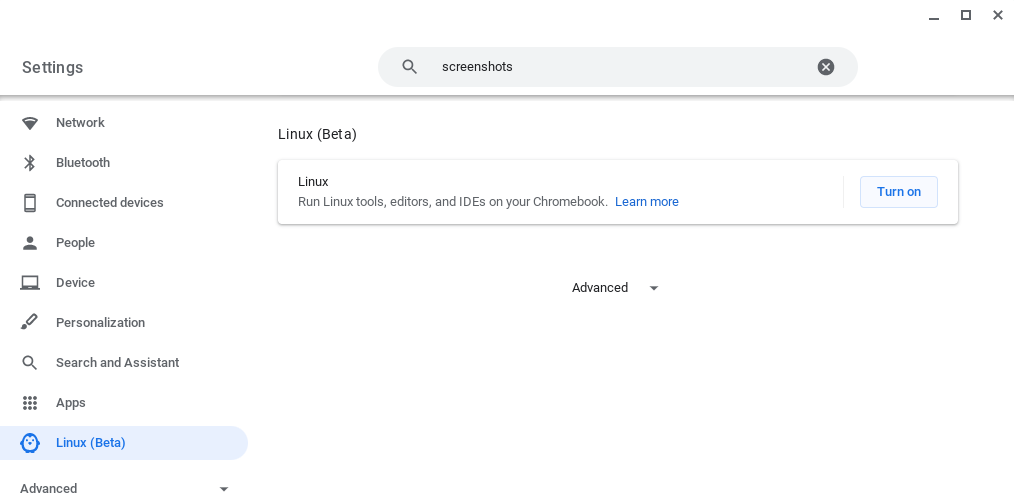
First, open your system's Settings, then look for Linux (Beta) on the sidebar. From there, turn on Linux support.
Follow the instructions on screen to configure the Linux environment (for most people, accepting the default values should be enough). Your Chromebook will then download the tools to create the Linux environment and configure it for you. Behind the scenes, this is actually creating a container running Debian 10, so you get a full Linux distribution to play with!
Once the Linux environment has been set up, you'll see a new terminal window popping up.

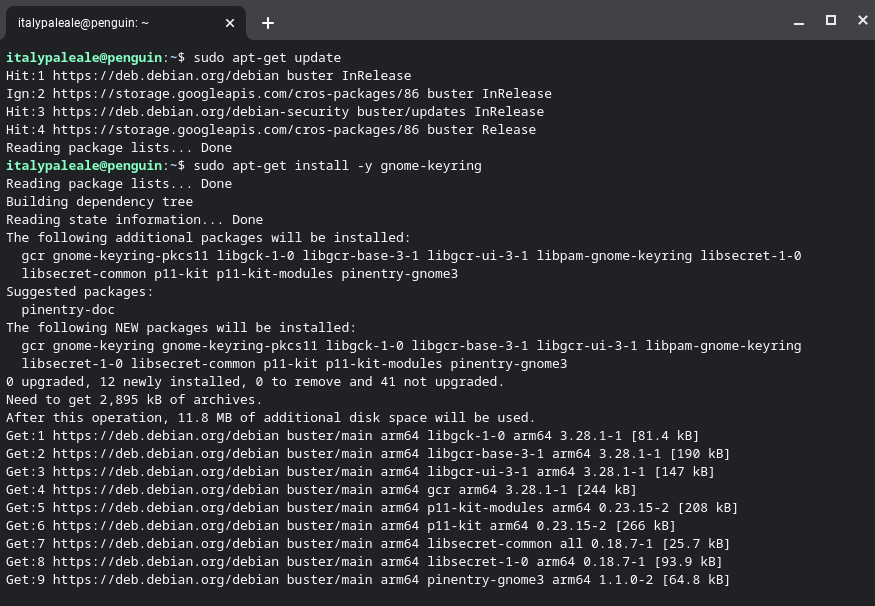
Before we can install VS Code, we need to run a couple of commands in the Linux terminal. We need to update the list of Linux packages and to install the optional (but strongly recommended) dependency gnome-keyring. In the terminal, type the following two commands (press the Enter key at the end of each command to execute them):
sudo apt-get update
sudo apt-get install -y gnome-keyring
The output will be similar to this:
As soon as the second command ends, you can move to the next step.
Install VS Code
We're now ready to install VS Code!
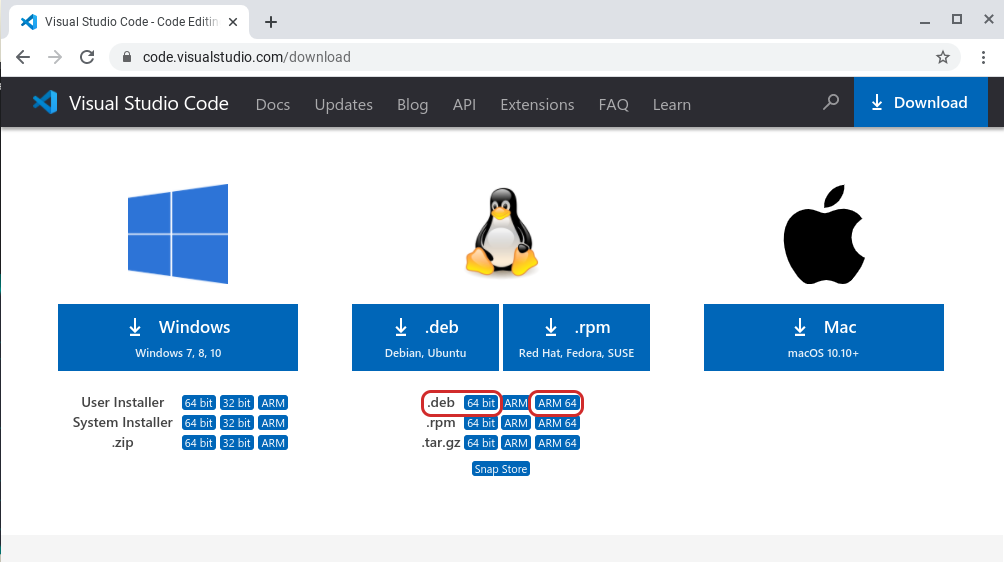
Go to the Visual Studio Code Download page. From there, you need to pick the right package for your Chromebook:
- For Chromebooks running an Intel or AMD chip, pick the .deb in variant 64 bit.
- If your Chromebook is running on an ARM64 chip (like the one I'm testing with), pick the .deb package in the variant ARM64 instead.
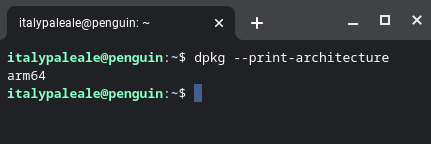
If you're unsure what kind of CPU your Chromebook is using, run the command dpkg --print-architecture in the Linux terminal to find out. You'll see either amd64 (for both Intel and AMD chips: pick the 64 bit variant for VS Code) or arm64 (pick ARM64).
After you've downloaded VS Code, you'll find the package in your Downloads folder. Double-click on the package to launch the installer:
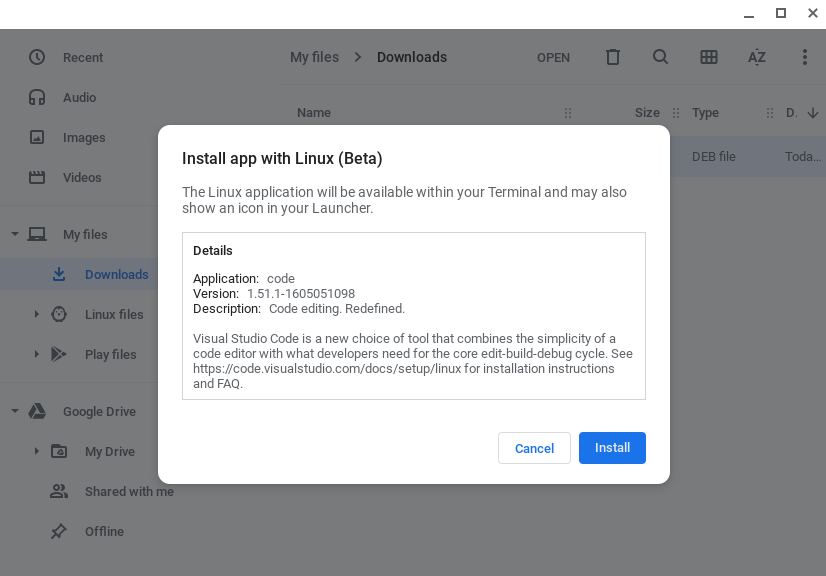
Your Chromebook will then install VS Code and all other dependencies.
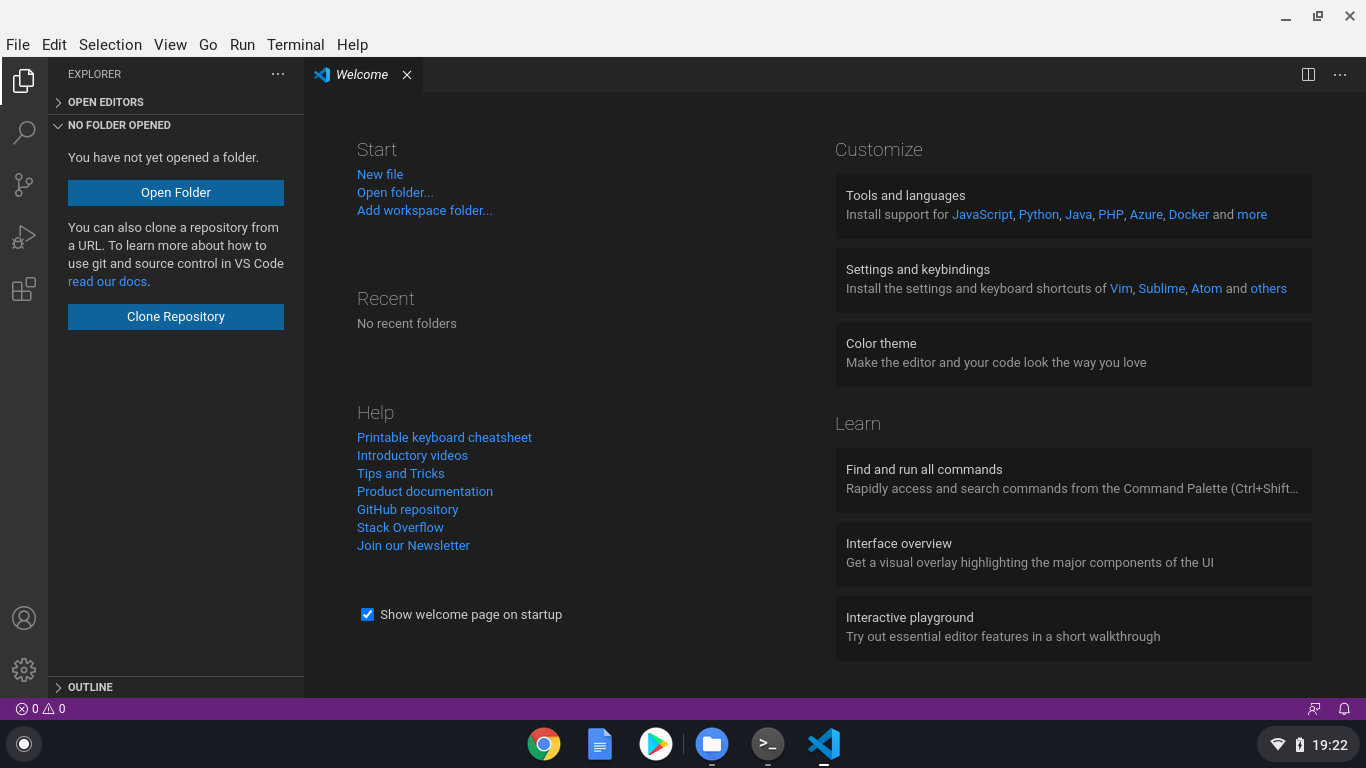
After the installation is complete, in your list of apps, you'll find Visual Studio Code inside a folder called Linux apps (along with the Linux terminal). You can now launch VS Code.

You should see VS Code running, and at this point you're ready to start coding!
If you're new to VS Code and want to know how to use the editor, here are some resources for you to explore:
- VS Code Introductory Videos: These videos will explain how to use VS Code to open files and folders, install themes and extensions, configure the editor, and more.
- Learn to code with VS Code: Our "Learn" section contains articles, tutorials, and videos for people who are new to coding and want to get started.
Code with JavaScript and Node.js
JavaScript is a very flexible programming language, that can be used to build apps running inside a web browser and on web servers with Node.js. Nowadays, JavaScript is also being used to build native desktop apps (Electron) and mobile apps (Apache Cordoba, React Native, etc.), programming Internet-of-Things (IoT) devices, and much more.
Tip: If you want to learn JavaScript, there is a free video series our colleagues made:

Visual Studio Code is a very popular editor for coding with JavaScript and Node.js (State of JS survey), and supports JavaScript natively.
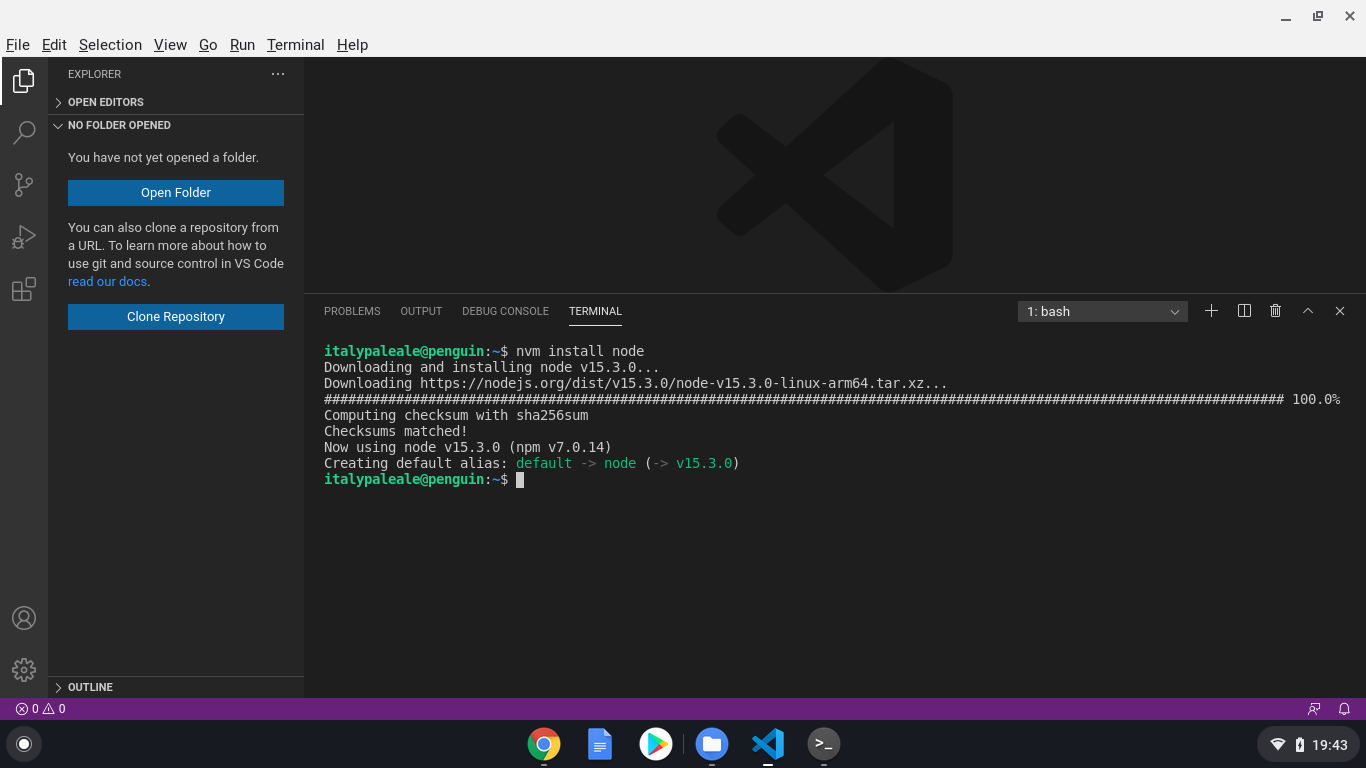
However, in order to use Node.js (and JavaScript in general) on your Chromebook, you'll have to install the Node.js runtime. To do that, we're going to use nvm, a small open-source utility that makes it easier to install Node.js and update it.
To install nvm, run the following commands inside the Linux terminal:
wget -qO- https://raw.githubusercontent.com/nvm-sh/nvm/v0.37.2/install.sh | bash
source .bashrc

After you have nvm installed, you can install the latest version of Node.js with this command:
nvm install node
Tip: Did you know that VS Code contains an integrated terminal? You can launch it from the Terminal menu and then New Terminal. VS Code is running in the context of the Linux environment, so the integrated terminal is also running in Linux.
nvm offers quite a few options to set up, update, and manage Node.js. If you're interested, you can read more in the official documentation for nvm.
After Node.js is installed, you can use the node command in the terminal (running node --version is a good way to check your Node.js installation), as well as all the built-in features of VS Code, such as the integrated task runner and debugger for Node.js and JavaScript. To learn more about using JavaScript and Node.js in VS Code, check out the VS Code documentation!
Code with Python
Python is another popular programming language, and it's especially great for beginners. With Python, you can build apps for the web, desktop, and command line. Python is one of the best-suited languages for working with data science and Artificial Intelligence (AI), and it's also used to program IoT devices, microcontrollers, and more!
VS Code is an excellent editor for coding Python and learning the language. You can use Python in VS Code both for building apps of every kind and for working with notebooks, such as those used by data scientists.
Tip: If you're looking at getting started with Python, there is a free video series for you as well:

Chrome OS already comes with the Python 3 interpreter pre-installed, but we need to install a few more packages to get the best Python coding experience. This includes pip (a dependency manager for Python), venv (for managing Python virtual environments), and some build tools for working with native packages. In the terminal, run:
sudo apt-get install -y python3-pip python3-dev python3-venv build-essential libssl-dev libffi-dev

Python support in VS Code is provided through the Microsoft Python extension. To install the Python extension, from within VS Code, use the left Activity bar to open the Extensions view (⇧⌘X (Windows, Linux Ctrl+Shift+X)), then search for "python" and install the extension provided by Microsoft:

At this point, you're ready to start developing with Python in VS Code! To learn more about using Python with VS Code, including running your code, using the integrated debugger, linting, etc., check out our documentation for Python in VS Code.
Coming next: using Remote Development
That's all for today! In this post, we looked at how to install VS Code on a Chromebook and how to get started with coding in JavaScript/Node.js and Python.
But wait, there's more. While Chromebooks can run VS Code just fine, even on lower-powered versions like the one I'm testing with, sometimes you need to use faster machines for your development, with more memory and/or a faster CPU. For example, maybe you're using an ARM-powered Chromebook but you need to run your code on a Intel/AMD chip. Or maybe you want to work with Artificial Intelligence and need access to machines with powerful GPUs.
With VS Code and the Remote Development extensions (SSH and Container), as well as GitHub Codespaces, we can solve all of the problems above–and more.
In the next part of this tutorial, you'll learn how VS Code Remote extensions and GitHub Codespaces can turn your Chromebook into a development powerhouse!
In the meanwhile, happy coding… and happy learning!
Alessandro Segala, VS Code Product Manager @ItalyPaleAle