FastAPI Tutorial in Visual Studio Code
FastAPI is a modern high-performant web framework for building APIs with Python. It is designed to make it easy to build APIs quickly and efficiently while providing features like automatic validation, serialization, and documentation of your API, making it a popular choice for building web services and microservices.
In this FastAPI tutorial, we will create a grocery list app using FastAPI. By the end of the tutorial, you will understand how to work with FastAPI in the Visual Studio Code terminal, editor, and debugger. This tutorial is not a FastAPI deep dive. For that, you can refer to the official FastAPI documentation.
If this is your first time using Python, we recommend you to start with our Python tutorial to get familiar with the language and VS Code's Python support. This tutorial is more suited for those who are already familiar with Python and want to learn how to work with FastAPI in VS Code.
The completed code project from this FastAPI tutorial can be found on GitHub: python-sample-vscode-fastapi-tutorial.
If you have any problems, you can search for answers or ask a question on the Python extension Discussions Q&A.
Set up the project
There are different ways you can set up your project for this tutorial. We will cover how you can set it up in GitHub Codespaces and in VS Code on your local machine.
GitHub Codespaces
You can set up this project to develop in GitHub Codespaces, where you can code, debug, and run your app remotely in a codespace. A codespace provides a fully configured development environment hosted in the cloud, eliminating the need for local setup. This environment includes your project's dependencies, tools, and extensions, ensuring a consistent and reproducible development experience. It streamlines collaboration by providing real-time editing, integrated version control, and easy access to debugging and testing tools, all while maintaining the security and reliability of your project.
Note: All GitHub.com accounts have a monthly quota of free use of GitHub Codespaces included in the Free or Pro plan. For more information, go to About billing for GitHub Codespaces.
To set up a codespace for this tutorial, navigate to this project's GitHub repository. This codespace contains all the necessary configurations and dependencies to quickly get started with FastAPI development.
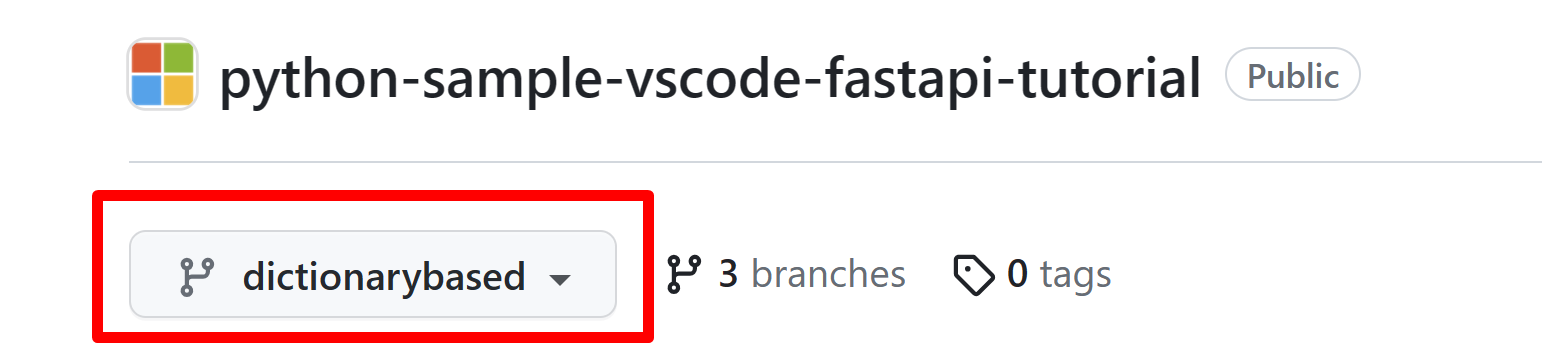
For this tutorial, select the dictionarybased branch:
Then, select Code > Codespaces > Create Codespace on <dictionarybased> branch to create and open a codespace for your project.
Once you're done, you can continue with the Replace the database section below.
Locally in VS Code
To successfully complete this tutorial in VS Code, you first need to set up your Python development environment. Specifically, this tutorial requires:
- Python 3 (check the installation guide if you don't have it installed)
- Python extension for VS Code (For additional details on installing extensions, you can read Extension Marketplace).
In this section, we will create a folder to open as a workspace in VS Code, set up a Python virtual environment, and install the project's dependencies.
-
In your file system, create a project folder for this tutorial, such as
groceries-plugin. -
Open this new folder in VS Code (File > Open Folder…).
-
When the Workspace Trust prompt shows up, select Yes, I trust the authors to allow the workspace to access necessary resources and extensions. You can learn more about Workspace Trust in the documentation.
Now, let's create a requirements.txt file that lists the dependencies we wish to install for the application. The requirements.txt file is a common practice in Python development, used to specify the libraries that your project relies on and their versions. This file helps ensure that anyone working on the project can recreate a similar development environment, making it a convenient component for maintaining consistency.
We will install FastAPI for creating the app, uvicorn to work as the server, and Redis and type-redis for handling data storage and interacting with a Redis database.
-
Create a new file in VS Code (File > New Text File or ⌘N (Windows, Linux Ctrl+N)).
-
Add the following content to it:
fastapi redis types-redis uvicorn -
Save the file (⌘S (Windows, Linux Ctrl+S)) and name it
requirements.txt. -
Create a virtual environment by opening the Command Palette (⇧⌘P (Windows, Linux Ctrl+Shift+P)) and running the Python: Create Environment command.
Note: This step may take a couple of minutes to complete.
-
When asked for the environment type, select Venv:

-
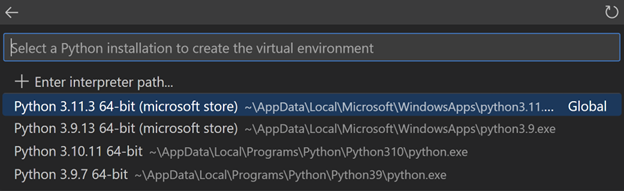
Then select the latest version of Python available on your machine:
-
Select the
requirements.txtfile from the dropdown list, so the dependencies are automatically installed, and then select OK:
The virtual environment will be created, the dependencies automatically installed, and the environment selected for your workspace to be used by the Python extension. You can confirm it's been selected by checking the bottom right corner of VS Code:

Note: If you don't find the newly created environment information on the Status bar, you can click on the Python interpreter indicator (or run the Python: Select Interpreter command from the Command Palette) and manually select the virtual environment.
Start Coding
Let's create the application!
-
Create a new Python file by using File > New File… and then select Python File.
-
Save it as
main.py(⇧⌘S (Windows, Linux Ctrl+Shift+S)) in thegroceries-pluginfolder. -
Add the following code to
main.pyand save the file:from fastapi import FastAPI app = FastAPI() @app.get("/") def root(): return {"message": "Hello World"} -
Run the code by starting up the debugger (F5).
-
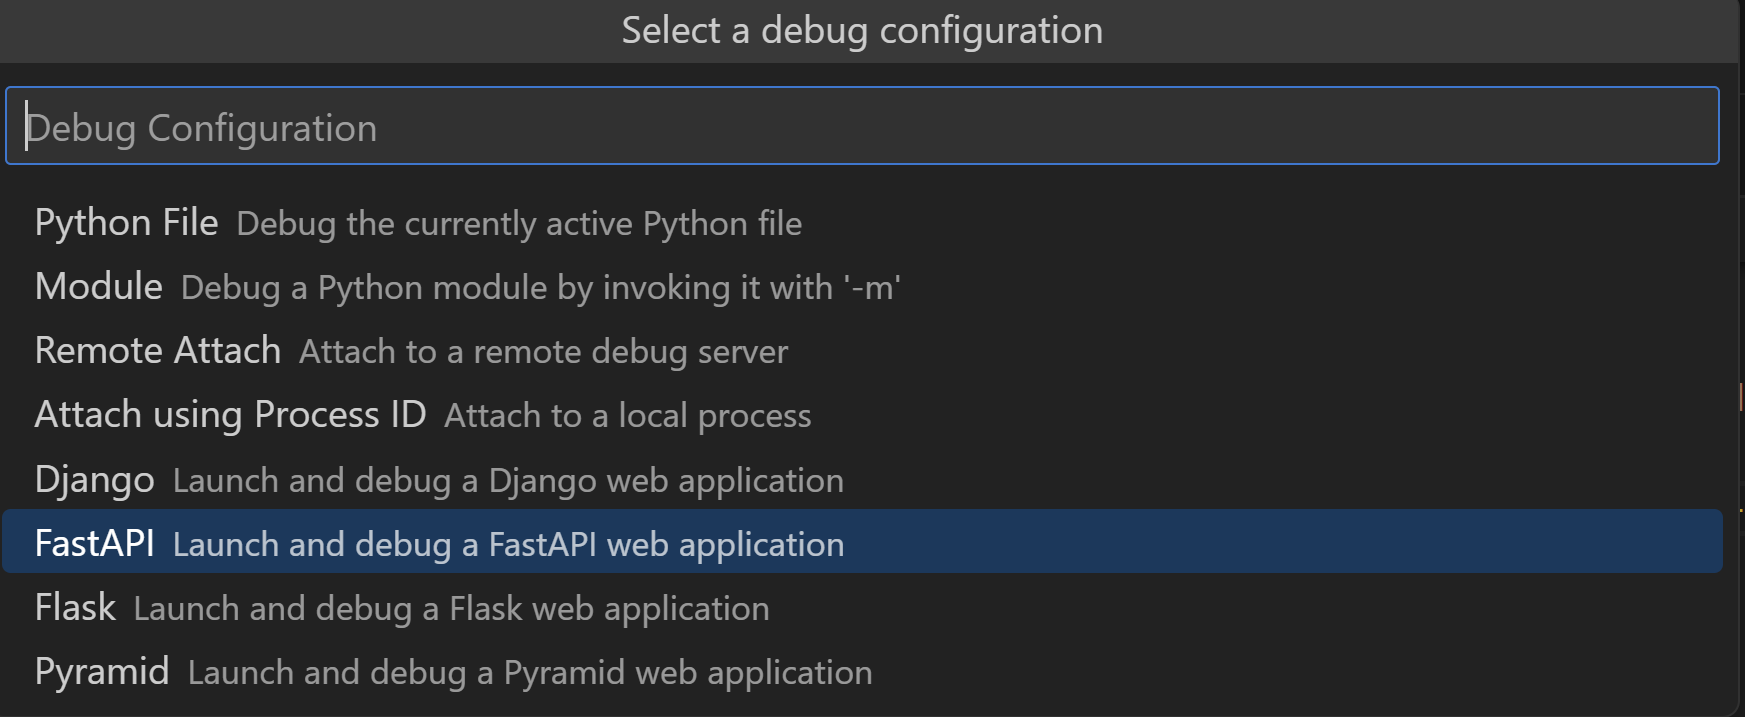
From the dropdown menu, select the FastAPI configuration option from the list:
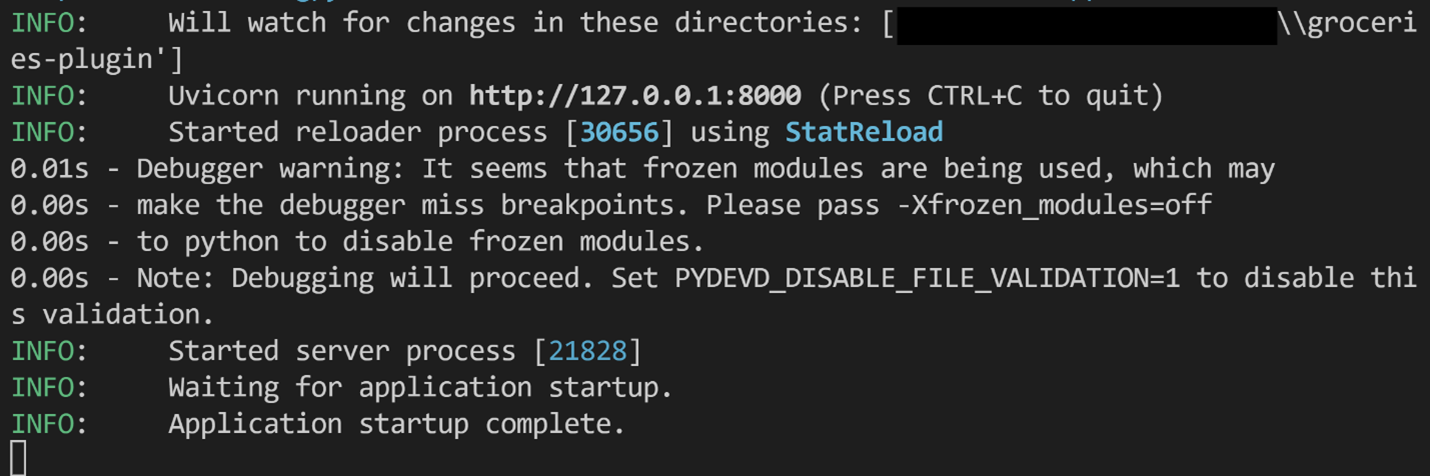
This invokes uvicorn to start the application server through the debugger and allow you to step through the source code to inspect its behavior. You should see something like the following in the terminal:
-
Ctrl+Click the
http://127.0.0.1:8000/URL in the terminal to open your default browser to that address: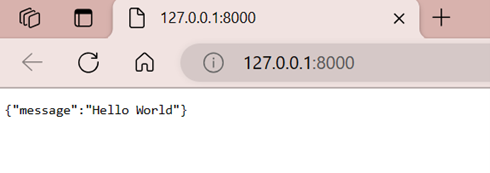
Congratulations! Your FastAPI app is up and running!
-
Stop the debugger by using the Stop button in the debug toolbar, or through ⇧F5 (Windows, Linux Shift+F5).
Create a model for grocery list items
Now that we have the FastAPI app working, we can define our grocery list items by using Pydantic, a data validation and parsing library that integrates seamlessly with FastAPI. Pydantic lets you define data models using Python classes with type hints for automatic validation and parsing of incoming data (called "payloads") in API requests.
Let's create a model for our grocery list items. We will use the ItemPayload model to define the data structure of the items to add to the grocery list. This model will have three fields: item_id, item_name, and quantity.
-
Create a new Python file with File > New File… and then select Python File.
-
Add the following lines to the file, and then save it in the
groceries-pluginfolder asmodels.py(⇧⌘S (Windows, Linux Ctrl+Shift+S)):from typing import Optional from pydantic import BaseModel class ItemPayload(BaseModel): item_id: Optional[int] item_name: str quantity: int
Pylance, the default language server for Python in VS Code, supports type hinting features that can be helpful for working with Pydantic models and FastAPI. This is because Pylance is built on top of Pyright, a static type checker for Python that can detect type errors in your code to prevent bugs and improve code quality.
The three steps below are optional, but given that FastAPI uses type hints extensively to improve code readability and validation, we can take advantage of Pylance's type checking features to catch errors early on:
-
Open the Settings editor (⌘, (Windows, Linux Ctrl+,)).
-
Search for "python type checking mode" and set it to
basicfor basic type checking. Pylance will now show diagnostics and warnings to catch simple type-related errors. Alternatively, you can set it tostrictto enforce more advanced type checking rules.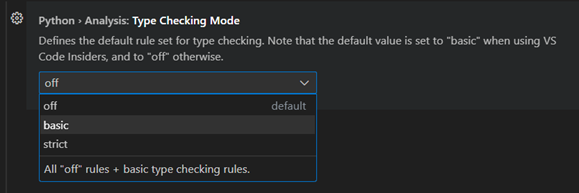
-
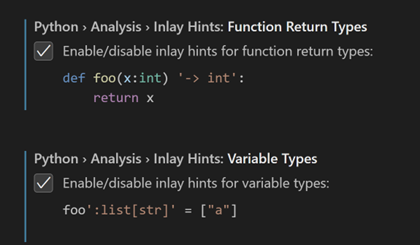
Next, search for "Python inlay type hints", and enable inlay hints for Variable Types and Function Return Types:
Create routes
Now we need a place to store the grocery list items. For simplicity, let's start with an empty dictionary.
-
First, let's import all the packages we need for the sample. Open the
main.pyfile and replace the first import line with the following ones:from fastapi import FastAPI, HTTPException from models import ItemPayload -
Now add the following line right below
app = FastAPI():grocery_list: dict[int, ItemPayload] = {}This creates a new empty dictionary that receives keys of type
int(as item IDs) and values of theItemPayloadtype.
We'll now define routes in our FastAPI application. In the context of web applications, routes are like pathways that map specific URLs to the code that handles them. These routes serve as the entry points for the different functionality within our application. When a client, such as a web browser or another program, sends a request to our application with a particular URL, FastAPI routes that request to the appropriate function (also known as route handler or view function) based on the URL, and that function processes the request and generates a response.
Let's proceed with defining routes to add and retrieve individual items, as well as return all items in the grocery list.
-
Add the following route at the end of the
main.pyfile:# Route to add a item @app.post("/items/{item_name}/{quantity}") def add_item(item_name: str, quantity: int): if quantity <= 0: raise HTTPException(status_code=400, detail="Quantity must be greater than 0.") # if item already exists, we'll just add the quantity. # get all item names items_ids = {item.item_name: item.item_id if item.item_id is not None else 0 for item in grocery_list.values()} if item_name in items_ids.keys(): # get index of item_name in item_ids, which is the item_id item_id = items_ids[item_name] grocery_list[item_id].quantity += quantity # otherwise, create a new item else: # generate an ID for the item based on the highest ID in the grocery_list item_id = max(grocery_list.keys()) + 1 if grocery_list else 0 grocery_list[item_id] = ItemPayload( item_id=item_id, item_name=item_name, quantity=quantity ) return {"item": grocery_list[item_id]}If you have enabled type hints in the previous section, you might notice Pylance adds inlay hints with the function return type, as well as the types for
item_idsanditem_id. You can optionally double-click on each suggestion to insert them into the code: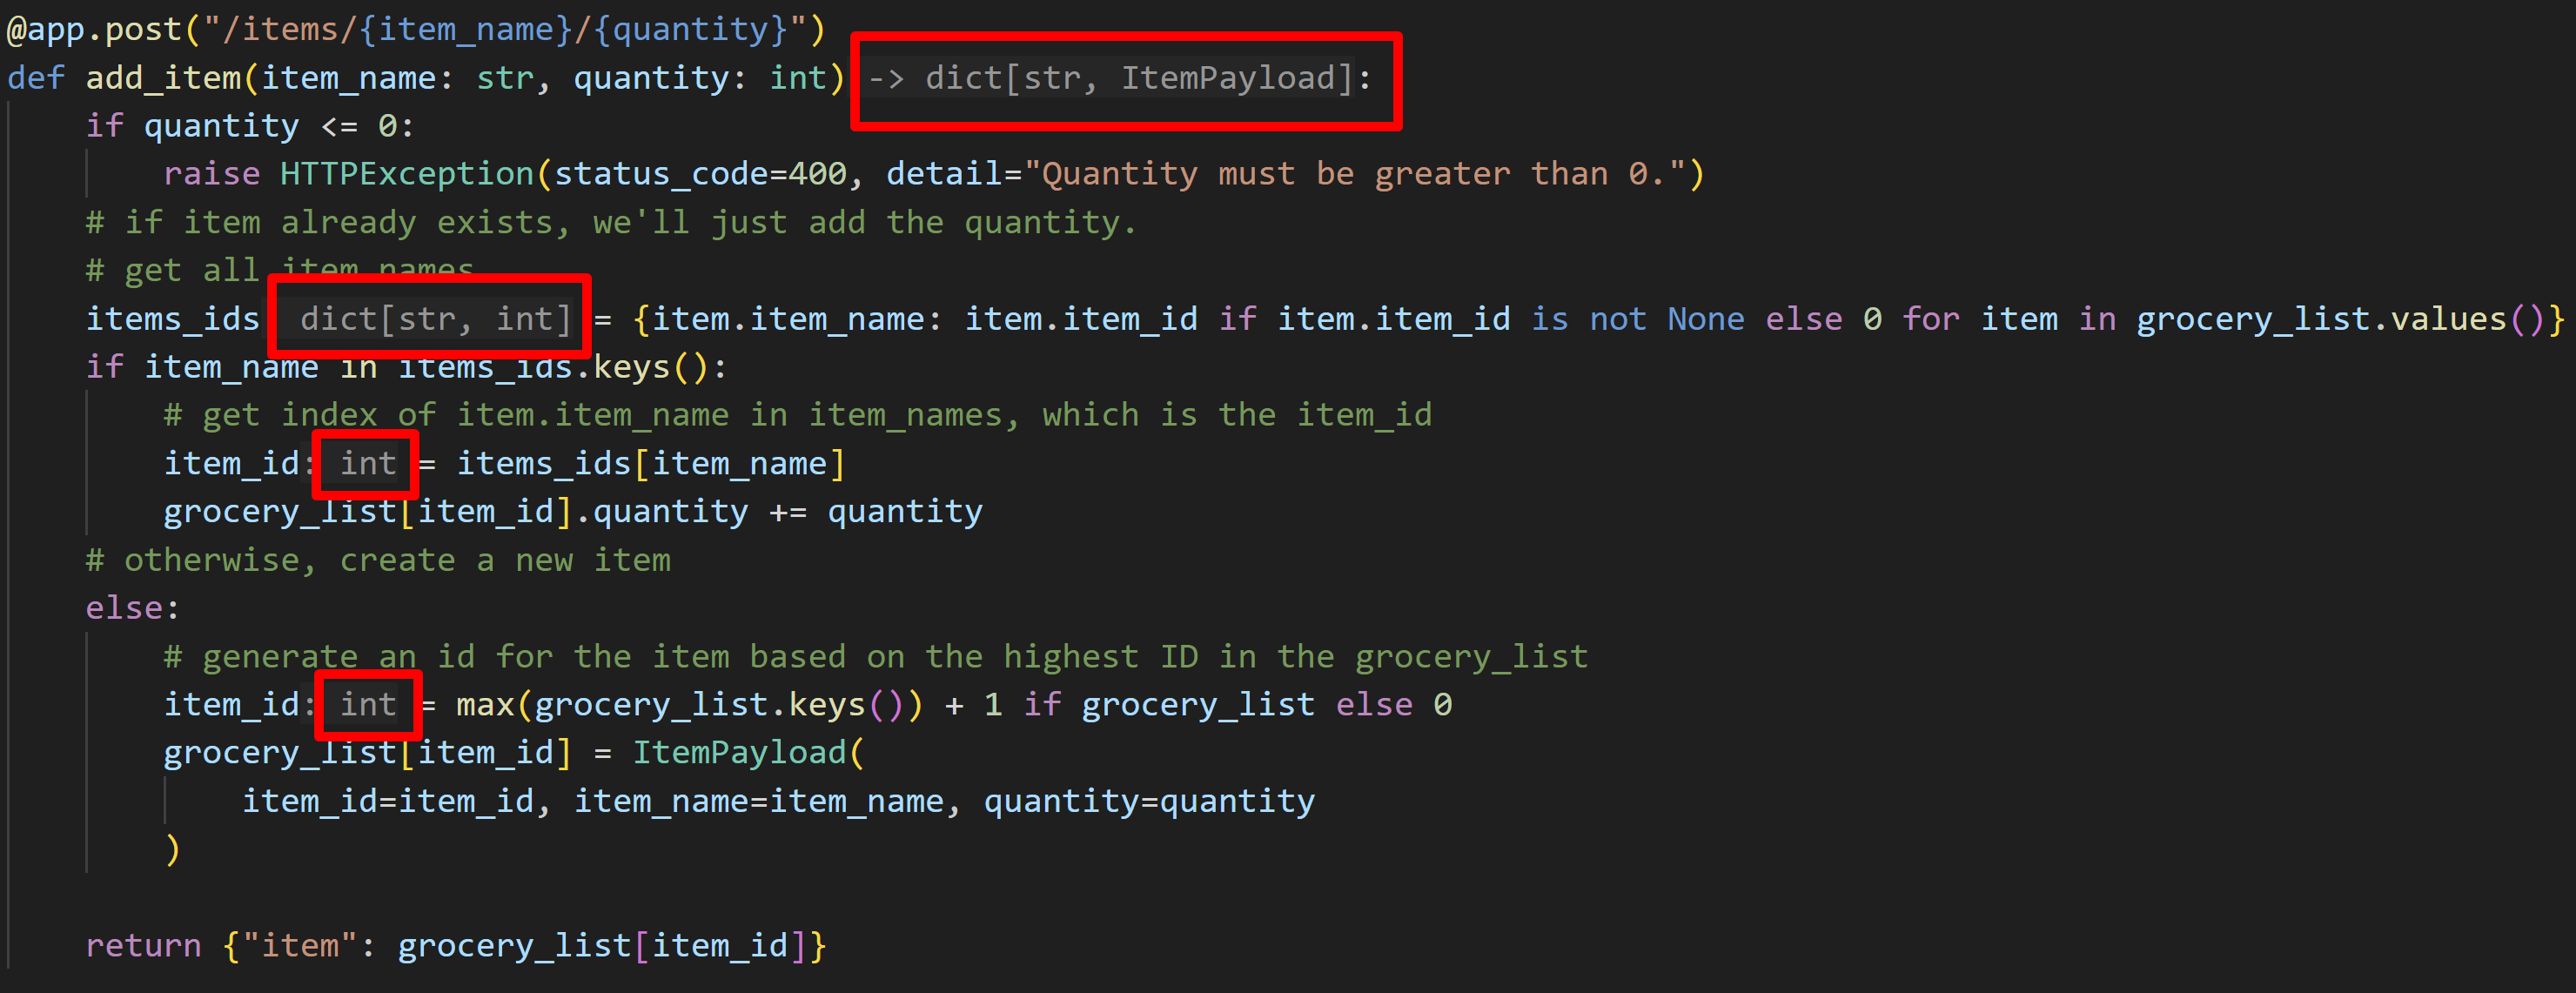
Now let's check if this route is working as expected. The fastest way to do so is to use both VS Code's debugger as well as FastAPI's /docs endpoint, which provides information about all the available API routes and lets you interact with the API to explore their parameters and responses. This documentation is generated dynamically based on the metadata and type hints defined in the FastAPI application.
-
Add a breakpoint next to the
if quantity <= 0statement, by clicking on the left margin of the line number (or F9). The debugger will stop prior to the execution of that line, so you can inspect the code line by line.
-
Start the debugger (F5), and then navigate to
http://127.0.0.1:8000/docsin the browser.There should be a Swagger interface with the two endpoints available in the app:
/itemsand root (/).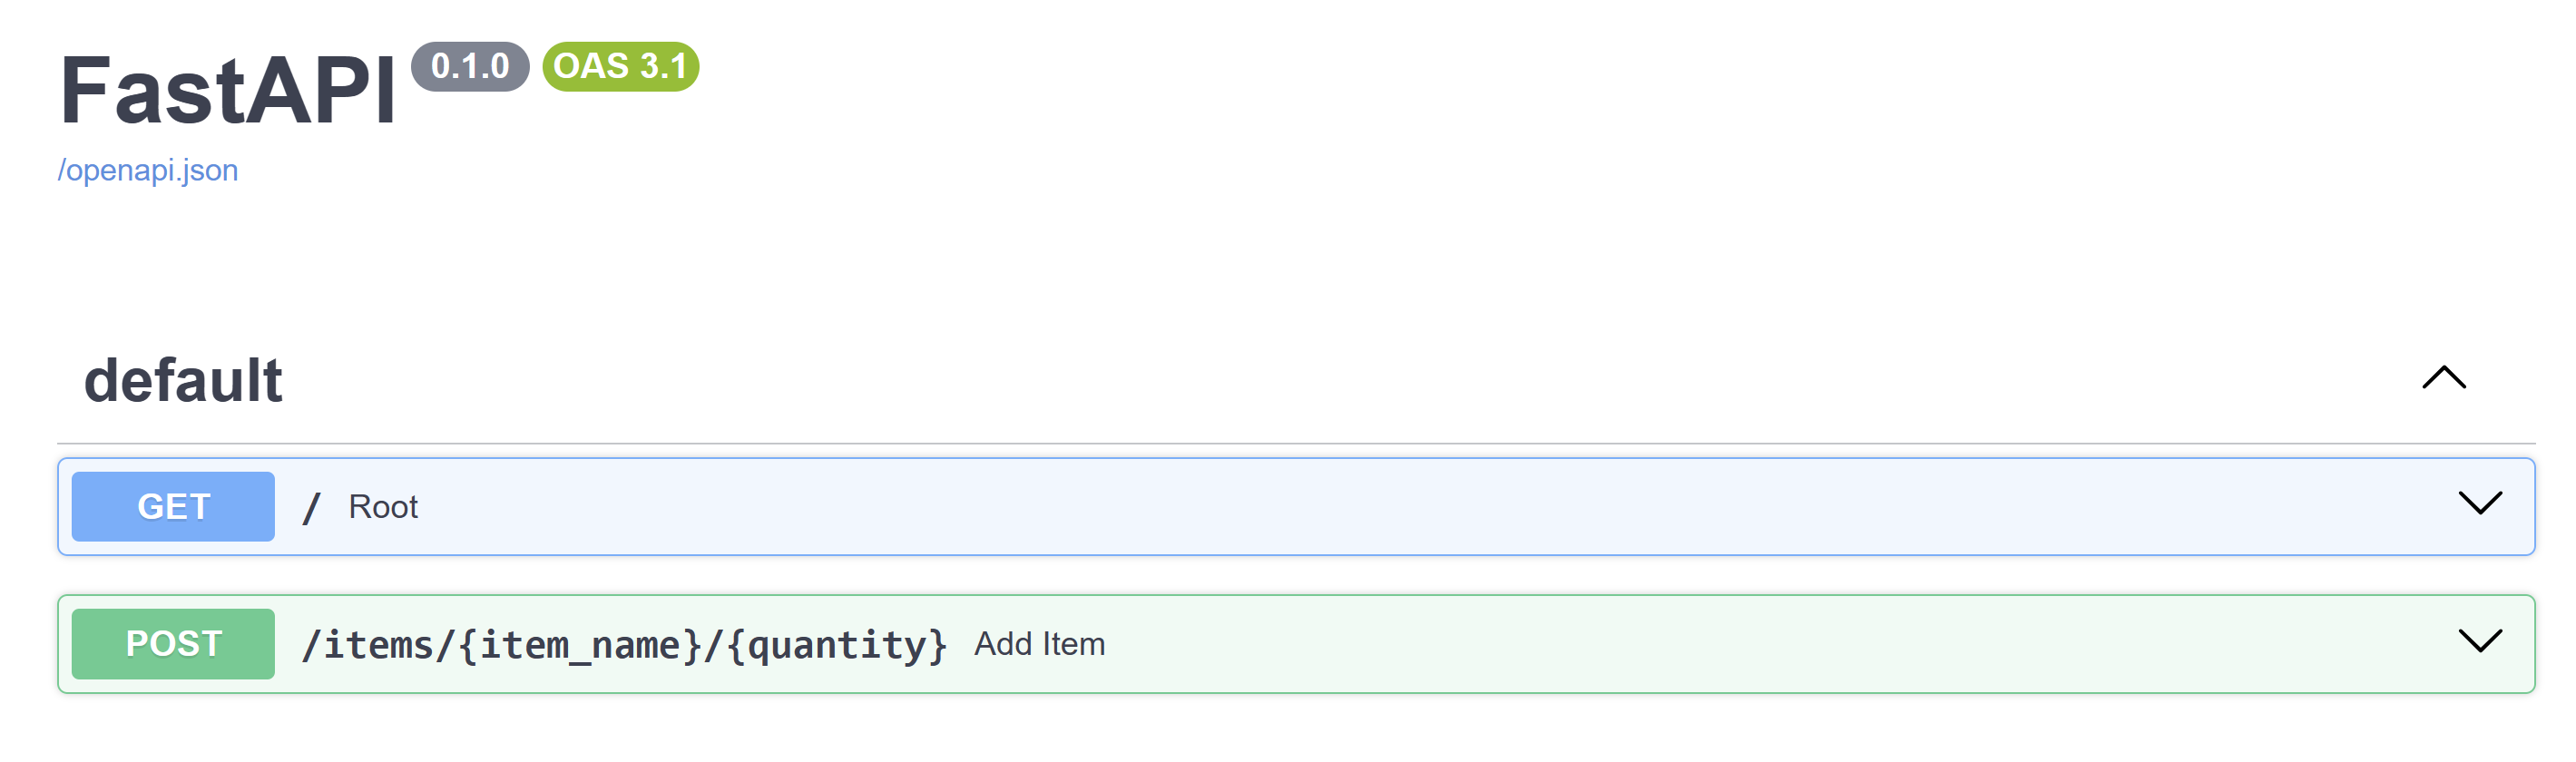
-
Select the down arrow next to the
/itemsroute to expand it, and then the Try it out button that appears on the right side.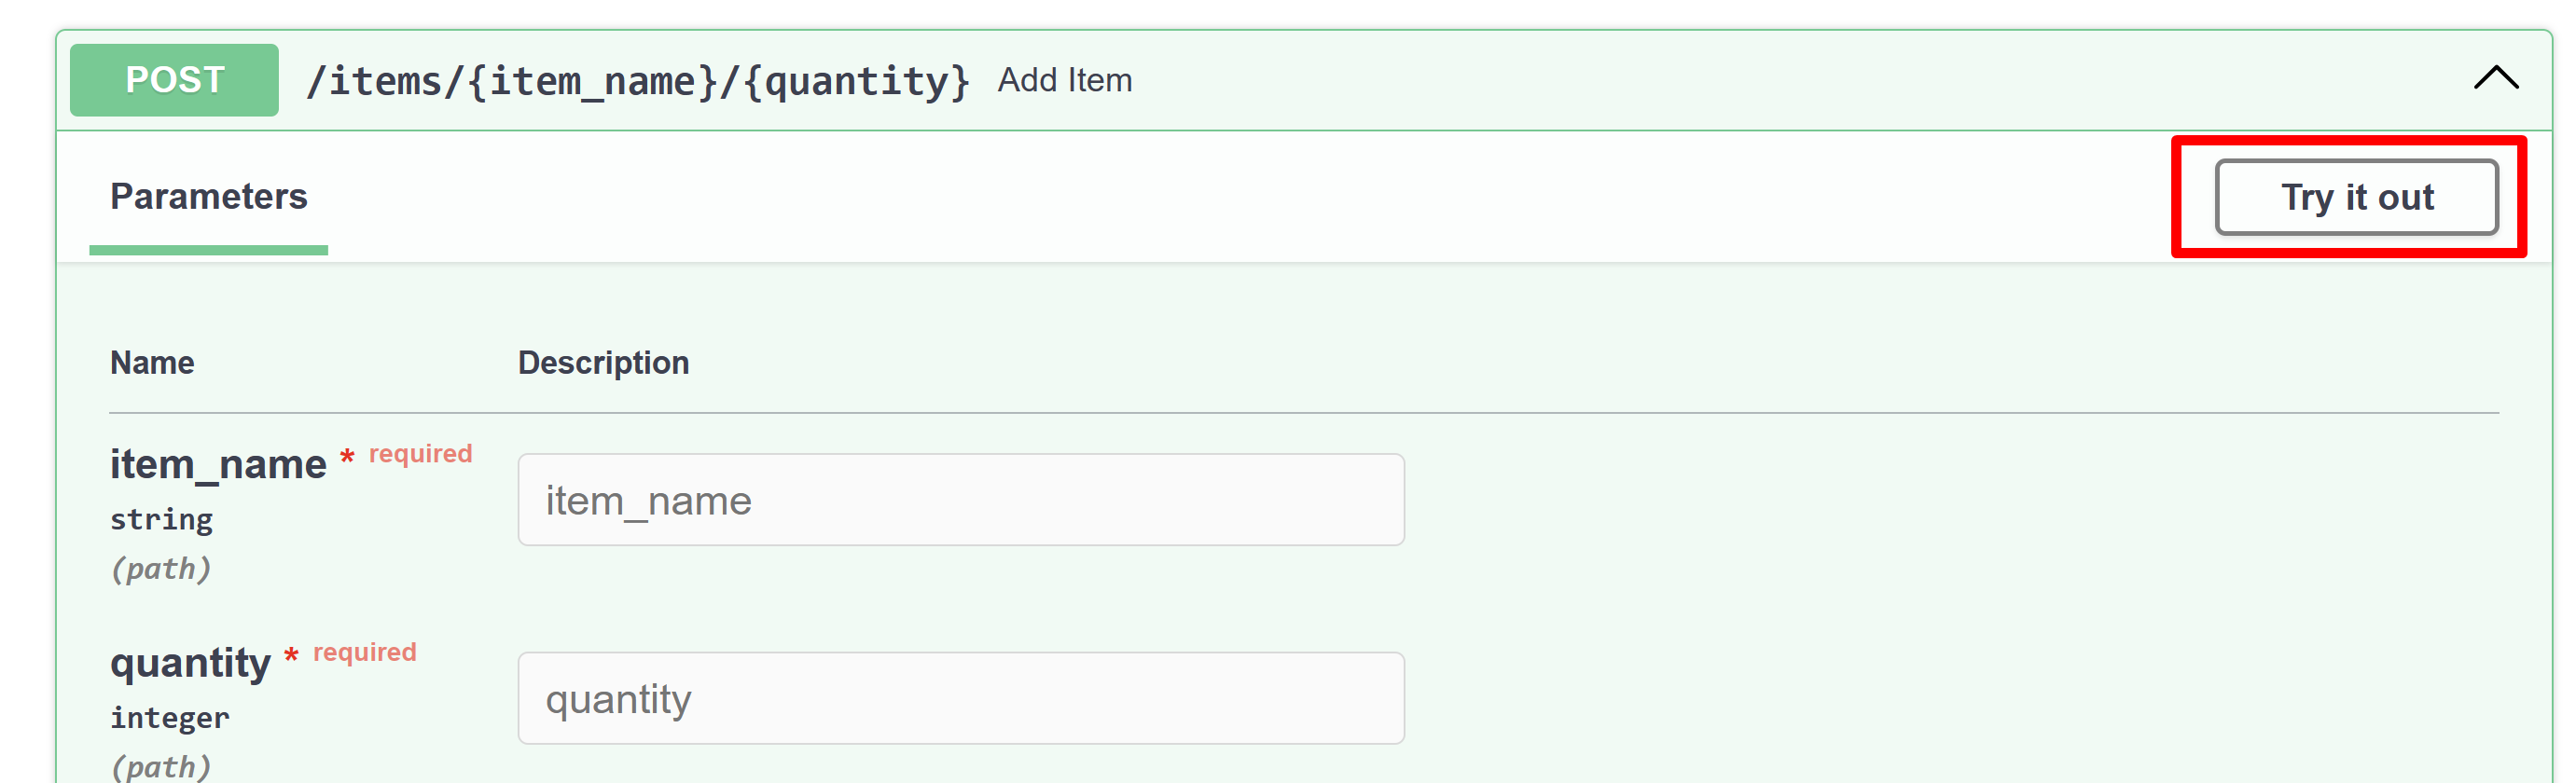
-
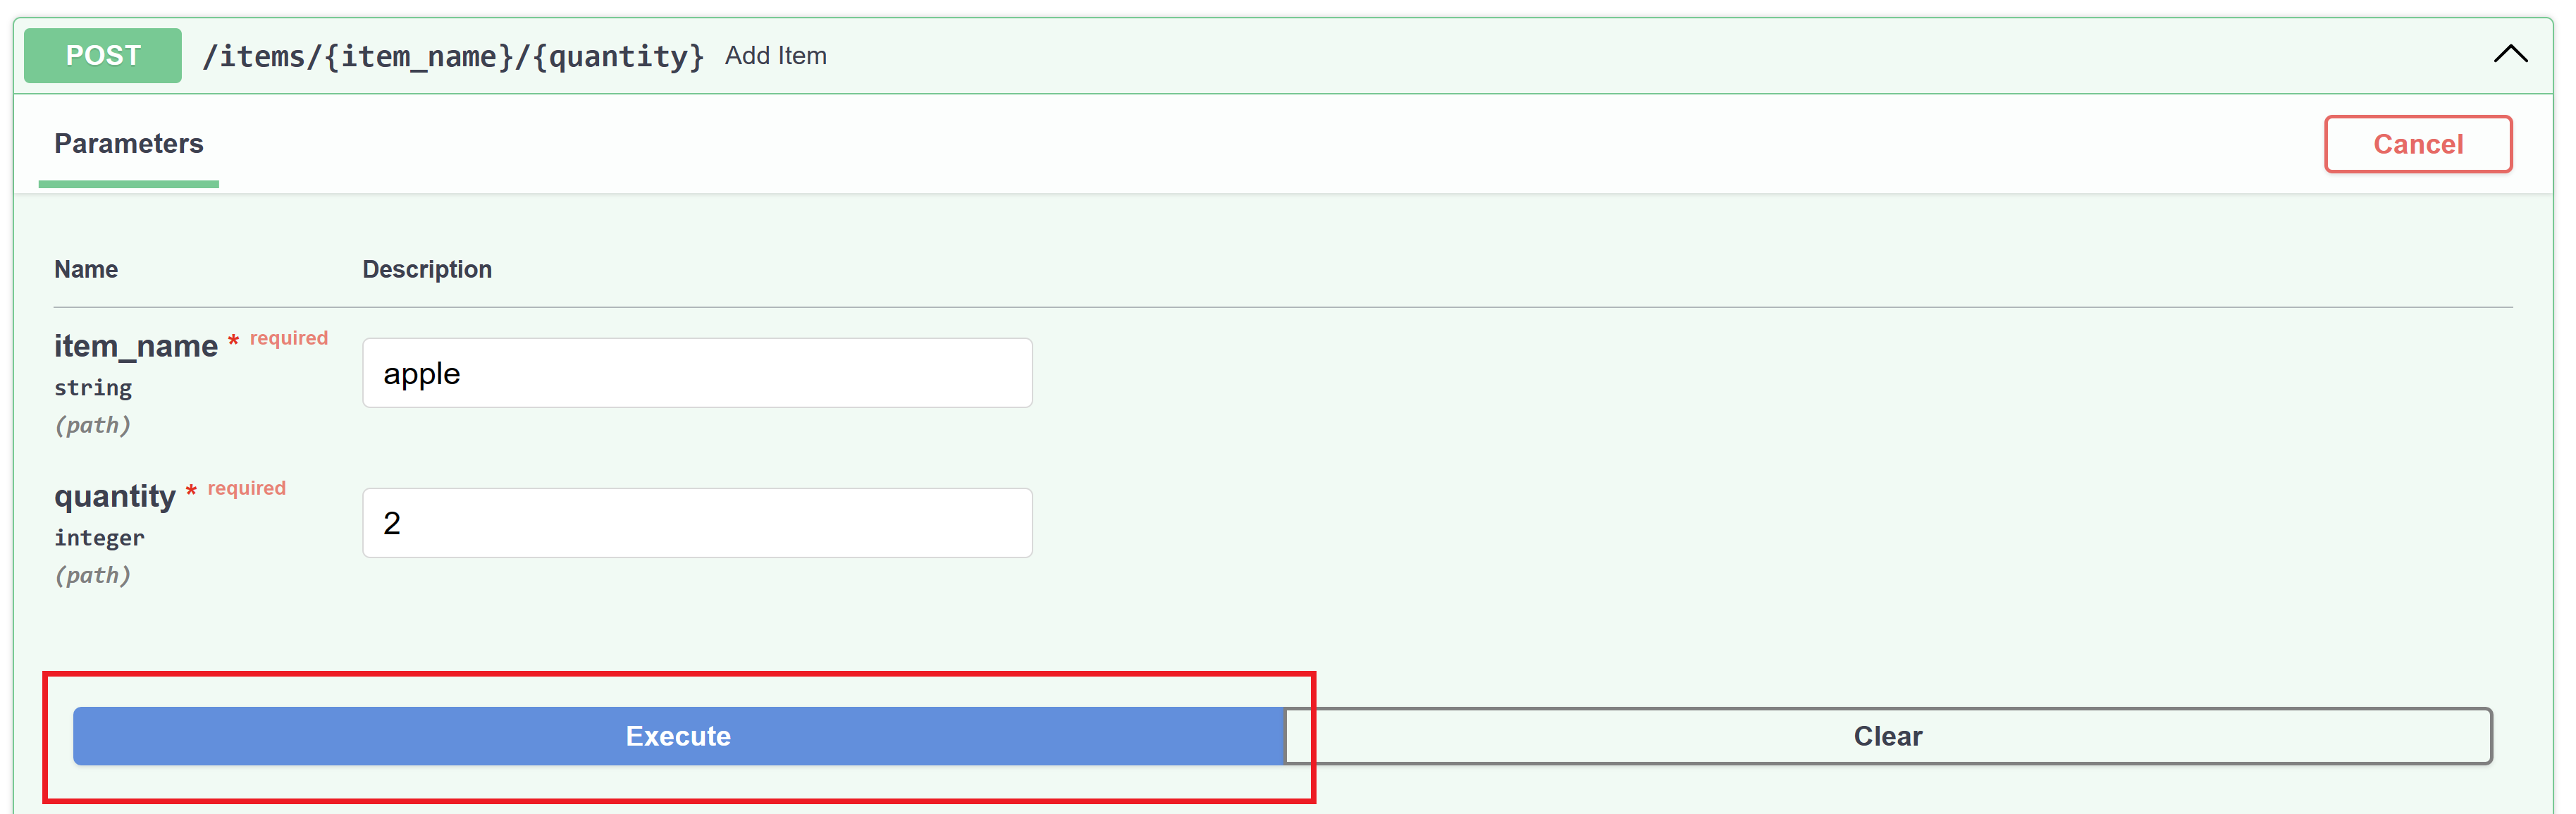
Add a grocery list item by passing a string to the
item_namefield and a number toquantity. For example, you could provide apple as theitem_nameand 2 as thequantity. -
Select Execute.
-
Open VS Code again and notice the debugger has stopped at the breakpoint you set earlier.

On the left side, all local and global variables defined at this point are displayed in the Variables window, under the Run and Debug view. In our example,
item_nameis set to 'apple' andquantityis set to 2 under the locals variable view, as well as an emptygrocery_listdictionary under the globals variable view.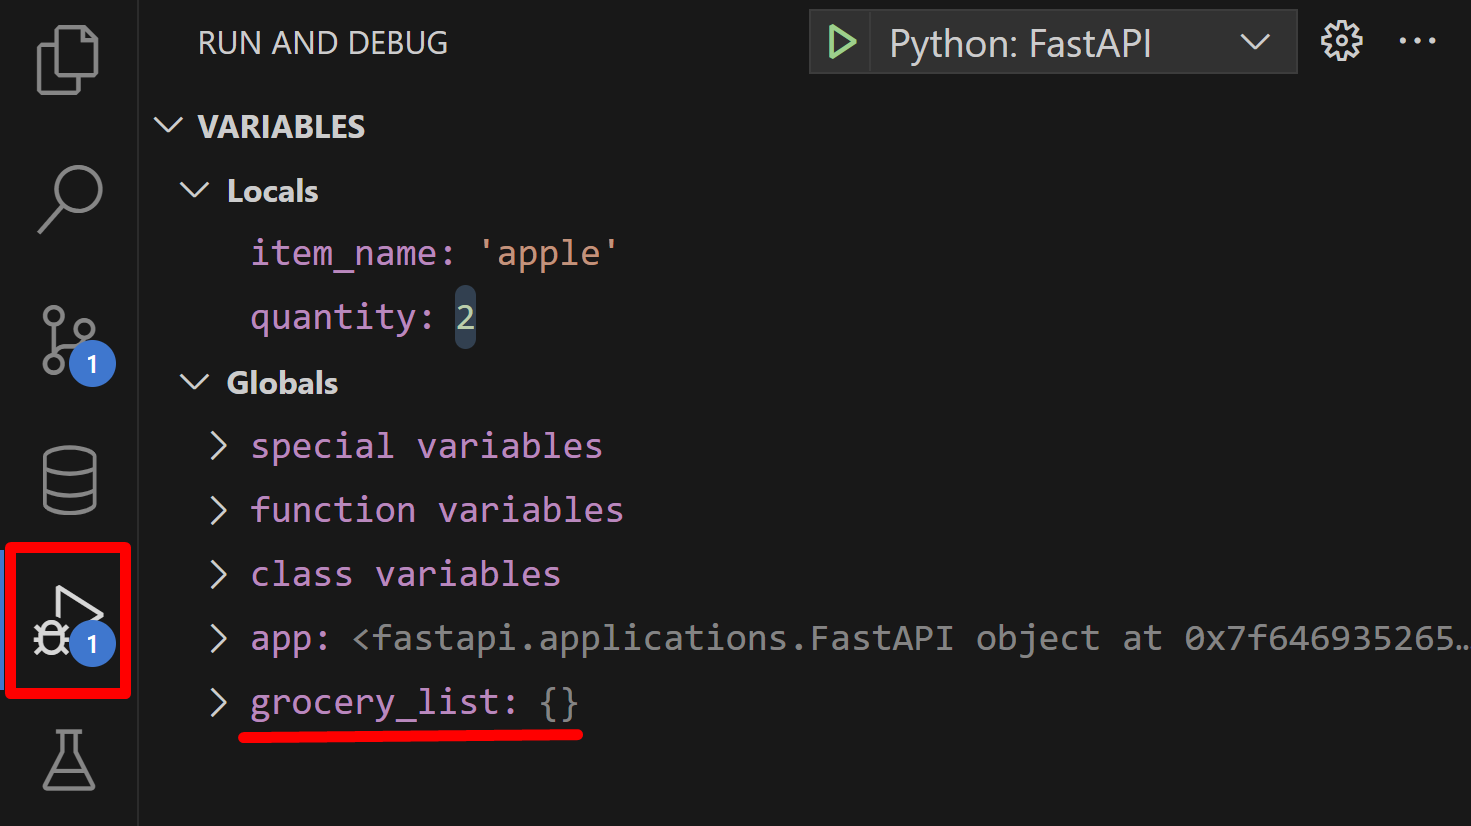
Now let's use VS Code's Debug Console to do some exploration.
-
Select the
quantity <= 0statement, right-click on the editor and select Evaluate in Debug Console: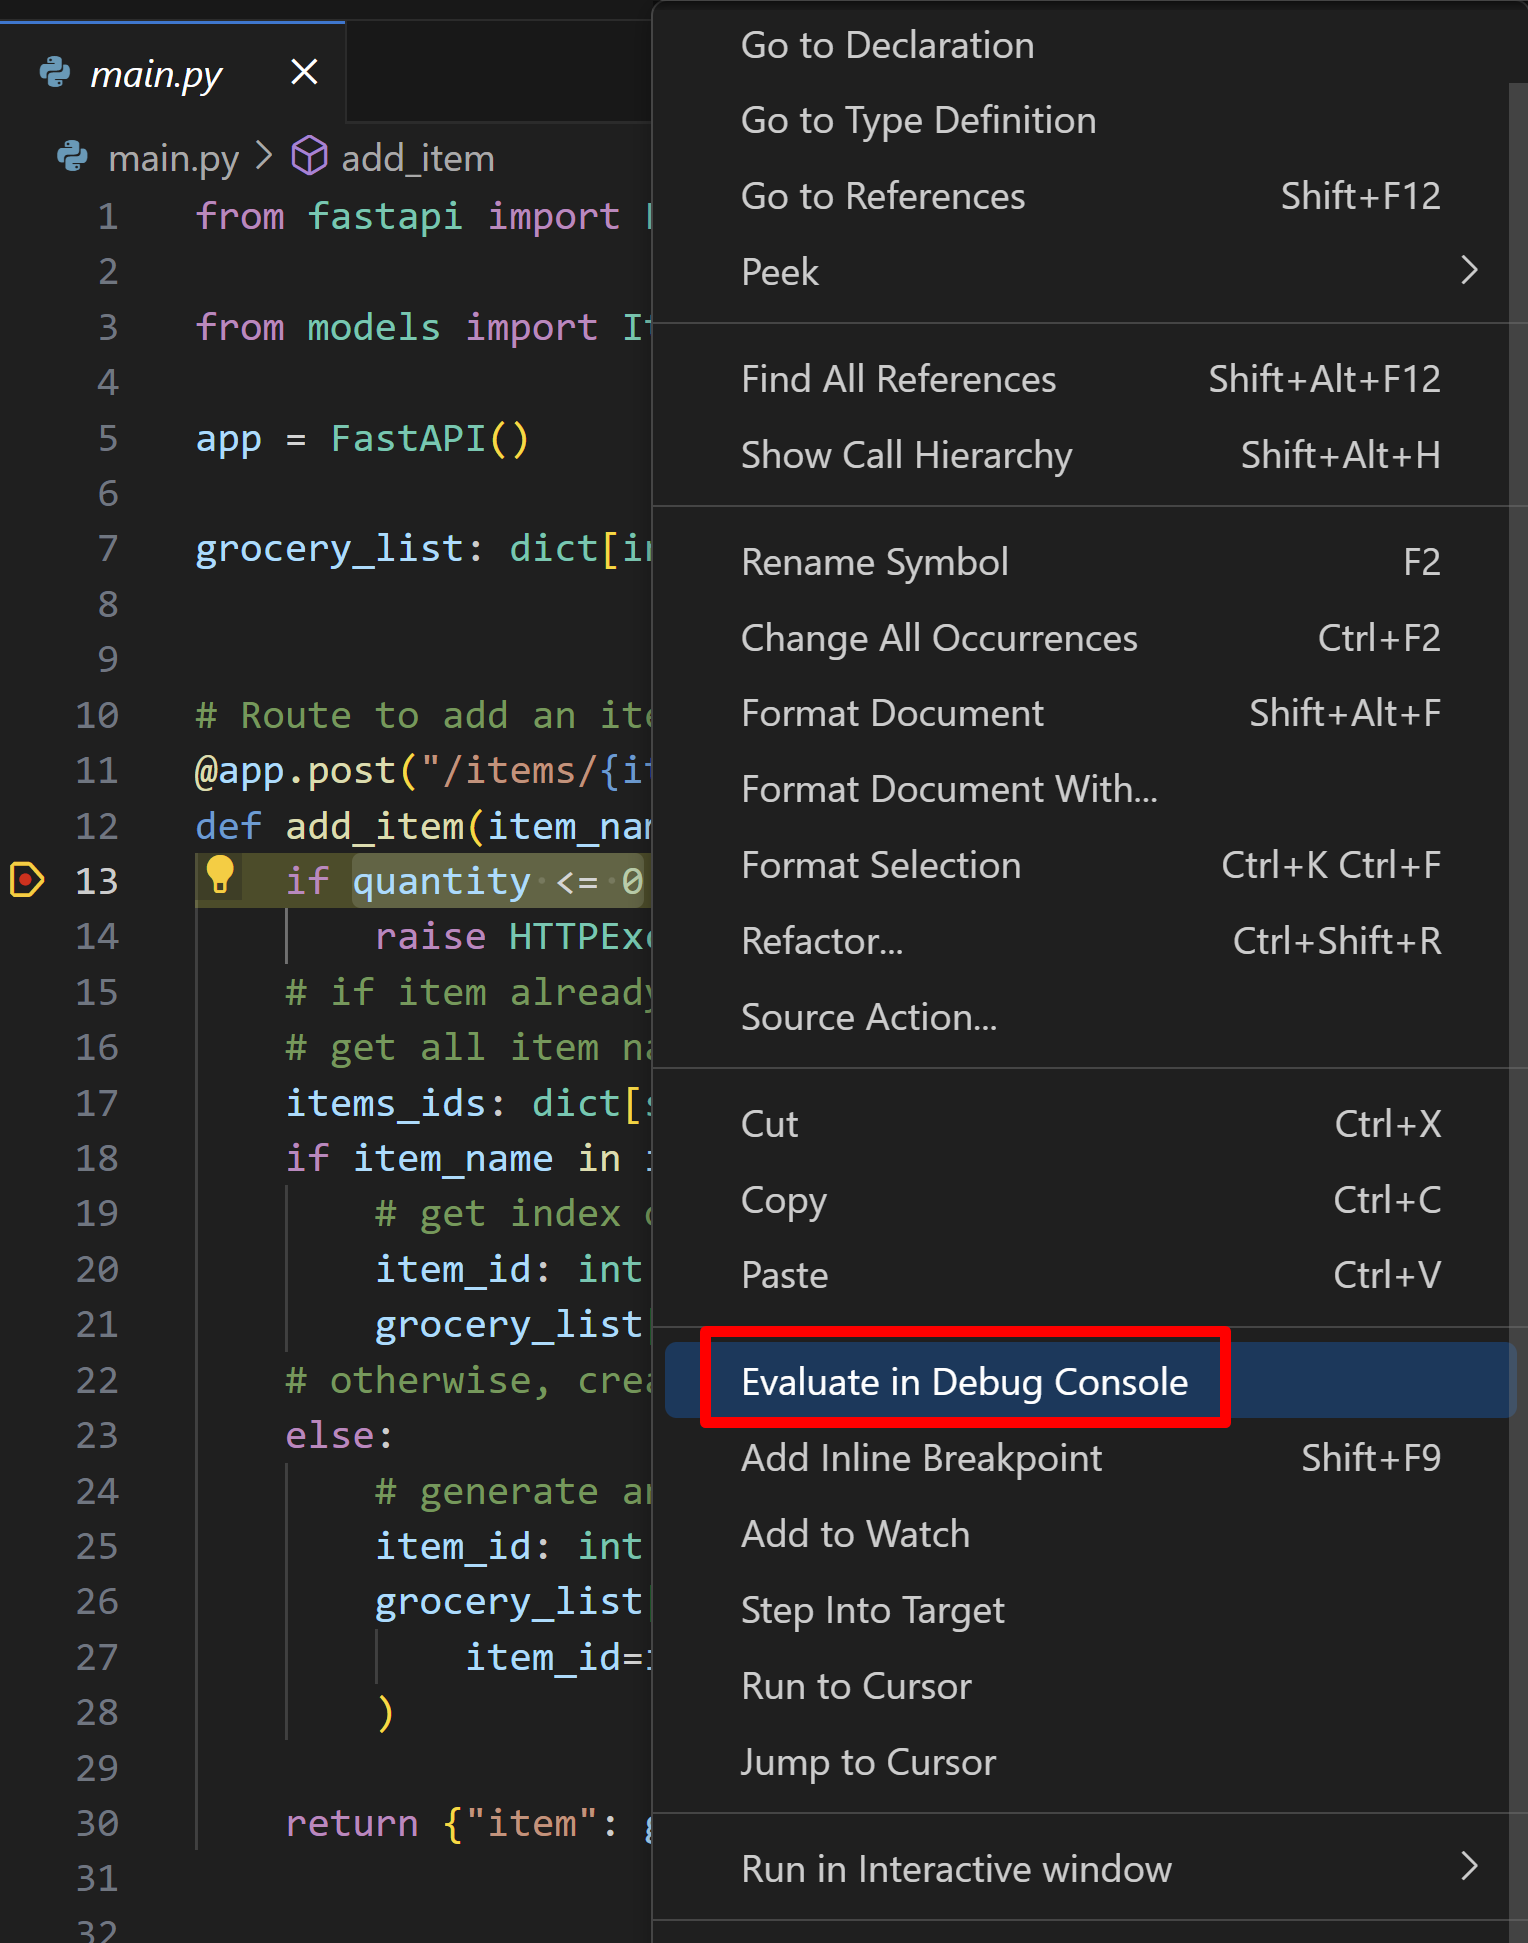
This opens the Debug Console and runs the selected expression. As expected in our example, the expression evaluates to
False.
The Debug Console can be a powerful tool to quickly test expressions and better understand the state of your code at the time of a breakpoint. You can also use it to run arbitrary code, such as calling functions or printing variables. You can learn more about Python debugging in VS Code in the Python tutorial.
You can now continue the execution of the code by selecting Continue in the Debug view tool bar, or by pressing F5.
Finally, let's add the remaining routes for the application so we can list all items or specific items, as well as remove them from our grocery list. You can leave the debugger running as it will automatically reload the application when you save the changes you make in the next step.
-
Replace the content in
main.pywith the code below:from fastapi import FastAPI, HTTPException from models import ItemPayload app = FastAPI() grocery_list: dict[int, ItemPayload] = {} # Route to add an item @app.post("/items/{item_name}/{quantity}") def add_item(item_name: str, quantity: int) -> dict[str, ItemPayload]: if quantity <= 0: raise HTTPException(status_code=400, detail="Quantity must be greater than 0.") # if item already exists, we'll just add the quantity. # get all item names items_ids: dict[str, int] = { item.item_name: item.item_id if item.item_id is not None else 0 for item in grocery_list.values() } if item_name in items_ids.keys(): # get index of item_name in item_ids, which is the item_id item_id: int = items_ids[item_name] grocery_list[item_id].quantity += quantity # otherwise, create a new item else: # generate an ID for the item based on the highest ID in the grocery_list item_id: int = max(grocery_list.keys()) + 1 if grocery_list else 0 grocery_list[item_id] = ItemPayload( item_id=item_id, item_name=item_name, quantity=quantity ) return {"item": grocery_list[item_id]} # Route to list a specific item by ID @app.get("/items/{item_id}") def list_item(item_id: int) -> dict[str, ItemPayload]: if item_id not in grocery_list: raise HTTPException(status_code=404, detail="Item not found.") return {"item": grocery_list[item_id]} # Route to list all items @app.get("/items") def list_items() -> dict[str, dict[int, ItemPayload]]: return {"items": grocery_list} # Route to delete a specific item by ID @app.delete("/items/{item_id}") def delete_item(item_id: int) -> dict[str, str]: if item_id not in grocery_list: raise HTTPException(status_code=404, detail="Item not found.") del grocery_list[item_id] return {"result": "Item deleted."} # Route to remove some quantity of a specific item by ID @app.delete("/items/{item_id}/{quantity}") def remove_quantity(item_id: int, quantity: int) -> dict[str, str]: if item_id not in grocery_list: raise HTTPException(status_code=404, detail="Item not found.") # if quantity to be removed is higher or equal to item's quantity, delete the item if grocery_list[item_id].quantity <= quantity: del grocery_list[item_id] return {"result": "Item deleted."} else: grocery_list[item_id].quantity -= quantity return {"result": f"{quantity} items removed."} -
Save the file (⌘S (Windows, Linux Ctrl+S)). The application should automatically reload.
You can now open the /docs page again and test the new routes, using the debugger and the Debug Console to better understand the code execution. Once you're done, you can stop the debugger (⇧F5 (Windows, Linux Shift+F5)). You can also remove the breakpoint we added in step 4 by clicking on it.
Congratulations! You now have a working FastAPI application with routes to add, list, and delete items from a grocery list.
Set up the data storage
At this point, you already have a working version of the application with the base functionality. This section guides you through setting up data storage for persistence, but you can choose to skip it if you're happy with what you've learned already.
So far we are storing the data in a dictionary, which is not ideal because all of the data will be lost when the application is restarted.
To persist the data, we will use Redis, which is an open source in-memory data structure store. Due to its speed and versatility, Redis is commonly used as a data storage system in a wide range of applications, including web applications, real-time analytics systems, caching layers, this tutorial, and more.
If you are already working on GitHub Codespaces with our existing template, you can skip directly to the Replace the database section.
If you are on Windows, you can work with Redis by setting up either a Docker container or a GitHub Codespace. In this tutorial we will use a Docker container, but you can refer to the section above for instructions on how to set up a GitHub Codespace.
Otherwise, if you are on a Linux or a macOS machine, you can install Redis by following the instructions on their website, and then skip to the Replace the database section.
Setting up a Docker Container on Windows
The VS Code Dev Containers extension offers a streamlined approach to consolidate your project, its dependencies, and all necessary tools into one tidy container, creating a full-featured development environment. The extension lets you open your project inside (or mounted into) the container in VS Code, where you'll have its full feature set.
For the steps below, make sure you have the following requirements installed on your machine:
Requirements
- Docker for Windows
- Dev Containers extension
Create the Dev container configuration
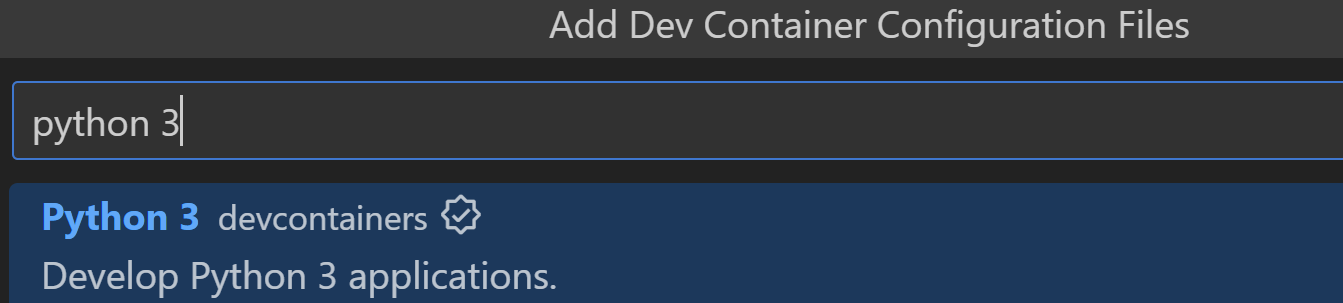
-
Open the Command Palette and run the Dev Containers: Add Dev Container Configuration Files….
-
Select Python 3:
-
Select the default version.
We can optionally install Features to be included in the container. For this tutorial, we will install Redis Server, a community contributed Feature that installs and adds the proper dev container setup for Redis.
-
Select Redis Server as an additional feature to be installed, press OK, and then select Keep Defaults.

This creates a .devcontainer folder in your workspace, with a devcontainer.json file. Let's make some edits to this file so the container setup includes steps such as installing the VS Code extensions we need as well as the project dependencies.
-
Open the
devcontainer.jsonfile. -
Add a "," after the
"features" : { ... }entry, so we can add more settings to the file.
Next, we will add the necessary dependency installation commands to the postCreateCommand property in the devcontainer.json file, so our application is ready to run once the container is set up.
-
Locate the content below and remove the comment (
//) from that line, so the dependencies can be installed once the container is created:"postCreateCommand": "pip3 install --user -r requirements.txt",You can learn about
postCreateCommandand more lifecycle scripts in the Development Containers Specification.Now we will use the
customizationsproperty to add the VS Code extensions we want installed in the container. -
Add the following setting to
devcontainer.json:// Use 'postCreateCommand' to run commands after the container is created. "postCreateCommand": "pip3 install --user -r requirements.txt", // Configure tool-specific properties. "customizations": { "vscode": { "extensions": [ "ms-python.python", //Python extension ID "ms-python.vscode-pylance" //Pylance extension ID ] } } -
Save the file.
-
Select Reopen in Container from the notification displayed in the bottom right corner, or run the Dev Containers: Reopen in Container command from the Command Palette.
Note: It may take several minutes to build the container, depending on internet speed and machine performance.
You can learn more about dev container configuration in the Dev Containers documentation.
Once it's done, you will have a fully configured Linux-based workspace with Python 3 and Redis Server installed.
Once the container is set up, you will notice an indicator on the bottom left corner of VS Code:

Note: Double check that the Python and Pylance extensions have been successfully installed in the container by opening the Extensions view (⇧⌘X (Windows, Linux Ctrl+Shift+X)) and searching for them. If not, you can install them by running Install in Dev Container.
The selected Python interpreter information is available on the Status bar at the bottom right corner, matching the version specified in the devcontainer.json file:

Note: If you don't find the Python interpreter information on the Status bar, you can click on the Python interpreter indicator (or run the Python: Select Interpreter command from the Command Palette) and manually select the Python interpreter in the container.
We are now ready to move on to the next section, where we will replace the data storage.
Replace the database
We have a dictionary that stores the grocery list items, but we want to replace it with a Redis database. In this tutorial, we will use Redis hashes to store our data, which is a data structure that can store multiple key-value pairs.
Unlike a traditional database where you can retrieve an item without knowing its ID, you need to know the Redis hash key in order to retrieve a value from it. In this tutorial, we will create a hash called item_name_to_id to retrieve items by name, and map them to their IDs. In addition, we'll create other hashes to retrieve items by ID, mapping them to their names and quantities. Each item hash is named item_id:{item_id} and has two fields: item_name and quantity.
First, let's start by replacing the dictionary with a Redis client object that connects to a Redis server.
-
In the
main.pyfile, replace thegrocery_list: dict[int, ItemPayload] = {}in the beginning of the file with the lines below:redis_client = redis.StrictRedis(host='0.0.0.0', port=6379, db=0, decode_responses=True)
Pylance will display an error message because Redis hasn't been imported yet.
-
Put the cursor on "redis" in the editor, and click on the displayed light bulb (or ⌘. (Windows, Linux Ctrl+.)). Then select Add 'import redis'.

Tip: You can set up Pylance to automatically add imports by looking for the Auto Import Completions setting in the Settings editor (⌘, (Windows, Linux Ctrl+,)) and enabling it.
We now have a Redis client object that connects to a Redis server running on the local host (host="0.0.0.0") and listening on port 6379 (port=6379). The db parameter specifies the Redis database to use. Redis supports multiple databases, and in this code we're going to use database 0, which is the default database. We're also passing decode_responses=True for the responses to be decoded as strings (instead of bytes).
Let's do some more replacements in the first route add_item. Instead of looking at all the keys from the dictionary to find the item name that has been provided, we can fetch that information directly from a Redis hash.
We'll assume that the item_name_to_id hash already exists, mapping item names to their IDs (don't worry, we'll add this code shortly!). We can then get the ID of the item name we're receiving in the request by invoking the hget method from Redis, which will return the item ID if the requested name already exists in the hash, or None if it doesn't.
-
Delete the line with the content below:
items_ids = {item.item_name: item.item_id if item.item_id is not None else 0 for item in grocery_list.values()}And replace it with:
item_id = redis_client.hget("item_name_to_id", item_name)
Notice that Pylance raises a problem with this change. This is because the hget method returns either str, or None (if the item doesn't exist). However, the lines below the code that we haven't replaced yet expect item_id to be of type int. Let's address this warning by renaming the item_id symbol.
-
Rename
item_idtoitem_id_str. -
If you have inlay hints enabled, Pylance should show a variable type hint next to
item_id_str. You can optionally double-click to accept it:
-
If the item doesn't exist, then
item_id_strisNone. So now we can delete the line with the following content:if item_name in items_ids.keys():And replace it with:
if item_id_str is not None:
Now that we have the item ID as a string, we need to convert it to an int and update the quantity for the item. Currently, our Redis hash only maps item names to their IDs. To also map item IDs to their names and quantities, we will create a separate Redis hash for each item, using "item_id:{item_id}" as our hash name to make retrieval by ID easier. We'll also add item_name and quantity fields for each of these hashes.
-
Delete the code within the
ifblock:item_id: int = items_ids[item_name] grocery_list[item_id].quantity += quantityAnd add the following, to convert the
item_idto anint, and then to increment the quantity of the item by calling thehincrbymethod from Redis. This method increments the value of the"quantity"field by the given amount in the request (quantity):item_id = int(item_id_str) redis_client.hincrby(f"item_id:{item_id}", "quantity", quantity)
We now only need to replace the code for when the item does not exist, when item_id_str is None. In this case, we generate a new item_id, create a new Redis hash for the item, and then add the provided item name and quantity.
To generate a new item_id, let's use the incr method from Redis, passing a new hash called "item_ids". This hash is used to store the last generated ID, so we can increment it each time we create a new item, ensuring that they all have a unique ID.
-
Delete the line with the following content:
item_id: int = max(grocery_list.keys()) + 1 if grocery_list else 0And add the following:
item_id: int = redis_client.incr("item_ids")When this
incrcall is run for the first time with theitem_idskey, Redis creates the key and maps it to the value1. Then, each subsequent time it's run, it increments the stored value by 1.
Now we will add the item to the Redis hash, using the hset method and by providing a mapping for the fields (item_id, item_name, and quantity), and the values (the item's newly created ID, and its provided name and quantity).
-
Delete the line with the following content:
grocery_list[item_id] = ItemPayload(
        item_id=item_id, item_name=item_name, quantity=quantity
    )
And replace it with the following:
redis_client.hset(
            f"item_id:{item_id}",
            mapping={
                "item_id": item_id,
                "item_name": item_name,
                "quantity": quantity,
            })
Now we only need to map the newly created ID to the item name by setting the hash we referenced in the beginning, item_name_to_id.
-
Add this line to the end of the route, inside the
elseblock:redis_client.hset("item_name_to_id", item_name, item_id) -
Delete the line with the following content:
return {"item": grocery_list[item_id]}And replace it with:
return {"item": ItemPayload(item_id=item_id, item_name=item_name, quantity=quantity)} -
If you would like, you can try to do a similar replacement for the other routes. Otherwise, you can just replace the entire content of the file with the lines below:
import redis from fastapi import FastAPI, HTTPException from models import ItemPayload app = FastAPI() redis_client = redis.StrictRedis(host="0.0.0.0", port=6379, db=0, decode_responses=True) # Route to add an item @app.post("/items/{item_name}/{quantity}") def add_item(item_name: str, quantity: int) -> dict[str, ItemPayload]: if quantity <= 0: raise HTTPException(status_code=400, detail="Quantity must be greater than 0.") # Check if item already exists item_id_str: str | None = redis_client.hget("item_name_to_id", item_name) if item_id_str is not None: item_id = int(item_id_str) redis_client.hincrby(f"item_id:{item_id}", "quantity", quantity) else: # Generate an ID for the item item_id: int = redis_client.incr("item_ids") redis_client.hset( f"item_id:{item_id}", mapping={ "item_id": item_id, "item_name": item_name, "quantity": quantity, }, ) # Create a set so we can search by name too redis_client.hset("item_name_to_id", item_name, item_id) return { "item": ItemPayload(item_id=item_id, item_name=item_name, quantity=quantity) } # Route to list a specific item by ID but using Redis @app.get("/items/{item_id}") def list_item(item_id: int) -> dict[str, dict[str, str]]: if not redis_client.hexists(f"item_id:{item_id}", "item_id"): raise HTTPException(status_code=404, detail="Item not found.") else: return {"item": redis_client.hgetall(f"item_id:{item_id}")} @app.get("/items") def list_items() -> dict[str, list[ItemPayload]]: items: list[ItemPayload] = [] stored_items: dict[str, str] = redis_client.hgetall("item_name_to_id") for name, id_str in stored_items.items(): item_id: int = int(id_str) item_name_str: str | None = redis_client.hget(f"item_id:{item_id}", "item_name") if item_name_str is not None: item_name: str = item_name_str else: continue # skip this item if it has no name item_quantity_str: str | None = redis_client.hget( f"item_id:{item_id}", "quantity" ) if item_quantity_str is not None: item_quantity: int = int(item_quantity_str) else: item_quantity = 0 items.append( ItemPayload(item_id=item_id, item_name=item_name, quantity=item_quantity) ) return {"items": items} # Route to delete a specific item by ID but using Redis @app.delete("/items/{item_id}") def delete_item(item_id: int) -> dict[str, str]: if not redis_client.hexists(f"item_id:{item_id}", "item_id"): raise HTTPException(status_code=404, detail="Item not found.") else: item_name: str | None = redis_client.hget(f"item_id:{item_id}", "item_name") redis_client.hdel("item_name_to_id", f"{item_name}") redis_client.delete(f"item_id:{item_id}") return {"result": "Item deleted."} # Route to remove some quantity of a specific item by ID but using Redis @app.delete("/items/{item_id}/{quantity}") def remove_quantity(item_id: int, quantity: int) -> dict[str, str]: if not redis_client.hexists(f"item_id:{item_id}", "item_id"): raise HTTPException(status_code=404, detail="Item not found.") item_quantity: str | None = redis_client.hget(f"item_id:{item_id}", "quantity") # if quantity to be removed is higher or equal to item's quantity, delete the item if item_quantity is None: existing_quantity: int = 0 else: existing_quantity: int = int(item_quantity) if existing_quantity <= quantity: item_name: str | None = redis_client.hget(f"item_id:{item_id}", "item_name") redis_client.hdel("item_name_to_id", f"{item_name}") redis_client.delete(f"item_id:{item_id}") return {"result": "Item deleted."} else: redis_client.hincrby(f"item_id:{item_id}", "quantity", -quantity) return {"result": f"{quantity} items removed."} -
Re-run the debugger to test this application by interacting with the
/docsroute. You can stop the debugger once you're done.
Congrats! You now have a working FastAPI application with routes to add, list, and delete items from a grocery list, and the data is persisted in a Redis database.
Optional: Set up database deletion
With the data now persisted by Redis, you might want to create a script to erase all testing data. To do so, create a new file called flushdb.py with the following content:
import redis

redis_client = redis.StrictRedis(host='0.0.0.0', port=6379, db=0, decode_responses=True)
redis_client.flushdb()
Then when you want to reset the database, you can open the flushdb.py file in VS Code and select the Run button on the top-right corner of the editor, or run the Python: Run Python File in Terminal command from the Command Palette.
Note that this should be done with caution because it will delete all the keys in the current database, which could lead to data loss if done in production.
Optional: Create a ChatGPT plugin
With GitHub Codespaces, you can host your application for testing purposes when using ChatGPT Plugins. ChatGPT Plugins are tools that enable ChatGPT to interact with existing APIs to enhance ChatGPT's abilities, allowing it to perform a wide range of actions. ChatGPT Plugins are not currently publicly available, but you can join their wait list to get access. Once you do, you can follow along the live stream recording below to create your own grocery list plugin for ChatGPT:
Note: All personal GitHub.com accounts have a monthly quota of free use of GitHub Codespaces included in the Free or Pro plan. For more information, go to About billing for GitHub Codespaces.
Next Steps
Thank you for following along this tutorial! We hope you learned something new about FastAPI and how to use it with VS Code.
The completed code project from this tutorial can be found on GitHub: python-sample-vscode-fastapi-tutorial.
Learn more about FastAPI at the official documentation.
To try the app on a production website, check out the tutorial Deploy Python apps to Azure App Service using Docker Containers.
You can also review these other VS Code Python articles: