Custom Layout
Visual Studio Code comes with a simple user interface and convenient default layout. At the same time, VS Code provides options and settings to let you customize the UI layout to suit your preferences and work style. In this topic, we'll highlight various UI customizations so you can display views, editors, and panels in the way that's most productive for you.
This article starts by discussing Workbench customizations to rearrange UI elements such as the side bars, views, and panels. Later in the article, we'll cover customization of the Editor region with editor groups, split editors, and editor tabs.
If you are new to VS Code, you may want to start with the user interface overview or take a look at the Tips and Tricks article.
Workbench
Primary Side Bar
By default, the Primary Side Bar is located on the left of the workbench and shows views such as the Explorer, Search, and Source Control views. You can quickly switch between views by selecting the icons in the Activity Bar.
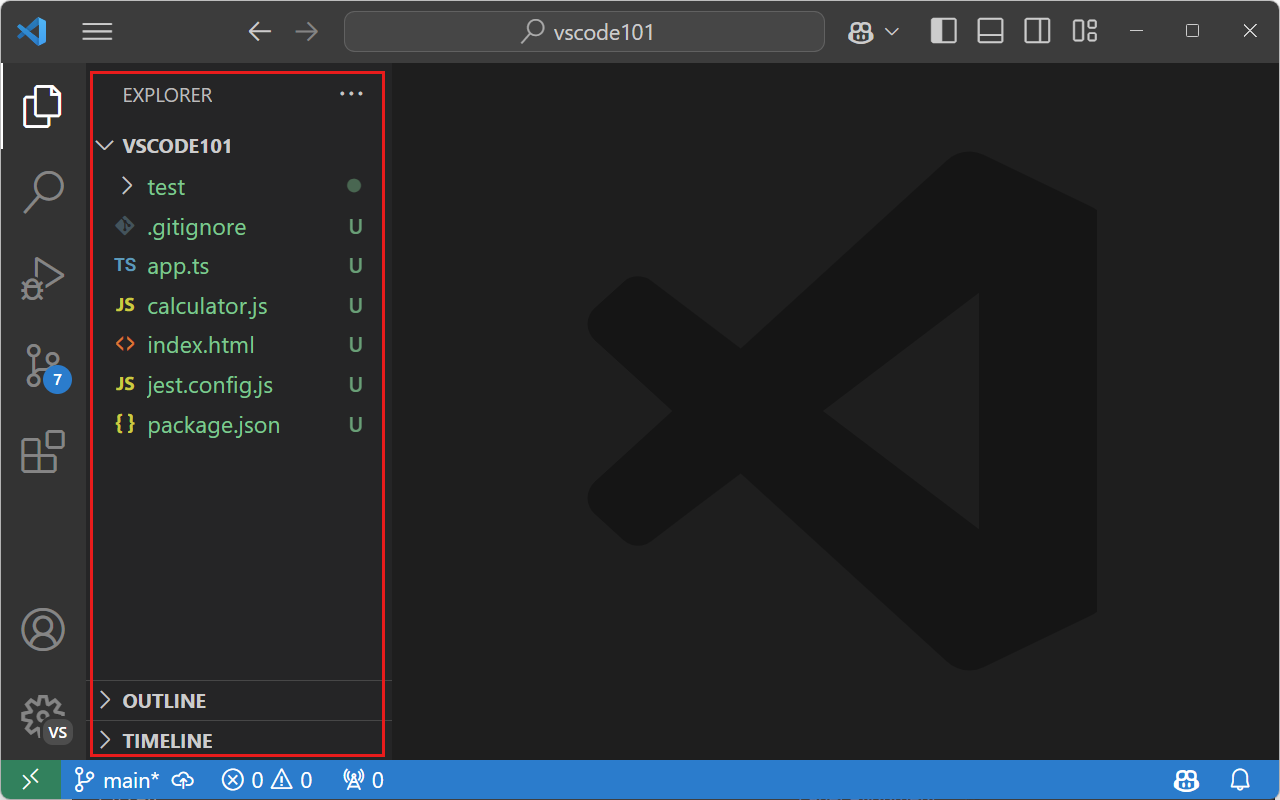
To change the position of the Primary Side Bar, you can:
- Right-click the Activity Bar and select Move Primary Side Bar Right
- Run View: Toggle Primary Side Bar Position to switch the Primary Side Bar right and left
- Use the View > Appearance > Move Primary Side Bar Right menu item
- Set the Workbench > Side Bar: Location (workbench.sideBar.location) setting to
rightin the Settings editor
Secondary Side Bar
By default, VS Code shows views in the Primary Side Bar located to the left of the editor region. It can be useful to see two views open at the same time. To do this, you can use the Secondary Side Bar to show views opposite the Primary Side Bar. The Secondary Side Bar is always positioned opposite the Primary Side Bar, regardless if you switched the position of the Primary Side Bar.
The following image shows the Explorer view in the Primary Side Bar and the Copilot Chat view in the Secondary Side Bar:
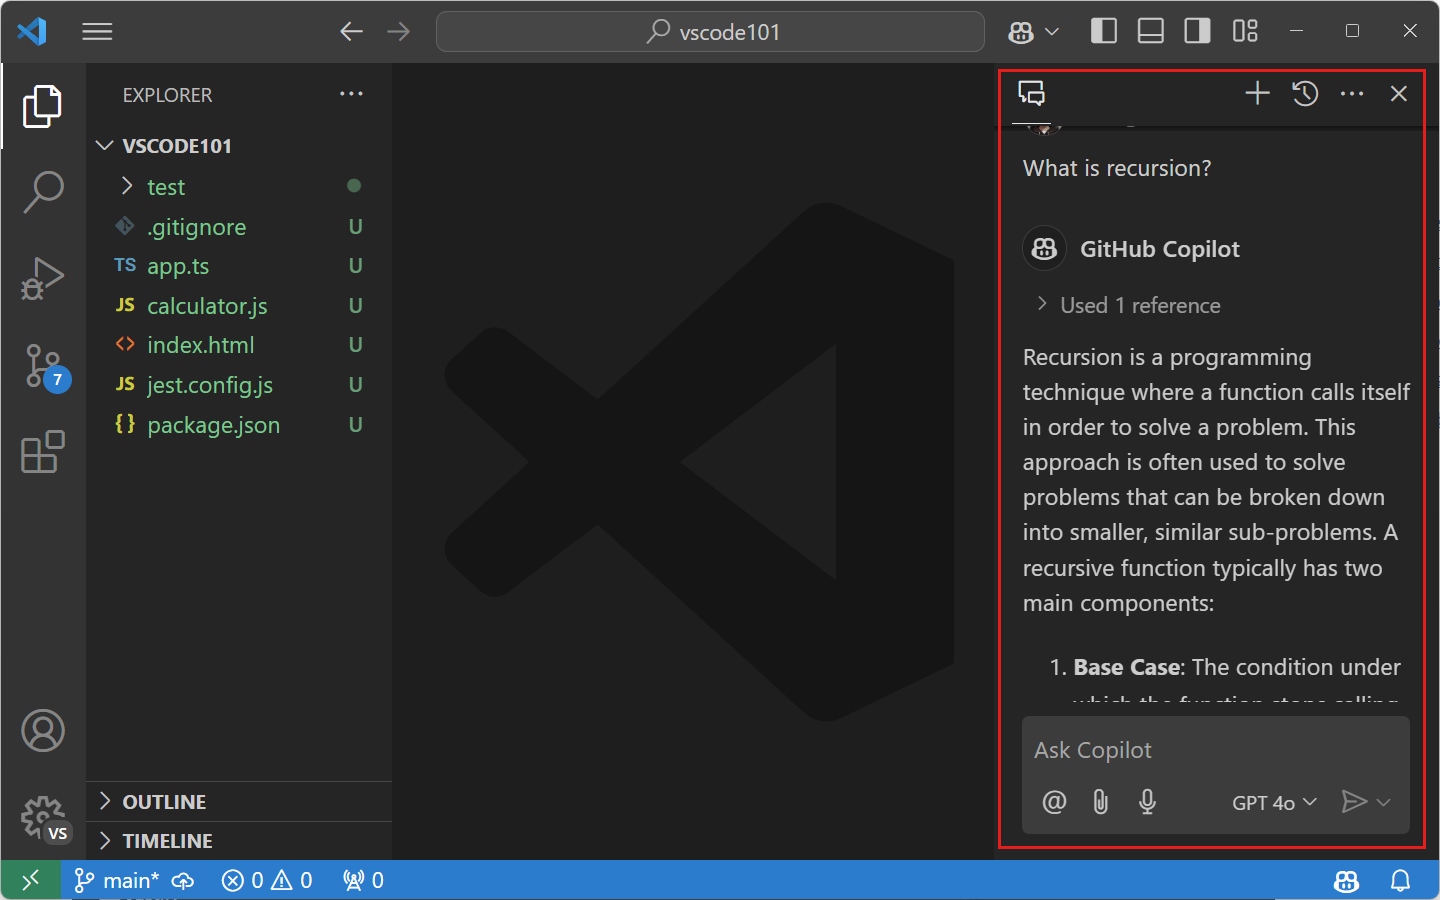
To show the Secondary Side Bar, you can use the layout controls in the VS Code title bar. If the layout controls are not visible, right-click the VS Code title bar and select Layout Controls.

Alternatively, you can also open the Secondary Side Bar as follows:
- Run the View: Toggle Secondary Side Bar Visibility command (or press ⌥⌘B (Windows, Linux Ctrl+Alt+B))
- Use the View > Appearance > Secondary Side Bar menu item
If you want to automatically show the Secondary Side Bar when you open a new window or a workspace, you can configure this with the workbench.secondarySideBar.defaultVisibility setting.
At any time, you can drag and drop views and panels into the Primary or Secondary Side Bar. VS Code will remember the layout of views and panels across your sessions.
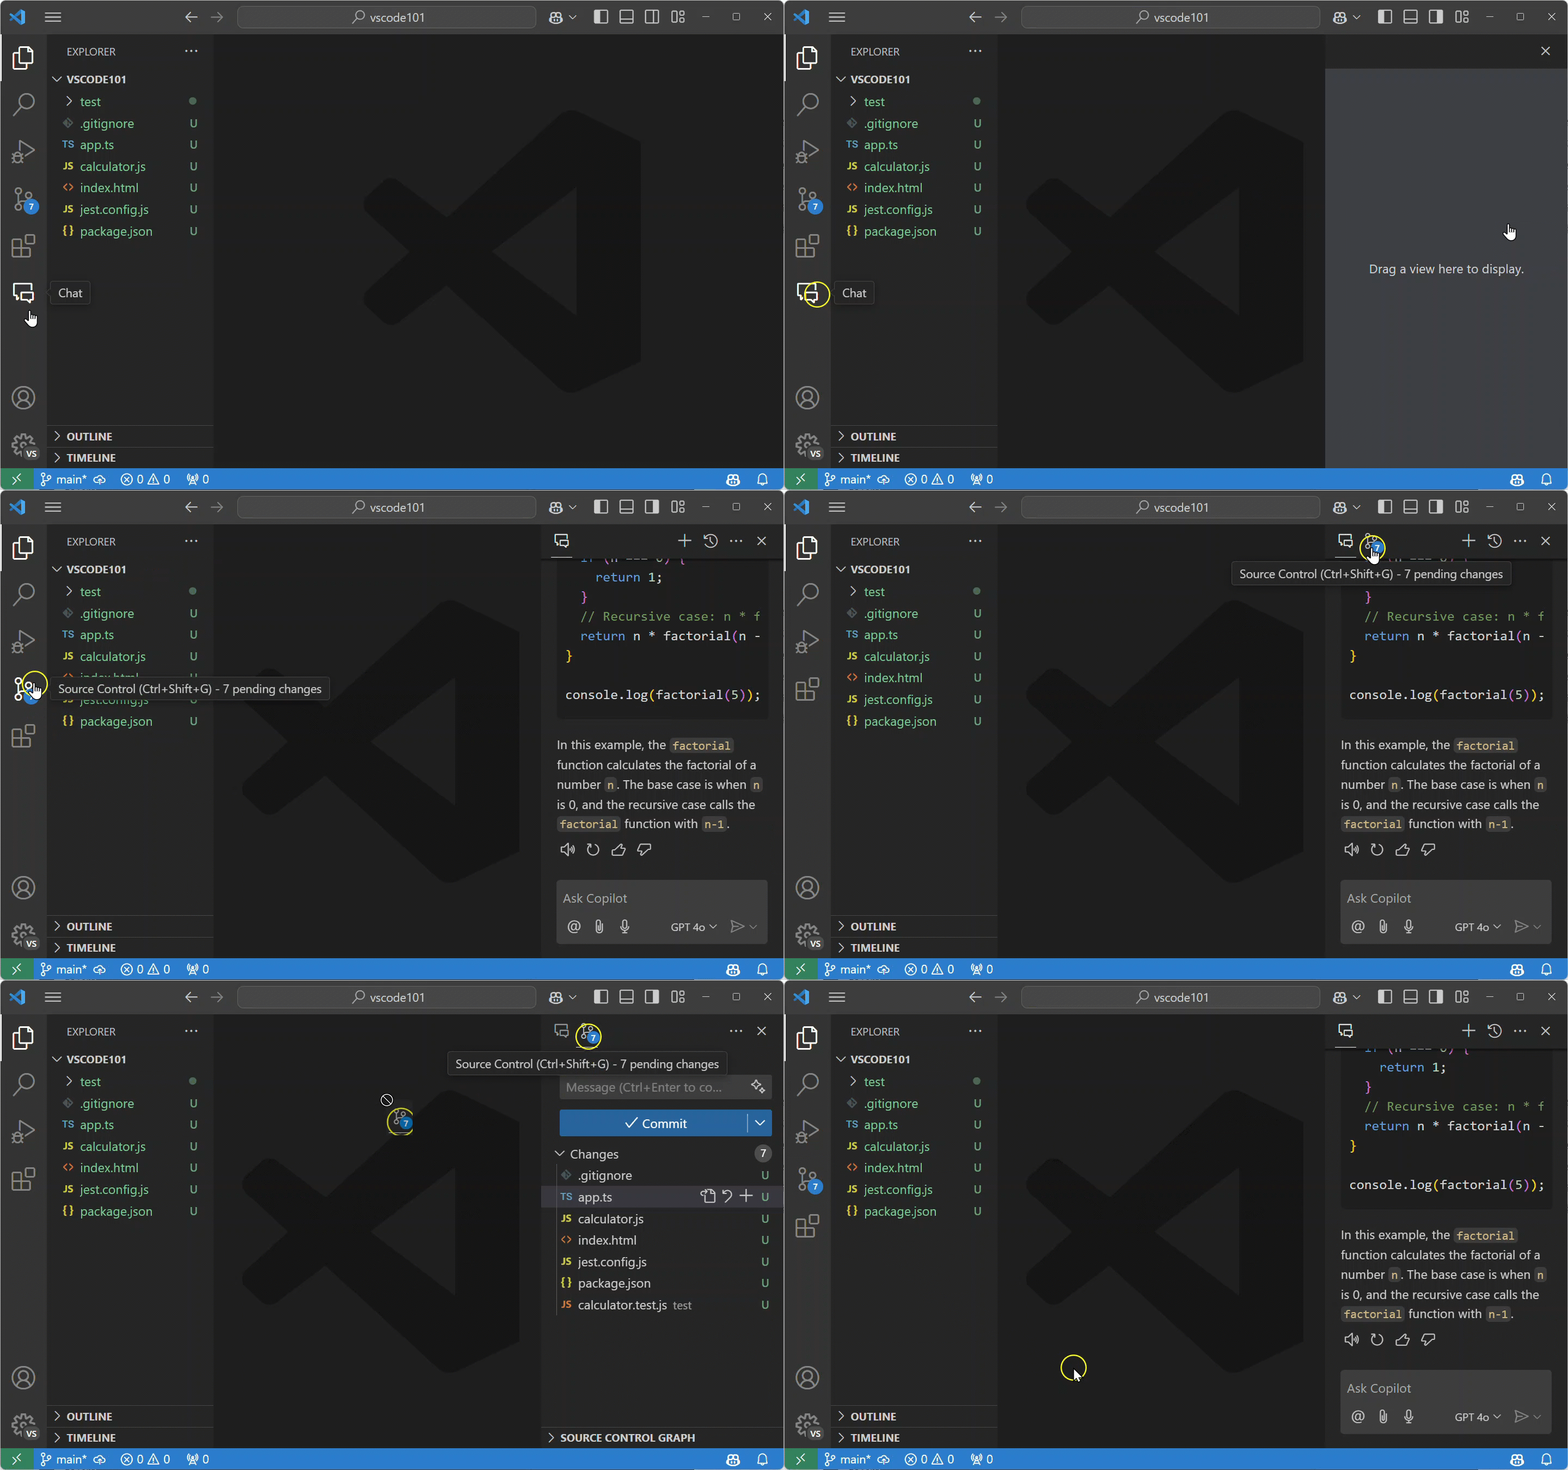
You can reset views and panels back to their default locations with the View: Reset View Locations command.
Command Palette position
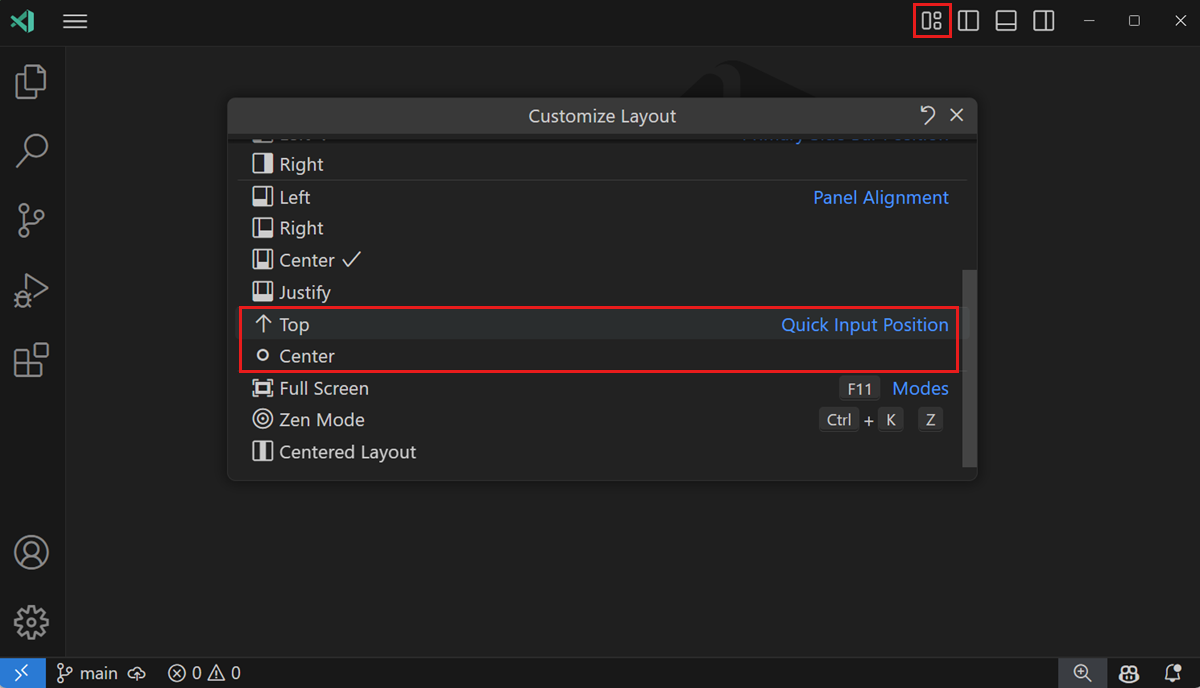
You can move the Command Palette to another location by grabbing the top edge with the mouse cursor and dragging it somewhere else. You can also select the Customize Layout control in the title bar, and then select one of the preconfigured Quick Input Positions.
Activity Bar position
By default, the Activity Bar moves with the Primary Side Bar and remains on the outer edge of the workbench. You can also choose to hide the Activity Bar, or move it to the top or bottom of the Primary Side Bar.
The Activity Bar Position menu is available from the Activity Bar context menu, or under View > Appearance > Activity Bar Position has the options Default, Top, Bottom, or Hidden.
When the Activity Bar is in the top or bottom position, the Account and Manage buttons, usually at the bottom of the Activity Bar, move to the right side of the title bar.

Customize Layout control
The VS Code title bar also has buttons to toggle the visibility of the main UI elements (Side bars and Panel region).

The rightmost button brings up the Customize Layout dropdown, where you can further change the visibility and layout of various UI elements and includes several layout modes:
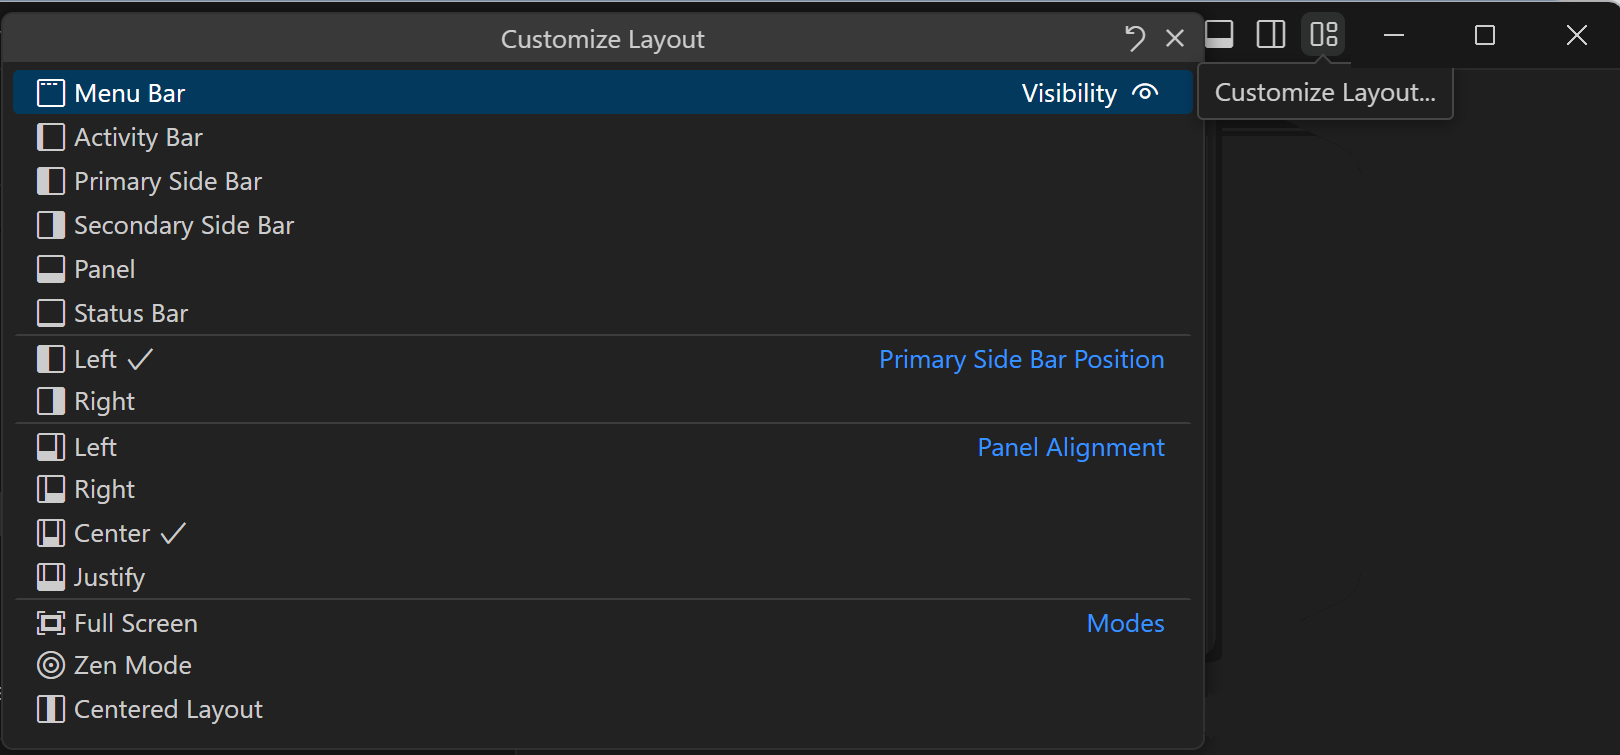
The layout modes are:
- Full Screen - Set the editor to fill the full display screen. View: Toggle Full Screen (⌃⌘F (Windows, Linux F11)).
- Zen Mode - Hide all UI except for the editor area. View: Toggle Zen Mode (⌘K Z (Windows, Linux Ctrl+K Z)).
- Centered Layout - Centers the editor inside the editor region. View: Toggle Centered Layout.
Window and menu style
You can customize the appearance of the VS Code window and menu bar with the following settings:
-
window.titleBarStyle: adjust the appearance of the VS Code window title bar to be native by the OS or custom. Changes require a full restart to apply.
-
window.title: configure the VS Code window title based on the current context such as the opened workspace or active editor. Variables are substituted based on the context. For example,
${activeEditorShort}will show the file name of the currently active editor. You can combine multiple variables, for example,${dirty}${activeEditorShort}${separator}${rootName}${separator}${profileName}${separator}${appName}. -
window.titleSeparator: the separator character that is used in the window.title setting.
-
window.menuStyle: adjust the menu style to either be native by the OS, custom, or inherited from the title bar style (defined in window.titleBarStyle). This also affects the context menu appearance. Changes require a full restart to apply.
-
window.menuBarVisibility: configure the visibility of the menu bar.
classic: the menu bar is shown at the top of the window, and only hidden when the window is in full screen mode.visible: the menu bar is always visible, also when the window is in full screen mode.toggle: the menu bar is hidden and a single press of the Alt key makes it visible.compact: the menu is moved into the Side Bar.hidden: the menu bar is always hidden.
Panel
The Panel region displays UI elements such as the Problems, Terminal, and Output panels and by default is located under the editor region.
Panel position
You can move the region to the left, right, bottom, or top of the editor. You can configure these options in the menu under View > Appearance > Panel Position, or via the Panel title bar context menu.
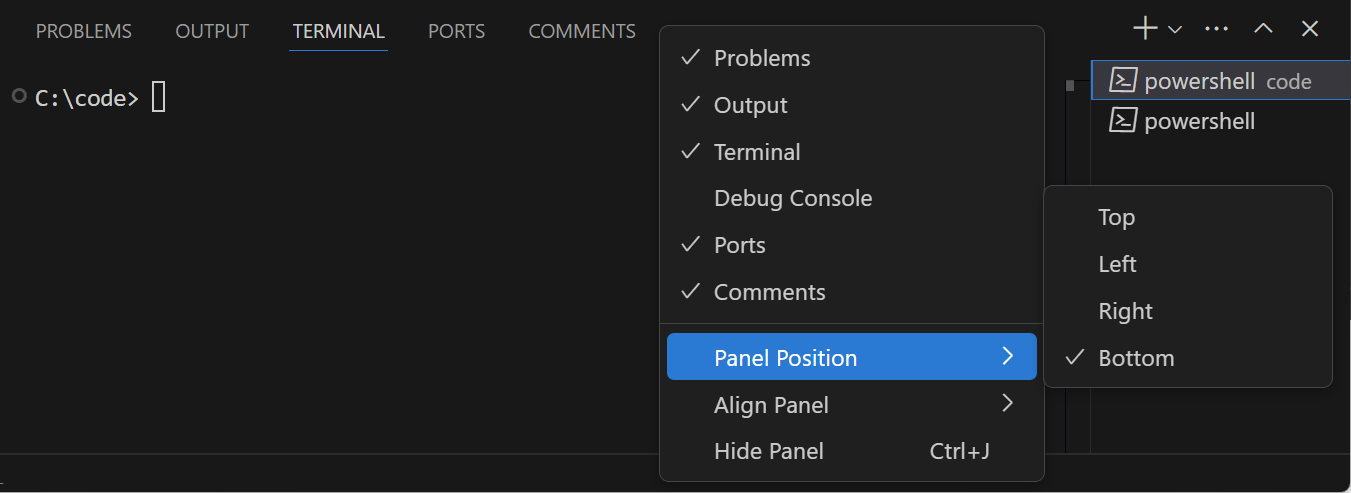
You can also use the Move Panel commands in the Command Palette:
- View: Move Panel Left (
workbench.action.positionPanelLeft) - View: Move Panel Right (
workbench.action.positionPanelRight) - View: Move Panel To Bottom (
workbench.action.positionPanelBottom) - View: Move Panel To Top (
workbench.action.positionPanelTop)
Panel alignment
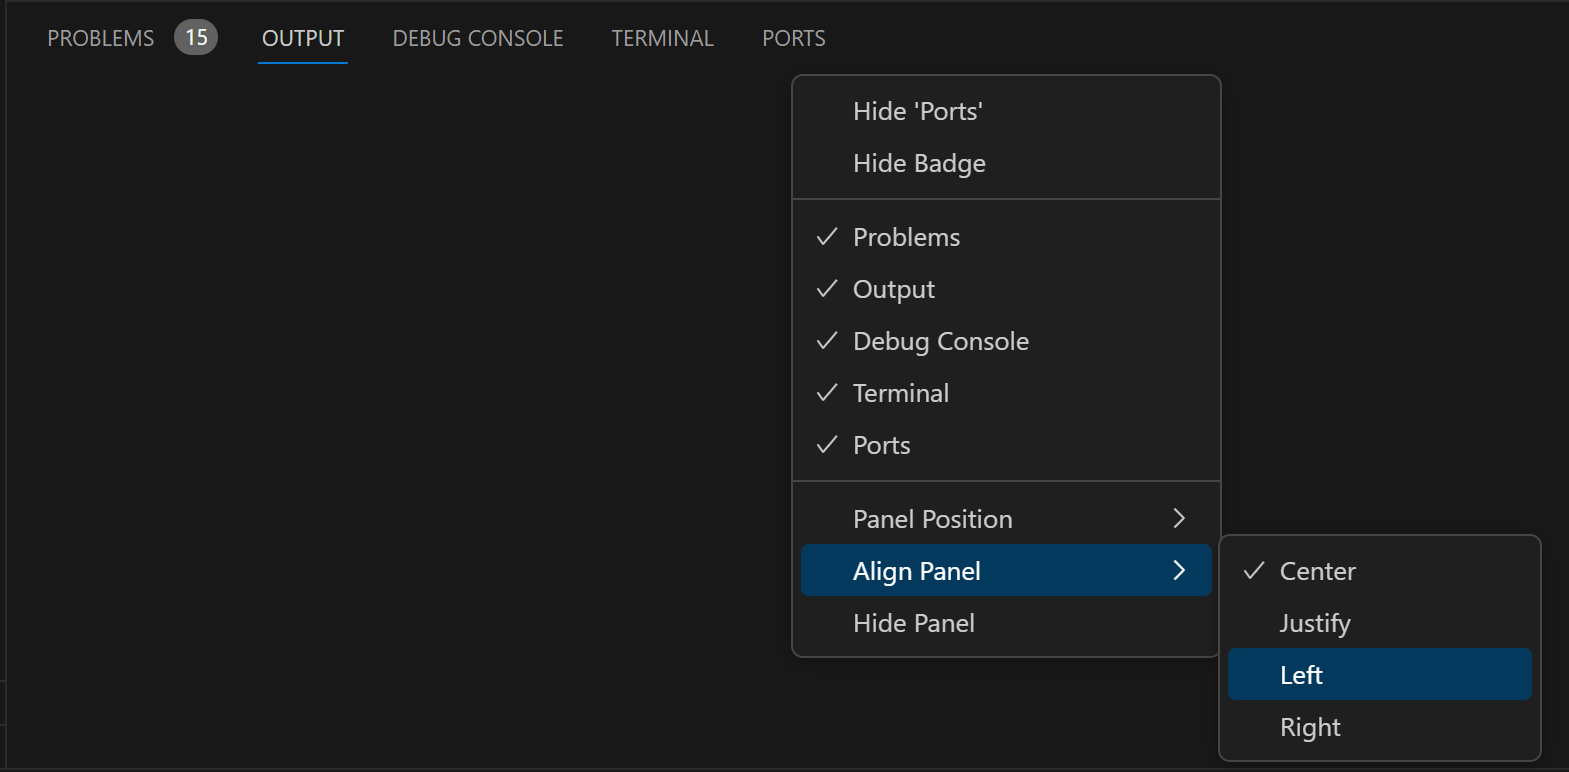
This option lets you configure how far the bottom Panel spans across your window. There are four options:
- Center - This is the default behavior. The panel spans the width of the editor area only.
- Justify - The panel spans the full width of the window.
- Left - The panel spans from the left edge of the window to the right edge of the editor area.
- Right - The panel spans from the right edge of the window to the left edge of the editor area.
With all Panel alignment options, the Activity Bar is considered the edge of the window.
You can configure these options in the menu under View > Appearance > Align Panel, Panel title context menu, or using the new Set Panel Alignment to... commands.
Maximize Panel size
When the Panel alignment is Center, you can quickly toggle the Panel region to fill the entire editor area with the Maximize Panel Size chevron button in the upper right of the Panel region. The chevron button points downwards in the maximized panel to restore the panel to the original size.

You can also maximize the Panel region via the View: Toggle Maximized Panel command.
Note: Besides customizing the overall Panel region display, individual panels may have their own layout customizations. For example, the Terminal lets you have multiple open tabs and split existing terminals.
Drag and drop views and panels
VS Code has a default layout of views and panels in the Primary Side bar and Panel region but you can drag and drop views and panels between these regions. For example, you can drag and drop the Source Control view into the Panel region or put the Problems panel into the Primary Side bar:
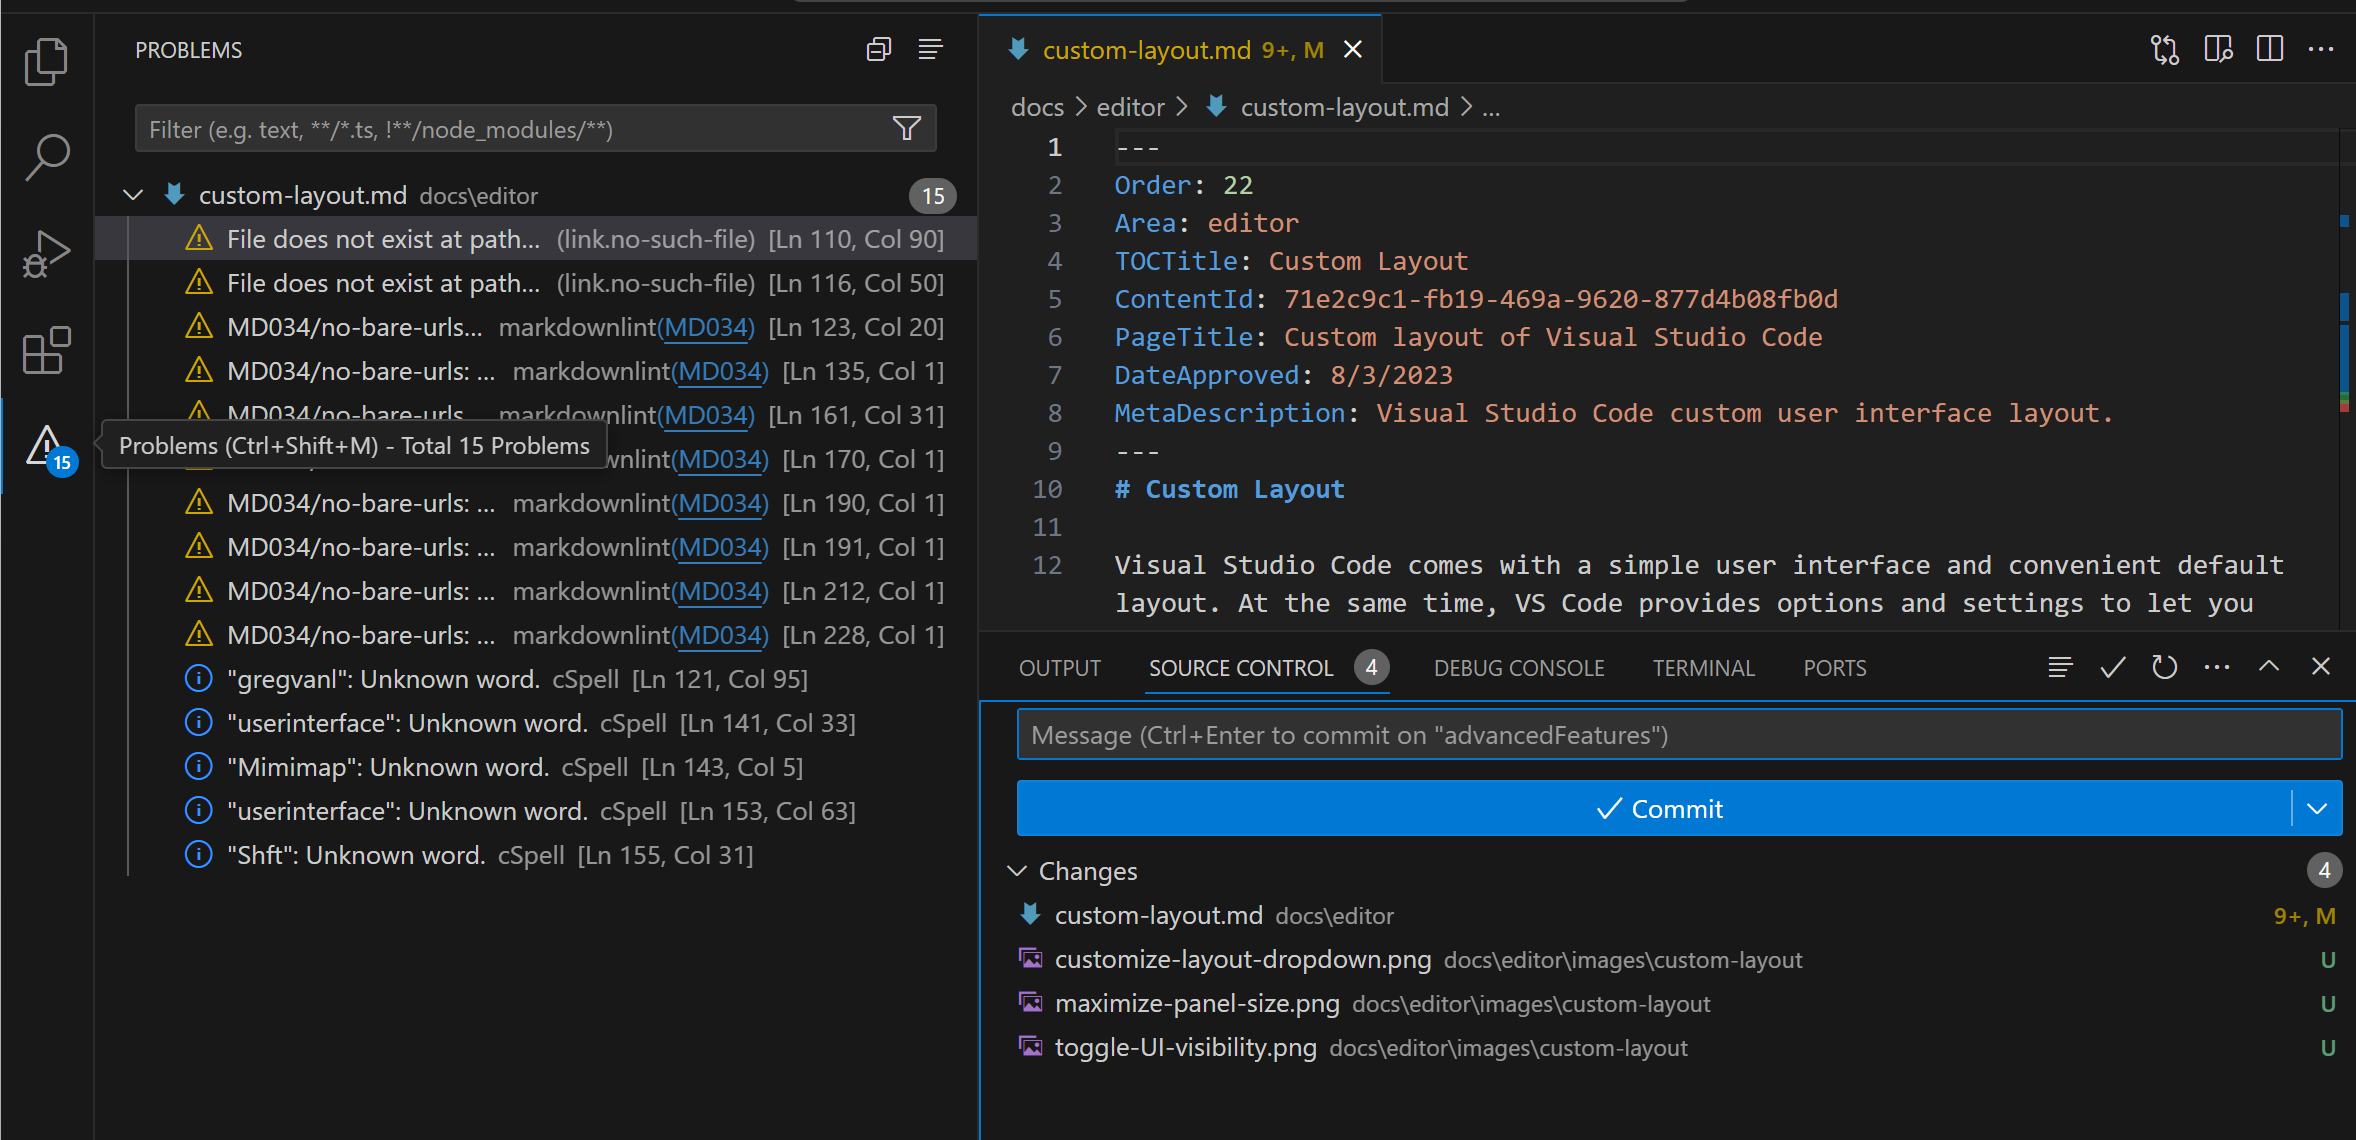
Note: Remember that you can reset a view and panel back to its default location with the Reset Location context menu item or all views and panels with the general View: Reset View Locations command.
You can also add views and panels to existing view or panel to create groups. For example, you could move the Output panel to the Explorer view group by dragging over the Explorer Activity Bar item and then dropping into the view:
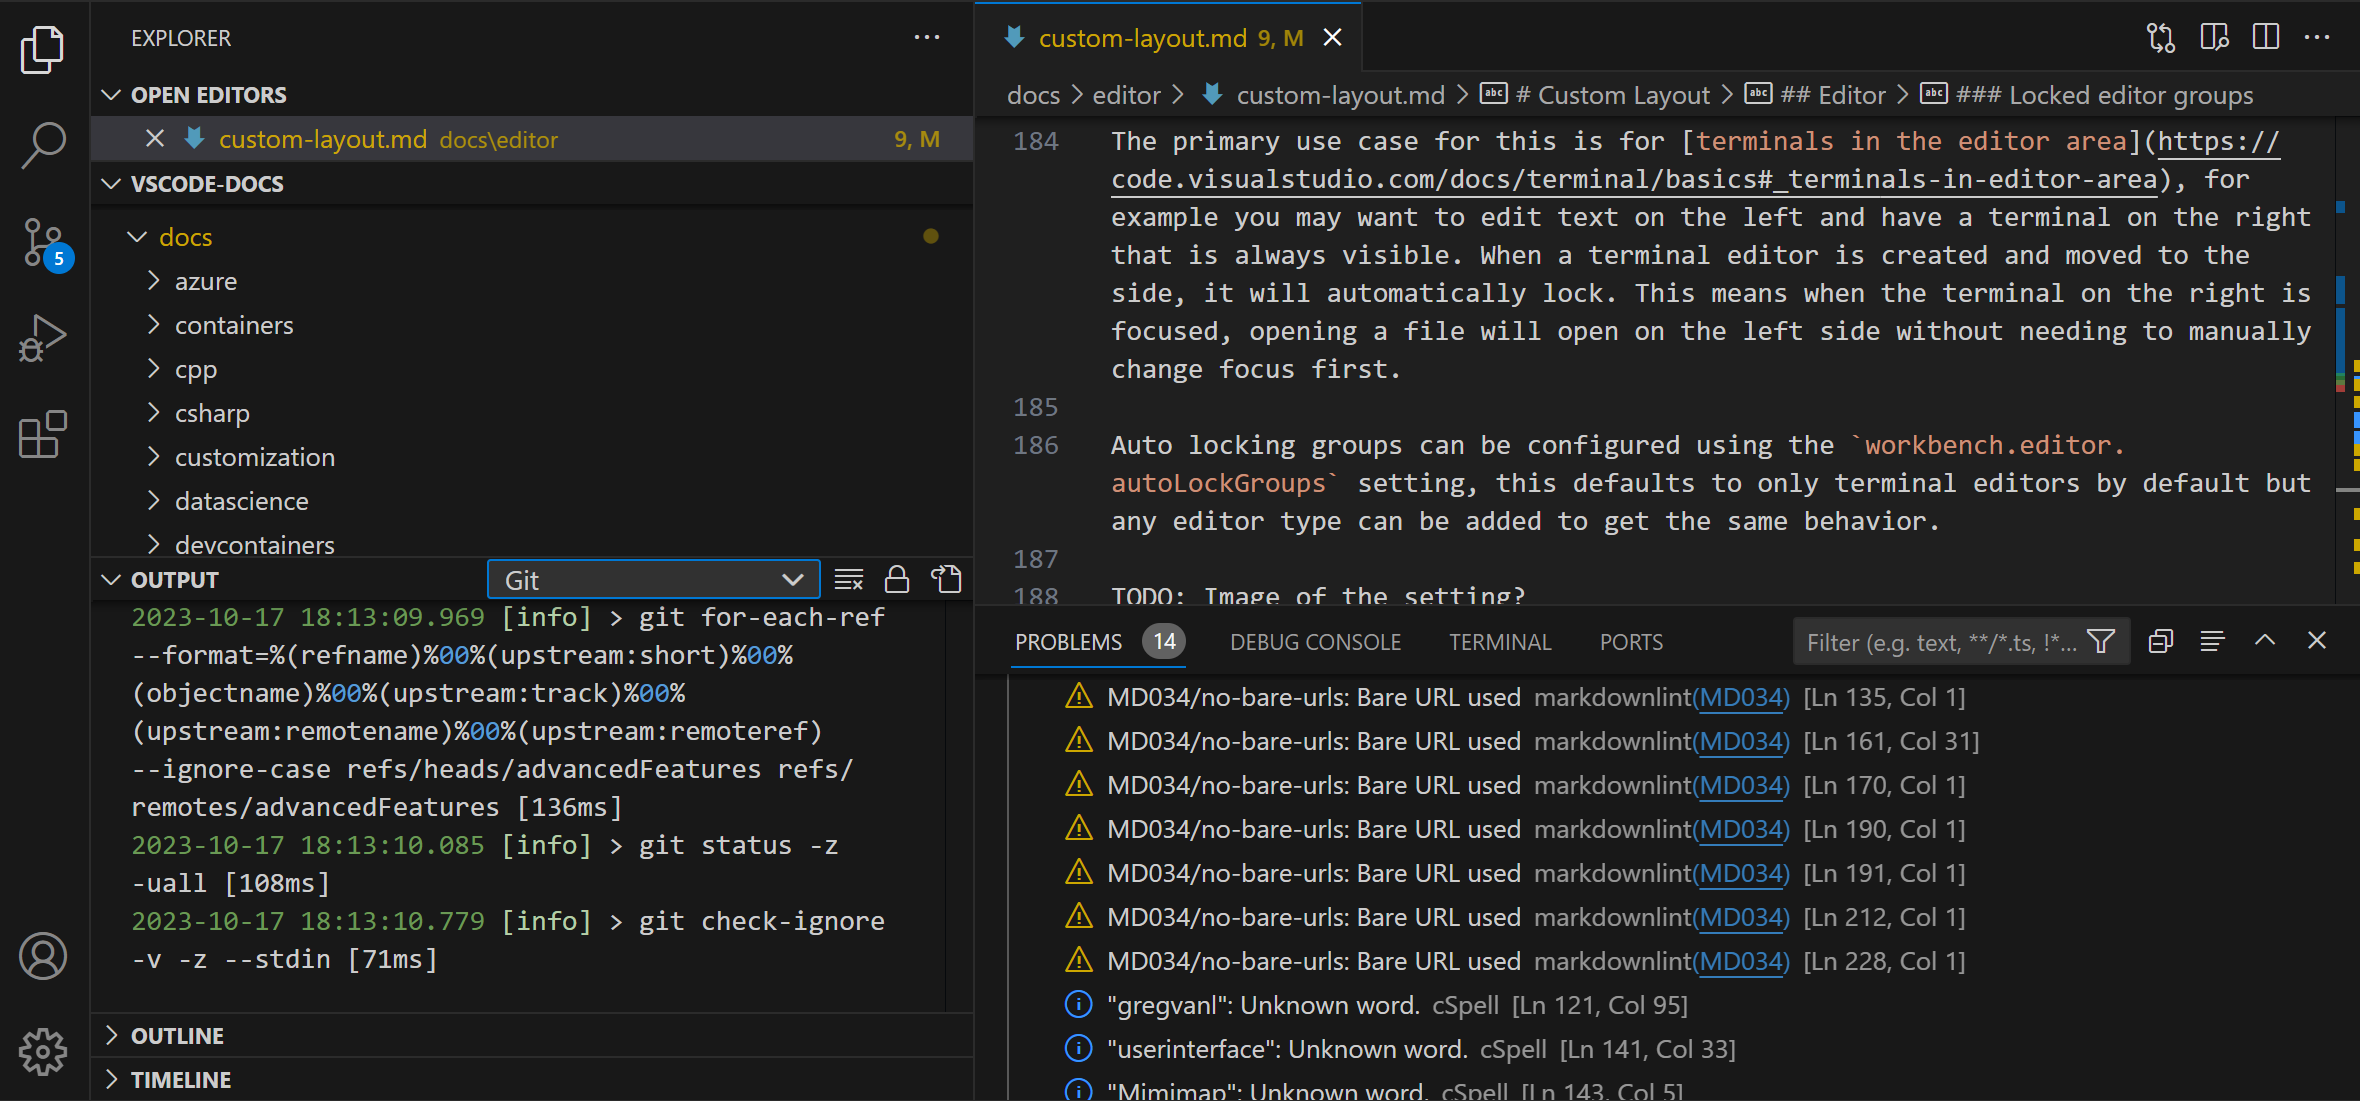
You are not limited to using the mouse for moving views and panels. You can also customize layouts via the keyboard with the View: Move View and View: Move Focused View commands, where dropdowns let you pick the UI element to move and the destination, either a location like the Side bar or Panel region or an existing view or panel to create a group.
Tool bars
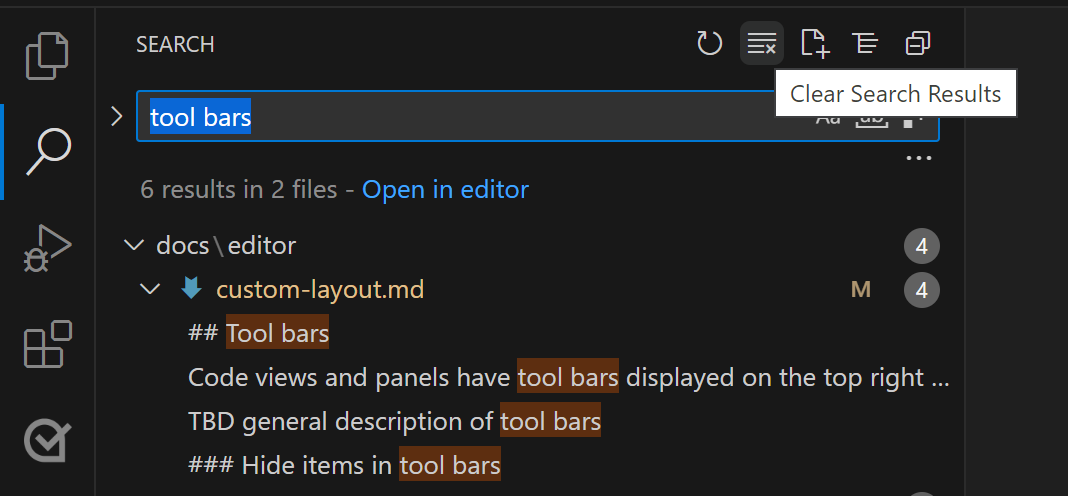
Most VS Code views and panels have tool bars displayed on the top right of their UI. For example, the Search view has a tool bar with actions such as Refresh, Clear Search Results, etc.:
Hide items in tool bars
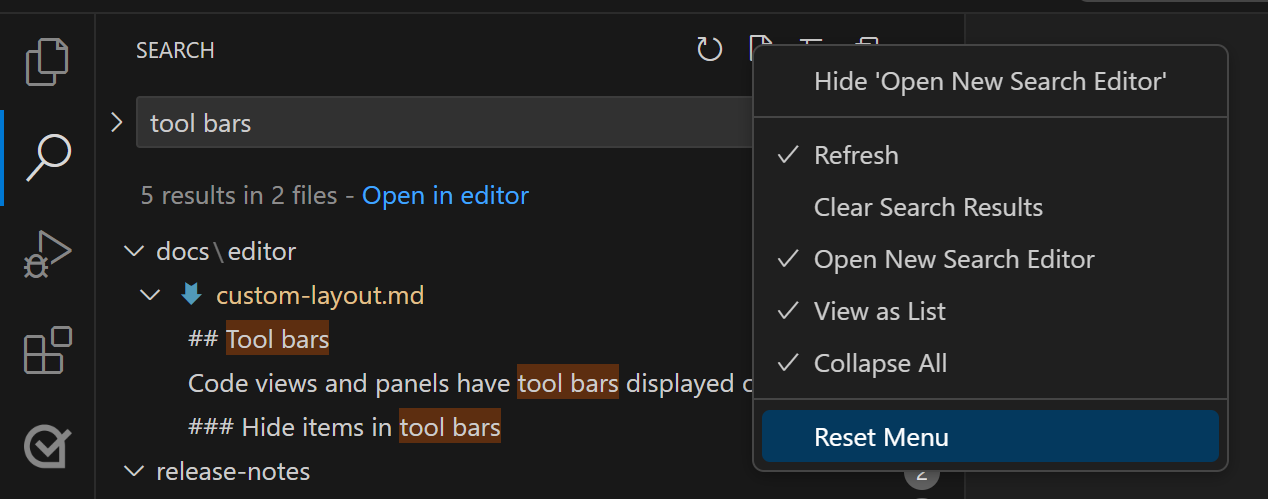
If you think a tool bar is too busy and you'd like to hide less frequently used actions, you can right-click on any action and select its Hide command (for example Hide 'Clear Search Results') or uncheck any of the actions from the dropdown. Hidden actions are moved to the ... More Actions menu and can be invoked from there.
To restore an action to the tool bar, right-click the tool bar button area and select the Reset Menu command or recheck the hidden action. To restore all menus in VS Code, run View: Reset All Menus from the Command Palette (⇧⌘P (Windows, Linux Ctrl+Shift+P)).
Editor
You can customize the layout of the VS Code editor region independently of the workbench user interface. By default, the editor region displays useful features such as the minimap, breadcrumbs, editor tabs, and has optional UI such as Sticky Scroll. You can also adjust the layout of the editors themselves or move them into floating windows.
Minimap and breadcrumbs
The View > Appearance menu has a section for customizing the editor region. There you'll find toggles for:
- Minimap - A visual overview of your current file. View: Toggle Minimap.
- Breadcrumbs - Display folder, file, and current symbol information for the active file. View: Toggle Breadcrumbs.
- Sticky Scroll - Display nested symbol scopes in the active file. View: Toggle Sticky Scroll.
Editor groups
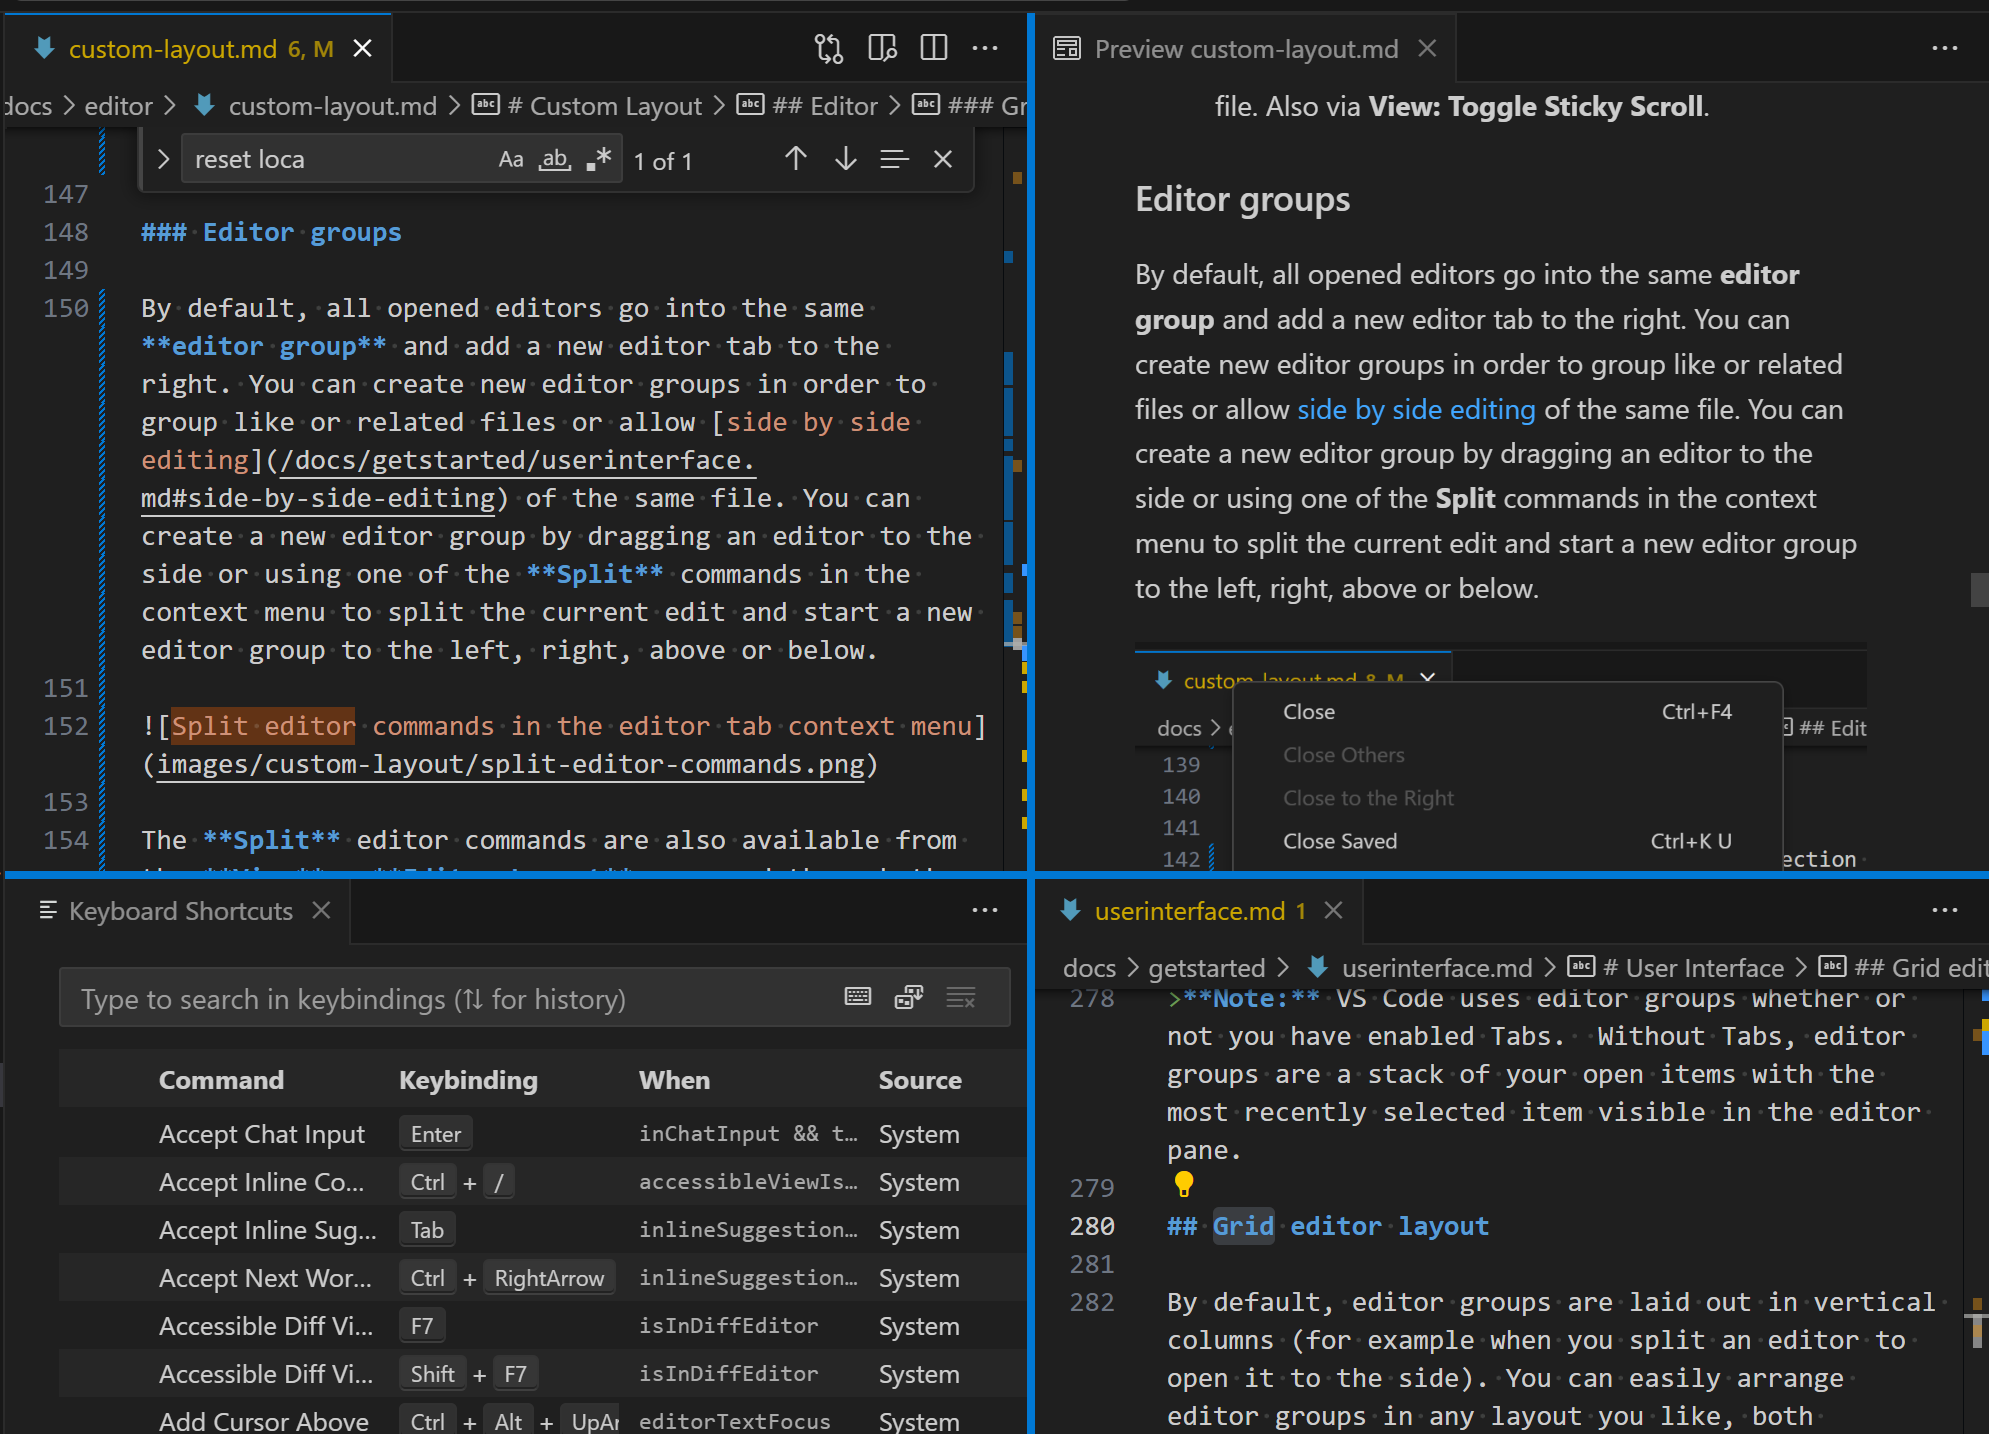
By default, each opened editor goes into the same editor group and adds a new editor tab to the right. You can create new editor groups in order to group similar or related files, or to allow side by side editing of the same file.
Create a new editor group by dragging an editor to the side, or by using one of the Split commands in the editor tab context menu to duplicate the current editor into a new editor group to the left, right, above, or below.
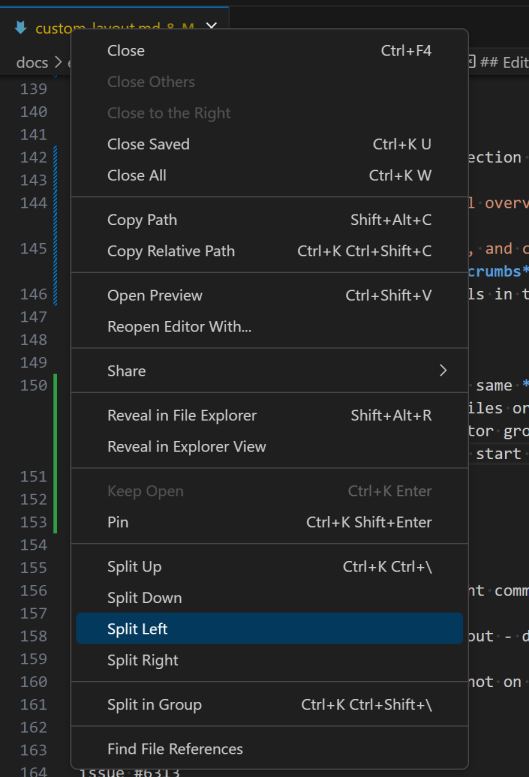
The Split editor commands are also available from the View > Editor Layout menu and through the Command Palette.
If you'd like to go quickly between vertical and horizontal editor group layout, you can use the Toggle Vertical/Horizontal Editor Layout command (⌥⌘0 (Windows, Linux Shift+Alt+0)).
Split in group
You can also split an editor in the same group for side by side editing with the View: Split Editor in Group command (⌘K ⇧⌘\ (Windows, Linux Ctrl+K Ctrl+Shift+\)).
When using the split in group feature, there are specific commands for toggling this mode and navigating between the two split editors:
- View: Split Editor in Group - Split the current editor.
- View: Toggle Split Editor in Group - Toggle between split mode for the active editor.
- View: Join Editor in Group - Go back to a single editor for the active file.
- View: Toggle Layout of Split Editor in Group - Toggle between horizontal and vertical layout.
To navigate between the sides:
- View: Focus First Side in Active Editor - Move focus to the first (left or top) side of split editor.
- View: Focus Second Side in Active Editor - Move focus to the second (right or bottom) side.
- View: Focus Other Side in Active Editor - Toggle between the split editor sides.
The Workbench > Editor: Split in Group Layout (workbench.editor.splitInGroupLayout) setting lets you set the preferred split editor layout to either horizontal (default) or vertical.
Grid layout
If you'd like more control over the editor group layout, you can use the grid layout, where you can have multiple rows and columns of editor groups visible. The View > Editor Layout menu lists various editor layout options (for example, Two Columns, Three Columns, Grid (2x2)) and you can adjust the group sizes by grabbing and moving the sash between them.
Floating windows
You can open an editor, the terminal, or specific views in a floating window. This is useful in a multi-monitor setup, where you can move the editor to another monitor or even to a different location on the same monitor.
To open an editor in a floating window, drag it out of the main window and drop it anywhere outside of the current VS Code window.
Floating windows are capable of opening as many editors as you like in a grid layout. The windows will restore at their location after restart and reopen all the editors within.
Another way to detach an editor is to right-click on an editor tab, and select the option Move into New Window (workbench.action.moveEditorToNewWindow) or Copy into New Window (⌘K O (Windows, Linux Ctrl+K O)).
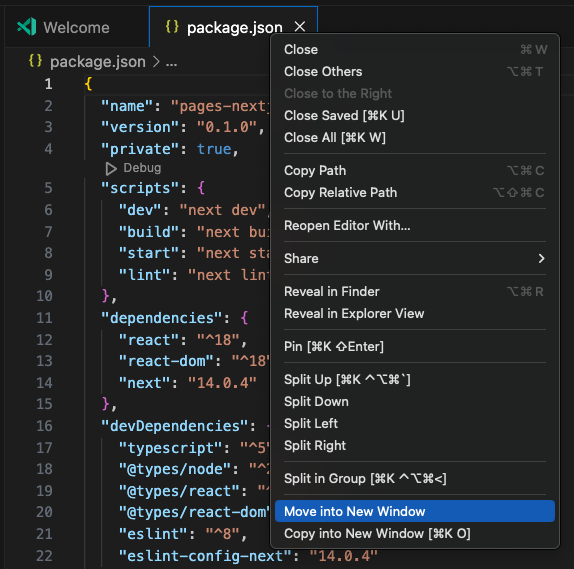
To move an entire editor group, use the Move Editor Group into New Window () or Copy Editor Group into New Window () commands.
Compact mode
To remove unnecessary UI elements from a floating window and make more room for the content, select the Set Compact Mode option the floating window title bar. Select it again to restore the floating window to its original mode.

Pin to top
You can pin a floating window to the top of the screen by selecting the Set Always on Top option in the floating window title bar. This can be useful to keep a terminal or preview window always visible while you work in the main VS Code window. Select it again to unpin the floating window.

Pinned tabs
If you'd like an editor tab to always be visible, you can pin it to the editor tab bar. You can pin an editor tab from either the context menu or using the command View: Pin Editor (⌘K ⇧Enter (Windows, Linux Ctrl+K Shift+Enter)).

Pinned tabs help access files that are important to you as:
- Pinned tabs always appear first before non-pinned tabs.
- They do not scroll out of view if you have many tabs opened.
- They do not close when using editor tab commands such as Close Others or Close All.
- They do not close even when you exceed a set limit of opened editors.
Unpin an editor by clicking on the pin icon, using the Unpin editor tab context menu item, or the View: Unpin Editor command.
You can choose how you'd like to display pinned editors with the Workbench > Editor: Pinned Tab Sizing (workbench.editor.pinnedTabSizing) setting. The options are:
normal: A pinned tab inherits the look of other tabs (default)shrink: A pinned tab shrinks to a fixed size showing parts of the editor label.compact: A pinned tab will only show as icon or first letter of the editor label.
You can also show pinned editor tabs on a separate row above the regular editor tab bar by setting Workbench > Editor: Pinned Tabs On Separate Row. You can pin and unpin editors by dragging and dropping their tabs between the two rows.
Locked editor groups
When using multiple editors, it's common to have one or more that you want to always keep visible. The locked editor group feature, where an entire editor group is locked and visible, provides a stable display and any request to open a new editor will create it in another group. You can tell whether an editor group is locked by the lock icon in the editor group tool bar.

You can lock an editor group by selecting Lock Group from the editor tool bar More Actions ... dropdown or running the View: Lock Editor Group command.
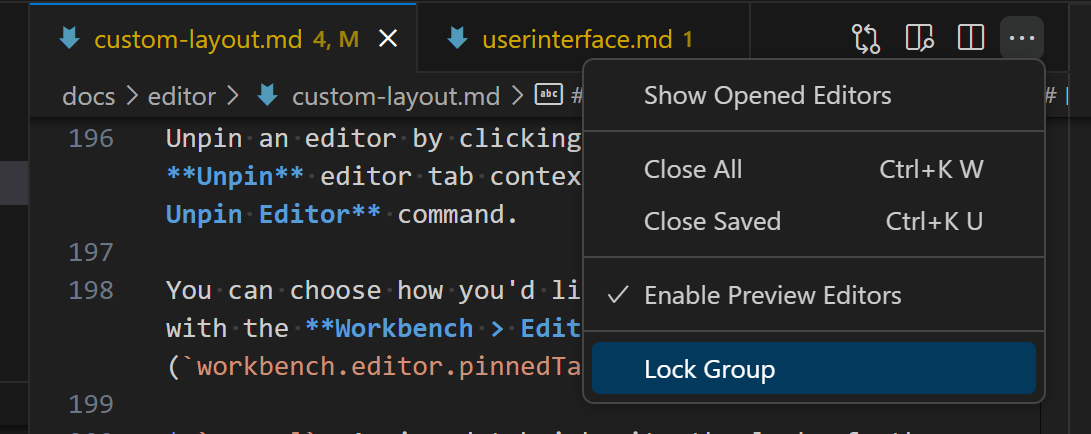
You can unlock an editor group by clicking on the lock icon or running the View: Unlock Editor Group command.
Locked groups behave differently than unlocked groups:
- New editors will not open in a locked group unless explicitly moved there (for example, via drag and drop).
- If a new editor skips a locked group, it will either open in the most recently used unlocked group or create a new group to the side of the locked one.
- The locked state of an editor group is persisted and restored across restarts.
- You can lock empty groups as well, allowing for a more stable editor layout.
The primary use case is for terminals in the editor area. For example, you might want to edit text on the left and have a terminal on the right that is always visible. When a terminal editor is created and moved to the side, it will automatically lock. This means that even when the terminal on the right is focused, opening a file will open it on the left side without needing to manually change focus first.
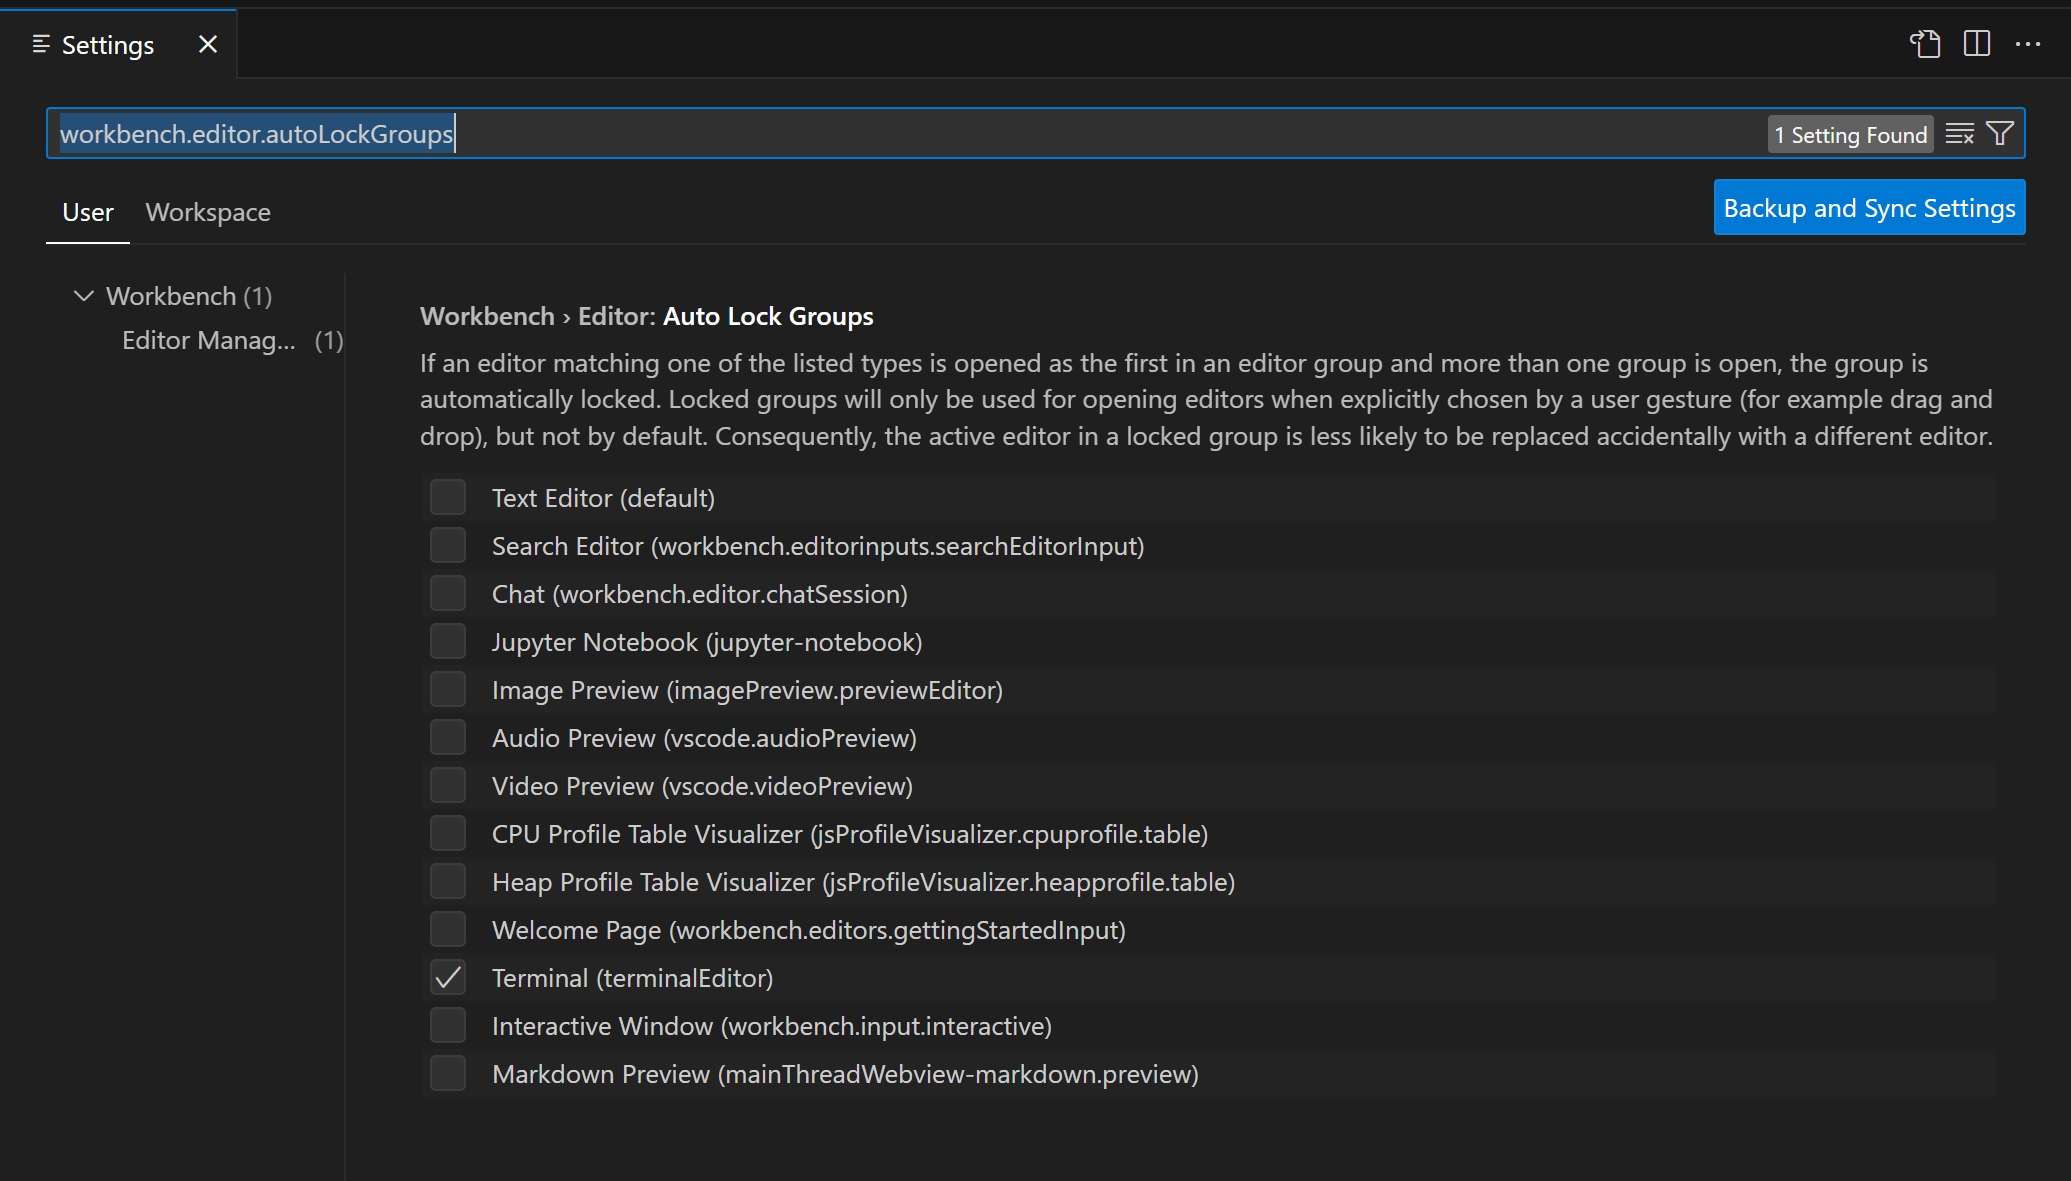
Auto locking groups can be configured using the workbench.editor.autoLockGroups setting, which defaults to only terminal editors but any editor type can be added to get the same behavior.
The commands related to editor group locking:
- View: Lock Editor Group - Lock the active editor group.
- View: Unlock Editor Group - Unlock the active locked editor group.
- View: Toggle Editor Group Lock - Lock or unlock the active editor group.
You must have more that one editor group for these commands to be available.
Next steps
Read on to find out about:
- Visual Studio Code User Interface - A quick orientation to VS Code.
- Basic Editing - Learn about the powerful VS Code editor.
- Code Navigation - Move quickly through your source code.