Chat extensions
Visual Studio Code's Copilot Chat architecture enables extension authors to integrate with the Copilot Chat experience. A chat extension is a VS Code extension that uses the Chat extension API by contributing a Chat participant.
Chat participants are domain experts that can answer user queries within a specific domain. They can choose to fully use AI for the query processing, or to forward the user request to a backend service. Participants can also provide the language model access to tools. With the help of the language model, the participant might select a tool and define how to invoke it. Some participants just make use of the Language Model to get answers to custom prompts (for example, the sample cat participant). Other participants are more advanced and act like autonomous agents that invoke tools with the help of the Language Model. An example of such an advanced participant is the built-in @workspace. @workspace knows about your workspace and can answer questions about it. Internally, @workspace is powered by multiple tools: GitHub's knowledge graph, combined with semantic search, local code indexes, and VS Code's language services.
When a user explicitly mentions a @participant in their chat prompt, that prompt is forwarded to the extension that contributed that specific chat participant. The participant then uses a ResponseStream to respond to the request. To provide a smooth user experience, the Chat API is streaming-based. A ResponseStream can include:
- Markdown for simple text and image responses
- Buttons that invoke VS Code commands
- Progress for longer running operations
- References to URIs or editor locations
- File trees (for example, to show a workspace preview when a chat participant proposes to create a new workspace)
To help the user take the conversation further, participants can provide follow-ups for each response. Follow-up questions are suggestions that are presented in the chat user interface and might give the user inspiration about the chat extension's capabilities.
Participants can also contribute commands, which are a shorthand notation for common user intents, and are indicated by the / symbol. The extension can then use the command to prompt the language model accordingly. For example, /explain is a command for the @workspace participant that corresponds with the intent that the language model should explain some code.
Note: The Chat and Language Model API are in a proposed state and we are actively working on adding more functionality. Share your feedback in this GitHub issue or create new issues.
Prerequisites
To develop a chat extension make sure to:
- Use the Visual Studio Code Insiders release
- Use the pre-release version of the GitHub Copilot Chat extension
Links
- Chat extension sample
- Use the Language Model API
- ChatParticipant API
- ChatVariableResolver API
- GitHub Copilot Trust Center
Parts of the chat user experience
The following screenshot shows the different chat concepts in the Visual Studio Code chat experience for the sample extension.
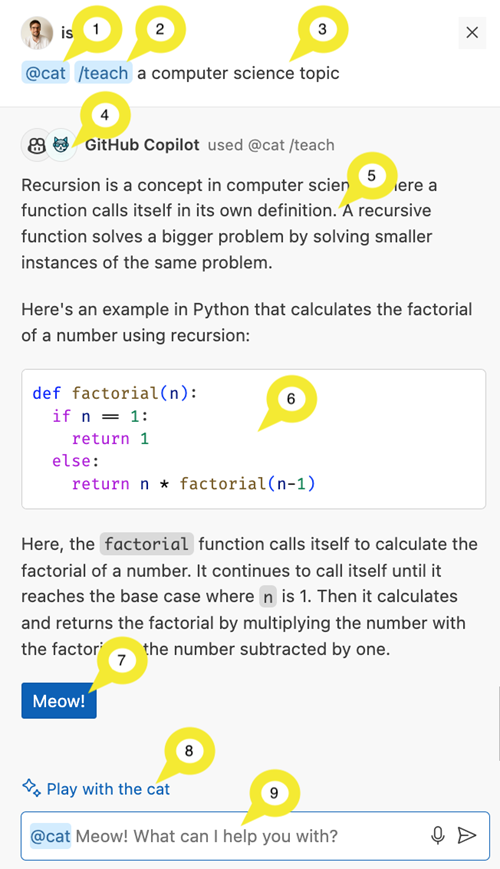
- Use the
@syntax to invoke the@catchat participant - Use the
/syntax to call the/teachcommand - User-provided query, also known as the user prompt
- Icon that indicates that Copilot is using the
@catchat participant - Markdown response, provided by
@cat - Code fragment included in the markdown response
- Button included in the
@catresponse, the button invokes a VS Code command - Suggested follow-up questions provided by the chat participant
- Chat input field with the placeholder text provided by the chat participant's
descriptionproperty
Develop a chat extension
A chat extension is an extension that has a dependency on the Copilot Chat extension and contributes a chat participant. You can find details about how to define extensionDependencies in the extension manifest.
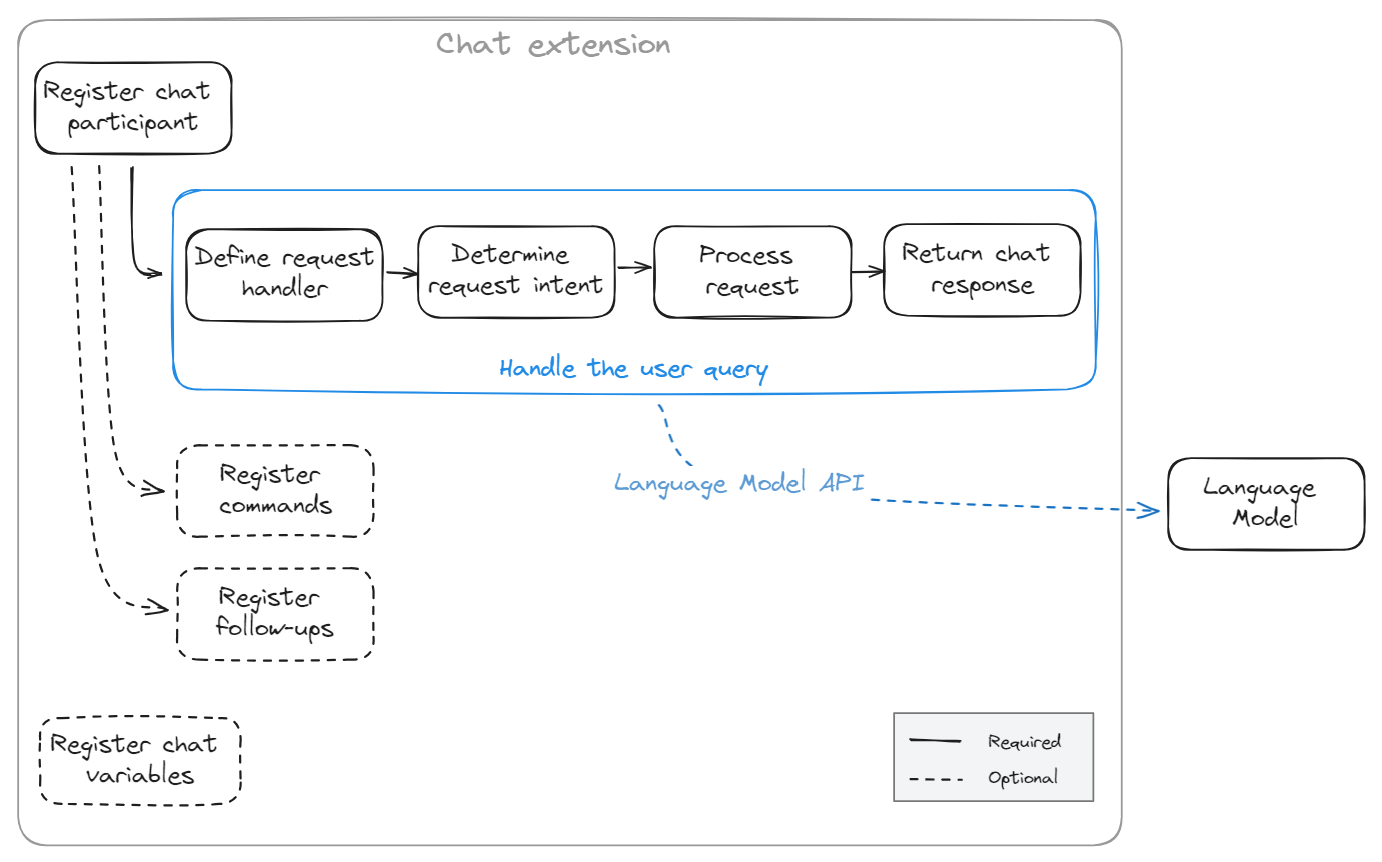
The minimum functionality that is needed for implementing a chat extension is:
- Register the chat participant, to let users invoke it by using the
@symbol in the VS Code Chat view. - Define a request handler that interprets the user's question, and returns a response in the Chat view.
You can further expand the functionality of the chat extension with the following optional features:
- Register chat commands to provide users with a shorthand notation for common questions
- Define suggested follow-up questions to help the user continue a conversation
- Define chat variables to capture and share domain-specific context in chat conversations
As a starting point for developing a chat extension, you can refer to our chat extension sample. This sample implements a simple cat tutor that can explain computer science topics using cat metaphors.
Register the chat extension
The first step to create a chat extension is to register it in your package.json by providing a unique id, the name, and description:
"contributes": {
        "chatParticipants": [
            {
                "id": "chat-sample.cat",
                "name": "cat",
                "description": "Meow! What can I teach you?",
                "isSticky": true
            }
        ]
}
We suggest to use a lowercase name to align with existing chat participants. Users can then reference the chat participant in the Chat view by using the @ symbol and the name you provided. Some participant names are reserved, and in case you use a reserved name VS Code will display the fully qualified name of your participant (including the extension id). The description is shown in the chat input field as a placeholder text.
The isSticky property controls whether the chat participant is persistent, which means that the participant name is automatically prepended in the chat input field after the user has started interacting with the participant.
Up-front registration of participants and commands in package.json is required, so that VS Code can activate your extension at the right time, and not before it is needed.
After registration, all your extension has to do is create the participant by using vscode.chat.createChatParticipant. When creating the participant, you have to provide the ID, which you defined in package.json, and a request handler.
The following code snippet shows how to create the @cat chat participant (after you register it in your package.json):
export function activate(context: vscode.ExtensionContext) {
  // Register the chat participant and its request handler
  const cat = vscode.chat.createChatParticipant('chat-sample.cat', handler);

  // Optionally, set some properties for @cat
  cat.iconPath = vscode.Uri.joinPath(context.extensionUri, 'cat.jpeg');

  // Add the chat request handler here
}
After registering and creating the chat participant, you now need to implement the request handler to process a user's request.
Implement a request handler
The request handler is responsible for processing the user's chat requests in the VS Code Chat view. Each time a user enters a prompt in the chat input field, the chat request handler is invoked. These are the typical steps for implementing a chat request handler:
- Define the request handler
- Determine the intent of the user's request
- Perform logic to answer the user's question
- Return a response to the user
Define the request handler
You define the request handler (vscode.ChatRequestHandler) inside the extension's activate function.
The following code snippet shows how to define a request handler:
const handler: vscode.ChatRequestHandler = async (
  request: vscode.ChatRequest,
  context: vscode.ChatContext,
  stream: vscode.ChatResponseStream,
  token: vscode.CancellationToken
): Promise<ICatChatResult> => {
  // Chat request handler implementation goes here
};
Determine the request intent
To determine the intent of the user's request, you can reference the vscode.ChatRequest parameter to access the prompt, commands, chat location, and chat variables that the user entered in the Chat view. Optionally, you can take advantage of the language model to determine the user's intent, rather than using traditional logic. Learn how you can use the Language Model API in your extension.
The following code snippet shows the basic structure of first using the command, and then the user prompt to determine the user intent:
const handler: vscode.ChatRequestHandler = async (
  request: vscode.ChatRequest,
  context: vscode.ChatContext,
  stream: vscode.ChatResponseStream,
  token: vscode.CancellationToken
): Promise<ICatChatResult> => {
  // Test for the `teach` command
  if (request.command == 'teach') {
    // Add logic here to handle the teaching scenario
    doTeaching(request.prompt, request.variables);
  } else {
    // Determine the user's intent
    const intent = determineUserIntent(request.prompt, request.variables);

    // Add logic here to handle other scenarios
  }
};
Process the request
Next, you need to implement the actual logic for processing the user request. Often, chat extensions use the Language Model API to process the request. In this case, you might adjust the language model prompt to match the user's intent. Alternately, you can implement the extension logic by invoking a backend service, by using traditional programming logic, or by using a combination of all these options. For example, you could invoke a web search to gather additional information, which you then provide as context to the language model.
While processing the current request, you might want to refer to previous chat messages. For example, if a previous response returned a C# code snippet, the user's current request might be "give the code in Python". Learn how you can use the chat message history.
If you want to process a request differently based on the location of the chat input, you can use the location property of the vscode.ChatRequest. For example, if the user sends a request from the terminal inline chat, you might look up a shell command. Whereas, if the user uses the Chat view, you could return a more elaborate response.
Return the chat response
Once you've processed the request, you have to return a response to the user in the Chat view. Chat extensions can use streaming to respond to user queries. Responses can contain different content types: markdown, images, references, progress, buttons, and file trees. For example to generate this response:
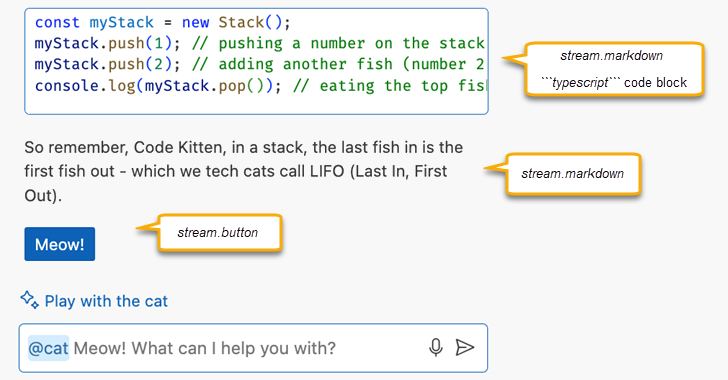
An extension can use the response stream in the following way:
stream.progress('Picking the right topic to teach...');
stream.markdown(`\`\`\`typescript
const myStack = new Stack();
myStack.push(1); // pushing a number on the stack (or let's say, adding a fish to the stack)
myStack.push(2); // adding another fish (number 2)
console.log(myStack.pop()); // eating the top fish, will output: 2
\`\`\`
So remember, Code Kitten, in a stack, the last fish in is the first fish out - which we tech cats call LIFO (Last In, First Out).`);

stream.button({
  command: 'cat.meow',
  title: vscode.l10n.t('Meow!'),
  arguments: []
});
In practice, extensions typically send a request to the language model. Once they get a response from the language model, they might further process it, and decide if they should stream anything back to the user. The VS Code Chat API is streaming-based, and is compatible with the streaming Language Model APIs. This allows extensions to report progress and results continuously with the goal of having a smooth user experience. Learn how you can use the Language Model API.
Use the chat message history
Participants have access to the message history of the current chat session. A participant can only access messages where it was mentioned. A history item is either a ChatRequestTurn or a ChatResponseTurn. For example, use the following code snippet to retrieve all the previous requests that the user sent to your participant in the current chat session:
const previousMessages = context.history.filter(h => h instanceof vscode.ChatRequestTurn);
History will not be automatically included in the prompt, it is up to the participant to decide if it wants to add history as additional context when passing messages to the language model.
Register commands
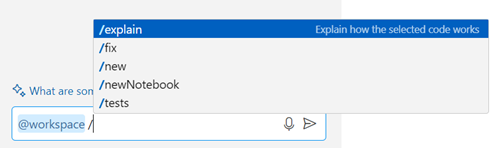
A chat participant can contribute commands, which are shortcuts to specific functionality provided by the extension. Users can reference commands in chat by using the / syntax, for example /explain.
One of the tasks when answering questions is to determine the user intent. For example, VS Code could infer that Create a new workspace with Node.js Express Pug TypeScript means that you want a new project, but @workspace /new Node.js Express Pug TypeScript is more explicit, concise, and saves typing time. If you type / in the chat input field, VS Code offers a list of registered commands with their description.
Chat participants can contribute commands with their description by adding them in package.json:
"contributes": {
    "chatParticipants": [
        {
            "id": "chat-sample.cat",
            "name": "cat",
            "description": "Meow! What can I teach you?",
            "isSticky": true,
            "commands": [
                {
                    "name": "teach",
                    "description": "Pick at random a computer science concept then explain it in purfect way of a cat"
                },
                {
                    "name": "play",
                    "description": "Do whatever you want, you are a cat after all"
                }
            ]
        }
    ]
}
Register follow-up requests
After each chat request, VS Code invokes follow-up providers to get suggested follow-up questions to show to the user. The user can then select the follow-up question, and immediately send it to the chat extension. Follow-up questions can provide inspiration to the user to take the conversation further, or to discover more capabilities of the chat extension.
The following code snippet shows how to register follow-up requests in a chat extension:
cat.followupProvider = {
    provideFollowups(result: ICatChatResult, context: vscode.ChatContext, token: vscode.CancellationToken) {
        if (result.metadata.command === 'teach') {
            return [{
                prompt: 'let us play',
                title: vscode.l10n.t('Play with the cat')
            } satisfies vscode.ChatFollowup];
        }
    }
};
Tip: Follow-ups should be written as questions or directions, not just concise commands.
Variables
Chat extensions can also contribute chat variables, which provide context about the extension's domain. For example, a C++ extension might contribute a variable #cpp that would get resolved based on the state of the language service - what C++ version is being used and what C++ programming approach is preferred.
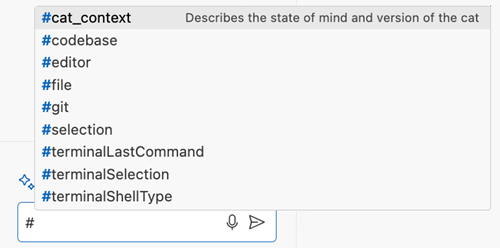
Users can refer to a chat variable in a prompt by using the # symbol. A variable is resolved by either the chat extension that contributed that variable, or by VS Code when it's a built-in variable (for example, #file or #selection). VS Code offers the list of registered variables upon typing the # symbol in the chat input.
Variables are resolved independently of the active chat participant. This means that you can use them as a mechanism to share context between different participants. For example, @workspace already maintains an index of the current workspace and contributes a variable #codebase. Users can include this variable in a prompt to pass the codebase context to another chat participant.
Variables and their values are passed as an object bag to the handler in request.variables. The prompt contains variable references as entered by the user and it is up to the participant to further modify the prompt, for instance by inlining variable values or creating links to headings which contain the resolved values. Variables are sorted in reverse order by their appearance in the prompt. That means that the last variable in the prompt is the first in this list. This simplifies string-manipulation of the prompt.
Variable resolvers can offer multiple length levels for the variable value. VS Code selects one based on how many tokens are left in a language model prompt.
vscode.chat.registerVariable(
  'cat_context',
  'Describes the state of mind and version of the cat',
  {
    resolve: (name, context, token) => {
      if (name == 'cat_context') {
        const mood = Math.random() > 0.5 ? 'happy' : 'grumpy';
        return [
          {
            level: vscode.ChatVariableLevel.Short,
            value: 'version 1.3 ' + mood
          },
          {
            level: vscode.ChatVariableLevel.Medium,
            value: 'I am a playful cat, version 1.3, and I am ' + mood
          },
          {
            level: vscode.ChatVariableLevel.Full,
            value:
              'I am a playful cat, version 1.3, this version prefer to explain everything using mouse and tail metaphors. I am ' +
              mood
          }
        ];
      }
    }
  }
);
Guidelines
Chat participants should not be purely question-answering bots. When building a chat participant, be creative and use the existing VS Code API to create rich integrations in VS Code. Users also love rich and convenient interactions, such as buttons in your responses, menu items that bring users to your participant in chat. Think about real life scenarios where AI can help your users.
It doesn't make sense for every extension to contribute a chat participant. Having too many participants in chat might lead to a bad user experience. Chat participants are best when you want to control the full prompt, including the system message and instructions to the model. Use chat variables when you only want to provide extra context to a prompt when requested by the user. You can reuse the carefully crafted Copilot system message and you can contribute context to other participants.
For example, language extensions (such as the C++ extension) can contribute in various other ways:
- Contribute variables that bring language service smarts to the user query. For example, the C++ extension could resolve the
#cppvariable to the C++ state of the workspace. This gives the Copilot language model the right C++ context to improve the quality of Copilot answers for C++. - Contribute smart actions that use the language model, optionally in combination with traditional language service knowledge, to deliver a great user experience. For example, C++ might already offer an "extract to method" smart action that uses the language model to generate a fitting default name for the new method.
Chat extensions should explicitly ask for user consent if they are about to do a costly operation or are about to edit or delete something that can’t be undone. To have a great user experience, we discourage extensions from contributing multiple chat participants. Up to one chat participant per extension is a simple model that scales well in the UI.
Publishing your extension
Once you have created your AI extension, and once we finalize the Chat and Language Model API (expected in the next couple of months), you can publish your extension to the Visual Studio Marketplace:
- Before publishing to the VS Marketplace we recommend that you read the Microsoft AI tools and practices guidelines. These guidelines provide best practices for the responsible development and use of AI technologies.
- By publishing to the VS Marketplace, your extension is adhering to the GitHub Copilot extensibility acceptable development and use policy.
- Update the attributes in the
package.jsonto make it easy for users to find your extension. Add "AI" and "Chat" to thecategoriesfield in yourpackage.json. - Upload to the Marketplace as described in Publishing Extension.